You are viewing an old version of this page. Return to the latest version.
Difference between revisions of "Bank"
(Tag: Visual edit) |
(Tag: Visual edit) |
||
| Line 6: | Line 6: | ||
=====Bank Record List===== | =====Bank Record List===== | ||
| + | [[File:Maintenance - Bank - Record List.png|border|center|1500x1500px]] | ||
| + | |||
| + | |||
Notes: | Notes: | ||
| Line 18: | Line 21: | ||
#Fill up the necessary Fields then Click '''Save''' | #Fill up the necessary Fields then Click '''Save''' | ||
| + | [[File:Maintenance - Bank - Add.png|border|center|1500x1500px]] | ||
| + | <br /> | ||
{| class="wikitable" style="margin: auto;" | {| class="wikitable" style="margin: auto;" | ||
!Field | !Field | ||
| Line 57: | Line 62: | ||
#Update the fields that needs to be edited. Then click '''Save.''' | #Update the fields that needs to be edited. Then click '''Save.''' | ||
| + | [[File:Maintenance - Bank - Edit.png|border|center|1500x1500px]] | ||
| + | <br /> | ||
{| class="wikitable" style="margin: auto;" | {| class="wikitable" style="margin: auto;" | ||
!Field | !Field | ||
| Line 96: | Line 103: | ||
*When Exporting the records, the user may also use the filter options through tabs for precise searching and exporting of records. | *When Exporting the records, the user may also use the filter options through tabs for precise searching and exporting of records. | ||
| + | |||
| + | [[File:Maintenance - Bank - Export.png|border|center|1500x1500px]] | ||
| + | <br /> | ||
| + | |||
*When Importing the records, the user should follow the following steps provided in the Importing Bank Screen such as | *When Importing the records, the user should follow the following steps provided in the Importing Bank Screen such as | ||
**Downloading the template link provided under Step 1. | **Downloading the template link provided under Step 1. | ||
| Line 101: | Line 112: | ||
**Uploading the updated Template | **Uploading the updated Template | ||
| + | [[File:Maintenance - Bank - Import.png|border|center|1500x1500px]] | ||
| + | <br /> | ||
{| class="wikitable" style="box-sizing: inherit; border-collapse: collapse; border-spacing: 0px; background-color: rgb(248, 249, 250); font-size: 14px; color: rgb(34, 34, 34); margin: auto; border: 1px solid rgb(162, 169, 177); font-family: "Open Sans", Roboto, arial, sans-serif; font-style: normal; font-variant-ligatures: normal; font-variant-caps: normal; font-weight: 400; letter-spacing: normal; orphans: 2; text-align: start; text-transform: none; white-space: normal; widows: 2; word-spacing: 0px; -webkit-text-stroke-width: 0px; text-decoration-thickness: initial; text-decoration-style: initial; text-decoration-color: initial;" | {| class="wikitable" style="box-sizing: inherit; border-collapse: collapse; border-spacing: 0px; background-color: rgb(248, 249, 250); font-size: 14px; color: rgb(34, 34, 34); margin: auto; border: 1px solid rgb(162, 169, 177); font-family: "Open Sans", Roboto, arial, sans-serif; font-style: normal; font-variant-ligatures: normal; font-variant-caps: normal; font-weight: 400; letter-spacing: normal; orphans: 2; text-align: start; text-transform: none; white-space: normal; widows: 2; word-spacing: 0px; -webkit-text-stroke-width: 0px; text-decoration-thickness: initial; text-decoration-style: initial; text-decoration-color: initial;" | ||
|+ style="box-sizing: inherit; padding-top: 8px; padding-bottom: 8px; color: rgb(119, 119, 119); text-align: left; font-weight: bold;" |Bank Import Details | |+ style="box-sizing: inherit; padding-top: 8px; padding-bottom: 8px; color: rgb(119, 119, 119); text-align: left; font-weight: bold;" |Bank Import Details | ||
| Line 156: | Line 169: | ||
| style="vertical-align:middle;text-align:center;" |Yes | | style="vertical-align:middle;text-align:center;" |Yes | ||
|} | |} | ||
| + | |||
| + | ===== <span class="mw-headline" id="Activating_Tax_Record" style="box-sizing: inherit;"><span class="mw-headline" id="Activating_Item_Master_Record" style="box-sizing: inherit;"><span class="mw-headline" id="Activating_Item_Class_Record" style="box-sizing: inherit;"><span class="mw-headline" id="Activating_Item_Type_Record" style="box-sizing: inherit;"><span class="mw-headline" id="Activating_Chart_of_Account_Record" style="box-sizing: inherit;">Activating Bank Record</span></span></span></span></span> ===== | ||
| + | Bank can be Activated in two ways: | ||
| + | |||
| + | * Using drop-down arrow of a record can be used in single record Activation | ||
| + | |||
| + | [[File:Maintenance - Bank - Activate1.png|border|center|1400x1400px]] | ||
| + | <br /> | ||
| + | |||
| + | * Using Activate Button for activating multiple record | ||
| + | |||
| + | [[File:Maintenance - Bank - Activate2.png|border|center|1500x1500px]] | ||
| + | <br /> | ||
| + | |||
| + | ===== <span class="mw-headline" id="Deactivating_Tax_Record" style="box-sizing: inherit;"><span class="mw-headline" id="Deactivating_Item_Master_Record" style="box-sizing: inherit;"><span class="mw-headline" id="Deactivating_Item_Class_Record" style="box-sizing: inherit;"><span class="mw-headline" id="Deactivating_Item_Type_Record" style="box-sizing: inherit;"><span class="mw-headline" id="Deactivating_Chart_of_Account_Record" style="box-sizing: inherit;">Deactivating Bank Record</span></span></span></span></span> ===== | ||
| + | Bank can be deactivated in two ways: | ||
| + | |||
| + | * Using drop-down arrow of a record can be used in single record deactivation | ||
| + | |||
| + | [[File:Maintenance - Bank - Deactivate1.png|border|center|1500x1500px]] | ||
| + | <br /> | ||
| + | |||
| + | * Using Deactivate Button for deactivating multiple record | ||
| + | |||
| + | [[File:Maintenance - Bank - Deactivate2.png|border|center|1500x1500px]] | ||
| + | <br /> | ||
| + | |||
| + | ===== <span class="mw-headline" id="Deleting_Tax_Record" style="box-sizing: inherit;"><span class="mw-headline" id="Deleting_Item_Master_Record" style="box-sizing: inherit;"><span class="mw-headline" id="Deleting_Item_Class_Record" style="box-sizing: inherit;"><span class="mw-headline" id="Deleting_Item_Type_Record" style="box-sizing: inherit;"><span class="mw-headline" id="Deleting_Chart_of_Account_Record" style="box-sizing: inherit;">Deleting Bank Record</span></span></span></span></span> ===== | ||
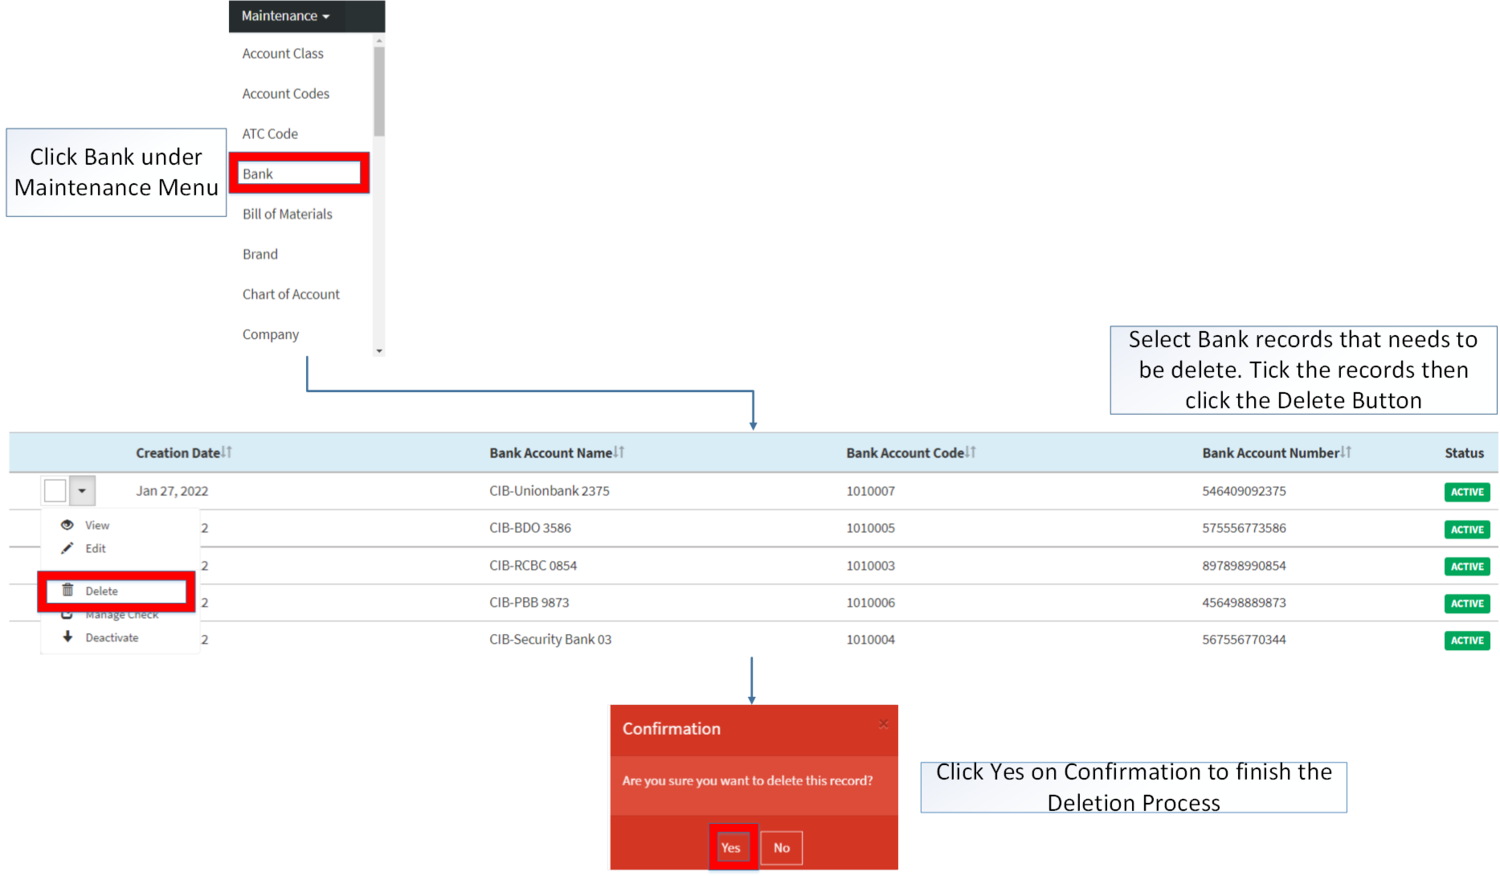
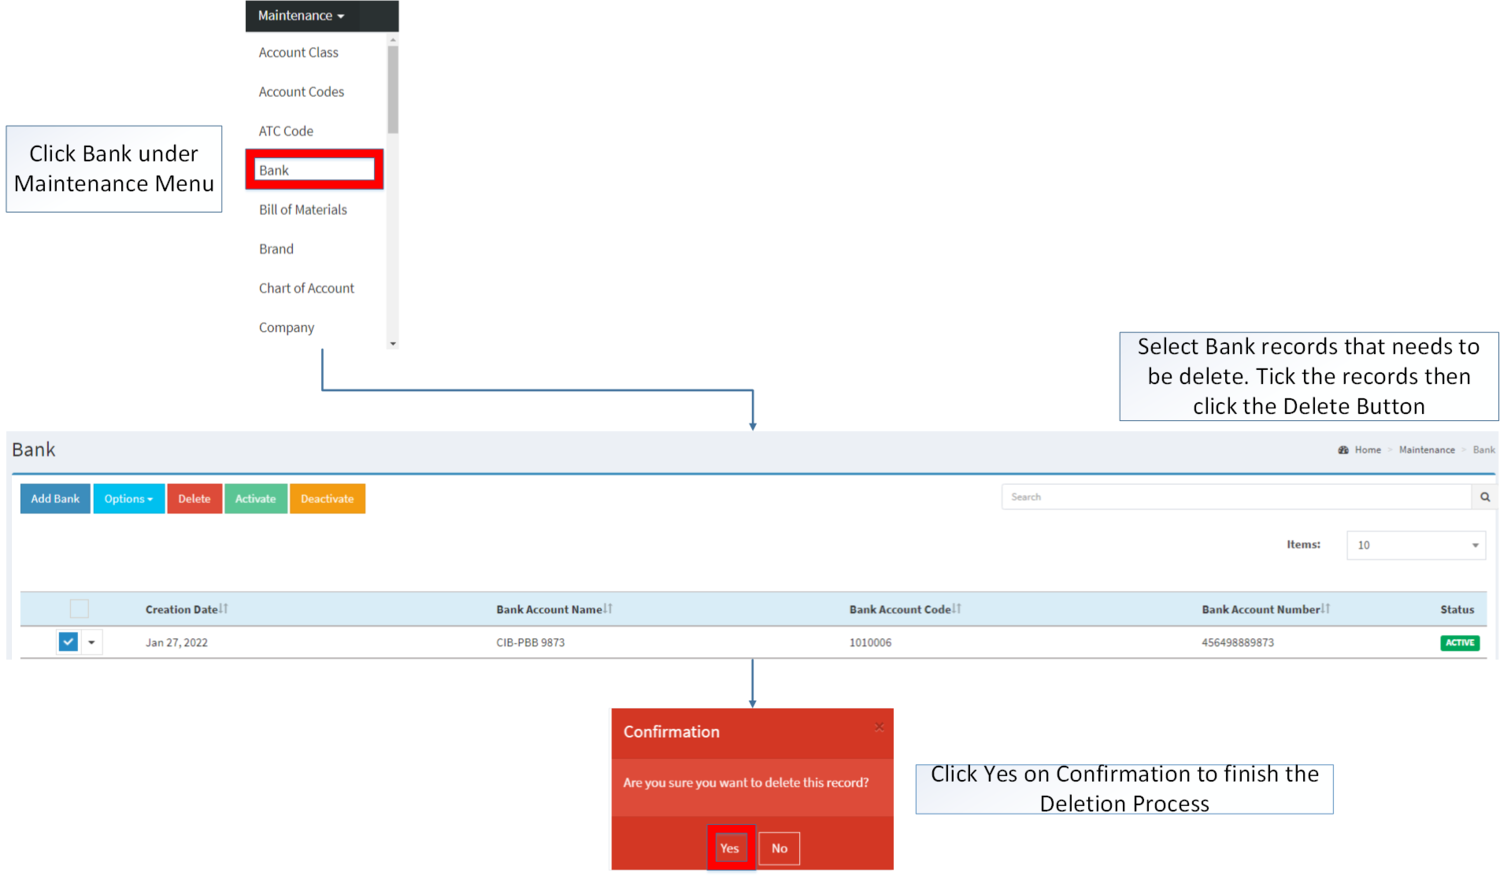
| + | Bank can be deleted in two ways: | ||
| + | |||
| + | * Using drop-down arrow of a record can be used in single record deletion | ||
| + | |||
| + | [[File:Maintenance - Bank - Delete1.png|border|center|1500x1500px]] | ||
| + | <br /> | ||
| + | |||
| + | * Using Delete Button for deleting multiple record | ||
| + | |||
| + | [[File:Maintenance - Bank - Delete2.png|border|center|1500x1500px]] | ||
=====Bank Record Options===== | =====Bank Record Options===== | ||
| Line 189: | Line 240: | ||
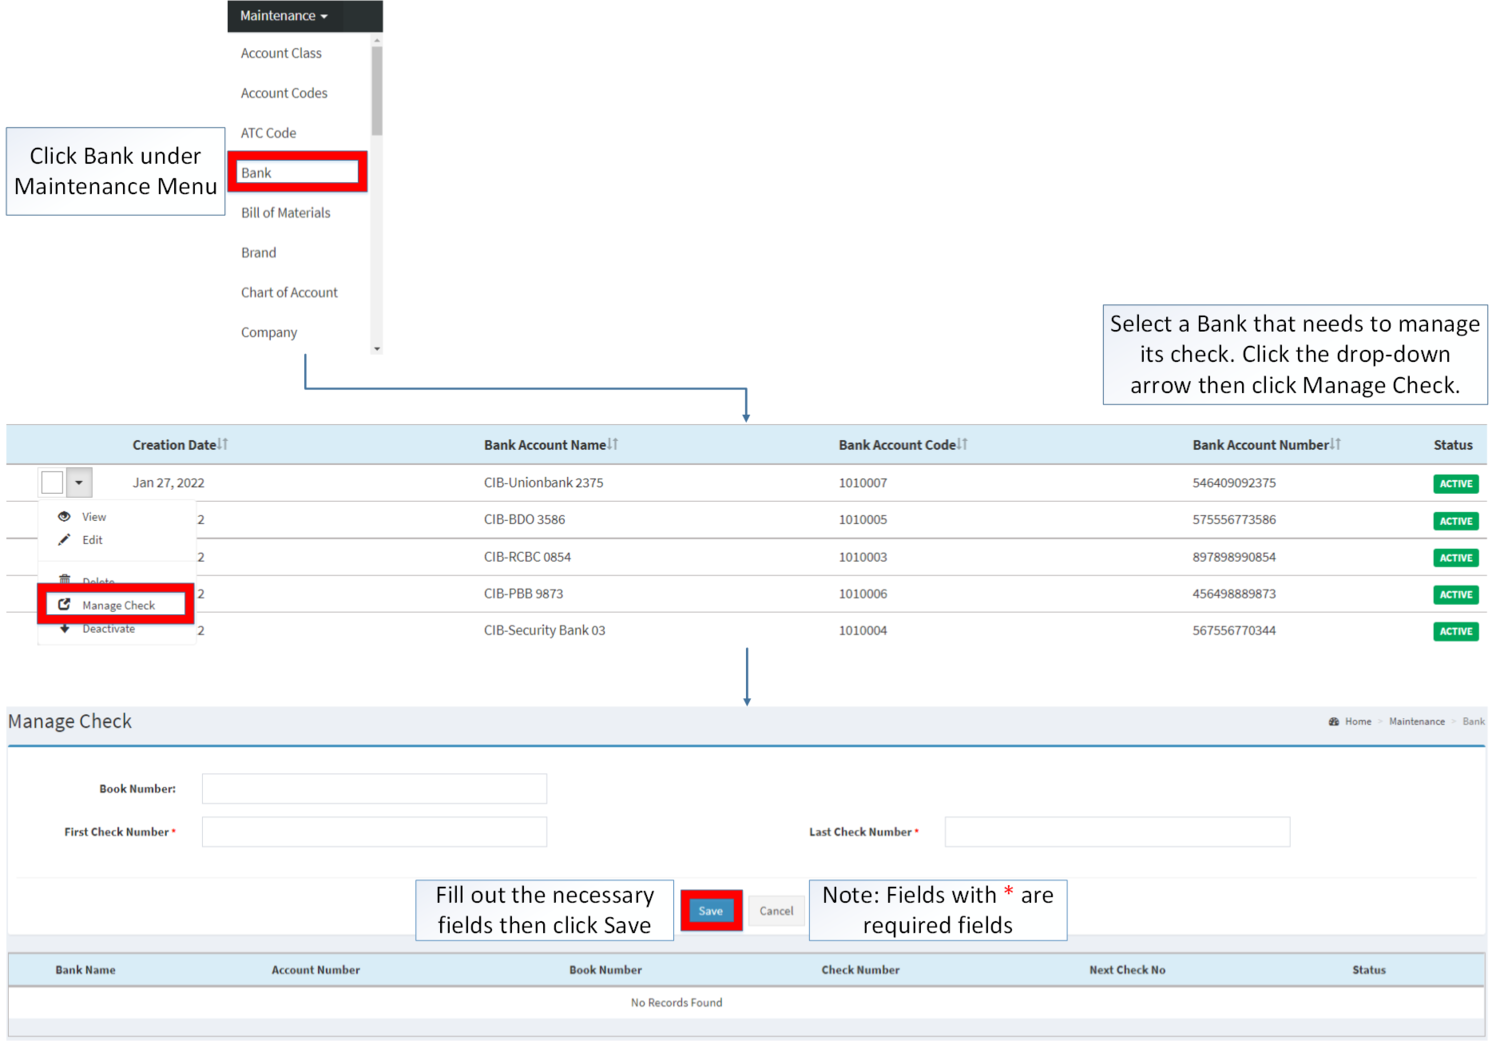
======Manage Check====== | ======Manage Check====== | ||
| + | <br /> | ||
| + | [[File:Maintenance - Bank - Manage Check.png|border|center|1500x1500px]] | ||
| + | <br /> | ||
{| class="wikitable" style="margin: auto;" | {| class="wikitable" style="margin: auto;" | ||
!Field | !Field | ||
Revision as of 12:59, 28 January 2022
Contents
Bank
This maintenance screen allows users to configure and add the Bank that they will used in transaction.
Bank Record List
Notes:
- Banks that are under INACTIVE status cannot be used in transactions
- Thus, it still can be used if it is already used in the past transactions.
- All checks under the bank will also be disabled and cannot be used in the transaction.
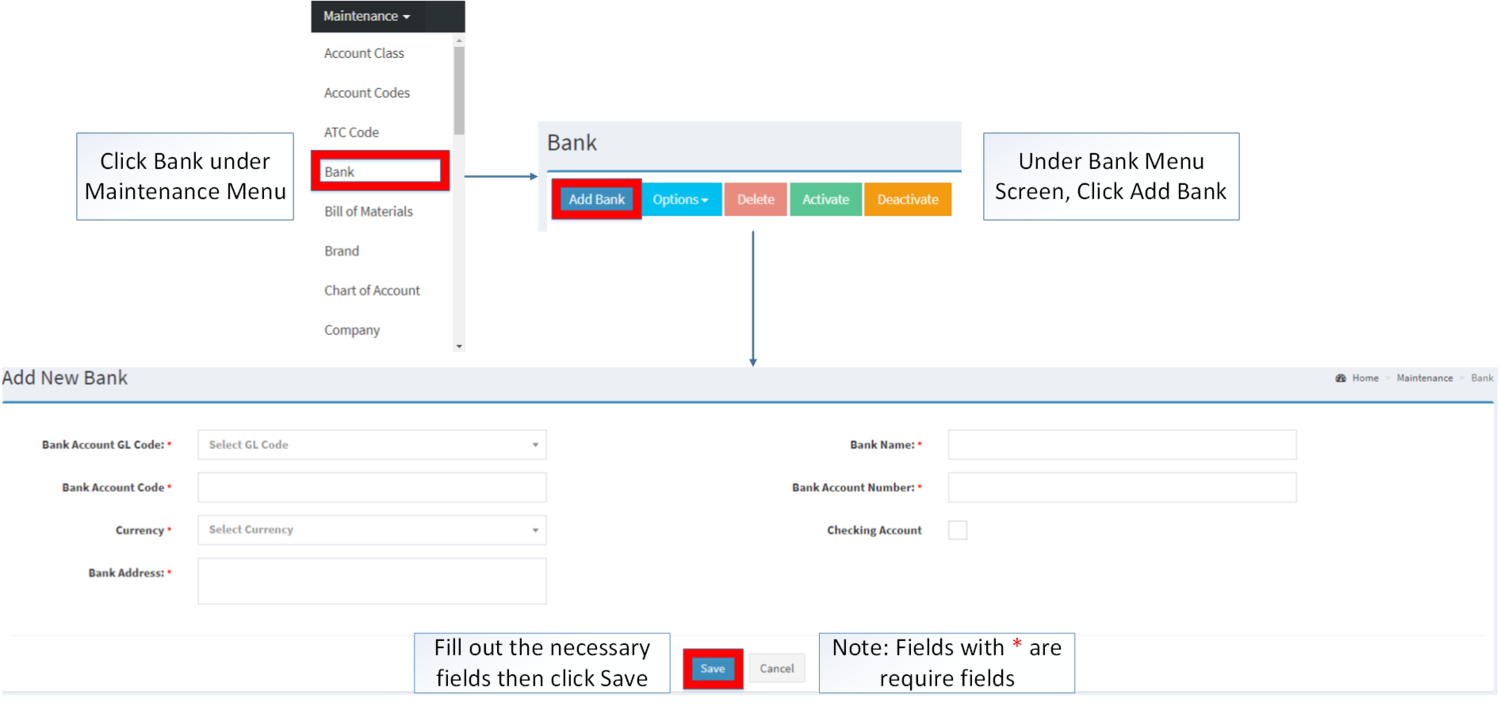
Adding Bank
- Go to Maintenance then click Bank
- Click Add Bank
- Fill up the necessary Fields then Click Save
| Field | Description | Expected Values |
|---|---|---|
| 1.Bank Account GL Code | •GL Code of the Bank Account | •GL Codes |
| 2.Bank Account Code | •Account Code of the Bank | •Alphanumeric |
| 3.Currency | •Currency the the bank use | •Currency List Provided on Currency Maintenance Module |
| 4.Bank Address | •Address of the Bank | •Alphanumeric |
| 5.Bank Name | •Name of the Bank | •Alphanumeric |
| 6.Bank Account Number | •Bank Account Number of the Bank | •Number |
| 7.Check Account | •Confirming if the Bank Account is a Check Account | •Tick/Untick |
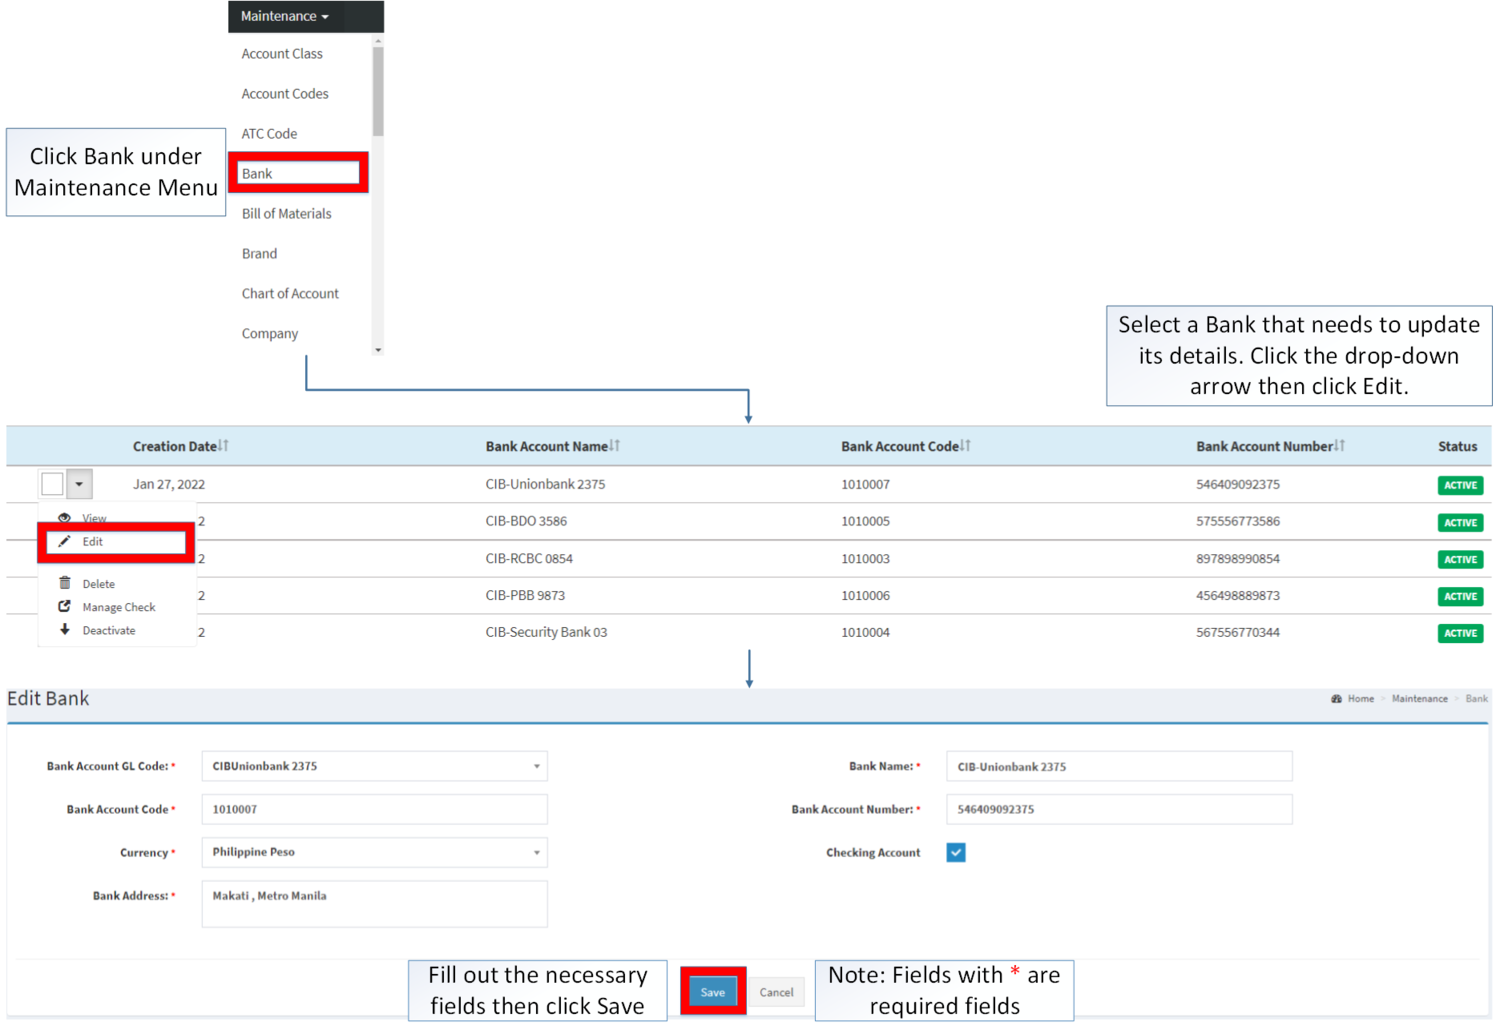
Editing Bank
- Go to Maintenance then click Bank.
- Find the Bank that need its details to be edited. Click the Drop-down Arrow then Edit
- Update the fields that needs to be edited. Then click Save.
| Field | Description | Expected Values |
|---|---|---|
| 1.Bank Account GL Code | •GL Code of the Bank Account | •GL Codes |
| 2.Bank Account Code | •Account Code of the Bank | •Alphanumeric |
| 3.Currency | •Currency the the bank use | •Currency List Provided on Currency Maintenance Module |
| 4.Bank Address | •Address of the Bank | •Alphanumeric |
| 5.Bank Name | •Name of the Bank | •Alphanumeric |
| 6.Bank Account Number | •Bank Account Number of the Bank | •Number |
| 7.Check Account | •Confirming if the Bank Account is a Check Account | •Tick/Untick |
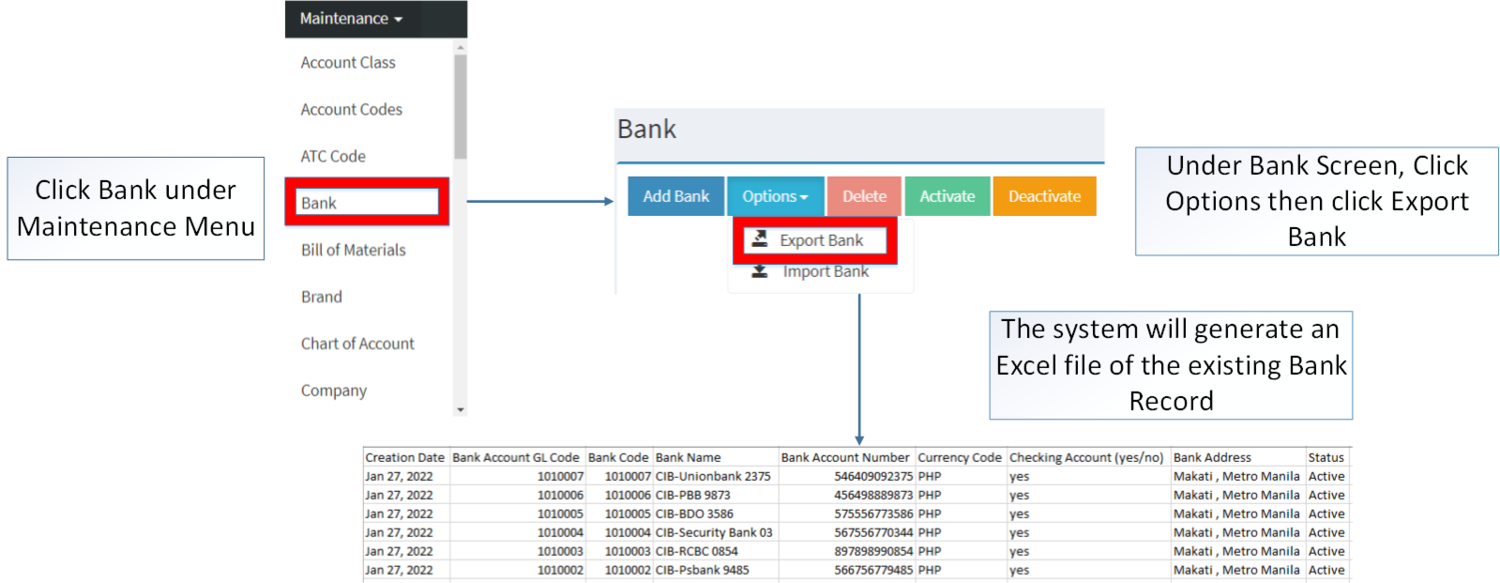
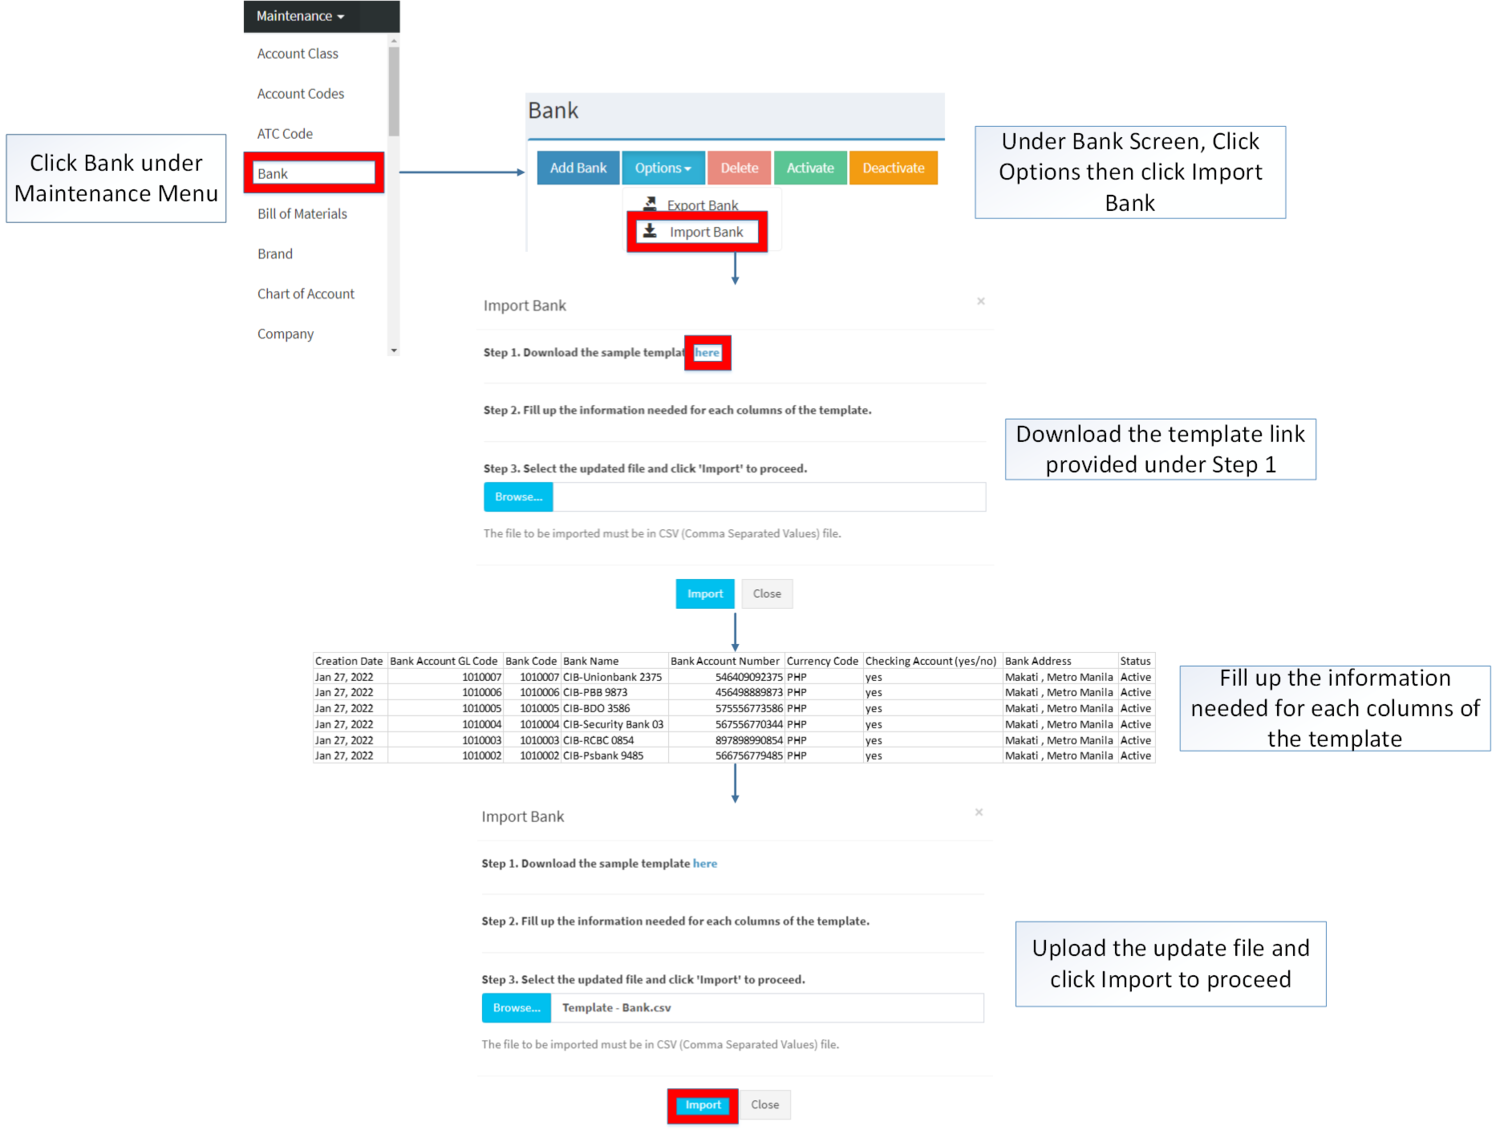
Importing and Exporting Bank
1. Under Bank Screen, Click Options
2. Under Options, The user may Export or Import The Record
- When Exporting the records, the user may also use the filter options through tabs for precise searching and exporting of records.
- When Importing the records, the user should follow the following steps provided in the Importing Bank Screen such as
- Downloading the template link provided under Step 1.
- Filling up the information needed for each columns of the template
- Uploading the updated Template
| Field | Description | Allowed Inputs | Input Restrictions | Required Field? |
|---|---|---|---|---|
| 1.Bank Account GL Code | General Ledger Code of the Bank Account | *Assets Account Code under Account list provided in Chart of Accounts Maintenance Module | *Any inputs not mentioned in the allowed inputs | Yes |
| 2.Bank Code | Account Code of the Bank | *Numeric | *Up to 20 characters
*Any inputs except numbers |
Yes |
| 3.Bank Name | Name of the Bank | *Alphanumeric
*Special Character |
*Up to 100 characters | Yes |
| 4.Bank Account Number | Account Number of the Bank | *Numeric | *Up to 20 characters
*Any inputs except numbers |
Yes |
| 5.Currency | Currency of the bank use | *Currency List Provided on Currency Maintenance Module | *Any inputs not mentioned in the required inputs | Yes |
| 6.Check Account | Classification of the Account if the Bank Account is a Check Account | *Yes
*No |
*Any inputs not mentioned in the required inputs | No |
| 7.Bank Address | Address of the Bank | *Alphanumeric
*Special Character |
*Up to 100 characters | Yes |
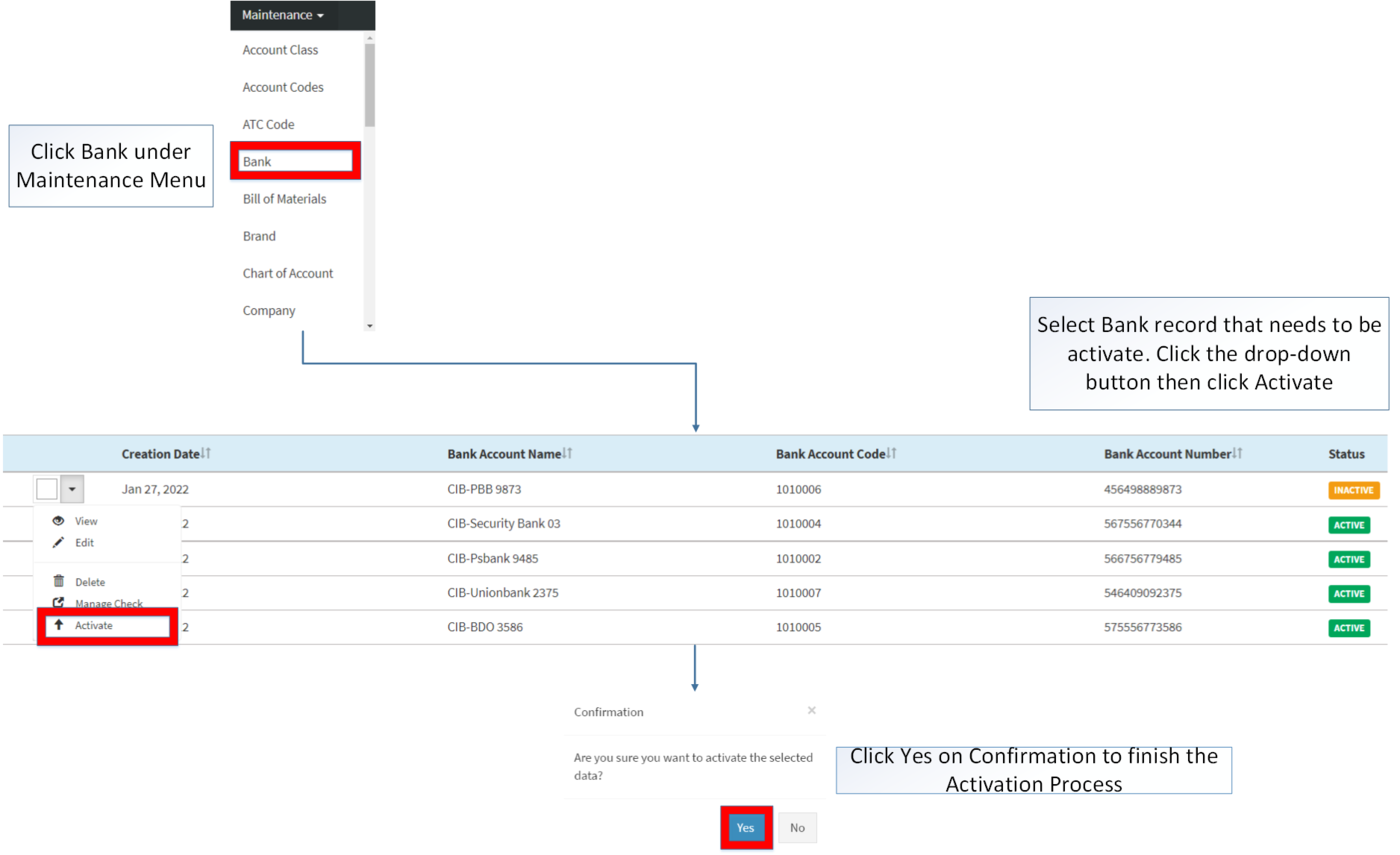
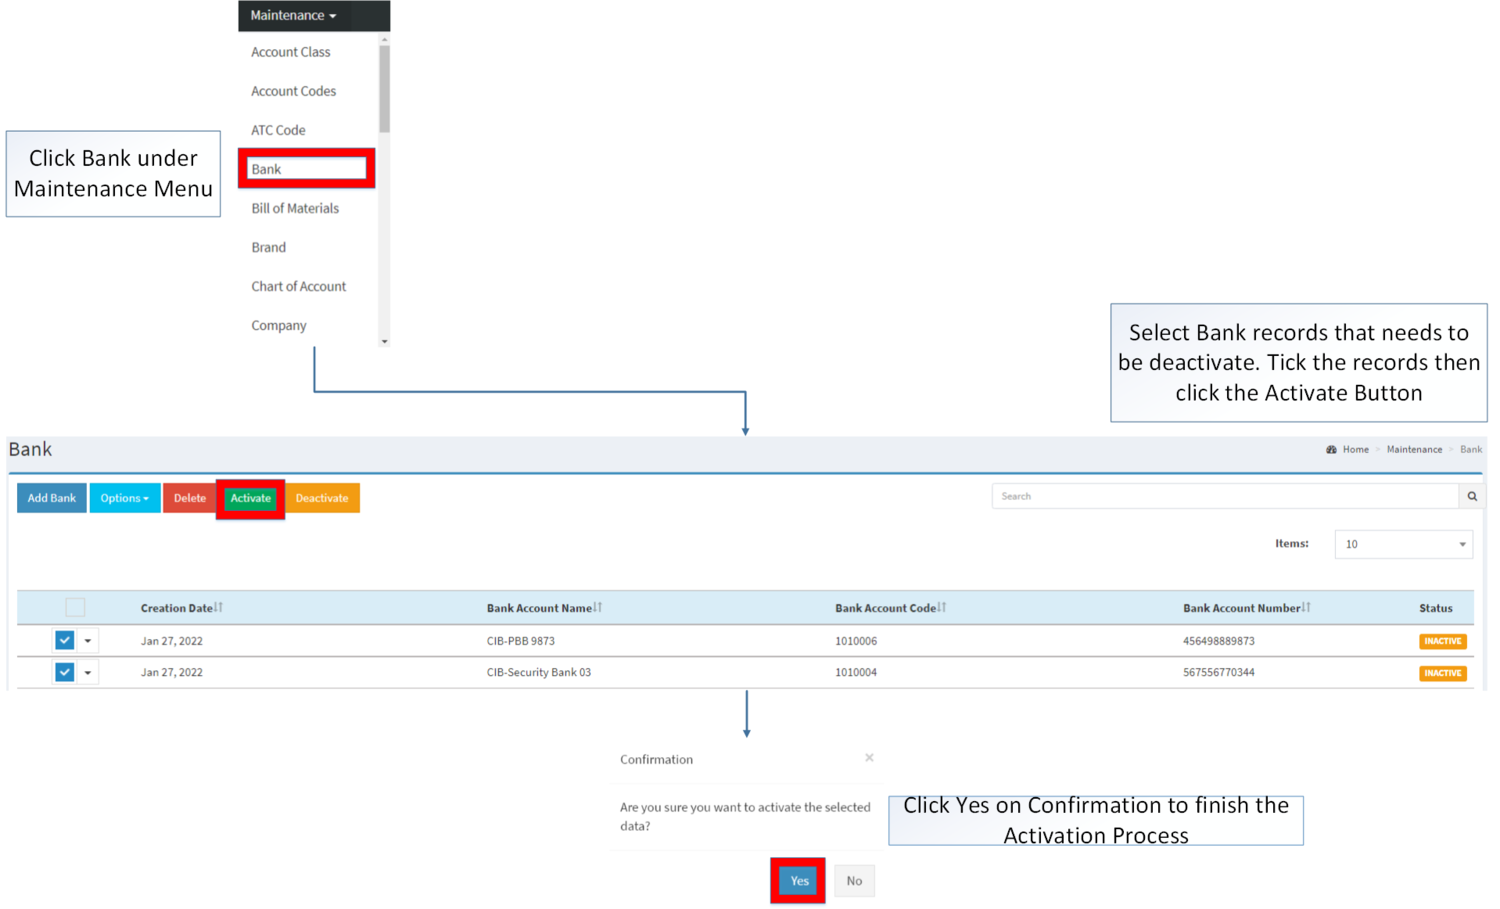
Activating Bank Record
Bank can be Activated in two ways:
- Using drop-down arrow of a record can be used in single record Activation
- Using Activate Button for activating multiple record
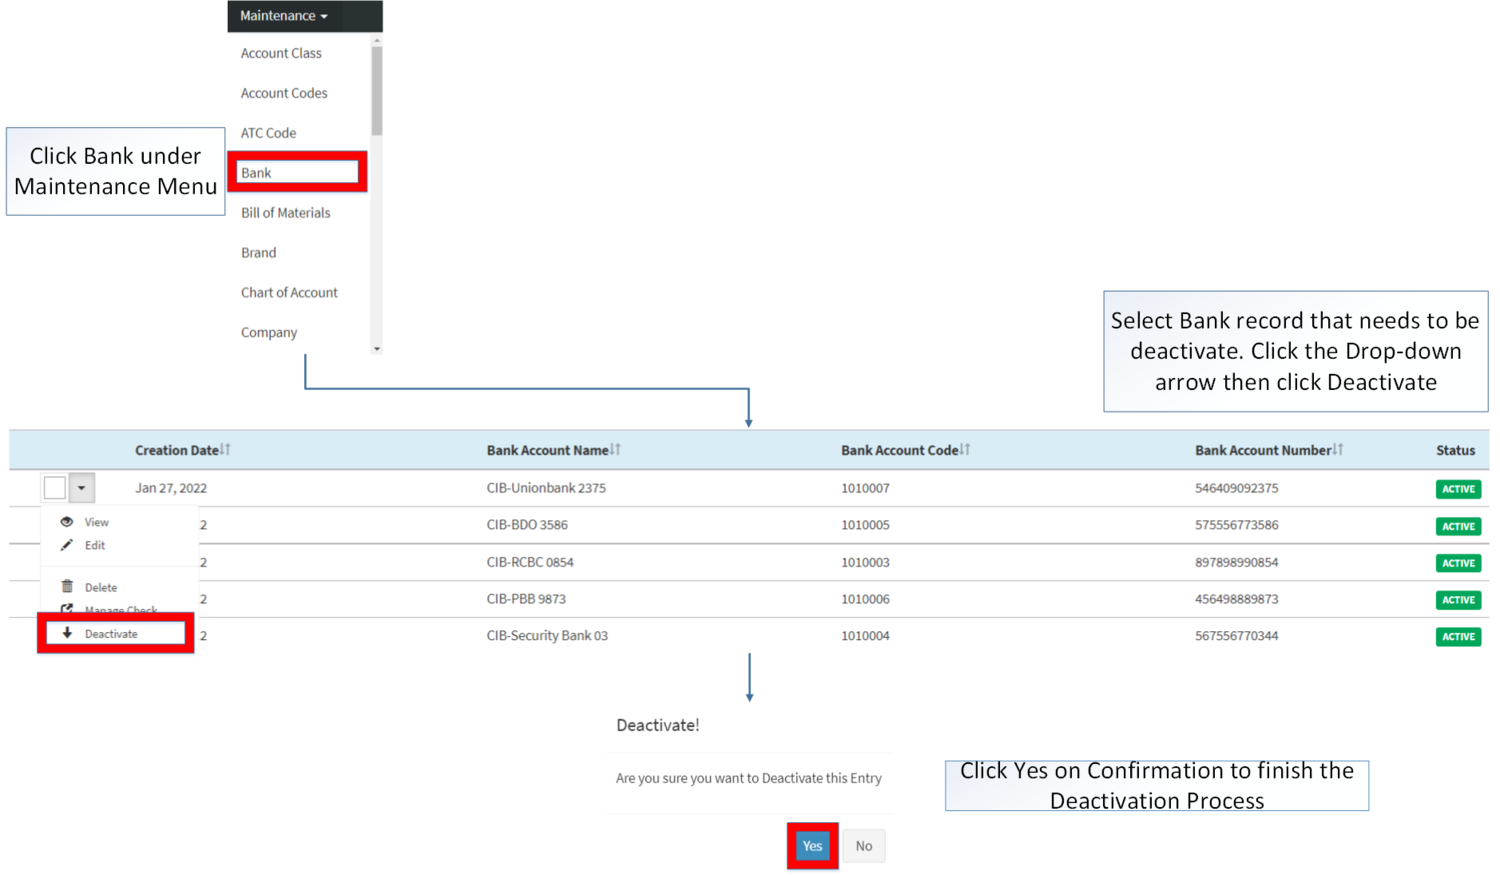
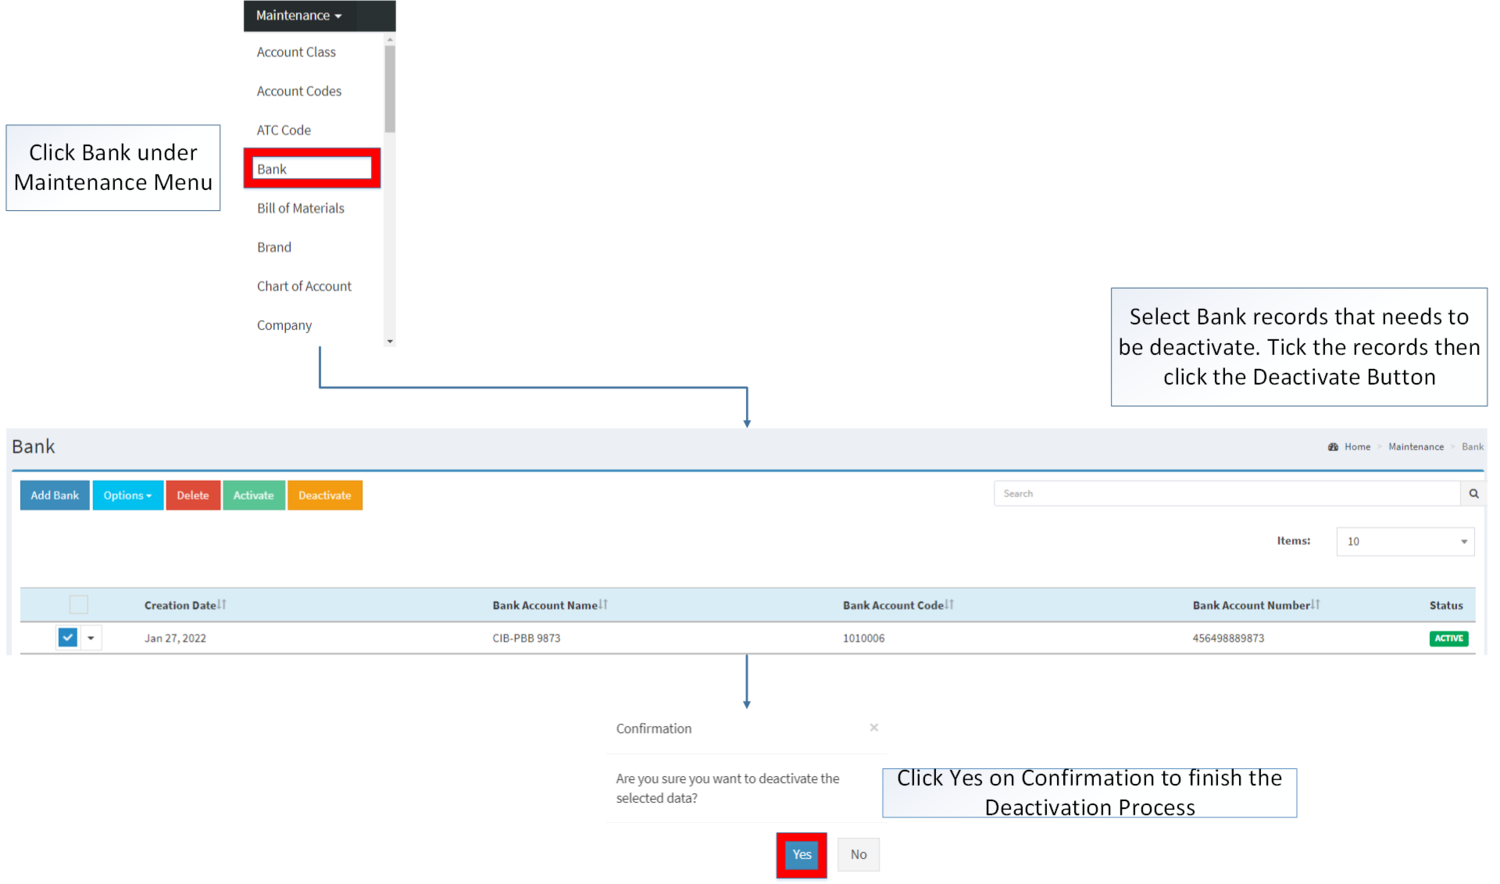
Deactivating Bank Record
Bank can be deactivated in two ways:
- Using drop-down arrow of a record can be used in single record deactivation
- Using Deactivate Button for deactivating multiple record
Deleting Bank Record
Bank can be deleted in two ways:
- Using drop-down arrow of a record can be used in single record deletion
- Using Delete Button for deleting multiple record
Bank Record Options
| Status | View | Edit | Deactivate | Activate | Delete |
|---|---|---|---|---|---|
| ACTIVE | ☑ | ☑ | ☑ | ☑ | |
| INACTIVE | ☑ | ☑ | ☑ | ☑ |
Notes:
- Activating/Deactivating and Deleting of Records can be done in two ways.
- For single records, the user may use the drop down arrow then the action that need to perform.
- For multiple records, the user may tick the records then click the action button that need to perform
- Click the Yes in the confirmation to proceed on the action taken.
Manage Check
| Field | Description | Expected Values |
|---|---|---|
| 1. Book Number | •Book number of the Check | •Number |
| 2, First Check Number | •First Check Number on the Check List | •Number |
| 3. Last Check Number | •Last Check Number on the Check List | •Number |
Notes:
- Checks that are under INACTIVE status cannot be used in transactions
- Thus, it still can be used if it is already used in the past transactions.
- Even the checks status are inactive. The bank can still be used in the transaction
| Modules | |
|---|---|
| Maintenance | Maintenance | Bank | Currency | Exchange Rate |
| Financials | Receipt Voucher | Payment Voucher |

