Item Master
-
- Last edited 3 years ago by Gelo
-
Maintenance | Item Class | Item Type | Brand | Chart of Account | Unit of Measure | Tax | Sales Reports
Contents
- 1 Item Master
- 1.1 Requirements before using Item Master
- 1.2 Item Master Record List
- 1.3 Adding Item Master
- 1.4 Viewing Item Master
- 1.5 Editing Item Master
- 1.6 Importing and Exporting Item Master
- 1.7 Activating Item Master Record
- 1.8 Deactivating Item Master Record
- 1.9 Deleting Item Master Record
- 1.10 Item Master Record Option
Item Master
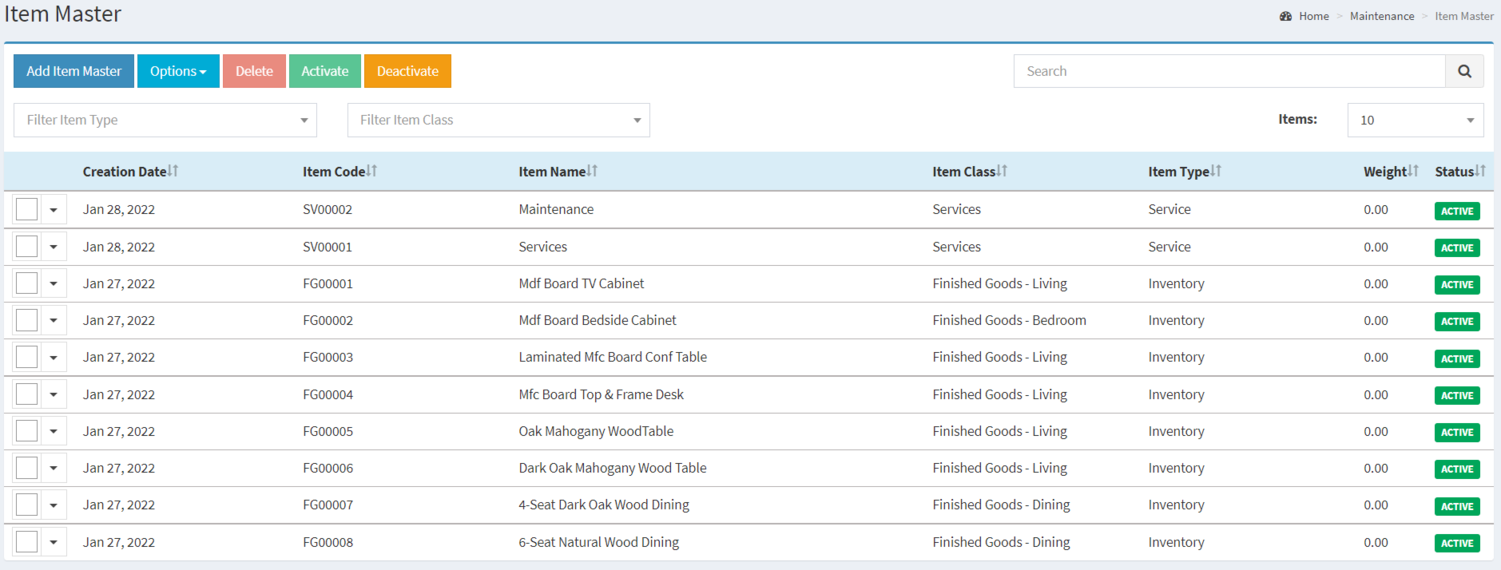
This maintenance screen allows the users to configure and add items to be used on their transaction.
Requirements before using Item Master
- The user should setup the following Maintenance Module in order to proceed on using the Item Master
Item Master Record List
Notes:
- Item Master is very important when using it on most of the primary modules on Oojeema mainly on Sales, Purchase, Financials and Inventory
Adding Item Master
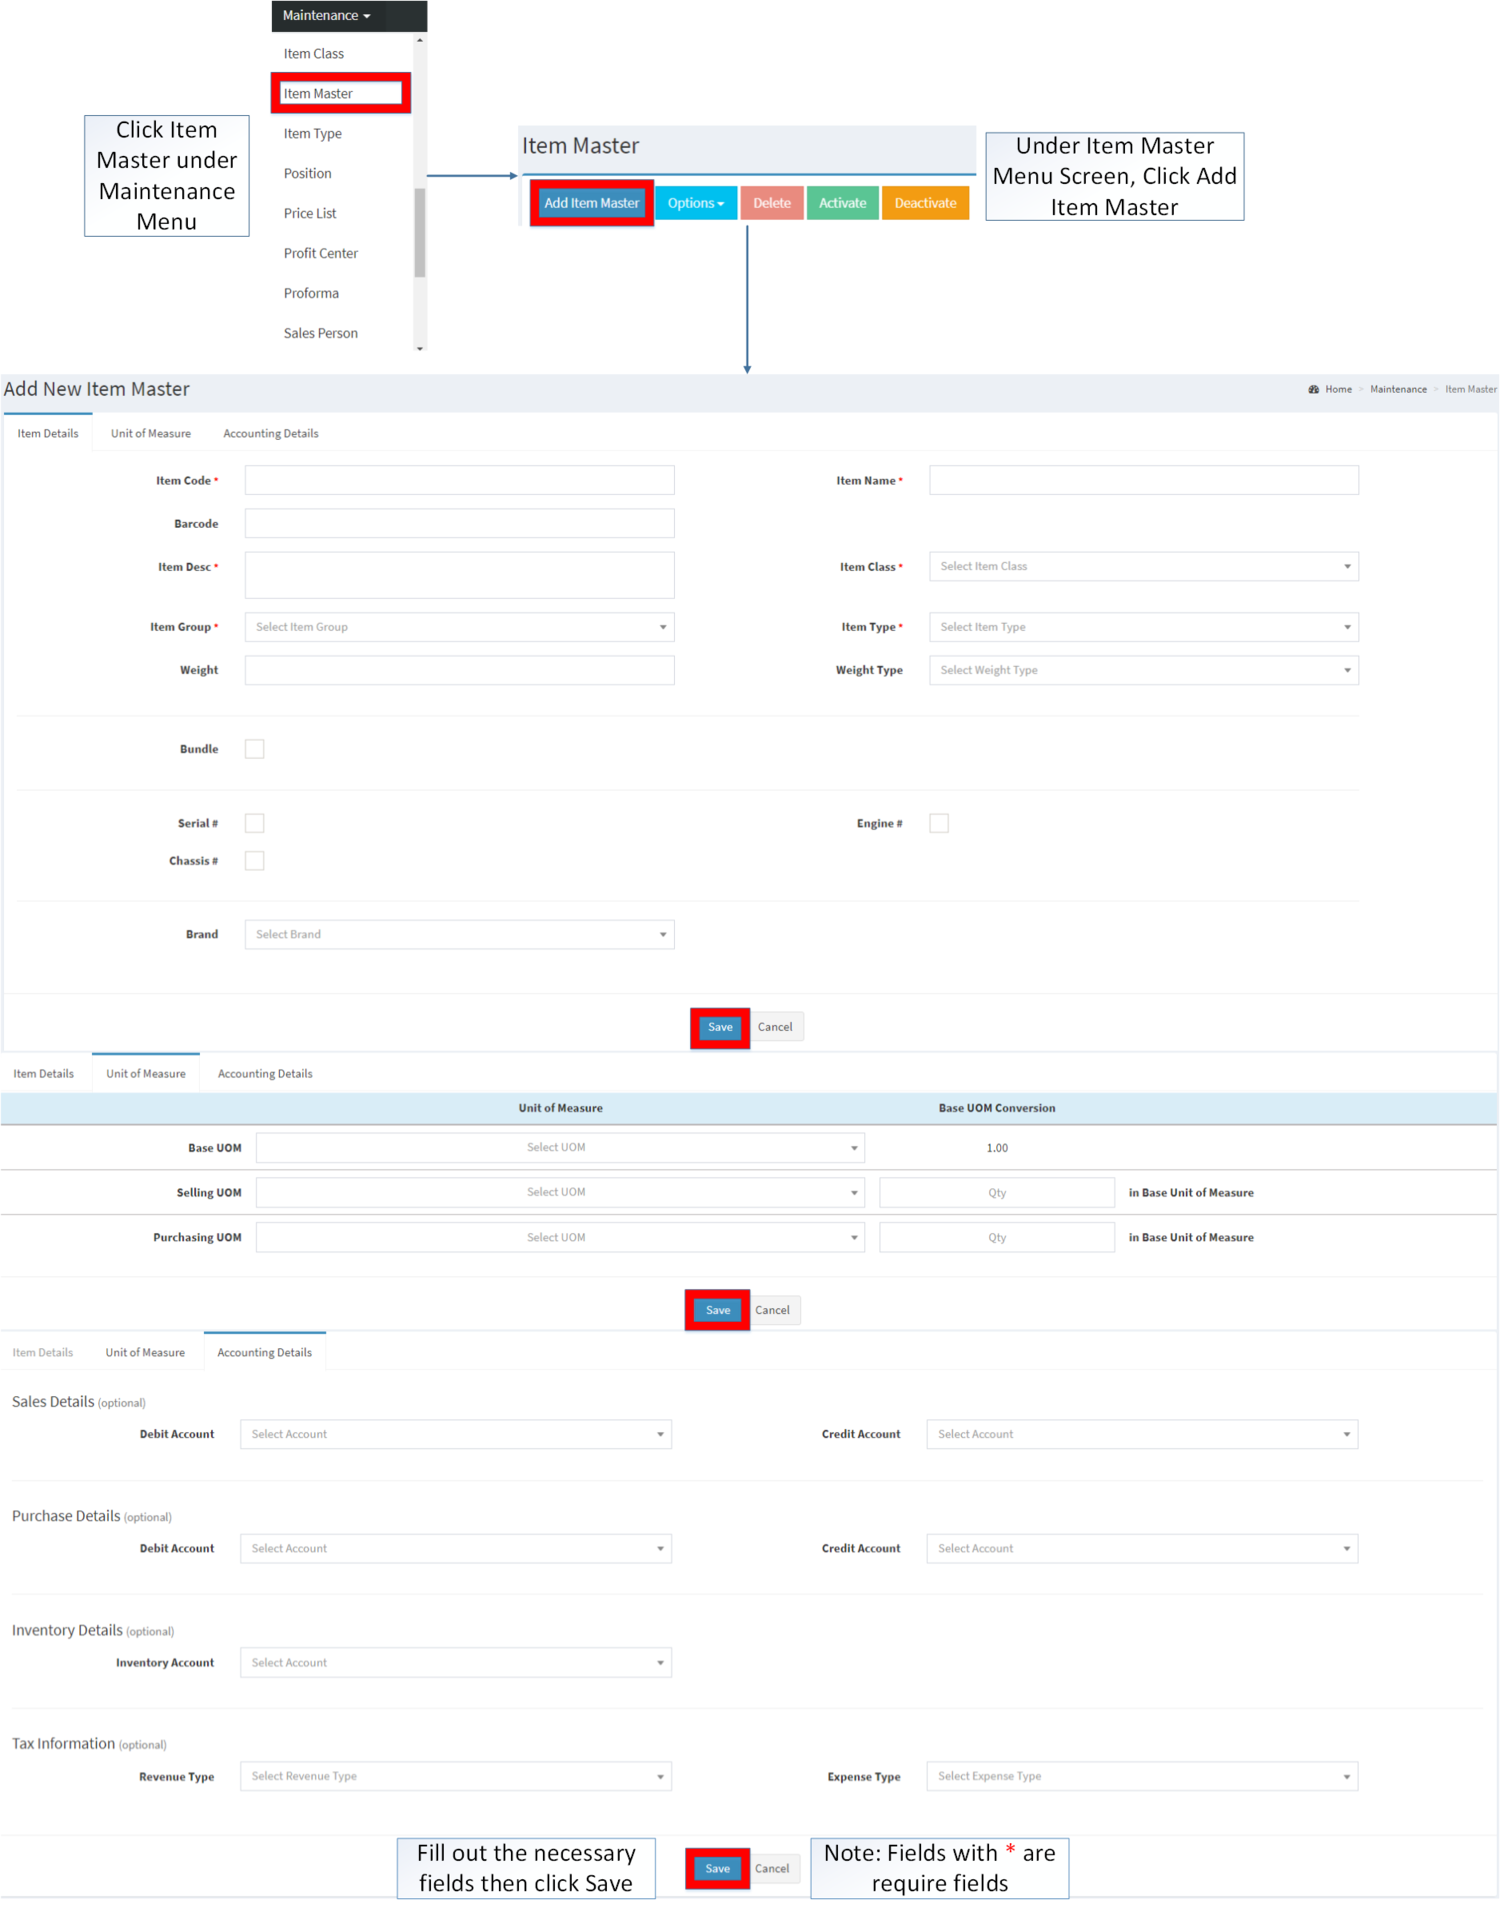
- Go to Maintenance then click Item Master
- Click Add Item Master Button
- Fill up the necessary fields. Please make sure that all tabs are filled out then click Save.
| Item Details | |||||
|---|---|---|---|---|---|
| Field | Description | Allowed Inputs | Restricted Inputs | Character Limit | Required Field |
| 1.Item Code | •Reference Code of an Item | *Alphanumeric
*Dash "-" *Underscore "_" |
Other Special Characters not mentioned in allowed inputs | 25 | Yes |
| 2.Barcode | •Barcode of the Item | *Alphanumeric | Special Characters | 50 | No |
| 3.Item Name | •Name of the Item | *Alphanumeric
*Special Characters |
None | 30 | Yes |
| 4.Item Description | •Description of the Item | *Alphanumeric
*Special Characters |
None | 250 | Yes |
| 5.Item Class | •Item Class categorization of the item | •Item Class List provided on Item Class on Maintenance Module | N/A | N/A | Yes |
| 6.Item Group | •Item Group categorization of the Item | *Goods
*Services *Non-Inventory |
N/A | N/A | Yes |
| 7.Item Type | •Type of the Item | *Item Type list provided on Item Type Maintenance Module | N/A | N/A | Yes |
| 8.Weight | •Weight of the Item | *Numeric | Any inputs except numeric | 5 | No |
| 9.Weight Type | •Weight Type of the Item | *Unit of Measure List with Unit Type as Weight from Unit of Measure Maintenance Module | *Any inputs not mentioned in the allowed inputs | N/A | No |
| 10.Bundle | •Classification if the item is a bundle type | *Tick/Untick | *Engine, Serial and Chassis number will be unavailable if ticked | N/A | No |
| 11.Serial Number | •Serial Number of the Item | *Tick/Untick | *If Bundle input is ticked then Serial number will be restricted | N/A | No |
| 12.Engine Number | •Engine Number of the item | *Tick/Untick | *If Bundle input is ticked then Engine number will be restricted | N/A | No |
| 13.Chasis Number | •Chasis Number of the Item | *Tick/Untick | *If Bundle input is ticked then Chassis number will be restricted | N/A | No |
| 14.Brand | •Brand of the Item | *Brand List Provided on Brand Maintenance Module | N/A | N/A | No |
| Unit of Measure | |||||
| 1.Base UOM | •Base Unit of Measure of the Item | •UOM List provided in Unit of Measure Maintenance Module | N/A | N/A | Yes |
| 2.Selling UOM | •Unit of Measure when selling the Item | •UOM List provided in Unit of Measure Maintenance Module | N/A | N/A | Yes |
| 3.Qty(Selling UOM) | •Qty of Selling UOM | •Number | Any inputs aside numeric | 20 | Yes |
| 4.Purchasing UOM | •Unit of Measure when purchasing an item | •UOM List provided in Unit of Measure Maintenance Module | N/A | N/A | Yes |
| 5.Qty(Purchasing UOM) | •Qty of Purchasing UOM | •Number | Any inputs aside numeric | 20 | Yes |
| Accounting Details | |||||
| 1. Debit Account(Sales) | •Debit Account on Sales Details | •Account List under Chart of Accounts | N/A | N/A | No |
| 2. Credit Account(Sales) | •Credit Account on Sales Details | •Account List under Chart of Accounts | N/A | N/A | No |
| 3. Debit Account(Purchase) | •Debit Account on Purchase Details | •Account List under Chart of Accounts | N/A | N/A | No |
| 4. Credit Account(Purchase) | •Credit Account on Purchase Details | •Account List under Chart of Accounts | N/A | N/A | No |
| 5. Inventory Account | •Inventory Account of the item | •Account List under Chart of Accounts | N/A | N/A | No |
| 6. Revenue Type | •Tax Revenue type of the item | •Tax Type List under Tax Maintenance Module | N/A | N/A | No |
| 7. Expense Type | •Tax Expense Type of the item | •Tax Type List under Tax Maintenance Module | N/A | N/A | No |
Notes:
- The following modules are required when creating and editing an Item. The record's status must be ACTIVE in order to use it on the Item master Module.
- Unit of Measure status must be active in order to use it on Unit of Measure Tab in Item Master Module.
- The status can be seen in Unit of Measure Maintenance Module
- Accounts to be used under Accounting Details must be ACTIVE when creating or editing an Item in Item Master.
- The status can be seen in Chart of Account Maintenance Module
- The items should be ACTIVE when using it as an Replacement Item.
- Brands should be ACTIVE when creating an Item Master Record.
- The status can be seen in Brand Maintenance Module.
- If the item is declared as serialized. The serial number registration can be done on Inventory Adjustment Module under Inventory.
Viewing Item Master
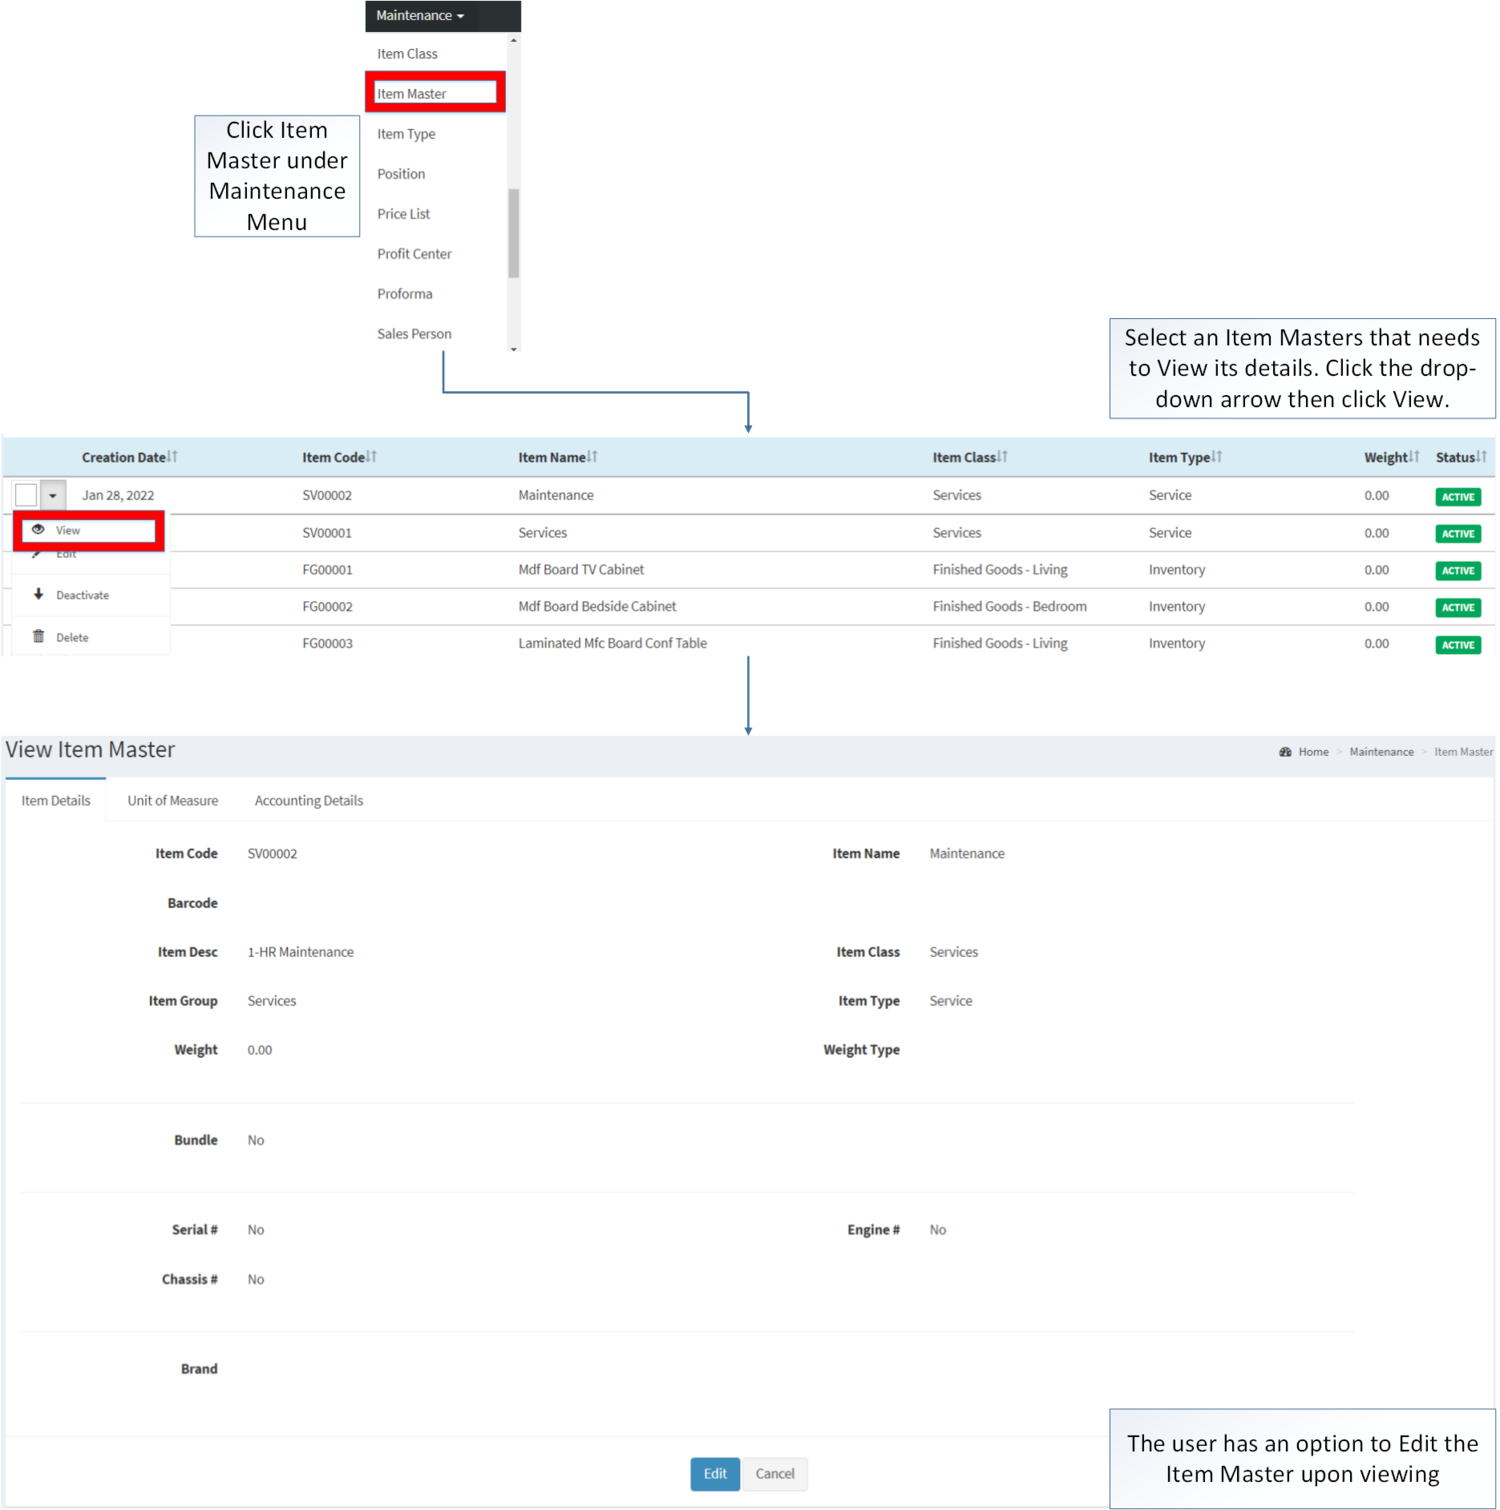
- Go to Maintenance then click Item Master
- Select an Item Masters that needs to View its details. Click the drop-down arrow then click View.
- The user has an option to Edit the Item Master upon viewing
Editing Item Master
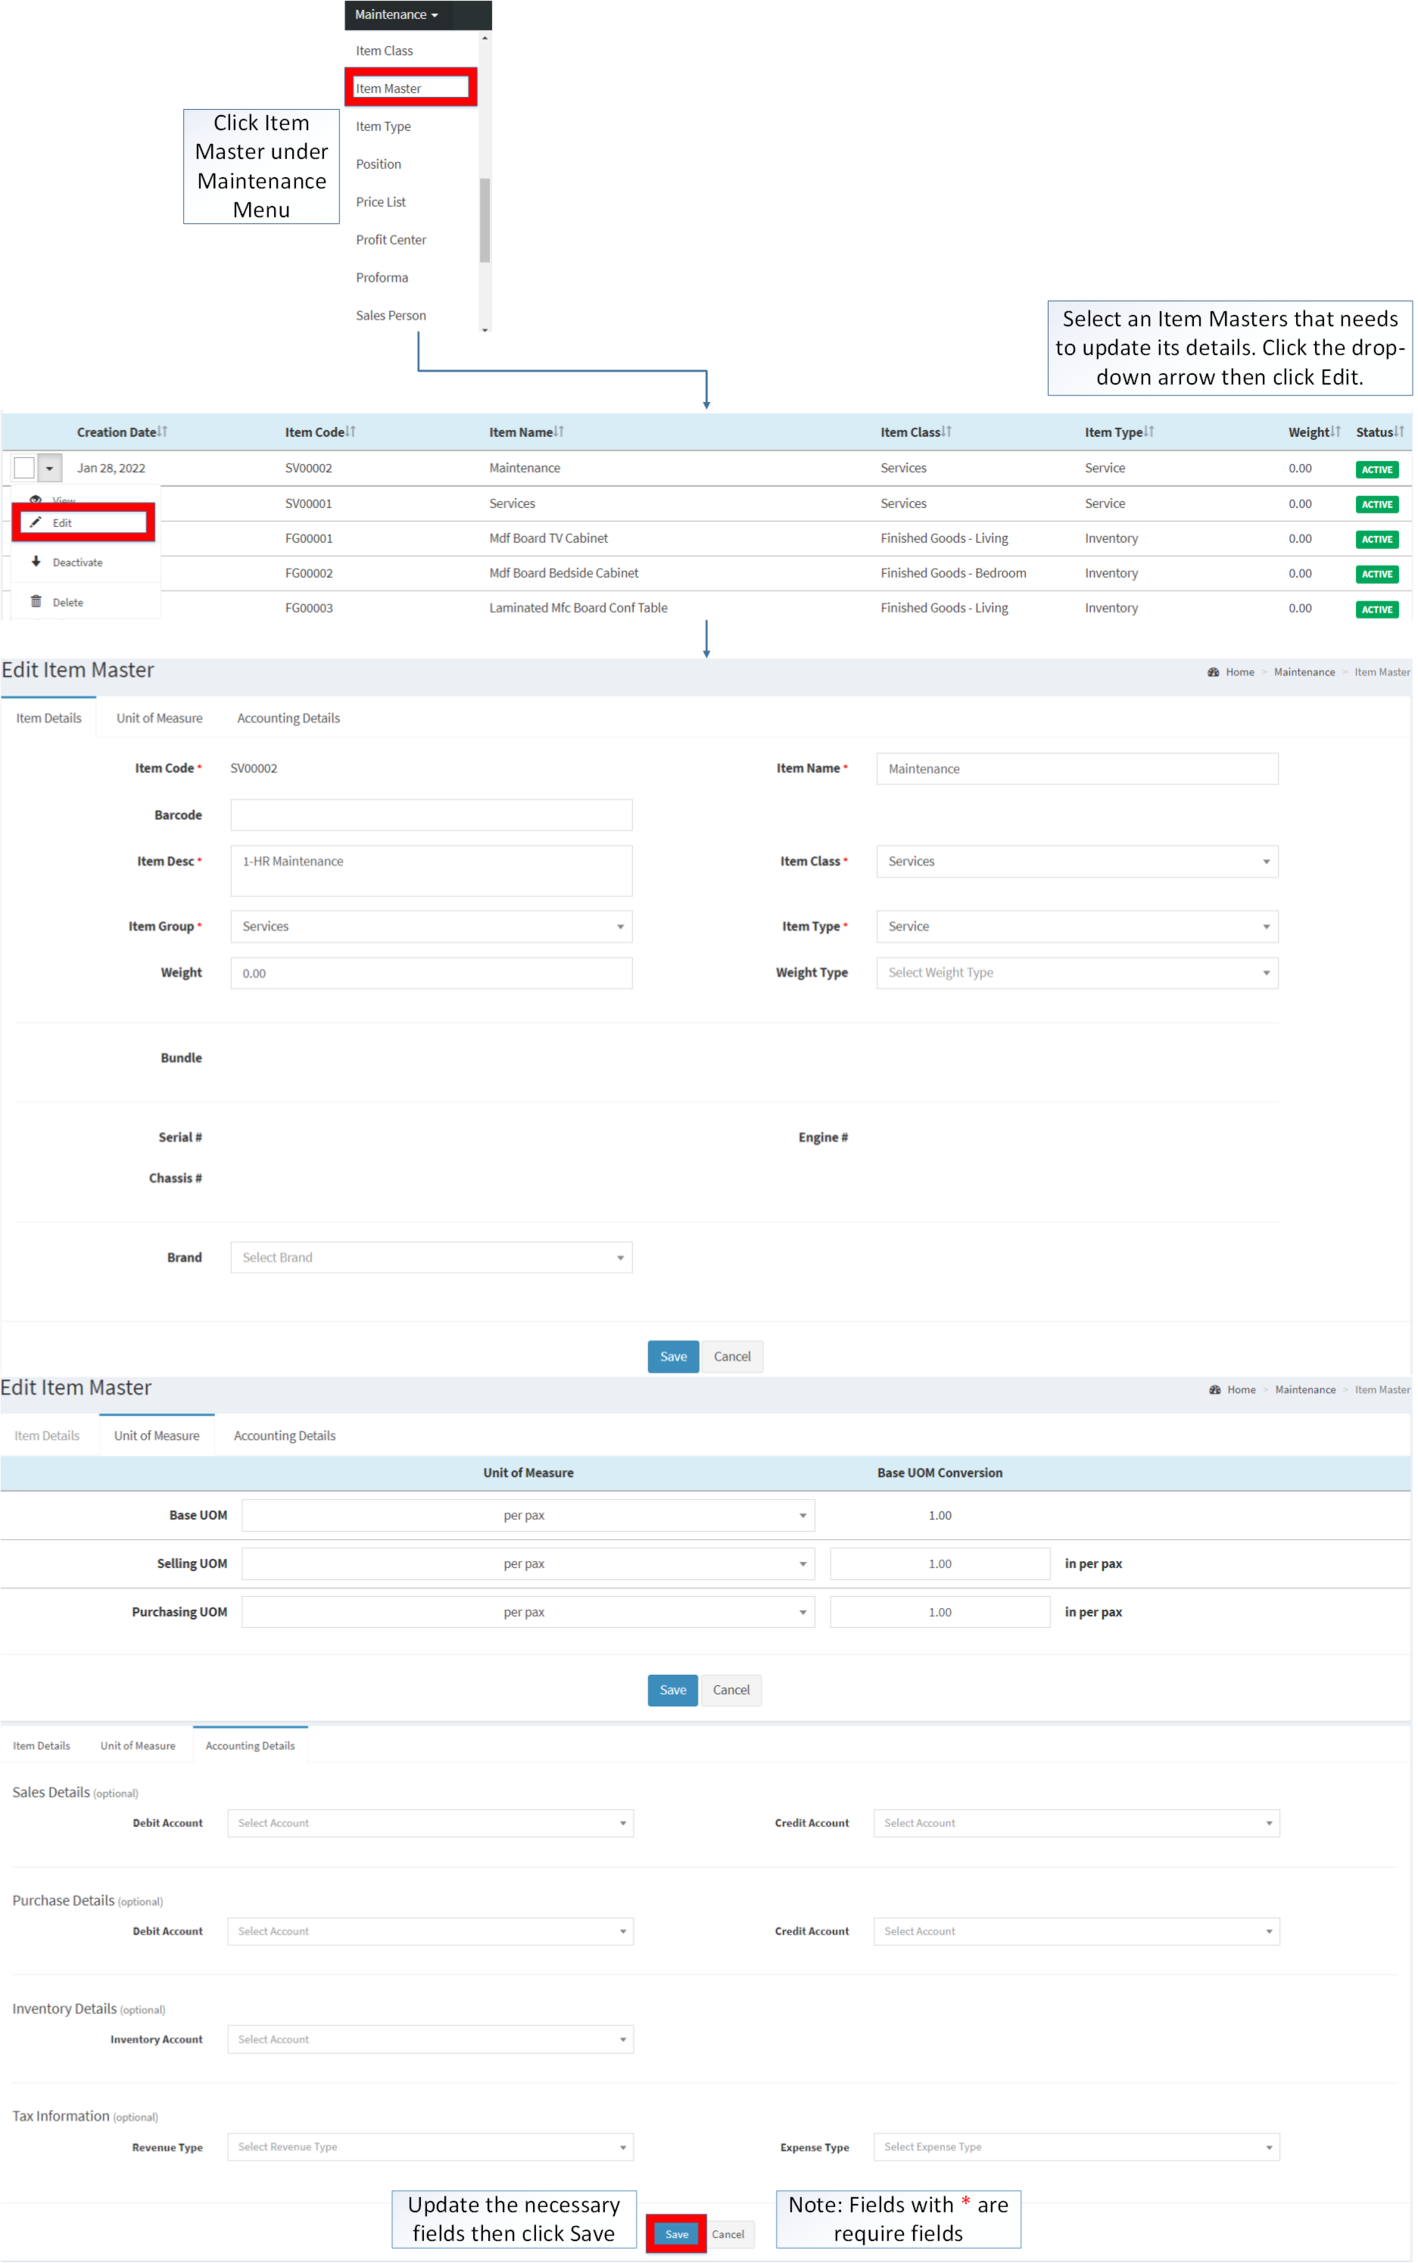
- Go to Maintenance then click Item Master
- Select the Item Master that needs an update. Click the drop-down arrow then click Edit
- Update the necessary Fields and Click Save
| Item Details | |||||
|---|---|---|---|---|---|
| Field | Description | Allowed Inputs | Restricted Inputs | Character Limit | Required Field |
| 1.Item Code | •Reference Code of an Item | N/A | N/A | N/A | N/A |
| 2.Barcode | •Barcode of the Item | *Alphanumeric | Special Characters | 50 | No |
| 3.Item Name | •Name of the Item | *Alphanumeric
*Special Characters |
None | 30 | Yes |
| 4.Item Description | •Description of the Item | *Alphanumeric
*Special Characters |
None | 250 | Yes |
| 5.Item Class | •Item Class categorization of the item | •Item Class List provided on Item Class on Maintenance Module | N/A | N/A | Yes |
| 6.Item Group | •Item Group categorization of the Item | *Goods
*Services *Non-Inventory |
N/A | N/A | Yes |
| 7.Item Type | •Type of the Item | *Item Type list provided on Item Type Maintenance Module | N/A | N/A | Yes |
| 8.Weight | •Weight of the Item | *Numeric | Any inputs except numeric | 5 | No |
| 9.Weight Type | •Weight Type of the Item | *Unit of Measure List with Unit Type as Weight from Unit of Measure Maintenance Module | *Any inputs not mentioned in the allowed inputs | N/A | No |
| 10.Bundle | •Classification if the item is a bundle type | *Tick/Untick | *Engine, Serial and Chassis number will be unavailable if ticked | N/A | No |
| 11.Serial Number | •Serial Number of the Item | *Tick/Untick | *If Bundle input is ticked then Serial number will be restricted | N/A | No |
| 12.Engine Number | •Engine Number of the item | *Tick/Untick | *If Bundle input is ticked then Engine number will be restricted | N/A | No |
| 13.Chasis Number | •Chasis Number of the Item | *Tick/Untick | *If Bundle input is ticked then Chassis number will be restricted | N/A | No |
| 14.Brand | •Brand of the Item | *Brand List Provided on Brand Maintenance Module | N/A | N/A | No |
| Unit of Measure | |||||
| 1.Base UOM | •Base Unit of Measure of the Item | •UOM List provided in Unit of Measure Maintenance Module | N/A | N/A | Yes |
| 2.Selling UOM | •Unit of Measure when selling the Item | •UOM List provided in Unit of Measure Maintenance Module | N/A | N/A | Yes |
| 3.Qty(Selling UOM) | •Qty of Selling UOM | •Number | Any inputs aside numeric | 20 | Yes |
| 4.Purchasing UOM | •Unit of Measure when purchasing an item | •UOM List provided in Unit of Measure Maintenance Module | N/A | N/A | Yes |
| 5.Qty(Purchasing UOM) | •Qty of Purchasing UOM | •Number | Any inputs aside numeric | 20 | Yes |
| Accounting Details | |||||
| 1. Debit Account(Sales) | •Debit Account on Sales Details | •Account List under Chart of Accounts | N/A | N/A | No |
| 2. Credit Account(Sales) | •Credit Account on Sales Details | •Account List under Chart of Accounts | N/A | N/A | No |
| 3. Debit Account(Purchase) | •Debit Account on Purchase Details | •Account List under Chart of Accounts | N/A | N/A | No |
| 4. Credit Account(Purchase) | •Credit Account on Purchase Details | •Account List under Chart of Accounts | N/A | N/A | No |
| 5. Inventory Account | •Inventory Account of the item | •Account List under Chart of Accounts | N/A | N/A | No |
| 6. Revenue Type | •Tax Revenue type of the item | •Tax Type List under Tax Maintenance Module | N/A | N/A | No |
| 7. Expense Type | •Tax Expense Type of the item | •Tax Type List under Tax Maintenance Module | N/A | N/A | No |
Notes:
- The following modules are required when creating and editing an Item. The record's status must be ACTIVE in order to use it on the Item master Module.
- Unit of Measure status must be active in order to use it on Unit of Measure Tab in Item Master Module.
- The status can be seen in Unit of Measure Maintenance Module
- Accounts to be used under Accounting Details must be ACTIVE when creating or editing an Item in Item Master.
- The status can be seen in Chart of Account Maintenance Module
- The items should be ACTIVE when using it as an Replacement Item.
- Brands should be ACTIVE when creating an Item Master Record.
- The status can be seen in Brand Maintenance Module.
- If the item is declared as serialized. The serial number registration can be done on Inventory Adjustment Module under Inventory.
- For detailed instructions on how to edit an Item Master record, the user may visit Item Master Aids which can be found here
Importing and Exporting Item Master
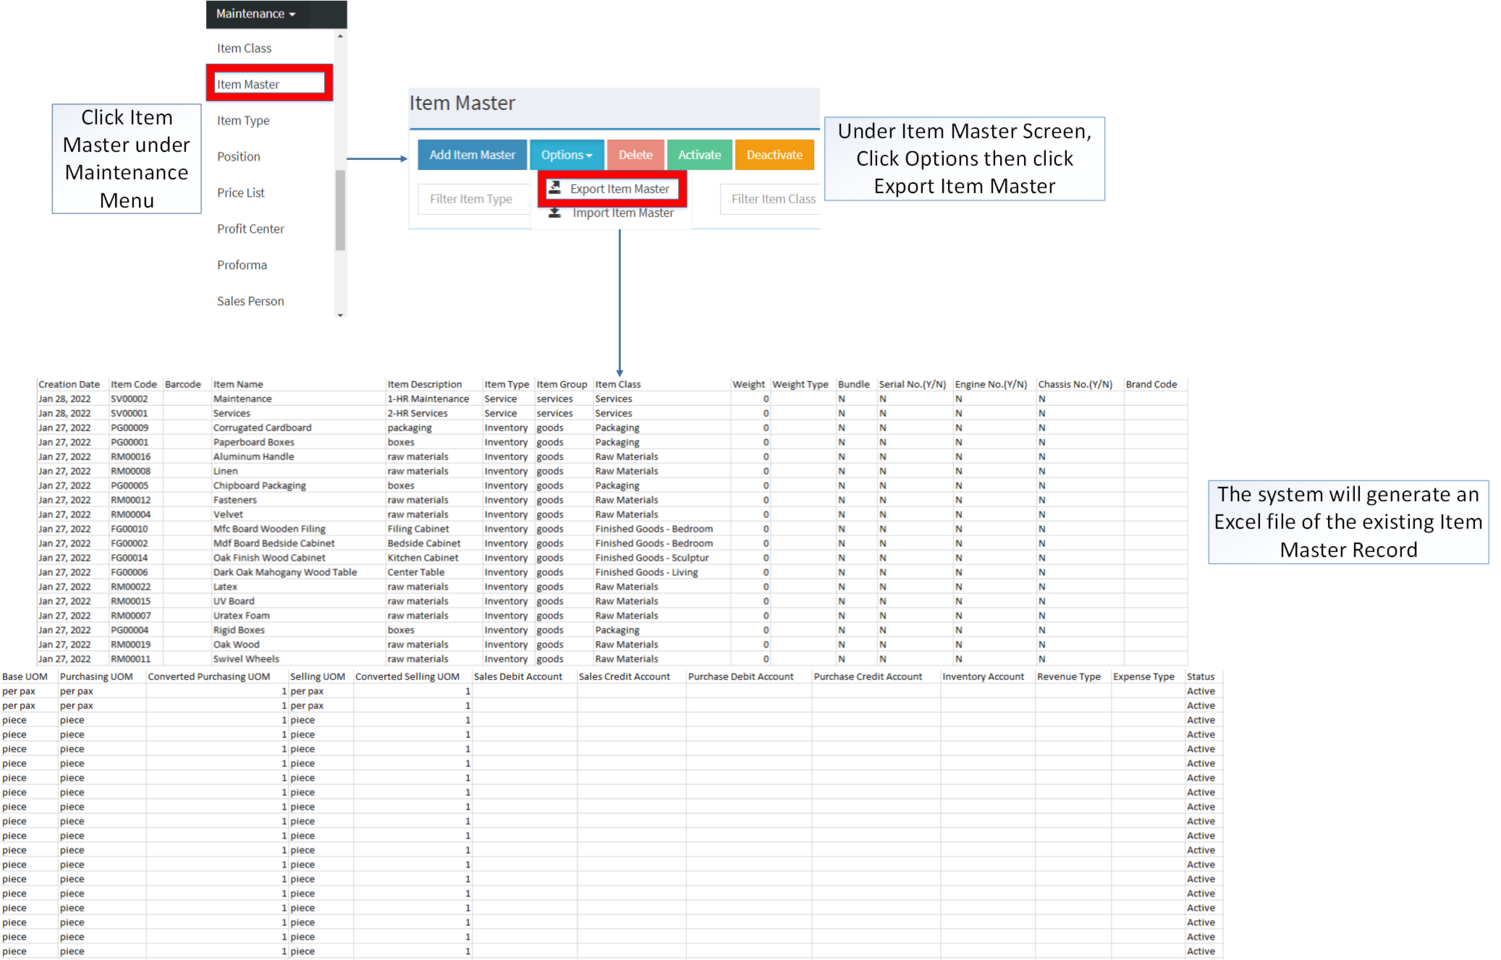
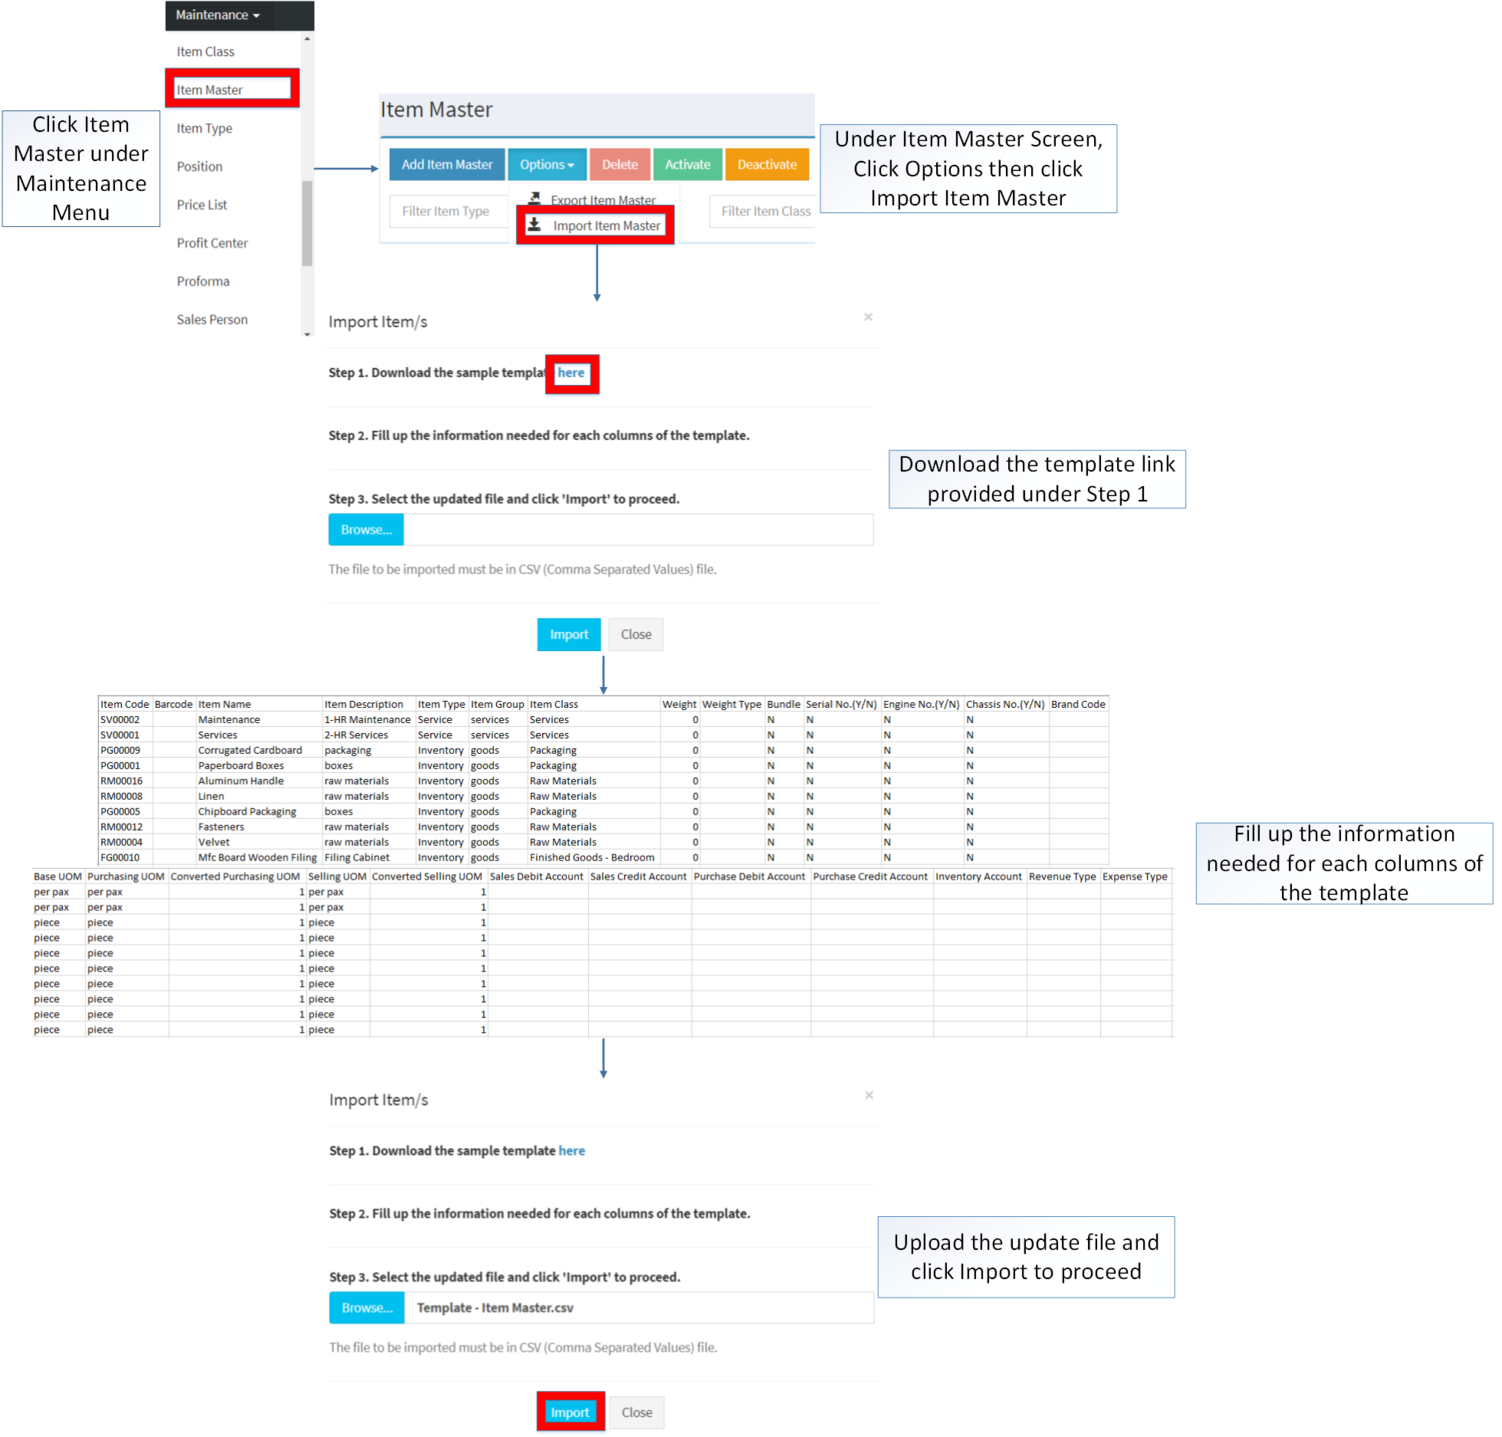
1. Under Item Master Screen, Click Options
2. Under Options, The user may Export or Import The Record
- When Exporting the records, the user may also use the filter options through tabs for precise searching and exporting of records.
- When Importing the records, the user should follow the following steps provided in the Importing Item Master Screen such as
- Downloading the template link provided under Step 1.
- Filling up the information needed for each columns of the template
- Uploading the updated Template
| Item Details | |||||
|---|---|---|---|---|---|
| Field | Description | Allowed Inputs | Restricted Inputs | Character Limit | Required Field |
| 1.Item Code | •Reference Code of an Item | N/A | N/A | N/A | N/A |
| 2.Barcode | •Barcode of the Item | *Alphanumeric | Special Characters | 50 | No |
| 3.Item Name | •Name of the Item | *Alphanumeric
*Special Characters |
None | 30 | Yes |
| 4.Item Description | •Description of the Item | *Alphanumeric
*Special Characters |
None | 250 | Yes |
| 5.Item Class | •Item Class categorization of the item | •Item Class List provided on Item Class on Maintenance Module | N/A | N/A | Yes |
| 6.Item Group | •Item Group categorization of the Item | *Goods
*Services *Non-Inventory |
N/A | N/A | Yes |
| 7.Item Type | •Type of the Item | *Item Type list provided on Item Type Maintenance Module | N/A | N/A | Yes |
| 8.Weight | •Weight of the Item | *Numeric | Any inputs except numeric | 5 | No |
| 9.Weight Type | •Weight Type of the Item | *Unit of Measure List with Unit Type as Weight from Unit of Measure Maintenance Module | *Any inputs not mentioned in the allowed inputs | N/A | No |
| 10.Bundle | •Classification if the item is a bundle type | *Y
*N |
*Engine, Serial and Chassis number will be unavailable if Y | N/A | No |
| 11.Serial Number | •Serial Number of the Item | *Y
*N |
*If Bundle input is Y then Serial number will be N | N/A | No |
| 12.Engine Number | •Engine Number of the item | *Y
*N |
*If Bundle input is Y then Engine number will be N | N/A | No |
| 13.Chasis Number | •Chasis Number of the Item | *Y
*N |
*If Bundle input is Y then Chassis number will be N | N/A | No |
| 14.Brand | •Brand of the Item | *Brand List Provided on Brand Maintenance Module | N/A | N/A | No |
| Unit of Measure | |||||
| 1.Base UOM | •Base Unit of Measure of the Item | •UOM List provided in Unit of Measure Maintenance Module | N/A | N/A | Yes |
| 2.Selling UOM | •Unit of Measure when selling the Item | •UOM List provided in Unit of Measure Maintenance Module | N/A | N/A | Yes |
| 3.Qty(Selling UOM) | •Qty of Selling UOM | •Number | Any inputs aside numeric | 20 | Yes |
| 4.Purchasing UOM | •Unit of Measure when purchasing an item | •UOM List provided in Unit of Measure Maintenance Module | N/A | N/A | Yes |
| 5.Qty(Purchasing UOM) | •Qty of Purchasing UOM | •Number | Any inputs aside numeric | 20 | Yes |
| Accounting Details | |||||
| 1. Debit Account(Sales) | •Debit Account on Sales Details | •Account List under Chart of Accounts | N/A | N/A | No |
| 2. Credit Account(Sales) | •Credit Account on Sales Details | •Account List under Chart of Accounts | N/A | N/A | No |
| 3. Debit Account(Purchase) | •Debit Account on Purchase Details | •Account List under Chart of Accounts | N/A | N/A | No |
| 4. Credit Account(Purchase) | •Credit Account on Purchase Details | •Account List under Chart of Accounts | N/A | N/A | No |
| 5. Inventory Account | •Inventory Account of the item | •Account List under Chart of Accounts | N/A | N/A | No |
| 6. Revenue Type | •Tax Revenue type of the item | •Tax Type List under Tax Maintenance Module | N/A | N/A | No |
| 7. Expense Type | •Tax Expense Type of the item | •Tax Type List under Tax Maintenance Module | N/A | N/A | No |
Activating Item Master Record
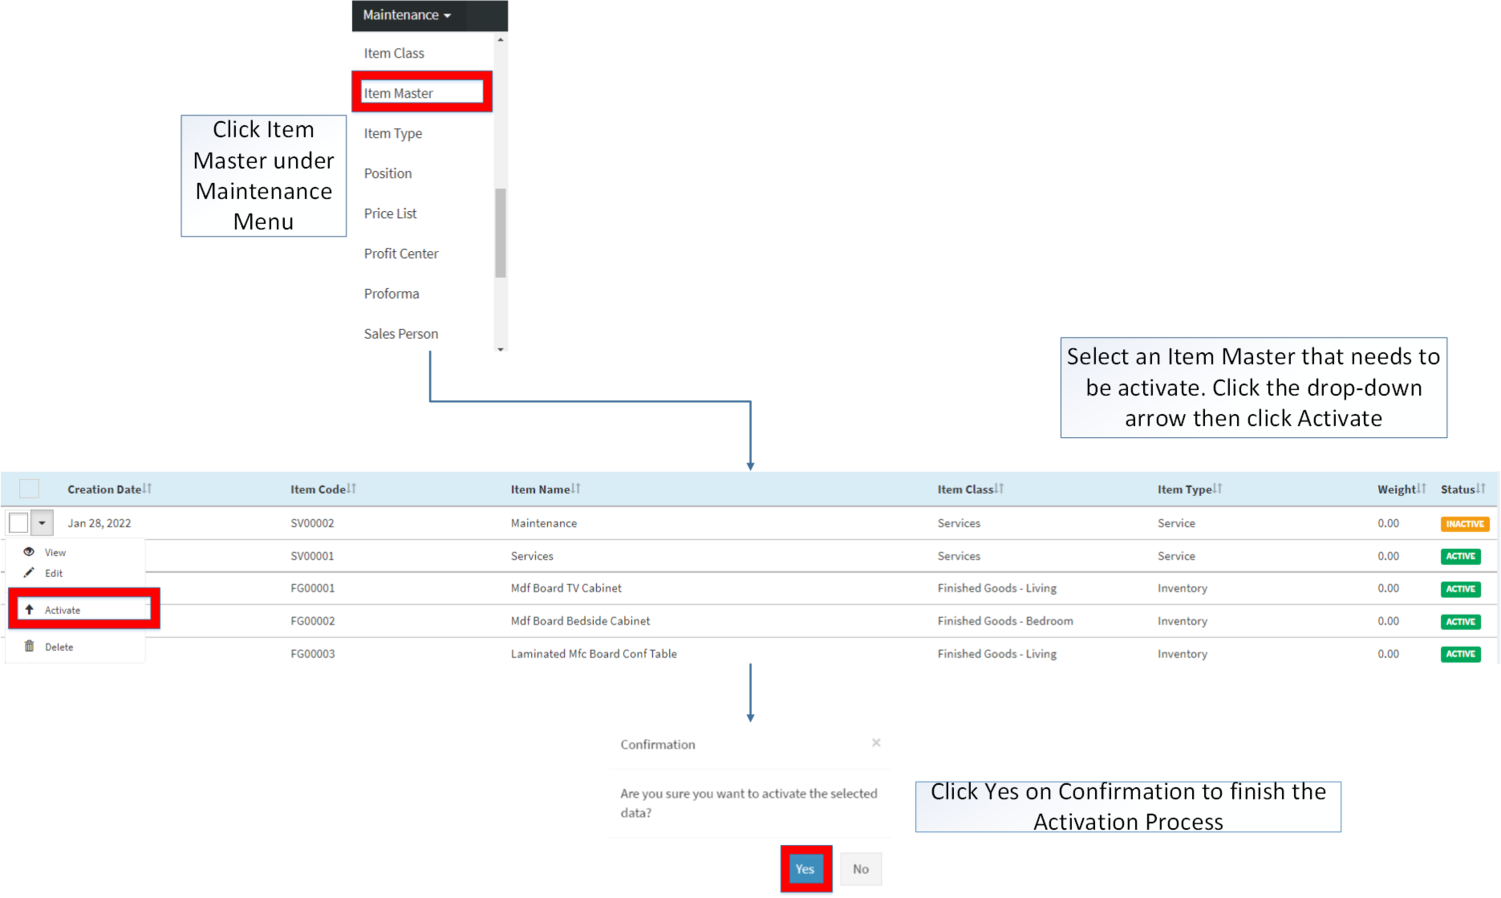
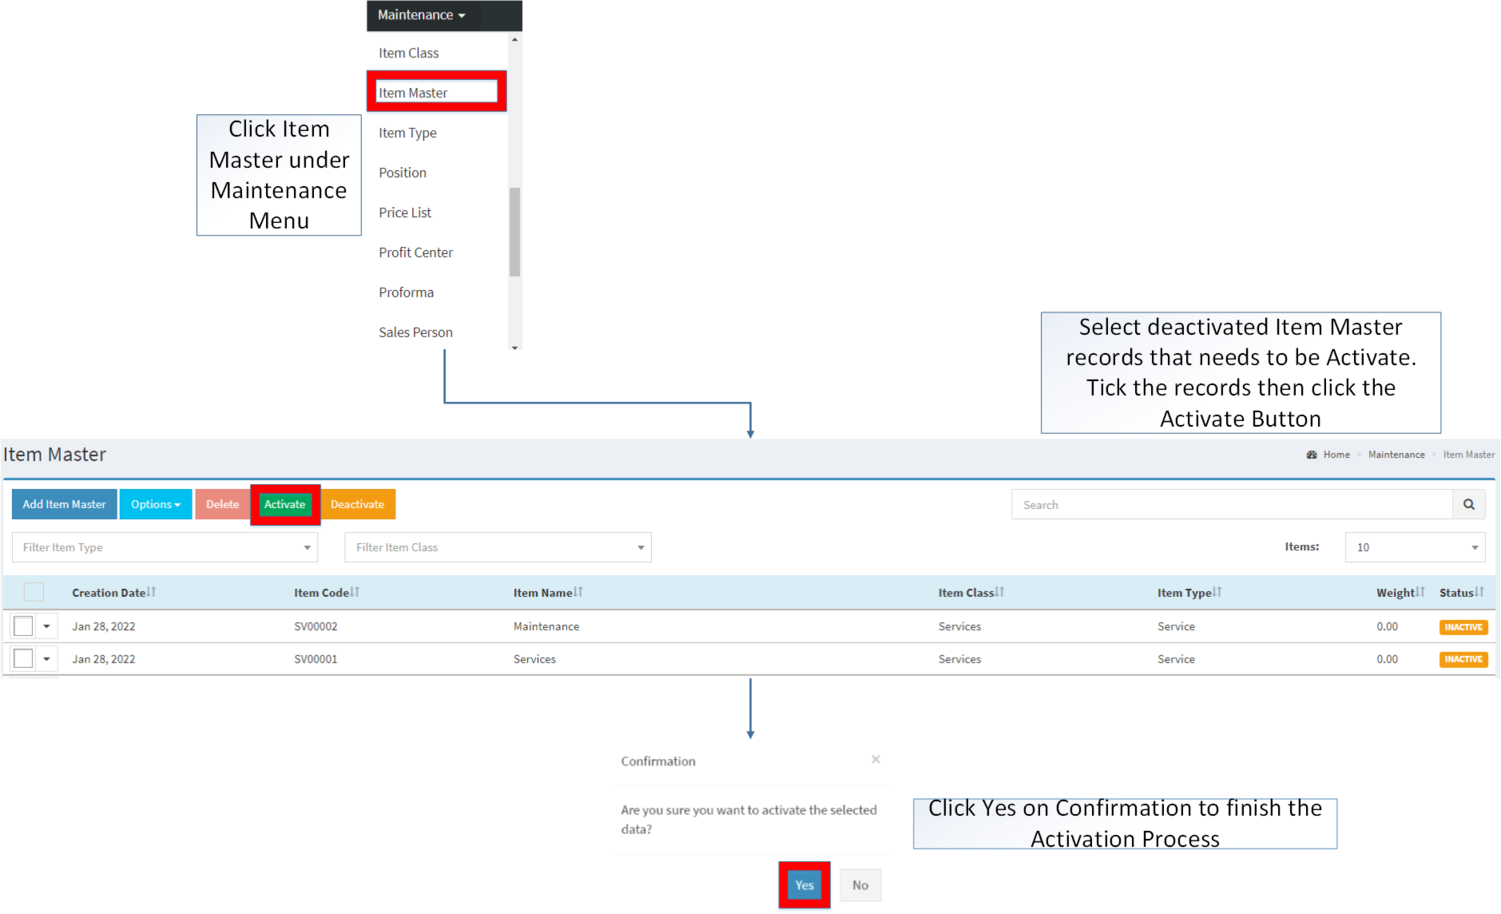
Item Master can be Activated in two ways:
- Using drop-down arrow of a record can be used in single record Activation
- Using Activate Button for activating multiple record
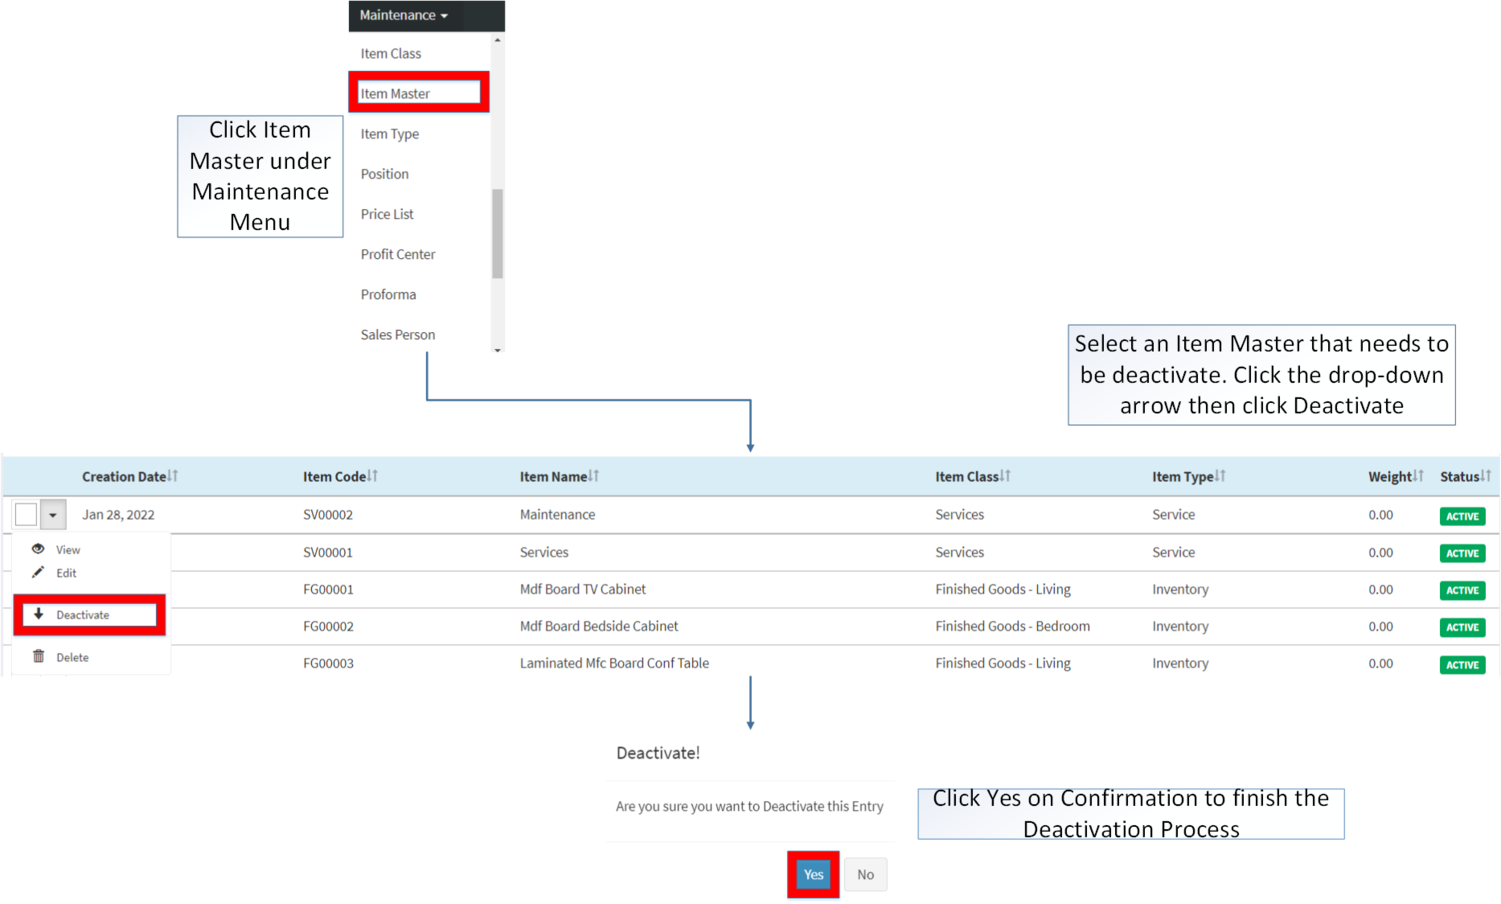
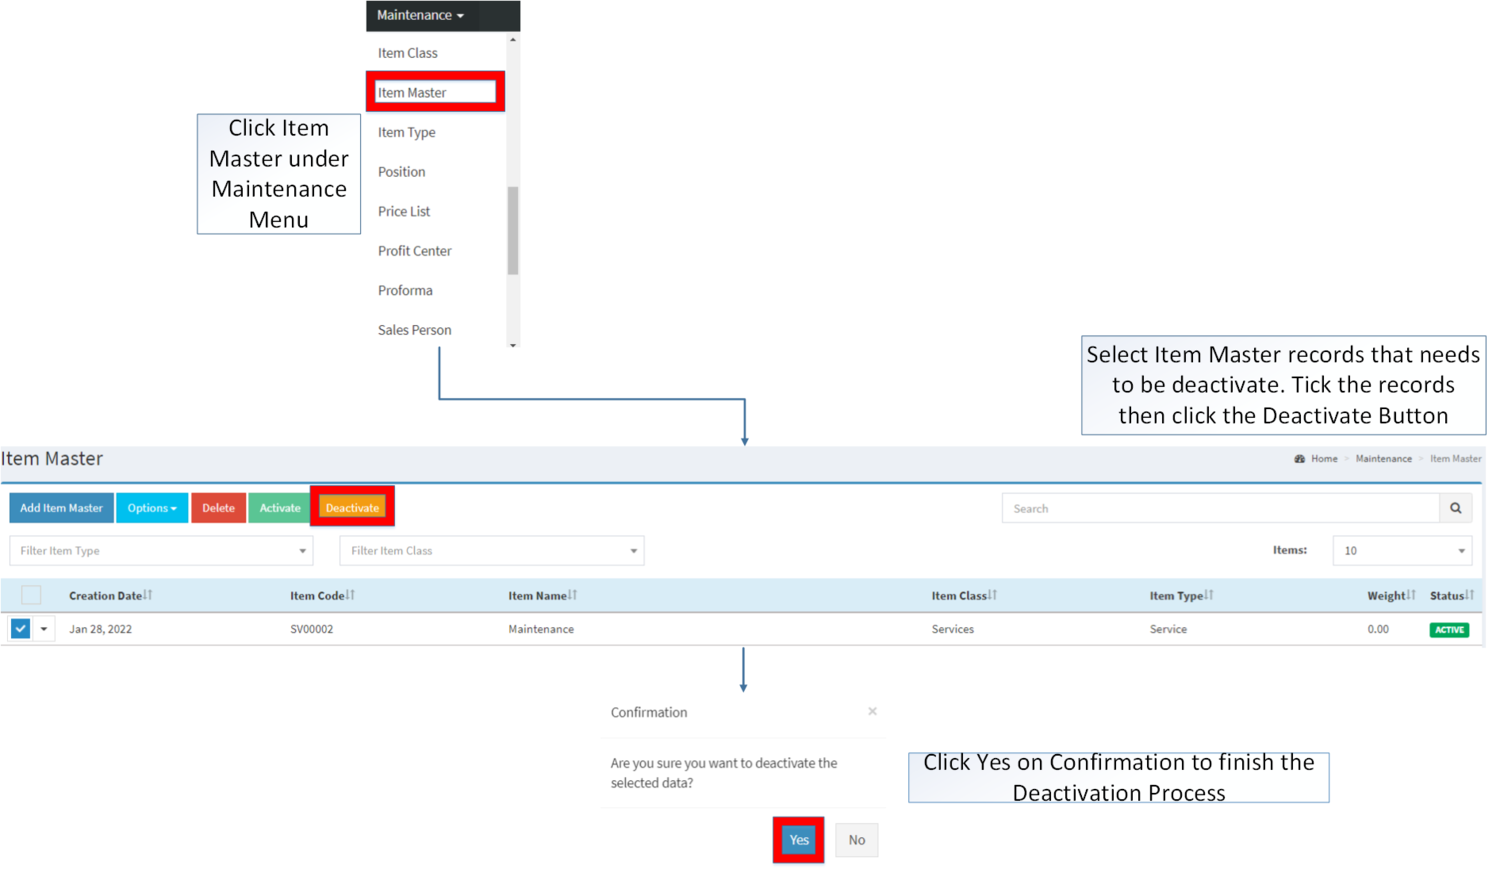
Deactivating Item Master Record
Item Master can be deactivated in two ways:
- Using drop-down arrow of a record can be used in single record deactivation
- Using Deactivate Button for deactivating multiple record
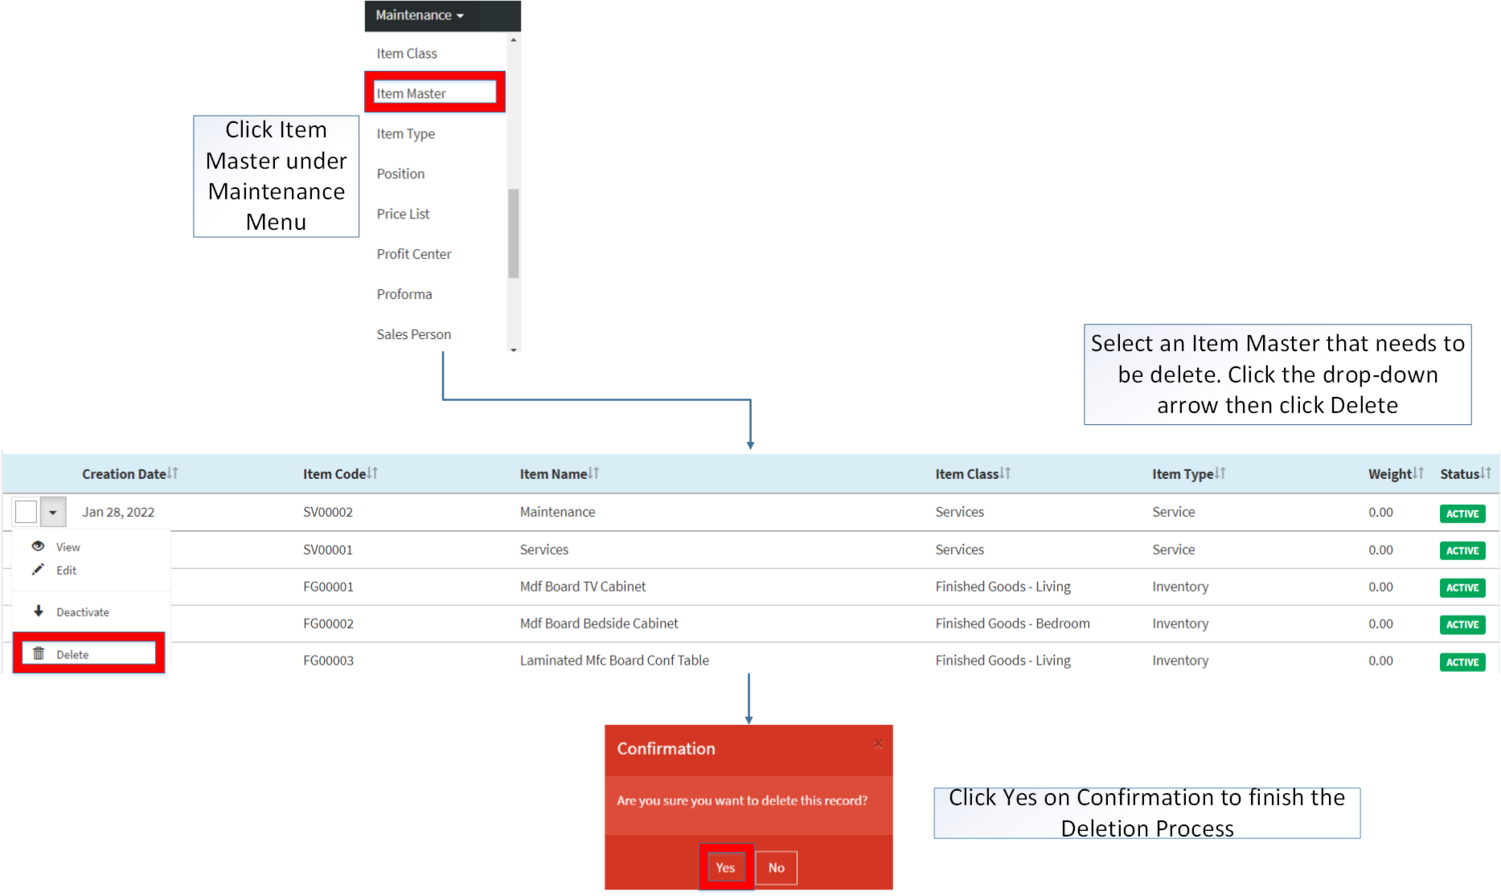
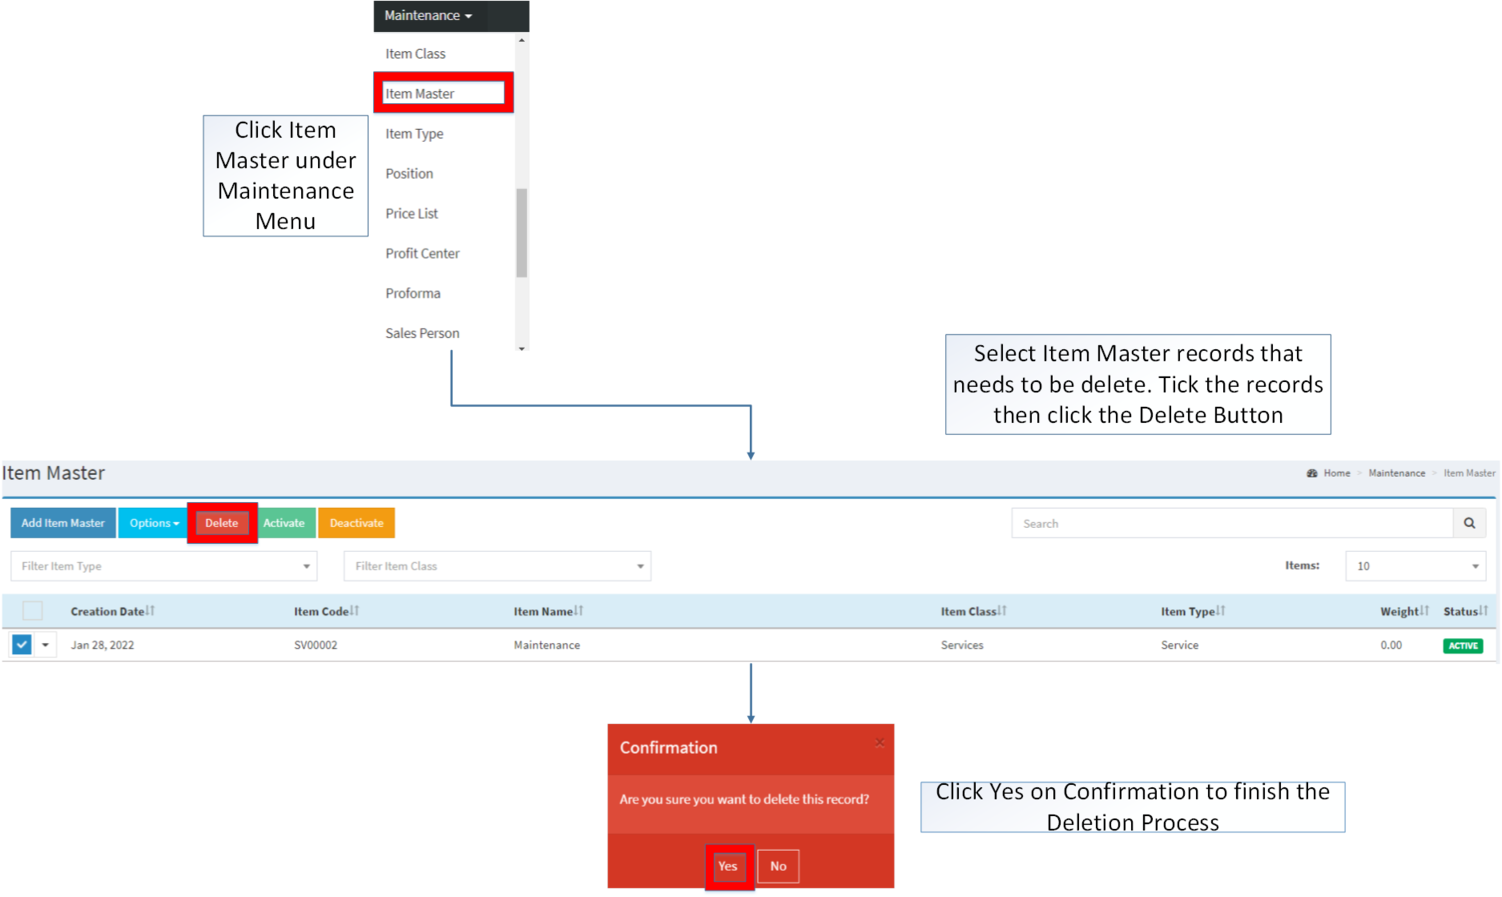
Deleting Item Master Record
Item Master can be deleted in two ways:
- Using drop-down arrow of a record can be used in single record deletion
- Using Delete Button for deleting multiple record
Item Master Record Option
| Status | View | Edit | Deactivate | Activate | Delete |
|---|---|---|---|---|---|
| ACTIVE | ☑ | ☑ | ☑ | ☑ | |
| INACTIVE | ☑ | ☑ | ☑ | ☑ |
Notes:
- Items used in the transaction cannot be deleted in the Item Master.
- The user may edit the record under view record.
- Activating/Deactivating and Deleting of Records can be done in two ways.
- For single records, the user may use the drop down arrow then the action that need to perform.
- For multiple records, the user may tick the records then click the action button that need to perform
- Click the Yes in the confirmation to proceed on the action taken.
| Reports | |
|---|---|
| Maintenance | Maintenance | Item Master | Item Class | Item Type | Brand | Chart of Account | Unit of Measure | Tax |
| Sales | Sales Quotation | Sales Order | Delivery Receipt | Sales Invoice |
| Purchase | Purchase | Import Purchase Order | Purchase Order | Purchase Requisition | Purchase Receipt |
| Inventory | Inventory | Inventory Adjustment | Inventory Inquiry | Inventory Movement | Purchase Return | Sales Return | Stock Transfer |
| Modules | |
| Sales Report | Sales per Item | Sales Top Item | Sales per Stock | Sales per Warehouse |
