Difference between revisions of "Customer"
(Tag: Visual edit) |
(Tag: Visual edit) |
||
| Line 6: | Line 6: | ||
=====Customer Record List===== | =====Customer Record List===== | ||
| + | [[File:Maintenance - Customer - Record List.png|border|center|1500x1500px]] | ||
| + | <br /> | ||
=====Adding Customer===== | =====Adding Customer===== | ||
| − | # Go to Maintenance then click [[Customer]] | + | #Go to Maintenance then click [[Customer]] |
| − | # Click '''Add Customer''' Button | + | #Click '''Add Customer''' Button |
| − | # Fill up the necessary fields then click '''Save''' | + | #Fill up the necessary fields then click '''Save''' |
| + | [[File:Maintenance - Customer - Add.png|border|center|1500x1500px]] | ||
| + | <br /> | ||
{| class="wikitable" style="margin: auto;" | {| class="wikitable" style="margin: auto;" | ||
!Field | !Field | ||
| Line 68: | Line 72: | ||
=====Editing Customer===== | =====Editing Customer===== | ||
| − | # Go to Maintenance then click [[Customer]] | + | #Go to Maintenance then click [[Customer]] |
| − | # Find the Customer Entry that needs to an update. Click the Drop-down Arrow then choose '''Edit.''' | + | #Find the Customer Entry that needs to an update. Click the Drop-down Arrow then choose '''Edit.''' |
| − | # Update the fields then click '''Save''' to finish the updating process | + | #Update the fields then click '''Save''' to finish the updating process |
| + | [[File:Maintenance - Customer - Edit.png|border|center|1500x1500px]] | ||
| + | <br /> | ||
{| class="wikitable" style="margin: auto;" | {| class="wikitable" style="margin: auto;" | ||
!Field | !Field | ||
| Line 122: | Line 128: | ||
2. Under Options, The user may Export or Import The Record | 2. Under Options, The user may Export or Import The Record | ||
| − | * When Exporting the records, the user may also use the filter options through tabs for precise searching and exporting of records. | + | *When Exporting the records, the user may also use the filter options through tabs for precise searching and exporting of records. |
| − | |||
| − | |||
| − | |||
| − | |||
| + | [[File:Maintenance - Customer - Export.png|border|center|1500x1500px]] | ||
| + | <br /> | ||
| + | |||
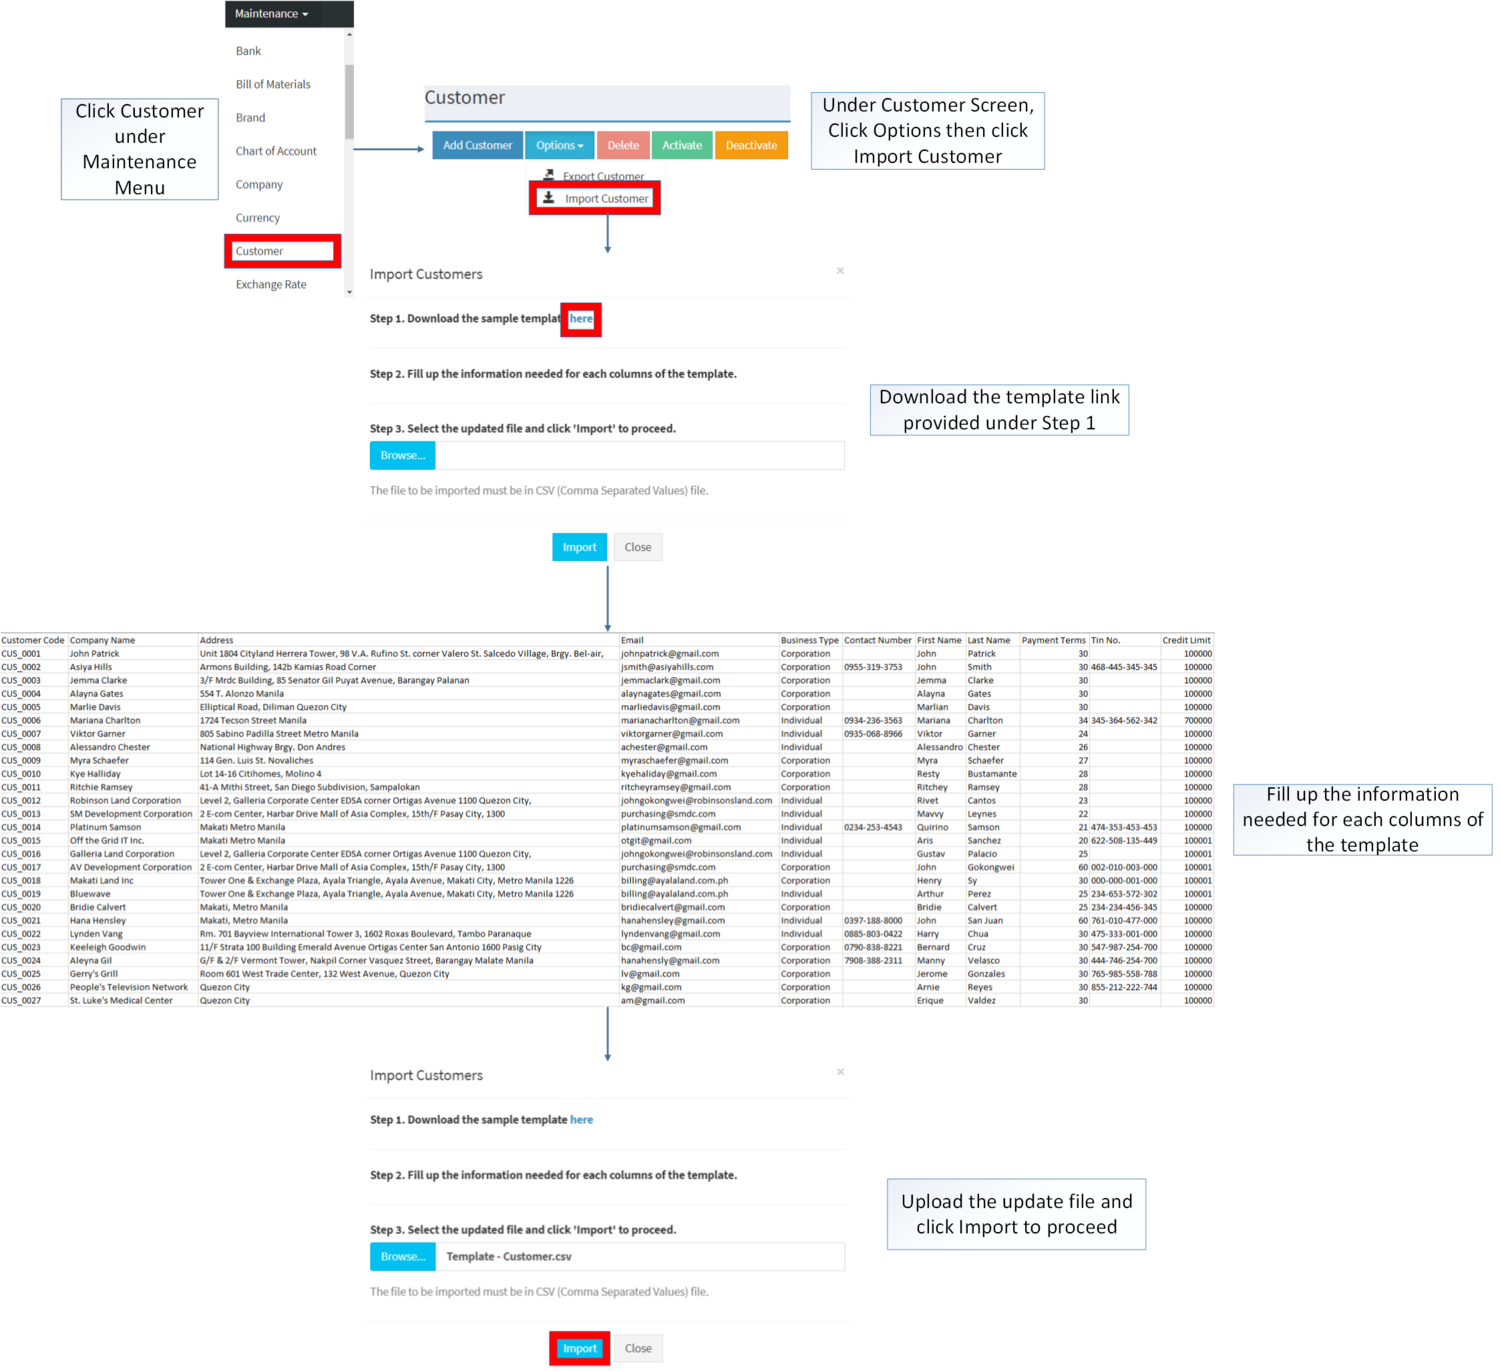
| + | *When Importing the records, the user should follow the following steps provided in the Importing Customer Screen such as | ||
| + | **Downloading the template link provided under Step 1. | ||
| + | **Filling up the information needed for each columns of the template | ||
| + | **Uploading the updated Template | ||
| + | |||
| + | [[File:Maintenance - Customer - Import.png|border|center|1500x1500px]] | ||
| + | <br /> | ||
{| class="wikitable" style="box-sizing: inherit; border-collapse: collapse; border-spacing: 0px; background-color: rgb(248, 249, 250); font-size: 14px; color: rgb(34, 34, 34); margin: auto; border: 1px solid rgb(162, 169, 177); font-family: "Open Sans", Roboto, arial, sans-serif; font-style: normal; font-variant-ligatures: normal; font-variant-caps: normal; font-weight: 400; letter-spacing: normal; orphans: 2; text-align: start; text-transform: none; white-space: normal; widows: 2; word-spacing: 0px; -webkit-text-stroke-width: 0px; text-decoration-thickness: initial; text-decoration-style: initial; text-decoration-color: initial;" | {| class="wikitable" style="box-sizing: inherit; border-collapse: collapse; border-spacing: 0px; background-color: rgb(248, 249, 250); font-size: 14px; color: rgb(34, 34, 34); margin: auto; border: 1px solid rgb(162, 169, 177); font-family: "Open Sans", Roboto, arial, sans-serif; font-style: normal; font-variant-ligatures: normal; font-variant-caps: normal; font-weight: 400; letter-spacing: normal; orphans: 2; text-align: start; text-transform: none; white-space: normal; widows: 2; word-spacing: 0px; -webkit-text-stroke-width: 0px; text-decoration-thickness: initial; text-decoration-style: initial; text-decoration-color: initial;" | ||
|+ style="box-sizing: inherit; padding-top: 8px; padding-bottom: 8px; color: rgb(119, 119, 119); text-align: left; font-weight: bold;" |Customer Import Details | |+ style="box-sizing: inherit; padding-top: 8px; padding-bottom: 8px; color: rgb(119, 119, 119); text-align: left; font-weight: bold;" |Customer Import Details | ||
| Line 222: | Line 234: | ||
<nowiki>*</nowiki>Any inputs except numbers | <nowiki>*</nowiki>Any inputs except numbers | ||
| style="vertical-align:middle;text-align:center;" |No | | style="vertical-align:middle;text-align:center;" |No | ||
| − | |} | + | |}<br /> |
| + | |||
| + | ===== <span class="mw-headline" id="Activating_Supplier_Record" style="box-sizing: inherit;"><span class="mw-headline" id="Activating_Tax_Record" style="box-sizing: inherit;"><span class="mw-headline" id="Activating_Item_Master_Record" style="box-sizing: inherit;"><span class="mw-headline" id="Activating_Item_Class_Record" style="box-sizing: inherit;"><span class="mw-headline" id="Activating_Item_Type_Record" style="box-sizing: inherit;"><span class="mw-headline" id="Activating_Chart_of_Account_Record" style="box-sizing: inherit;">Activating Customer Record</span></span></span></span></span></span> ===== | ||
| + | Customer can be Activated in two ways: | ||
| + | |||
| + | * Using drop-down arrow of a record can be used in single record Activation | ||
| + | |||
| + | [[File:Maintenance - Customer - Activate1.png|center|1500x1500px]] | ||
| + | <br /> | ||
| + | |||
| + | * Using Activate Button for activating multiple record. | ||
| + | |||
| + | [[File:Maintenance - Customer - Activate2.png|border|center|1500x1500px]] | ||
| + | <br /> | ||
| + | |||
| + | ===== <span class="mw-headline" id="Deactivating_Supplier_Record" style="box-sizing: inherit;"><span class="mw-headline" id="Deactivating_Tax_Record" style="box-sizing: inherit;"><span class="mw-headline" id="Deactivating_Item_Master_Record" style="box-sizing: inherit;"><span class="mw-headline" id="Deactivating_Item_Class_Record" style="box-sizing: inherit;"><span class="mw-headline" id="Deactivating_Item_Type_Record" style="box-sizing: inherit;"><span class="mw-headline" id="Deactivating_Chart_of_Account_Record" style="box-sizing: inherit;">Deactivating Customer Record</span></span></span></span></span></span> ===== | ||
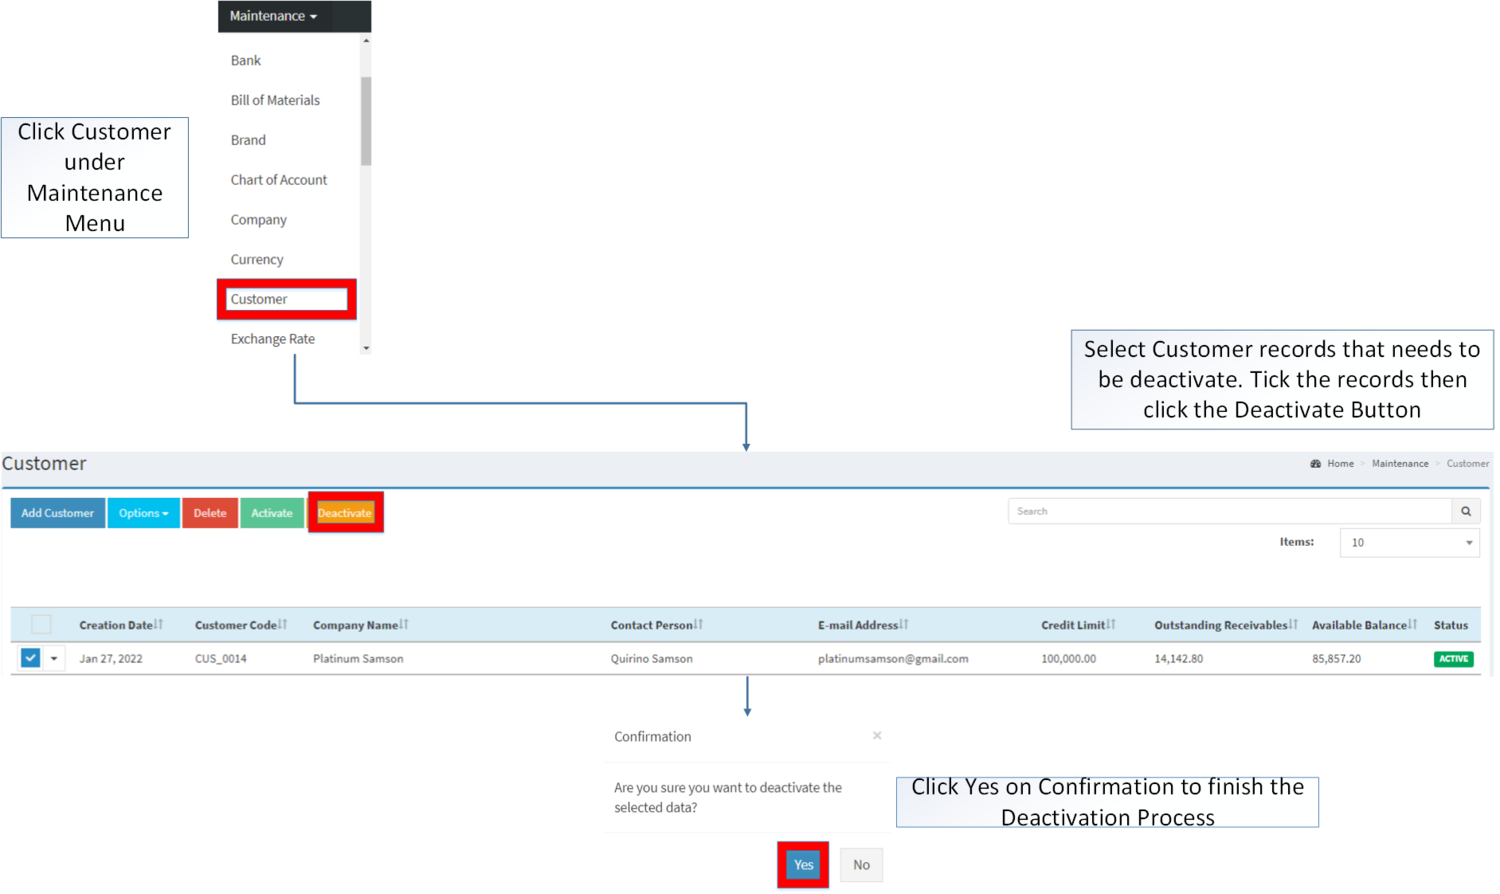
| + | Customer can be deactivated in two ways: | ||
| + | |||
| + | * Using drop-down arrow of a record can be used in single record deactivation | ||
| + | |||
| + | [[File:Maintenance - Customer - Deactivate1.png|border|center|1500x1500px]] | ||
| + | <br /> | ||
| + | |||
| + | * Using Deactivate Button for deactivating multiple record | ||
| + | |||
| + | [[File:Maintenance - Customer - Deactivate2.png|border|center|1500x1500px]] | ||
| + | <br /> | ||
| + | |||
| + | ===== <span class="mw-headline" id="Deleting_Supplier_Record" style="box-sizing: inherit;"><span class="mw-headline" id="Deleting_Tax_Record" style="box-sizing: inherit;"><span class="mw-headline" id="Deleting_Item_Master_Record" style="box-sizing: inherit;"><span class="mw-headline" id="Deleting_Item_Class_Record" style="box-sizing: inherit;"><span class="mw-headline" id="Deleting_Item_Type_Record" style="box-sizing: inherit;"><span class="mw-headline" id="Deleting_Chart_of_Account_Record" style="box-sizing: inherit;">Deleting Customer Record</span></span></span></span></span></span> ===== | ||
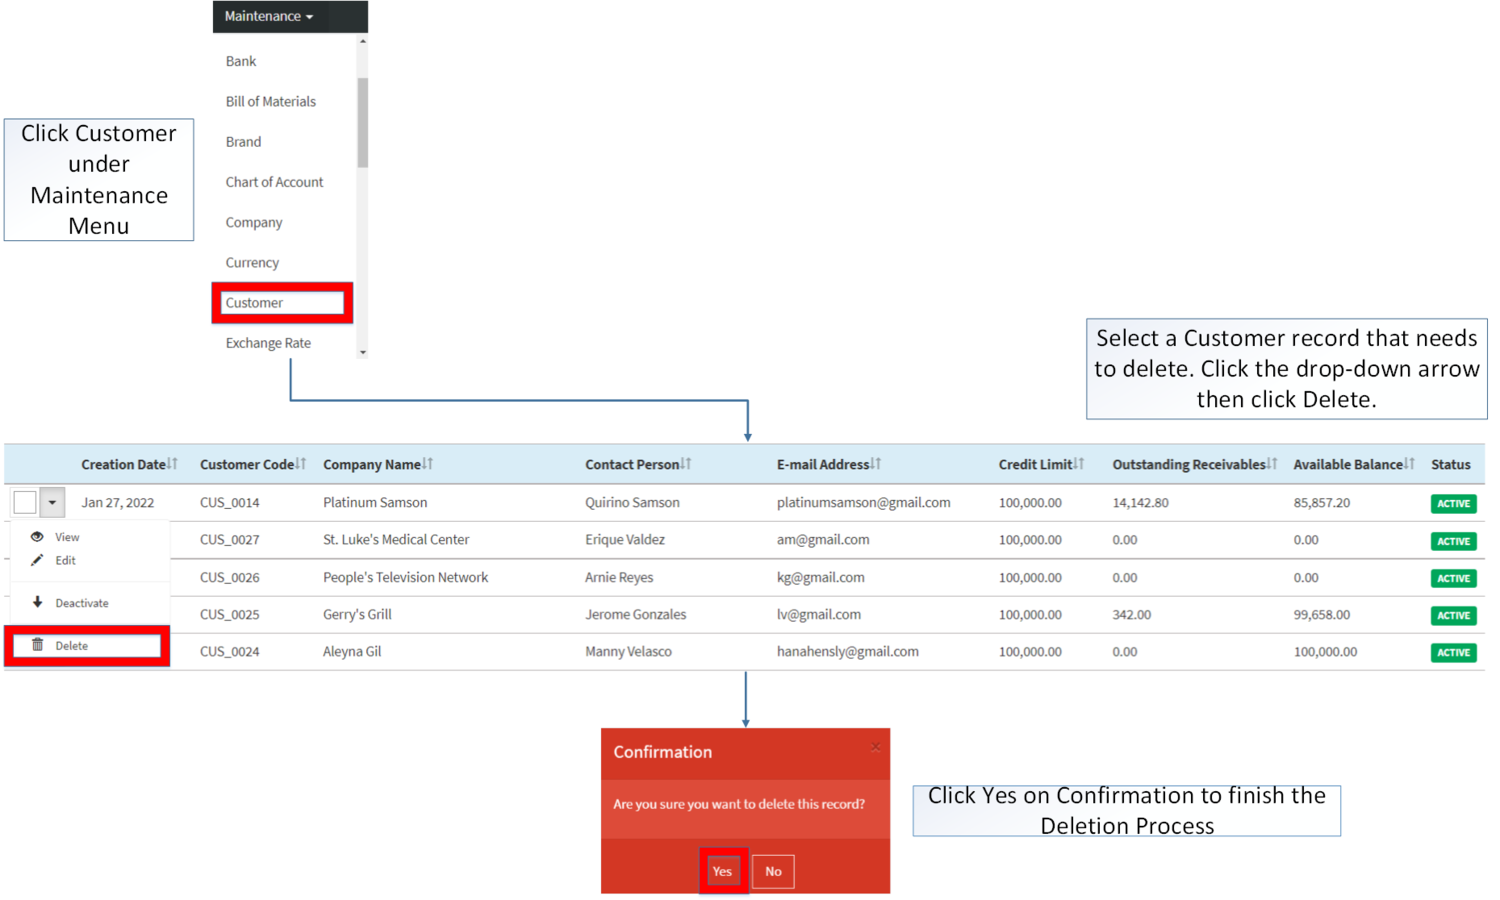
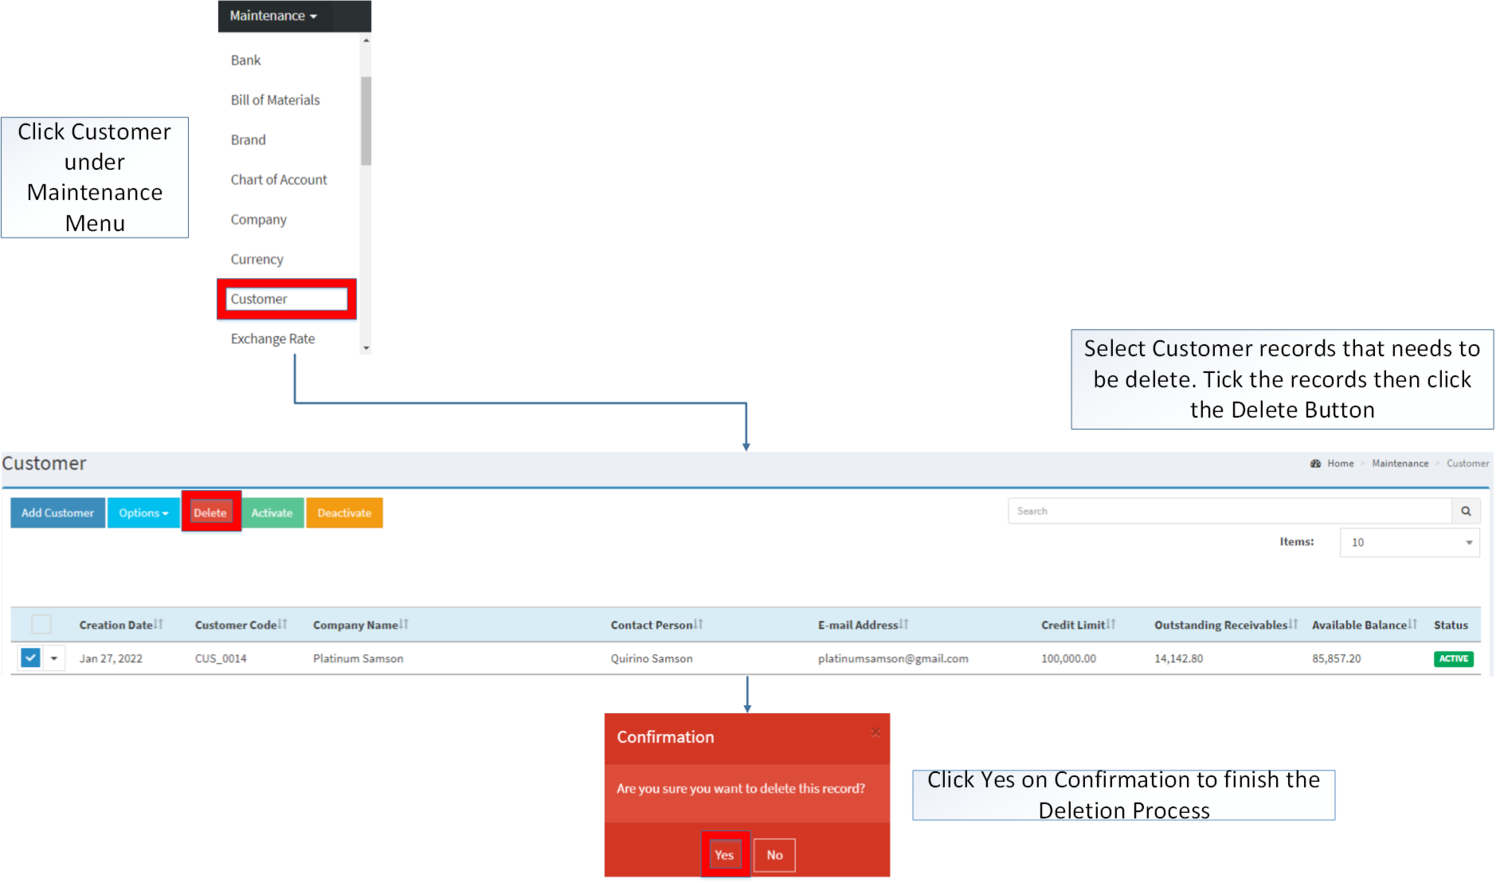
| + | Customer can be deleted in two ways: | ||
| + | |||
| + | * Using drop-down arrow of a record can be used in single record deletion | ||
| + | |||
| + | [[File:Maintenance - Customer - Delete1.png|border|center|1500x1500px]] | ||
| + | <br /> | ||
| + | |||
| + | * Using Delete Button for deleting multiple record | ||
| + | [[File:Maintenance - Customer - Delete2.png|border|center|1500x1500px]] | ||
| + | <br /> | ||
=====Customer Record Option===== | =====Customer Record Option===== | ||
{| class="wikitable" style="box-sizing: inherit; border-collapse: collapse; border-spacing: 0px; background-color: rgb(248, 249, 250); font-size: 14px; color: rgb(34, 34, 34); margin: auto; border: 1px solid rgb(162, 169, 177); font-family: "Open Sans", Roboto, arial, sans-serif; font-style: normal; font-variant-ligatures: normal; font-variant-caps: normal; font-weight: 400; letter-spacing: normal; orphans: 2; text-align: start; text-transform: none; white-space: normal; widows: 2; word-spacing: 0px; -webkit-text-stroke-width: 0px; text-decoration-thickness: initial; text-decoration-style: initial; text-decoration-color: initial;" | {| class="wikitable" style="box-sizing: inherit; border-collapse: collapse; border-spacing: 0px; background-color: rgb(248, 249, 250); font-size: 14px; color: rgb(34, 34, 34); margin: auto; border: 1px solid rgb(162, 169, 177); font-family: "Open Sans", Roboto, arial, sans-serif; font-style: normal; font-variant-ligatures: normal; font-variant-caps: normal; font-weight: 400; letter-spacing: normal; orphans: 2; text-align: start; text-transform: none; white-space: normal; widows: 2; word-spacing: 0px; -webkit-text-stroke-width: 0px; text-decoration-thickness: initial; text-decoration-style: initial; text-decoration-color: initial;" | ||
| Line 255: | Line 305: | ||
**[[Sales]] Module | **[[Sales]] Module | ||
**[[Accounts Receivable]] and [[Receipt Voucher]] | **[[Accounts Receivable]] and [[Receipt Voucher]] | ||
| − | ** | + | **[[Credit Voucher]] |
**[[Sales Return]] | **[[Sales Return]] | ||
*'''INACTIVE''' customers cannot be used in the transactions but can still be used if it is present in the past transactions | *'''INACTIVE''' customers cannot be used in the transactions but can still be used if it is present in the past transactions | ||
*Activating/Deactivating and Deleting of Records can be done in two ways. | *Activating/Deactivating and Deleting of Records can be done in two ways. | ||
| − | ** For single records, the user may use the drop down arrow then the action that need to perform. | + | **For single records, the user may use the drop down arrow then the action that need to perform. |
| − | ** For multiple records, the user may tick the records then click the action button that need to perform | + | **For multiple records, the user may tick the records then click the action button that need to perform |
| − | *** Click the Yes in the confirmation to proceed on the action taken. | + | ***Click the Yes in the confirmation to proceed on the action taken. |
<br /> | <br /> | ||
Revision as of 12:19, 2 February 2022
Contents
Customer
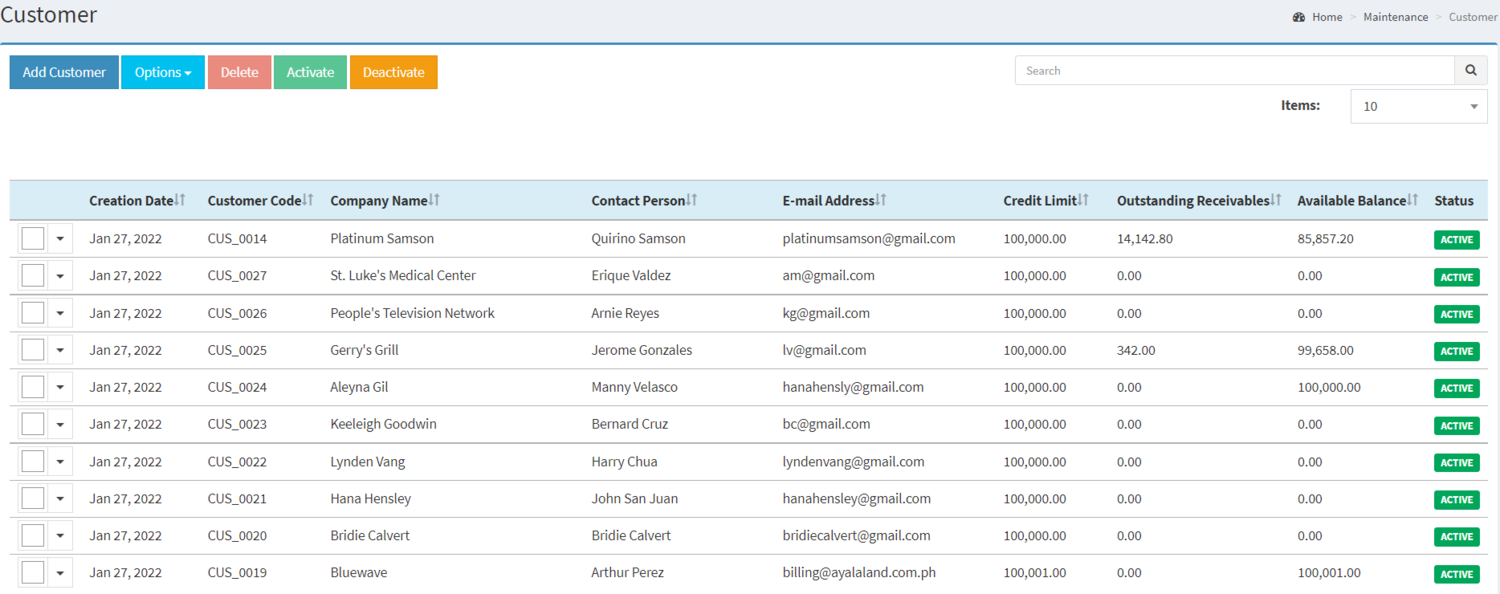
This maintenance screen allows users to configure and add customers that will be used on their transactions.
Customer Record List
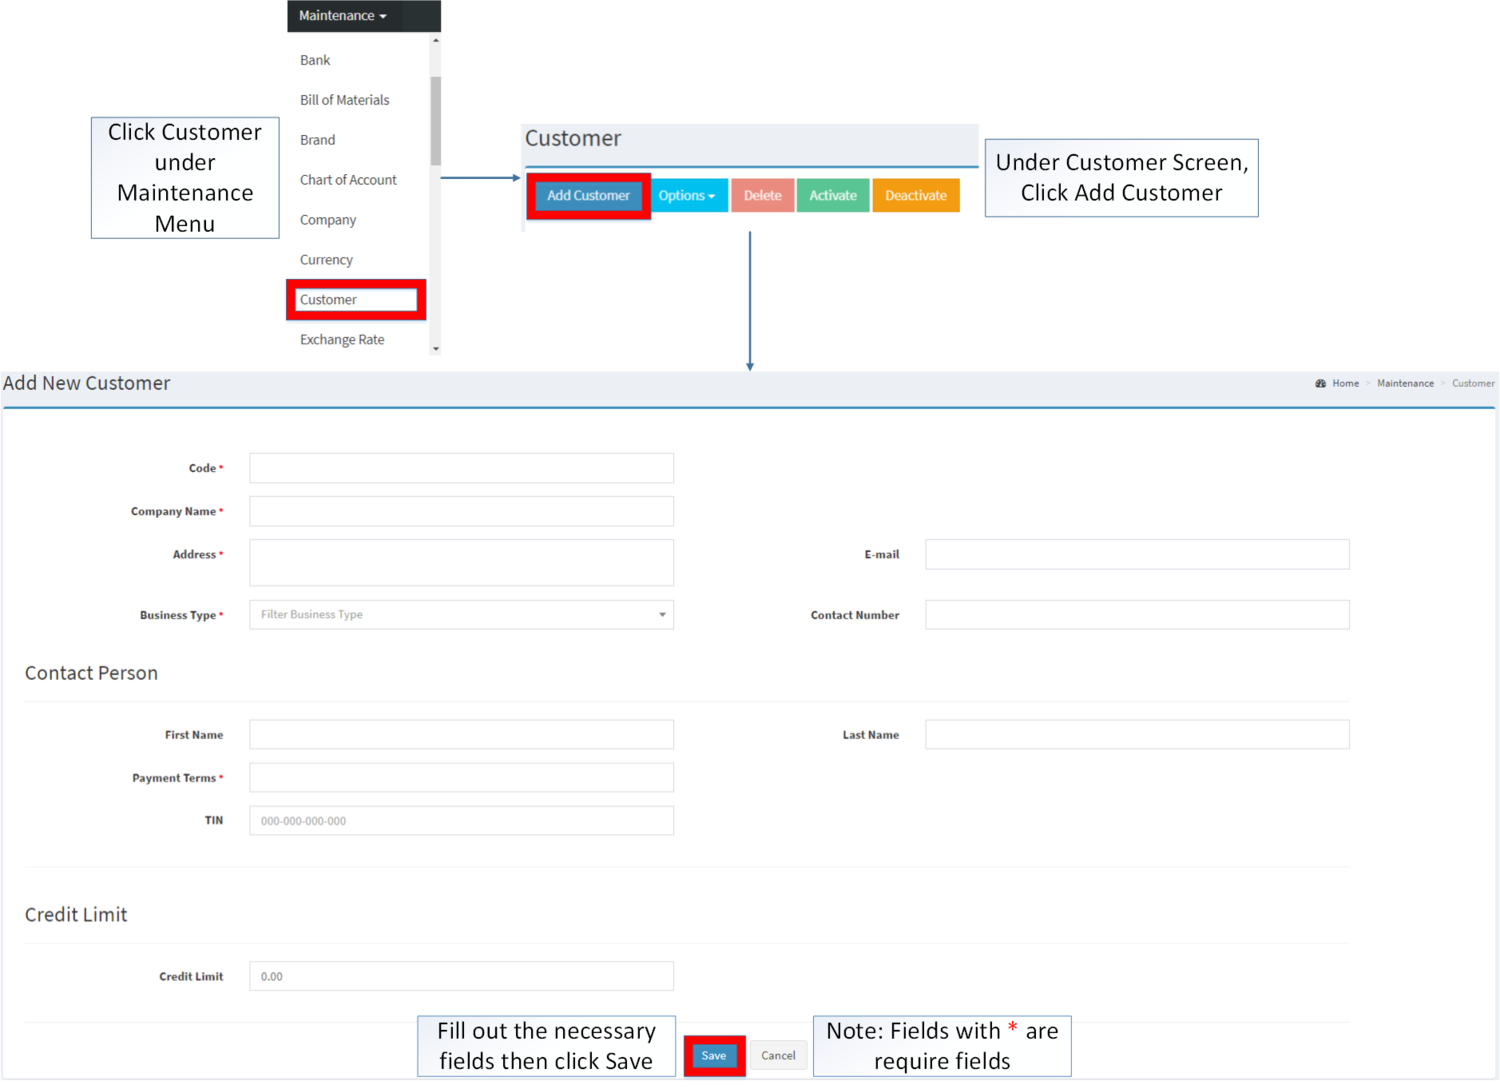
Adding Customer
- Go to Maintenance then click Customer
- Click Add Customer Button
- Fill up the necessary fields then click Save
| Field | Description | Expected Output |
|---|---|---|
| 1.Code | •Customer Reference Code | •Alphanumeric |
| 2.Company Name | •Company Name of the Customer | •Alphanumeric |
| 3.Address | •Address of the Customer | •Alphanumeric |
| 4.Email | •Email of the Customer | •Alphanumeric |
| 5.Business Type | •Business Type of the Customer's Company | •Alphanumeric |
| 6.Contact Number | •Contact Number of the Customer | •Number |
| 7.First Name | •First Name of the Customer | •Text |
| 8.Last Name | •Last Name of the Customer | •Text |
| 9.Payment Terms | •Payment Terms of the Customer | •Number |
| 10.TIN | •Tax Identification Number of the Customer | •Number |
| 11.Credit Limit | •Credit Limit of the Customer | •Number |
Notes:
- Code in the Customer is a Unique field, this cannot be edited once the user proceed to creation.
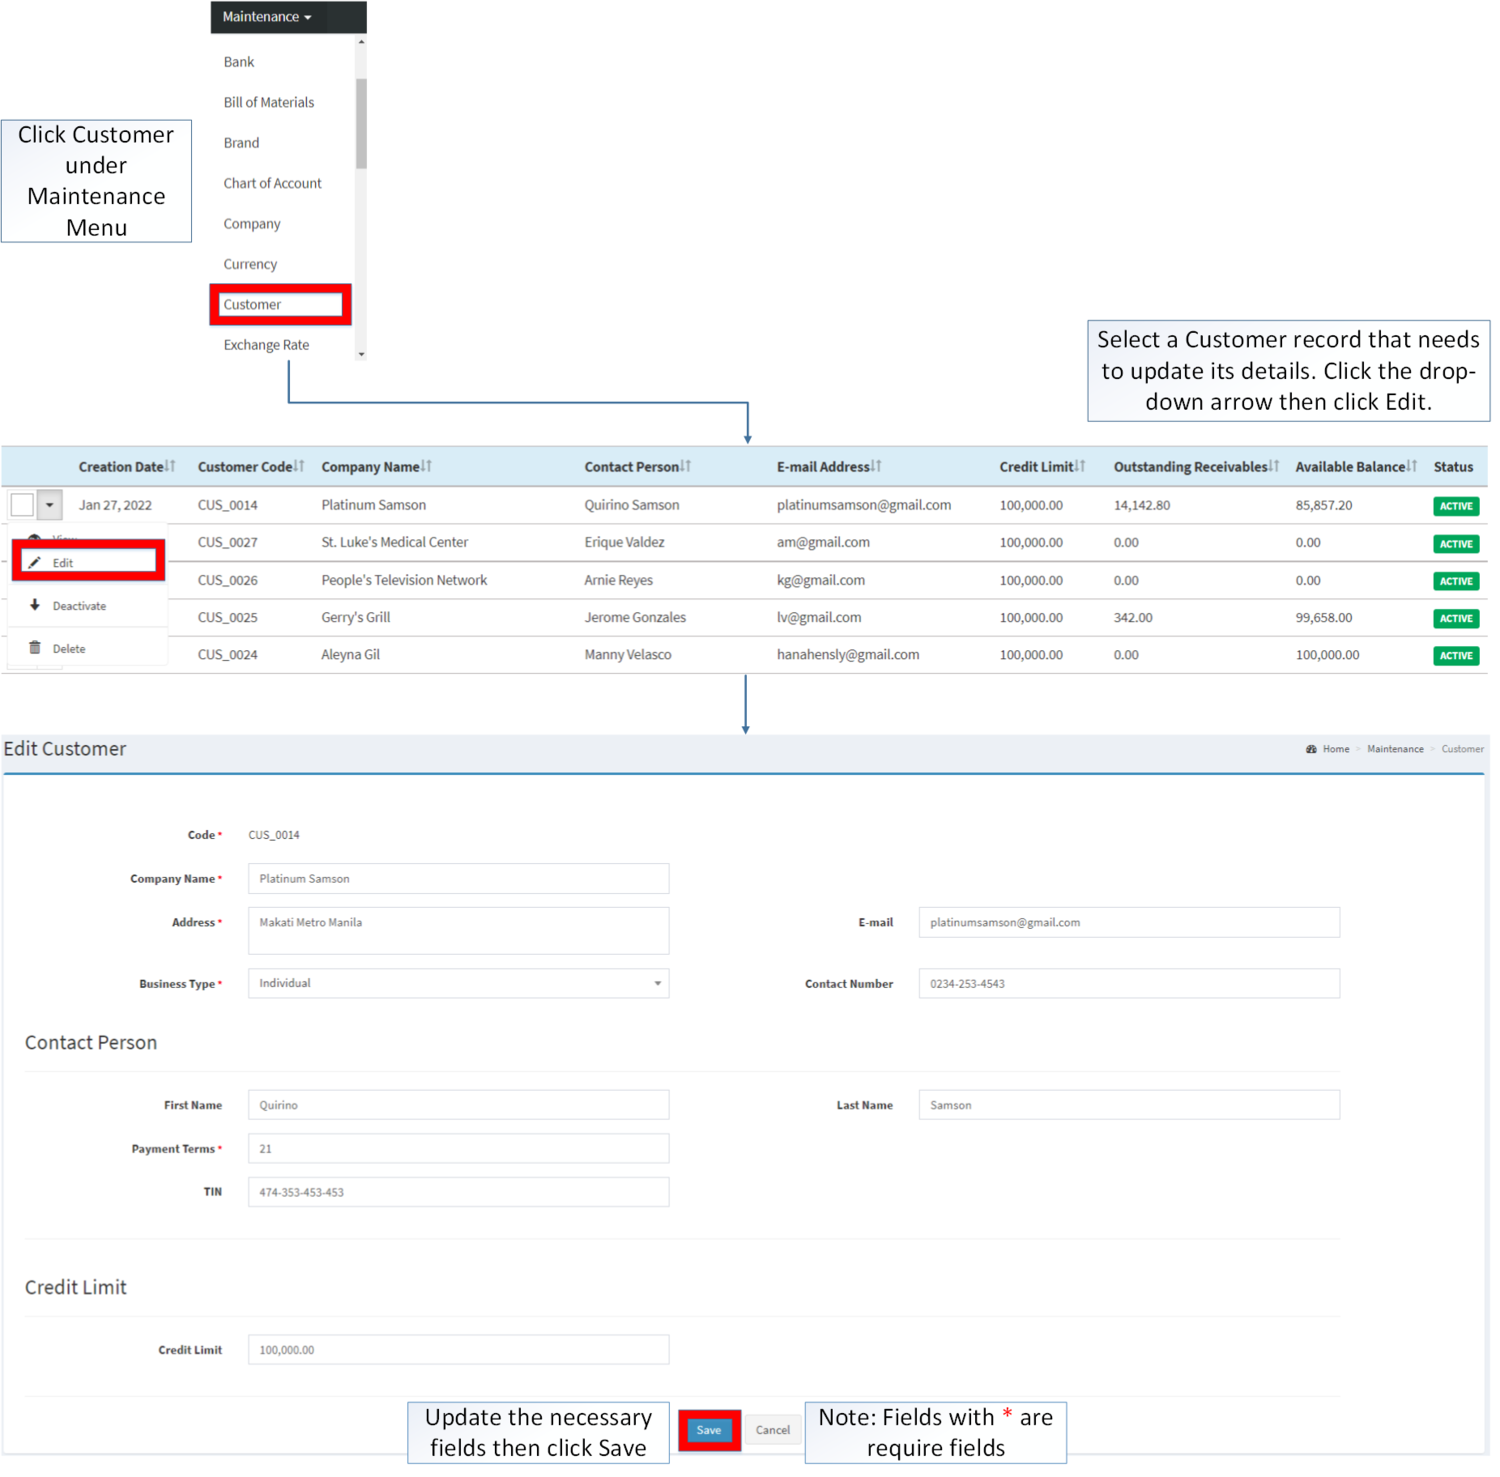
Editing Customer
- Go to Maintenance then click Customer
- Find the Customer Entry that needs to an update. Click the Drop-down Arrow then choose Edit.
- Update the fields then click Save to finish the updating process
| Field | Description | Expected Output |
|---|---|---|
| 1.Company Name | •Company Name of the Customer | •Alphanumeric |
| 2.Address | •Address of the Customer | •Alphanumeric |
| 3.Email | •Email of the Customer | •Alphanumeric |
| 4.Business Type | •Business Type of the Customer's Company | •Alphanumeric |
| 5.Contact Number | •Contact Number of the Customer | •Number |
| 6.First Name | •First Name of the Customer | •Text |
| 7.Last Name | •Last Name of the Customer | •Text |
| 8.Payment Terms | •Payment Terms of the Customer | •Number |
| 9.TIN | •Tax Identification Number of the Customer | •Number |
| 10.Credit Limit | •Credit Limit of the Customer | •Number |
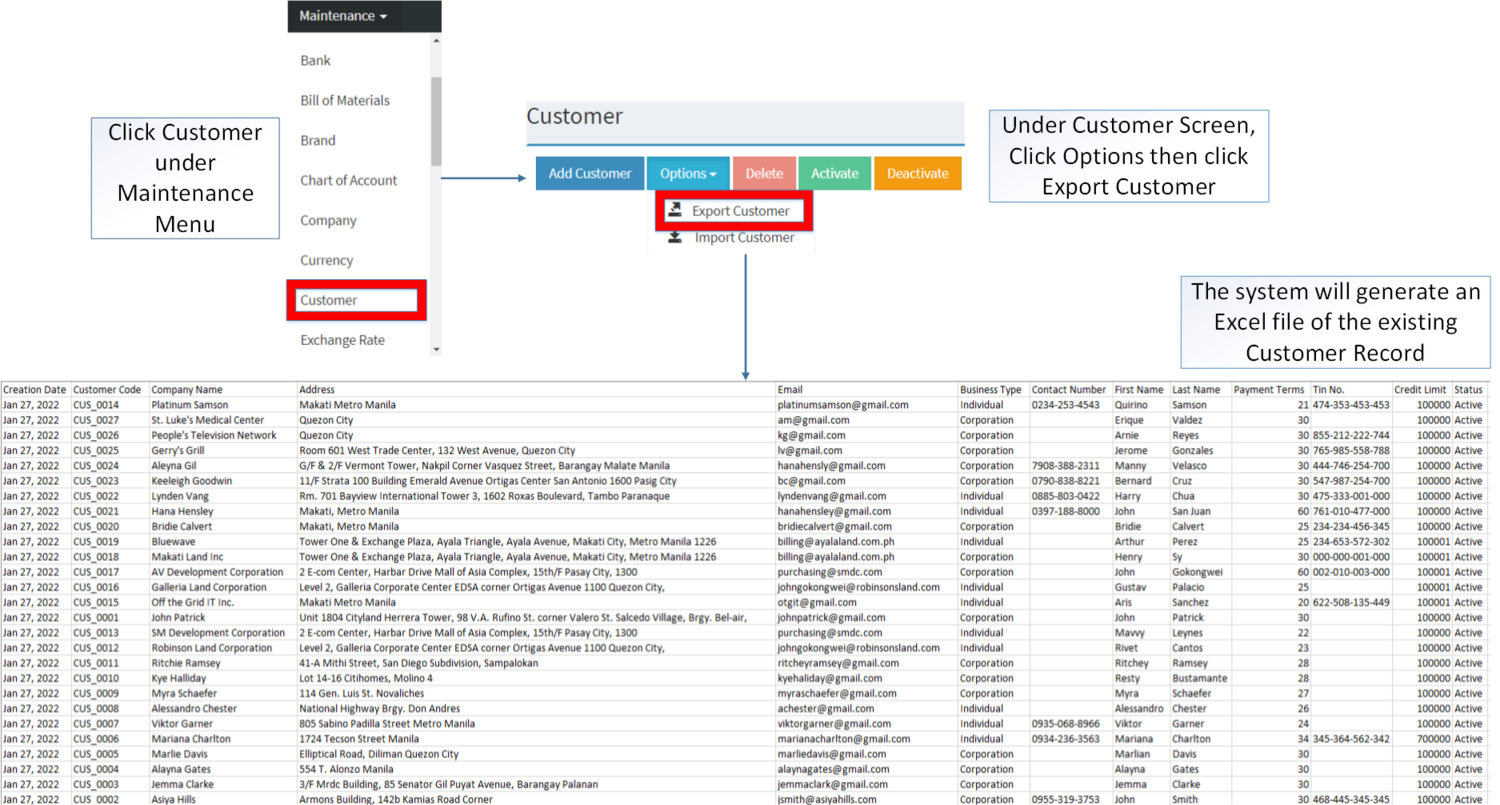
Importing and Exporting Customer Record
1. Under Customer Screen, Click Options
2. Under Options, The user may Export or Import The Record
- When Exporting the records, the user may also use the filter options through tabs for precise searching and exporting of records.
- When Importing the records, the user should follow the following steps provided in the Importing Customer Screen such as
- Downloading the template link provided under Step 1.
- Filling up the information needed for each columns of the template
- Uploading the updated Template
| Field | Description | Allowed Inputs | Input Restrictions | Required Field? |
|---|---|---|---|---|
| 1.Customer Code | Customer Reference Code | *Alphanumeric
*Dash "-" *Underscore "_" |
*Up to 20 characters
*Other Special Characters *Space |
Yes |
| 2.Company Name | Company Name of the Customer | *Alphanumeric, Period, Comma, Space, Percent, Ampersand, Left Parenthesis, Right Parenthesis, Left Bracket, Right Bracket, Underscore, Minus, Plus, Equal, Slash, Dollar Sign, Number Sign, At Sign, Exclamation, Single Quote, Double Quote, Colon, and Semicolon | *Up to 100 characters
*Other Special Characters not mentioned |
Yes |
| 3.Address | Address of the Customer | *Alphanumeric, Period, Comma, Space, Percent, Ampersand, Left Parenthesis, Right Parenthesis, Left Bracket, Right Bracket, Underscore, Minus, Plus, Equal, Slash, Dollar Sign, Number Sign, At Sign, Exclamation, Single Quote, Double Quote, Colon, and Semicolon | *Up to 105 characters
*Other Special Characters not mentioned |
Yes |
| 4.Email | Email of the Customer | *Alphanumeric
*Dash "-" *Underscore "_" *Must follow the format ___@__.__ |
*Up to 150 characters
*Any Special Characters except Dash and Underscore |
No |
| 5.Business Type | Business Type of the Customer's Company | *Individual
*Corporation |
*Any inputs not mentioned in the allowed inputs | Yes |
| 6.Contact Number | Contact Number of the Customer | *Numeric | *Up to 11 characters
*Any inputs except numbers |
No |
| 7.First Name | First Name of the Customer | *Alphanumeric, Period, Comma, Space, Percent, Ampersand, Left Parenthesis, Right Parenthesis, Left Bracket, Right Bracket, Underscore, Minus, Plus, Equal, Slash, Dollar Sign, Number Sign, At Sign, Exclamation, Single Quote, Double Quote, Colon, and Semicolon | *Up to 20 characters
*Other Special Characters not mentioned |
No |
| 8.Last Name | Last Name of the Customer | *Alphanumeric, Period, Comma, Space, Percent, Ampersand, Left Parenthesis, Right Parenthesis, Left Bracket, Right Bracket, Underscore, Minus, Plus, Equal, Slash, Dollar Sign, Number Sign, At Sign, Exclamation, Single Quote, Double Quote, Colon, and Semicolon | *Up to 20 characters
*Other Special Characters not mentioned |
No |
| 9.Payment Terms | Payment Terms of the Customer | *Numeric | *Up to 5 characters
*Any inputs except numbers |
Yes |
| 10.TIN | Tax Identification Number of the Customer | *Numeric | *Up to 12 characters
*Any inputs except numbers |
No |
| 11.Credit Limit | Credit Limit of the Customer | *Numeric | *Up to 20 characters
*Any inputs except numbers |
No |
Activating Customer Record
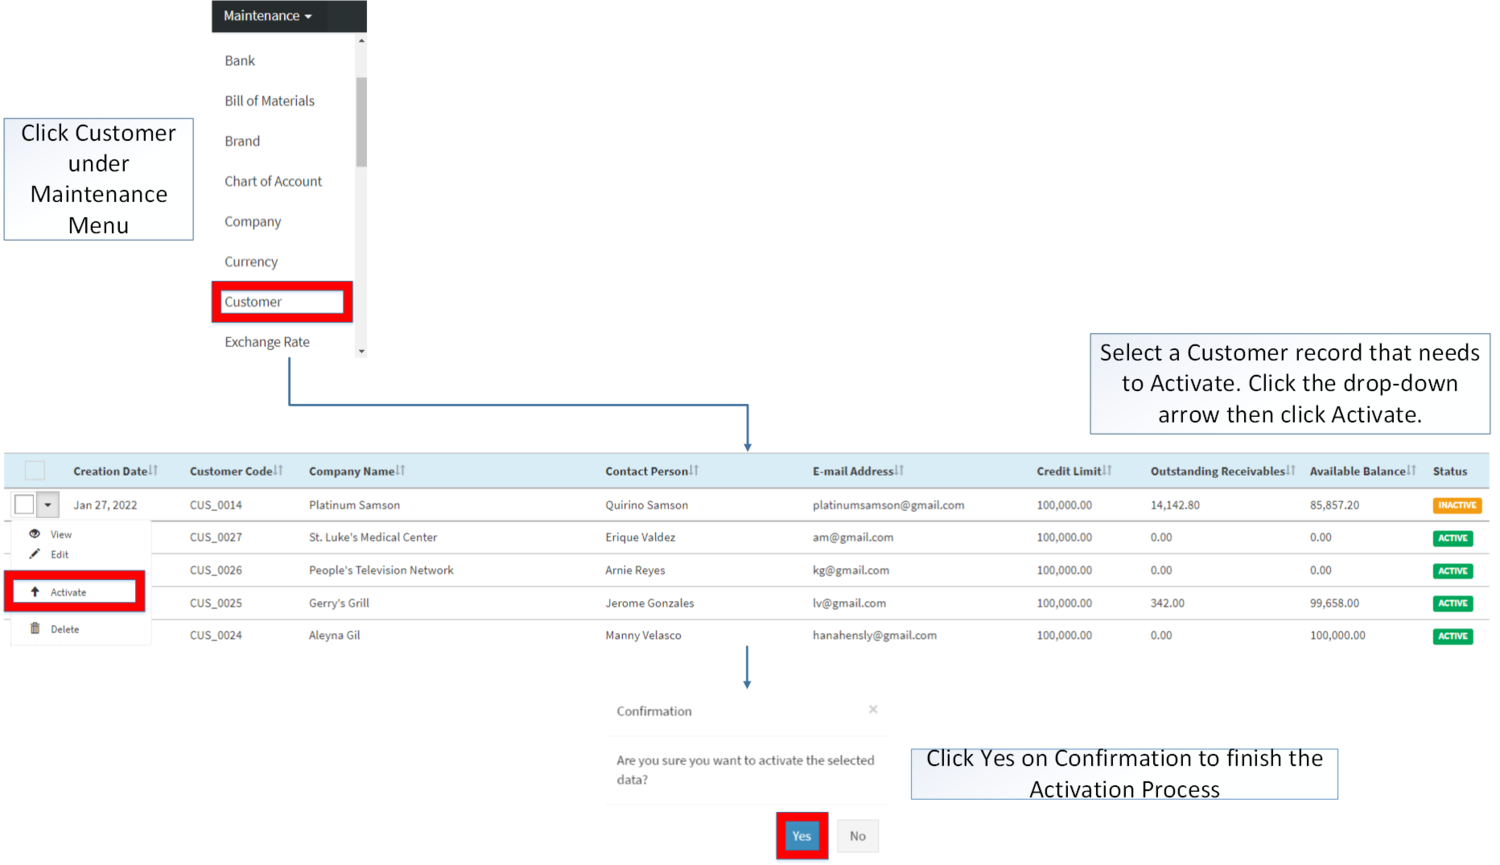
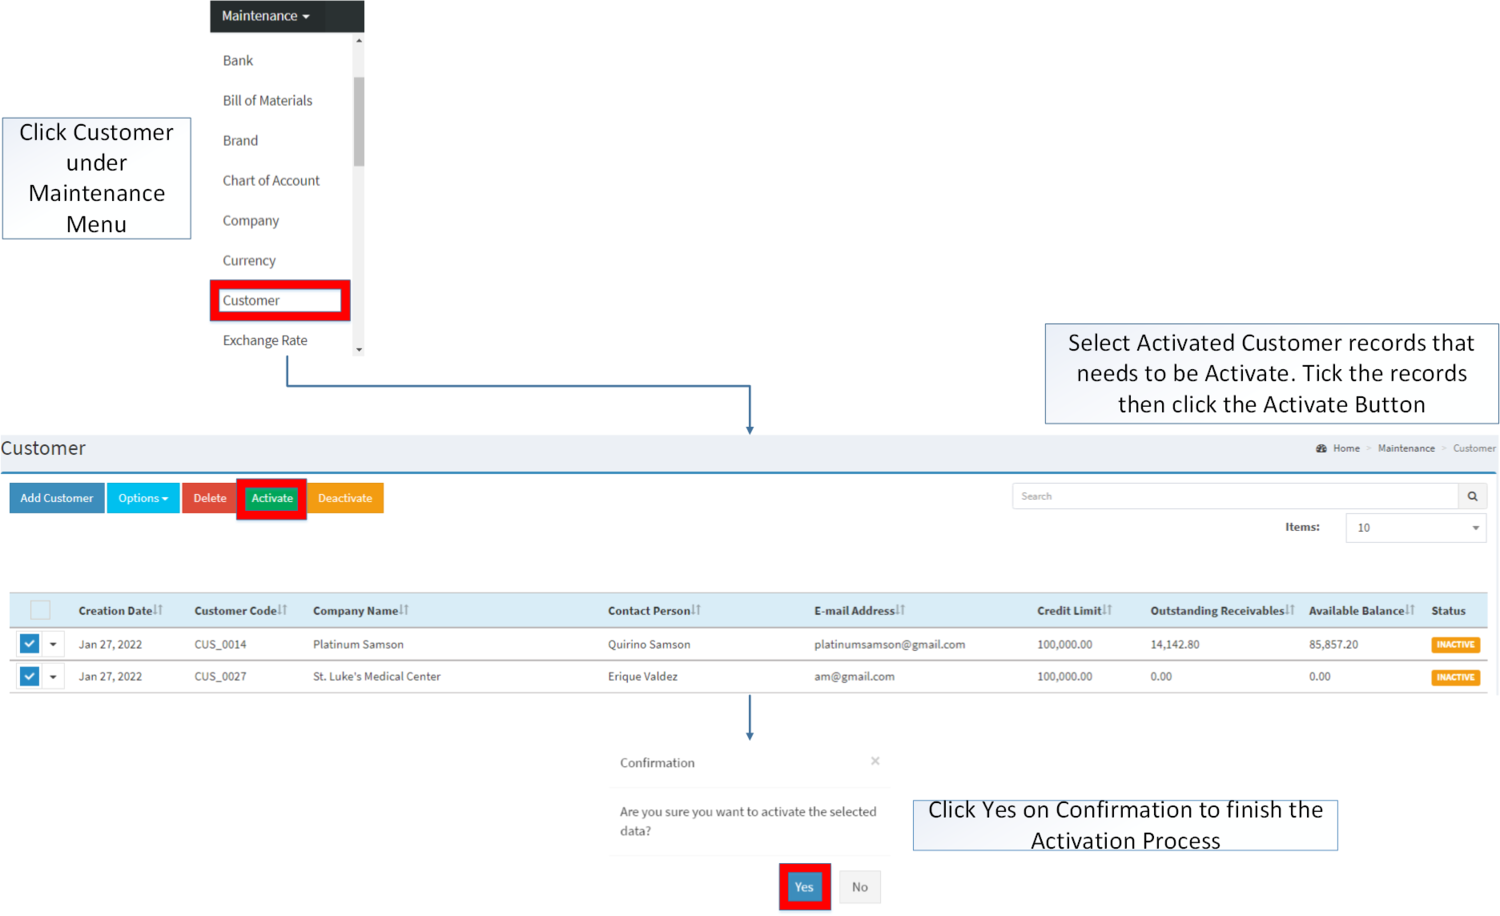
Customer can be Activated in two ways:
- Using drop-down arrow of a record can be used in single record Activation
- Using Activate Button for activating multiple record.
Deactivating Customer Record
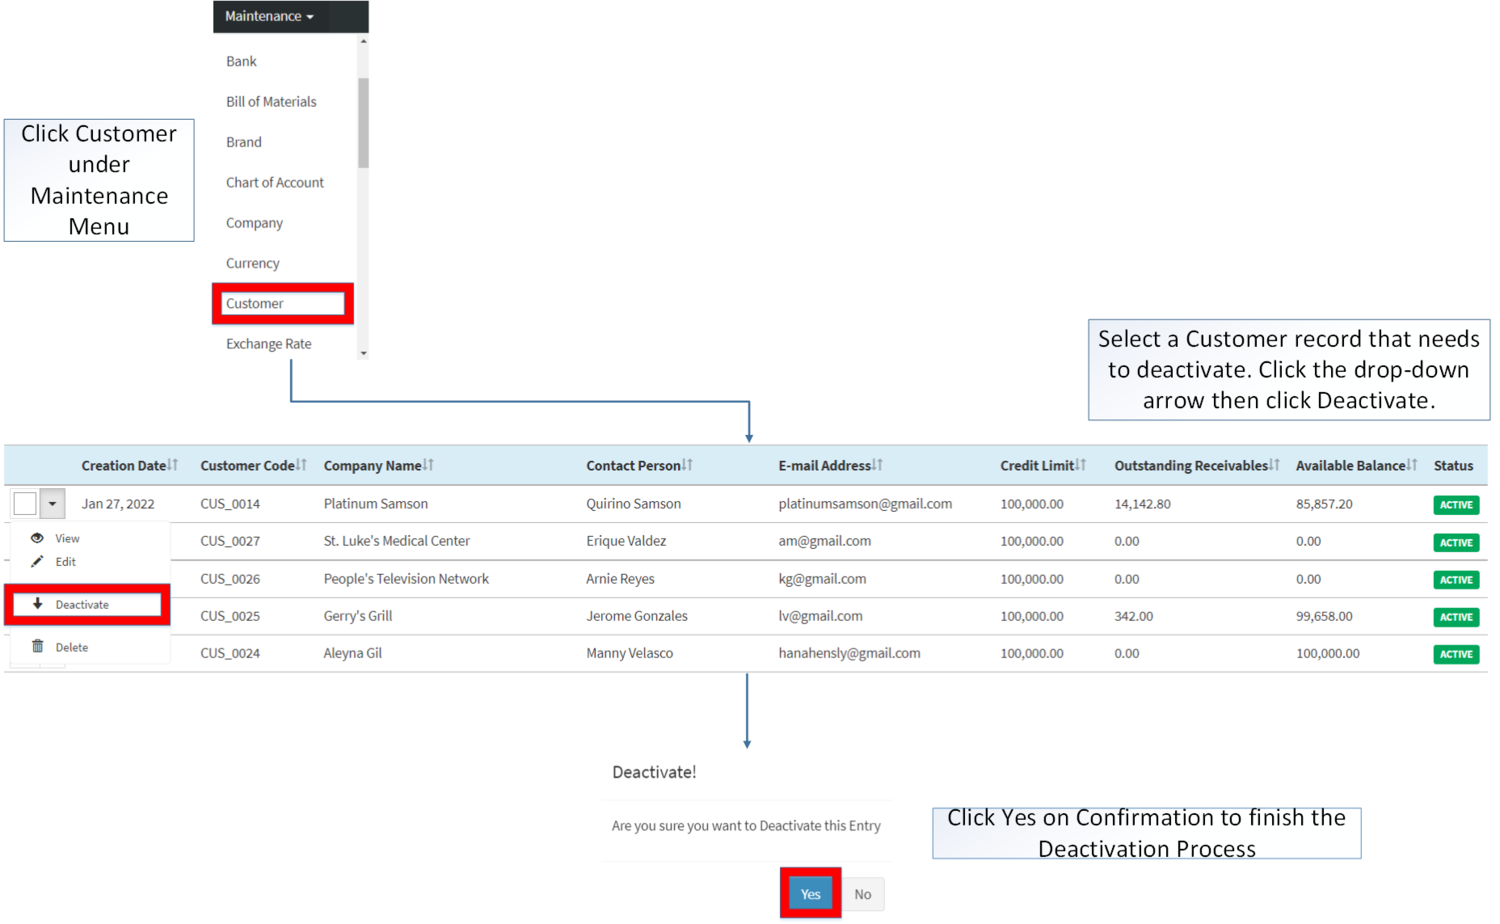
Customer can be deactivated in two ways:
- Using drop-down arrow of a record can be used in single record deactivation
- Using Deactivate Button for deactivating multiple record
Deleting Customer Record
Customer can be deleted in two ways:
- Using drop-down arrow of a record can be used in single record deletion
- Using Delete Button for deleting multiple record
Customer Record Option
| Status | View | Edit | Deactivate | Activate | Delete |
|---|---|---|---|---|---|
| ACTIVE | ☑ | ☑ | ☑ | ☑ | |
| INACTIVE | ☑ | ☑ | ☑ | ☑ |
Notes:
- The user is allowed to edit the details when viewing the Record.
- Customer can be used in the following modules as long as its status is ACTIVE
- INACTIVE customers cannot be used in the transactions but can still be used if it is present in the past transactions
- Activating/Deactivating and Deleting of Records can be done in two ways.
- For single records, the user may use the drop down arrow then the action that need to perform.
- For multiple records, the user may tick the records then click the action button that need to perform
- Click the Yes in the confirmation to proceed on the action taken.
| Modules | |
|---|---|
| Maintenance | Maintenance | Customer |
| Sales | Sales Quotation | Sales Order | Delivery Receipt | Sales Invoice |
| Financials | Accounts Receivable | Receipt Voucher | Credit Memo | Credit Voucher |
| Inventory | Sales Return |
