Difference between revisions of "Users"
(Tag: Visual edit) |
(Tag: Visual edit) |
||
| Line 4: | Line 4: | ||
==Users== | ==Users== | ||
The Users Maintenance screen allows the user to configure and add Users that can use their system. | The Users Maintenance screen allows the user to configure and add Users that can use their system. | ||
| − | |||
| − | |||
| − | |||
====Requirements before using Users==== | ====Requirements before using Users==== | ||
| Line 15: | Line 12: | ||
=====Users Record List===== | =====Users Record List===== | ||
| + | [[File:Maintenance - Users - Record List.png|border|center|1500x1500px]] | ||
| Line 27: | Line 25: | ||
2. Under Users Menu Screen, Click Add Users | 2. Under Users Menu Screen, Click Add Users | ||
| − | 3. Fill out the necessary fields then click Save. | + | 3. Fill out the necessary fields then click Save. |
| + | [[File:Maintenance - Users - Add.png|link=https://docs.oojeema.com/File:Maintenance%20-%20Users%20-%20Add.png|border|center|1500x1500px]] | ||
{| class="wikitable" style="margin: auto;" | {| class="wikitable" style="margin: auto;" | ||
!Field | !Field | ||
| Line 87: | Line 86: | ||
3. Update the necessary fields then click Save.<br /> | 3. Update the necessary fields then click Save.<br /> | ||
| + | [[File:Maintenance - Users - Edit.png|link=https://docs.oojeema.com/File:Maintenance%20-%20Users%20-%20Edit.png|border|center|1500x1500px]] | ||
{| class="wikitable" style="margin: auto;" | {| class="wikitable" style="margin: auto;" | ||
!Field | !Field | ||
| Line 143: | Line 143: | ||
4. Fill up the information needed for each columns of the template. | 4. Fill up the information needed for each columns of the template. | ||
| + | [[File:Maintenance - Users - Import.png|border|center|1500x1500px]] | ||
| + | <br /> | ||
{| class="wikitable" style="box-sizing: inherit; border-collapse: collapse; border-spacing: 0px; background-color: rgb(248, 249, 250); font-size: 14px; color: rgb(34, 34, 34); margin: auto; border: 1px solid rgb(162, 169, 177); font-family: "Open Sans", Roboto, arial, sans-serif; font-style: normal; font-variant-ligatures: normal; font-variant-caps: normal; font-weight: 400; letter-spacing: normal; orphans: 2; text-align: start; text-transform: none; white-space: normal; widows: 2; word-spacing: 0px; -webkit-text-stroke-width: 0px; text-decoration-thickness: initial; text-decoration-style: initial; text-decoration-color: initial;" | {| class="wikitable" style="box-sizing: inherit; border-collapse: collapse; border-spacing: 0px; background-color: rgb(248, 249, 250); font-size: 14px; color: rgb(34, 34, 34); margin: auto; border: 1px solid rgb(162, 169, 177); font-family: "Open Sans", Roboto, arial, sans-serif; font-style: normal; font-variant-ligatures: normal; font-variant-caps: normal; font-weight: 400; letter-spacing: normal; orphans: 2; text-align: start; text-transform: none; white-space: normal; widows: 2; word-spacing: 0px; -webkit-text-stroke-width: 0px; text-decoration-thickness: initial; text-decoration-style: initial; text-decoration-color: initial;" | ||
|+ style="box-sizing: inherit; padding-top: 8px; padding-bottom: 8px; color: rgb(119, 119, 119); text-align: left; font-weight: bold;" |Users Import Details | |+ style="box-sizing: inherit; padding-top: 8px; padding-bottom: 8px; color: rgb(119, 119, 119); text-align: left; font-weight: bold;" |Users Import Details | ||
| Line 228: | Line 230: | ||
|} | |} | ||
5. Attach the template then click Import. | 5. Attach the template then click Import. | ||
| + | |||
| + | ===== <span class="mw-headline" id="Activating_Bank_Record" style="box-sizing: inherit;"><span class="mw-headline" id="Activating_Tax_Record" style="box-sizing: inherit;"><span class="mw-headline" id="Activating_Item_Master_Record" style="box-sizing: inherit;"><span class="mw-headline" id="Activating_Item_Class_Record" style="box-sizing: inherit;"><span class="mw-headline" id="Activating_Item_Type_Record" style="box-sizing: inherit;"><span class="mw-headline" id="Activating_Chart_of_Account_Record" style="box-sizing: inherit;">Activating Users Record</span></span></span></span></span></span> ===== | ||
| + | Users can be Activated in two ways: | ||
| + | |||
| + | * Using drop-down arrow of a record can be used in single record Activation | ||
| + | |||
| + | [[File:Maintenance - Users - Activate1.png|border|center|1501x1501px]] | ||
| + | <br /> | ||
| + | |||
| + | * Using Activate Button for activating multiple record | ||
| + | |||
| + | [[File:Maintenance - Users - Activate2.png|border|center|1499x1499px]] | ||
| + | <br /> | ||
| + | |||
| + | ===== <span class="mw-headline" id="Deactivating_Bank_Record" style="box-sizing: inherit;"><span class="mw-headline" id="Deactivating_Tax_Record" style="box-sizing: inherit;"><span class="mw-headline" id="Deactivating_Item_Master_Record" style="box-sizing: inherit;"><span class="mw-headline" id="Deactivating_Item_Class_Record" style="box-sizing: inherit;"><span class="mw-headline" id="Deactivating_Item_Type_Record" style="box-sizing: inherit;"><span class="mw-headline" id="Deactivating_Chart_of_Account_Record" style="box-sizing: inherit;">Deactivating Users Record</span></span></span></span></span></span> ===== | ||
| + | Users can be deactivated in two ways: | ||
| + | |||
| + | * Using drop-down arrow of a record can be used in single record deactivation | ||
| + | |||
| + | [[File:Maintenance - Users - Deactivate1.png|border|center|1501x1501px]] | ||
| + | <br /> | ||
| + | |||
| + | * Using Deactivate Button for deactivating multiple record | ||
| + | |||
| + | [[File:Maintenance - Users - Deactivate2.png|border|center|1500x1500px]] | ||
| + | <br /> | ||
| + | |||
| + | ===== <span class="mw-headline" id="Deleting_Bank_Record" style="box-sizing: inherit;"><span class="mw-headline" id="Deleting_Tax_Record" style="box-sizing: inherit;"><span class="mw-headline" id="Deleting_Item_Master_Record" style="box-sizing: inherit;"><span class="mw-headline" id="Deleting_Item_Class_Record" style="box-sizing: inherit;"><span class="mw-headline" id="Deleting_Item_Type_Record" style="box-sizing: inherit;"><span class="mw-headline" id="Deleting_Chart_of_Account_Record" style="box-sizing: inherit;">Deleting Users Record</span></span></span></span></span></span> ===== | ||
| + | Users can be deleted in two ways: | ||
| + | |||
| + | * Using drop-down arrow of a record can be used in single record deletion | ||
| + | |||
| + | [[File:Maintenance - Users - Delete1.png|border|center|1500x1500px]] | ||
| + | <br /> | ||
| + | |||
| + | * Using Delete Button for deleting multiple record | ||
| + | |||
| + | [[File:Maintenance - Users - Delete2.png|border|center|1500x1500px]] | ||
| + | |||
=====Users Record Option===== | =====Users Record Option===== | ||
{| class="wikitable" style="box-sizing: inherit; border-collapse: collapse; border-spacing: 0px; background-color: rgb(248, 249, 250); font-size: 14px; color: rgb(34, 34, 34); margin: auto; border: 1px solid rgb(162, 169, 177); font-family: "Open Sans", Roboto, arial, sans-serif; font-style: normal; font-variant-ligatures: normal; font-variant-caps: normal; font-weight: 400; letter-spacing: normal; orphans: 2; text-align: start; text-transform: none; white-space: normal; widows: 2; word-spacing: 0px; -webkit-text-stroke-width: 0px; text-decoration-thickness: initial; text-decoration-style: initial; text-decoration-color: initial;" | {| class="wikitable" style="box-sizing: inherit; border-collapse: collapse; border-spacing: 0px; background-color: rgb(248, 249, 250); font-size: 14px; color: rgb(34, 34, 34); margin: auto; border: 1px solid rgb(162, 169, 177); font-family: "Open Sans", Roboto, arial, sans-serif; font-style: normal; font-variant-ligatures: normal; font-variant-caps: normal; font-weight: 400; letter-spacing: normal; orphans: 2; text-align: start; text-transform: none; white-space: normal; widows: 2; word-spacing: 0px; -webkit-text-stroke-width: 0px; text-decoration-thickness: initial; text-decoration-style: initial; text-decoration-color: initial;" | ||
Revision as of 15:00, 4 February 2022
Contents
Users
The Users Maintenance screen allows the user to configure and add Users that can use their system.
Requirements before using Users
- The user should setup the following Maintenance Module in order to proceed on using the Users
Users Record List
Notes:
- Users are records that has the privilege to access the system
- Users has a set of access on what specific modules that they can access through the system. The privilege and restrictions can be adjusted through Users Group
Adding Users
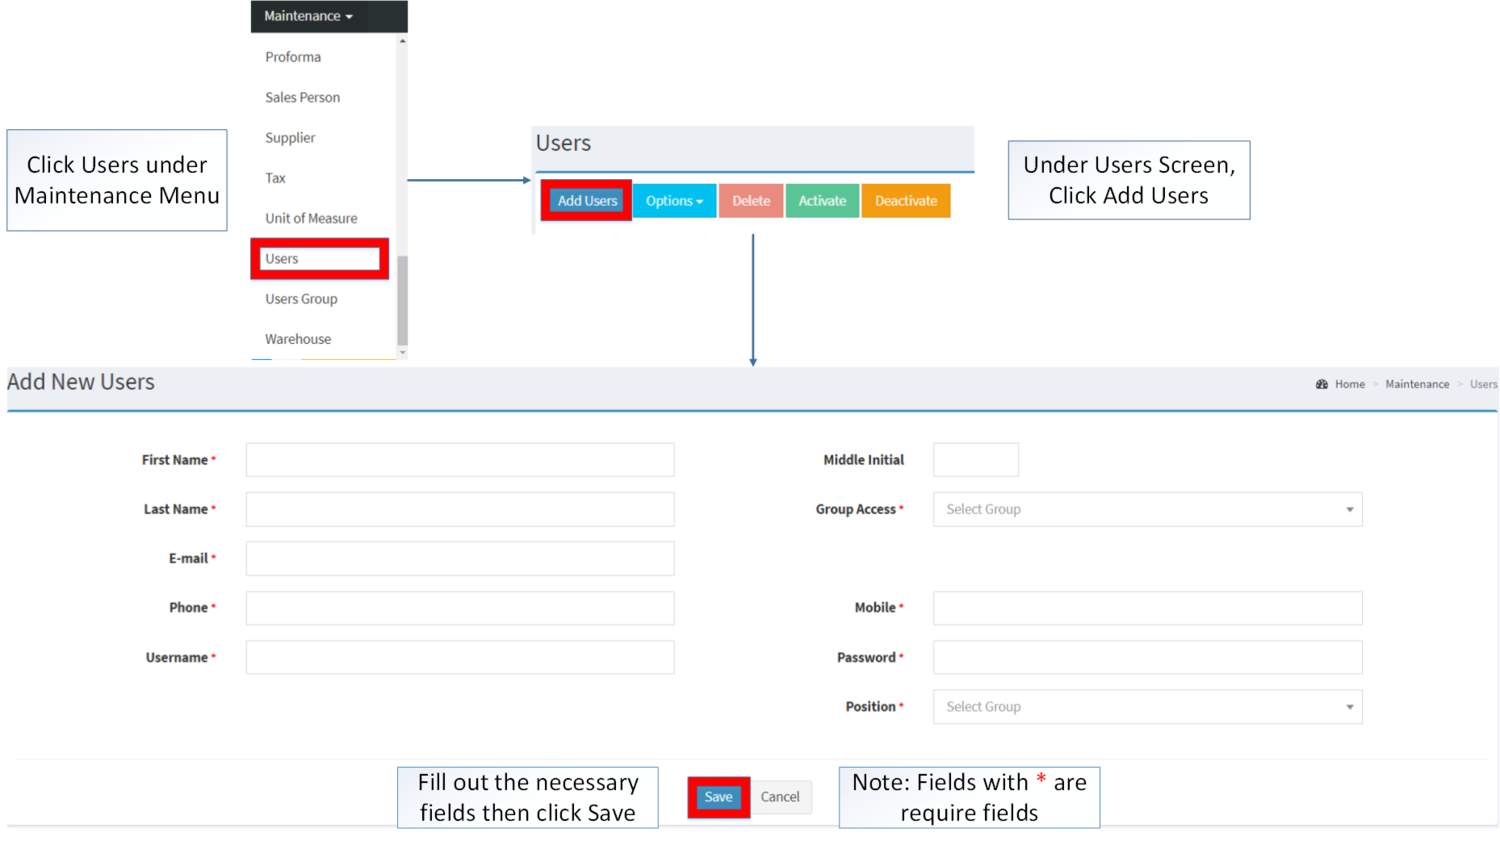
1. Click Users under Maintenance Module
2. Under Users Menu Screen, Click Add Users
3. Fill out the necessary fields then click Save.
| Field | Description | Expected Values |
|---|---|---|
| 1. First Name | • First Name of the User | •Alphanumeric |
| 2. Middle Initial | • Middle Initial of the User | •Text |
| 3. Last Name | • Last Name of the User | •Alphanumeric |
| 4. Group Access | • Group Access of the User | •Users Group List under Users Group Maintenance Module |
| 5. E-mail | • Email Address of the User | •Alphanumeric |
| 6. Phone | • Phone Number of the User | •Number |
| 7. Mobile | • Mobile Number of the User | •Number |
| 8. Username | • Username of the User | •Alphanumeric |
| 9. Password | • Password of the User | •Alphanumeric |
| 10. Position | • Position of the User | •Position List under Position Maintenance Module |
Notes:
- Username is a unique required field in the module. This cannot be edited once the account was created.
- Group Access is required field in the module. The list of Group Access can be found in Users Group Maintenance Module.
- Group Access can be used as long as the status of the Group Access is ACTIVE
- Position is required field in the module. The list of Position can be found in Position Maintenance Module.
- Position can be used as long as the status of the Position is ACTIVE
- INACTIVE position can still be use if it is used by the users prior to its deactivation.
Editing Users
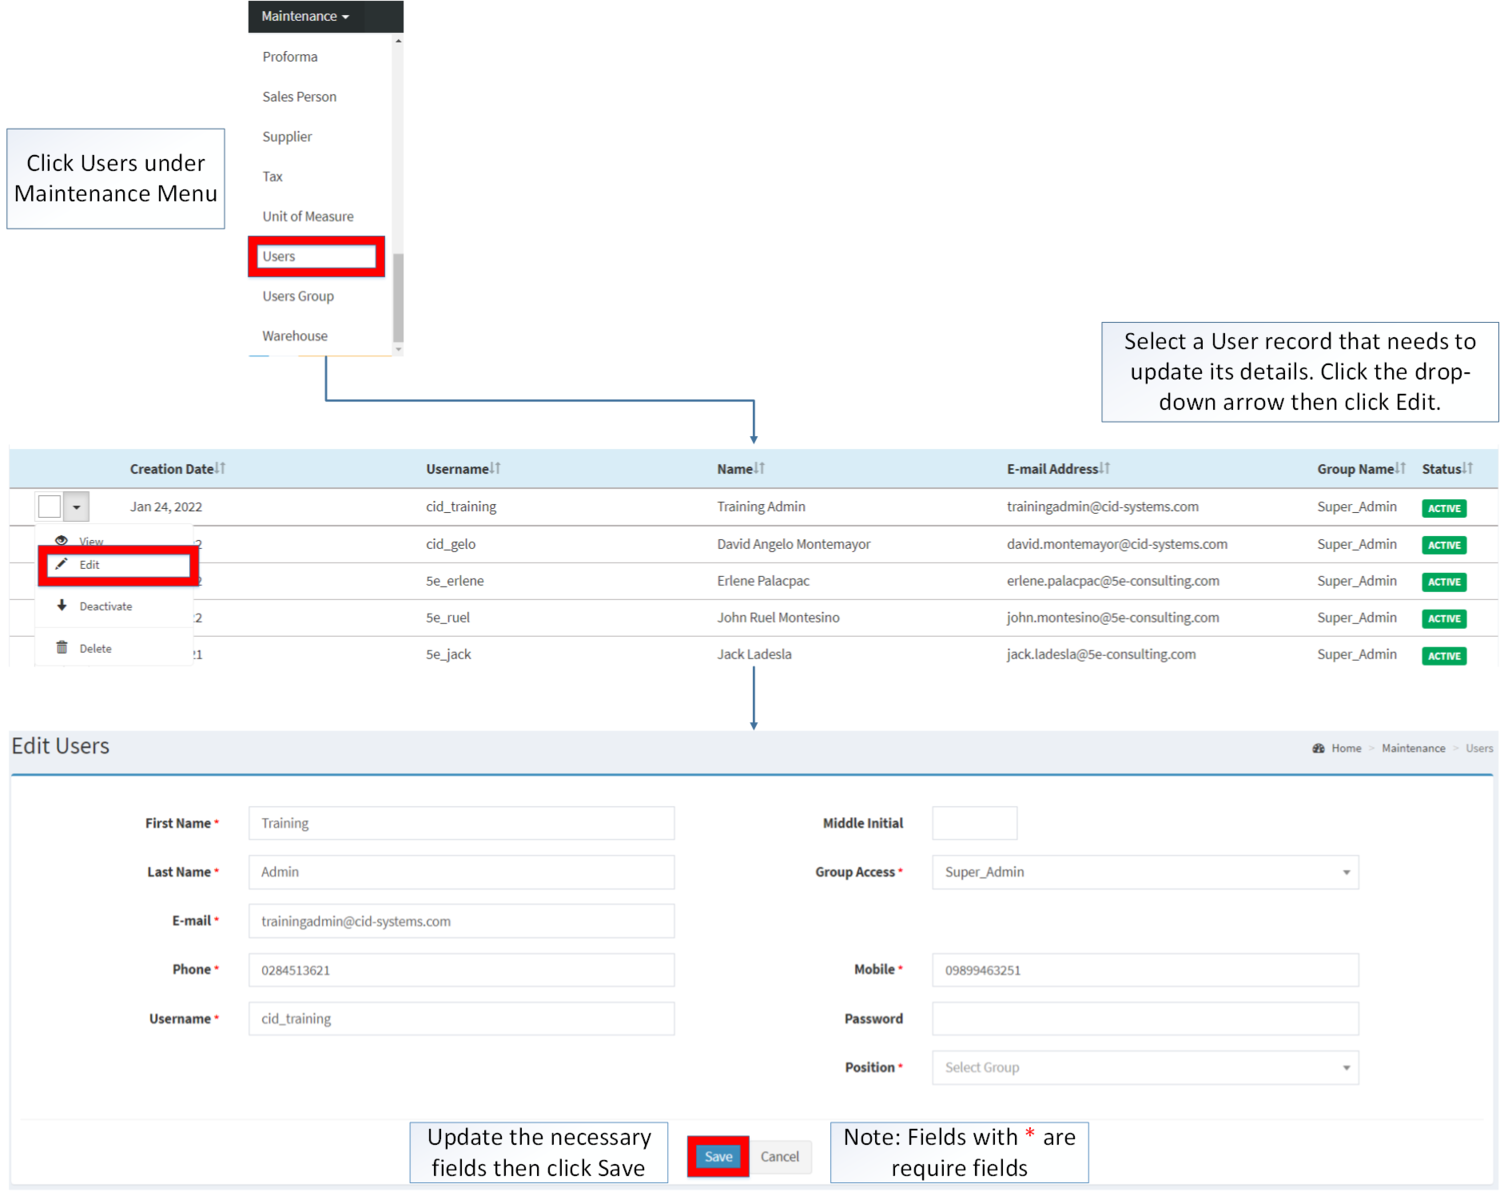
1. Click Users under Maintenance Module
2. Select a Users that needs to update its details. Click the drop-down arrow then click Edit.
3. Update the necessary fields then click Save.
| Field | Description | Expected Values |
|---|---|---|
| 1. First Name | • First Name of the User | •Alphanumeric |
| 2. Middle Initial | • Middle Initial of the User | •Text |
| 3. Last Name | • Last Name of the User | •Alphanumeric |
| 4. Group Access | • Group Access of the User | •Users Group List under Users Group Maintenance Module |
| 5. E-mail | • Email Address of the User | •Alphanumeric |
| 6. Phone | • Phone Number of the User | •Number |
| 7. Mobile | • Mobile Number of the User | •Number |
| 8. Password | • Password of the User | •Alphanumeric |
| 9. Position | • Position of the User | •Position List under Position Maintenance Module |
Notes:
- Group Access is required field in the module. The list of Group Access can be found in Users Group Maintenance Module.
- Group Access can be used as long as the status of the Group Access is ACTIVE
- Position is required field in the module. The list of Position can be found in Position Maintenance Module.
- Position can be used as long as the status of the Position is ACTIVE
- INACTIVE position can still be use if it is used by the users prior to its inactivation.
Importing Users
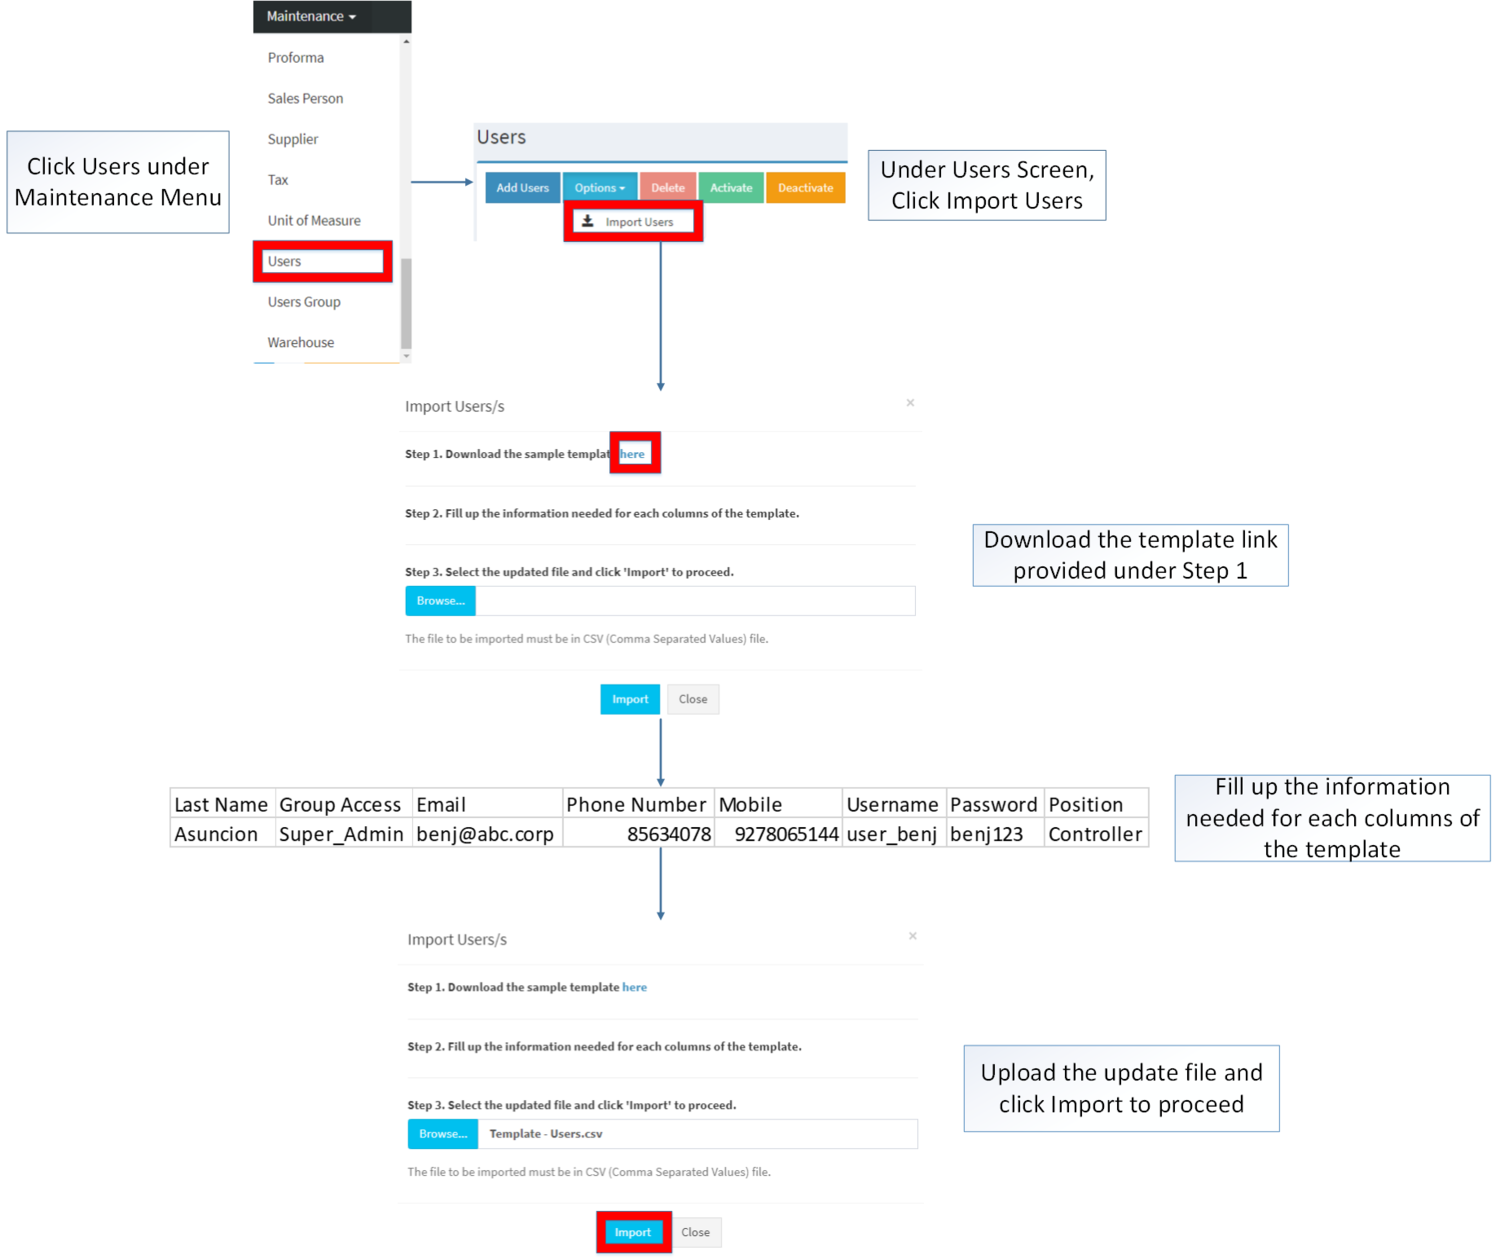
1. Click Users under Maintenance Module
2. Under Position Screen, click Import Users under Options.
3. Download the template in the link provided under step 1.
4. Fill up the information needed for each columns of the template.
| Field | Description | Allowed Inputs | Input Restrictions | Required Field? |
|---|---|---|---|---|
| 1. First Name | Position of the user | *Alphanumeric
*Special Characters |
*Up to 100 characters | Yes |
| 2. Middle Initial | Description of the Position | *Alphanumeric
*Special Characters |
*Up to 250 characters | No |
| 3. Last Name | Last Name of the User | *Alphanumeric
*Special Characters |
*Up to 20 characters | Yes |
| 4. Group Access | Group Access of the User | •Users Group List under Users Group Maintenance Module | *Any inputs not mentioned in the allowed inputs | Yes |
| 5. E-mail | Email Address of the User | *Alphanumeric
*Dash ""-"" *Underscore ""_"" *Must follow the format ___@__.__ |
*Up to 150 characters
*Any Special Characters not mentioned |
Yes |
| 6. Phone Number | Phone Number of the User | *Numeric | *Up to 25 characters
*Any inputs except numbers" |
Yes |
| 7. Mobile | Mobile Number of the User | *Numeric | *Up to 20 characters
*Any inputs except numbers |
Yes |
| 8. Username | Username of the User | *Alphanumeric
*Special Character |
*Up to 20 characters | Yes |
| 9. Password | Password of the User | *Alphanumeric
*Special Character |
*Up to 255 characters | Yes |
| 10. Position | Position of the User | *Position List under Position Maintenance Module | *Any inputs not mentioned in the required inputs | Yes |
5. Attach the template then click Import.
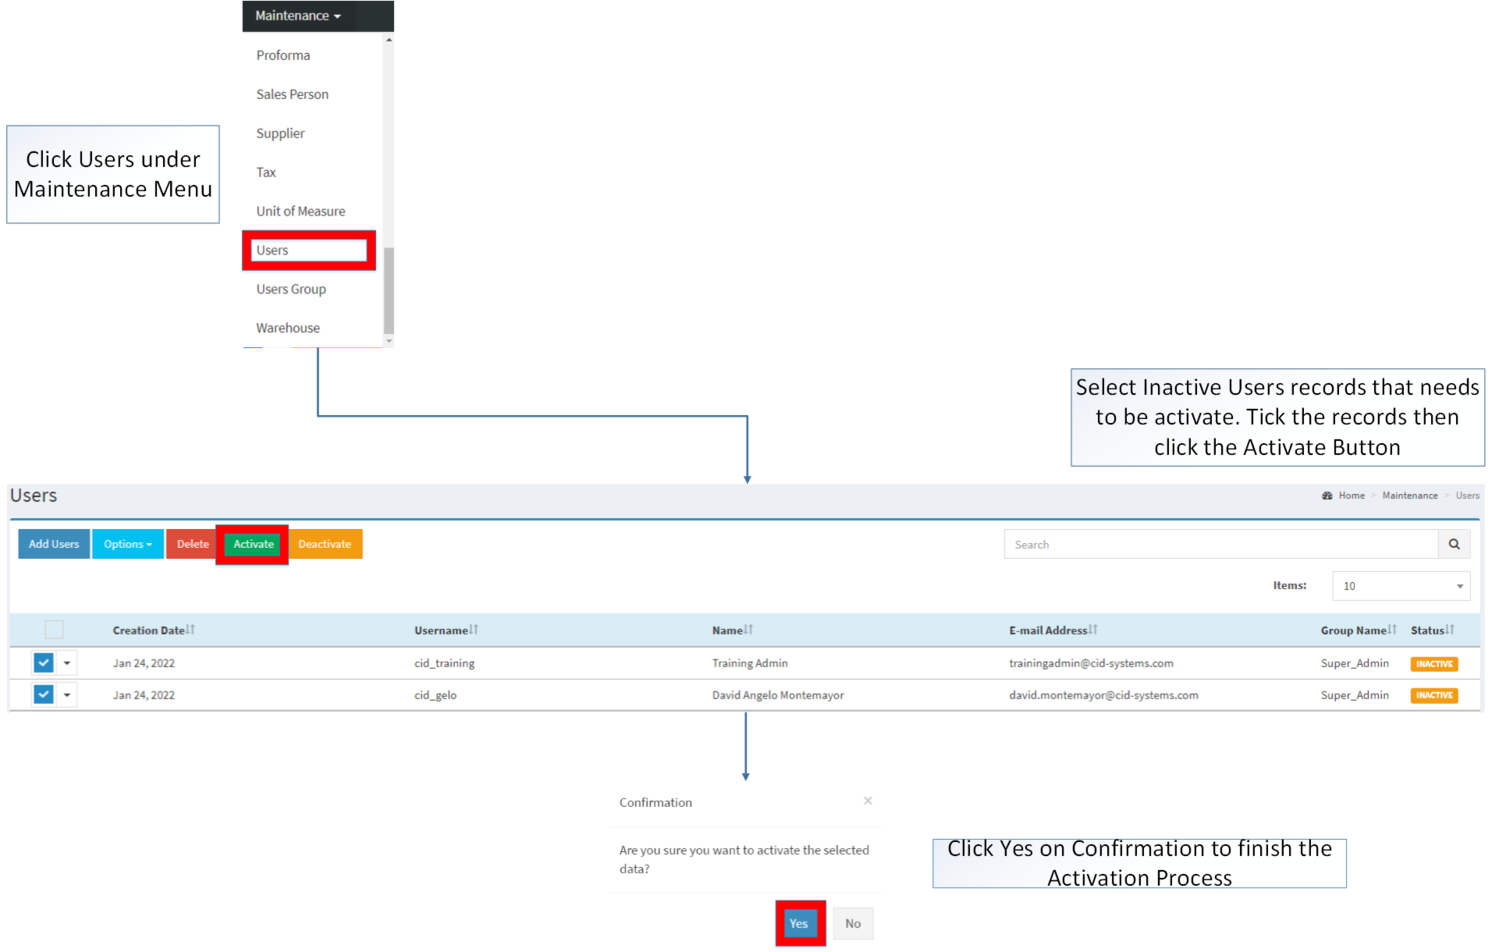
Activating Users Record
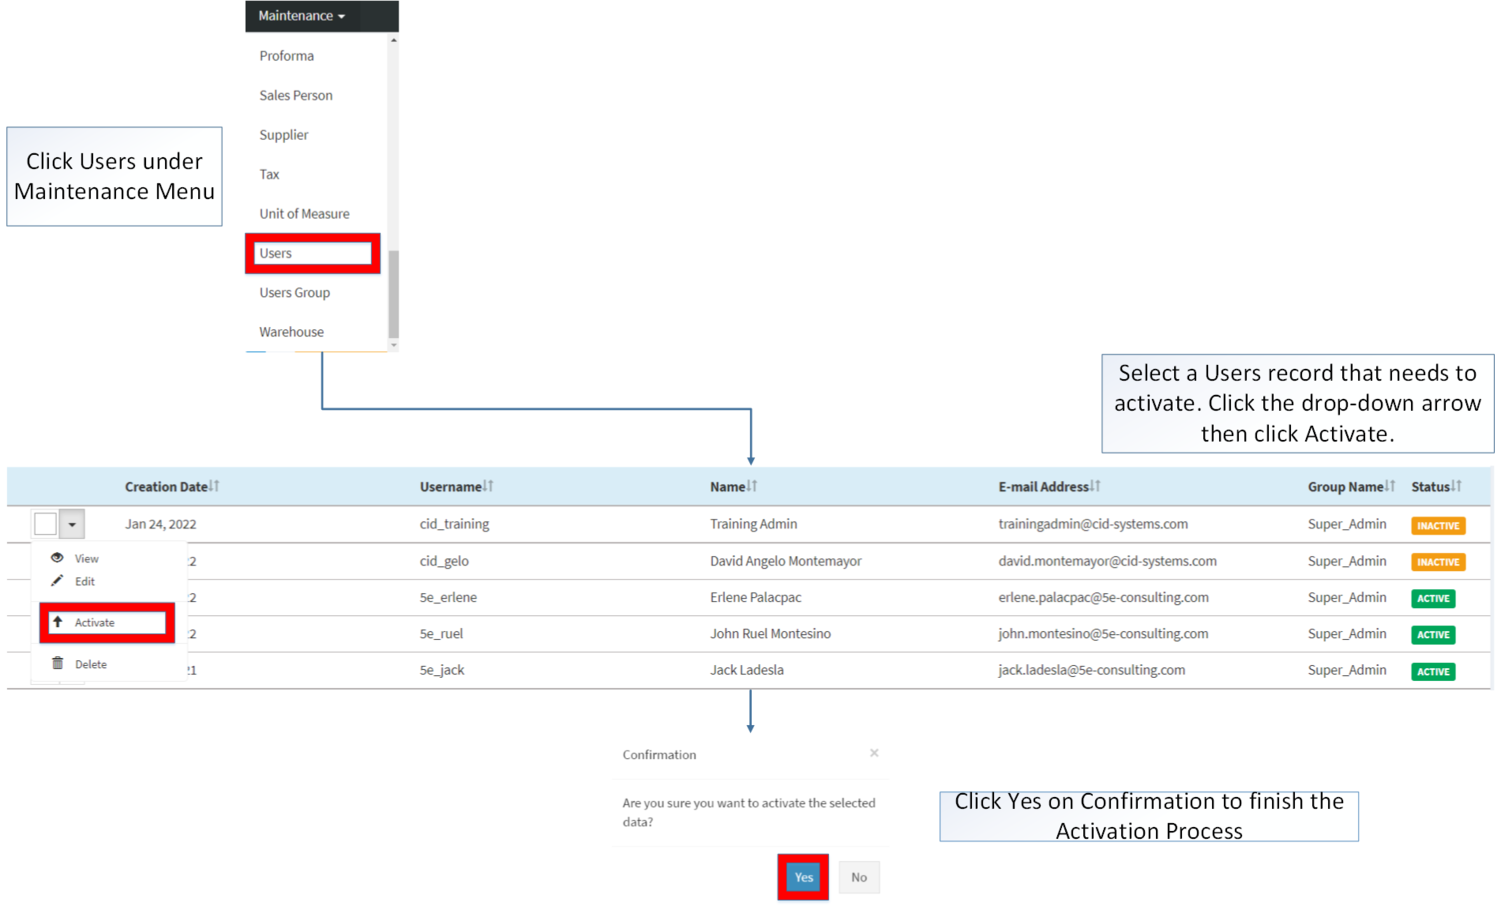
Users can be Activated in two ways:
- Using drop-down arrow of a record can be used in single record Activation
- Using Activate Button for activating multiple record
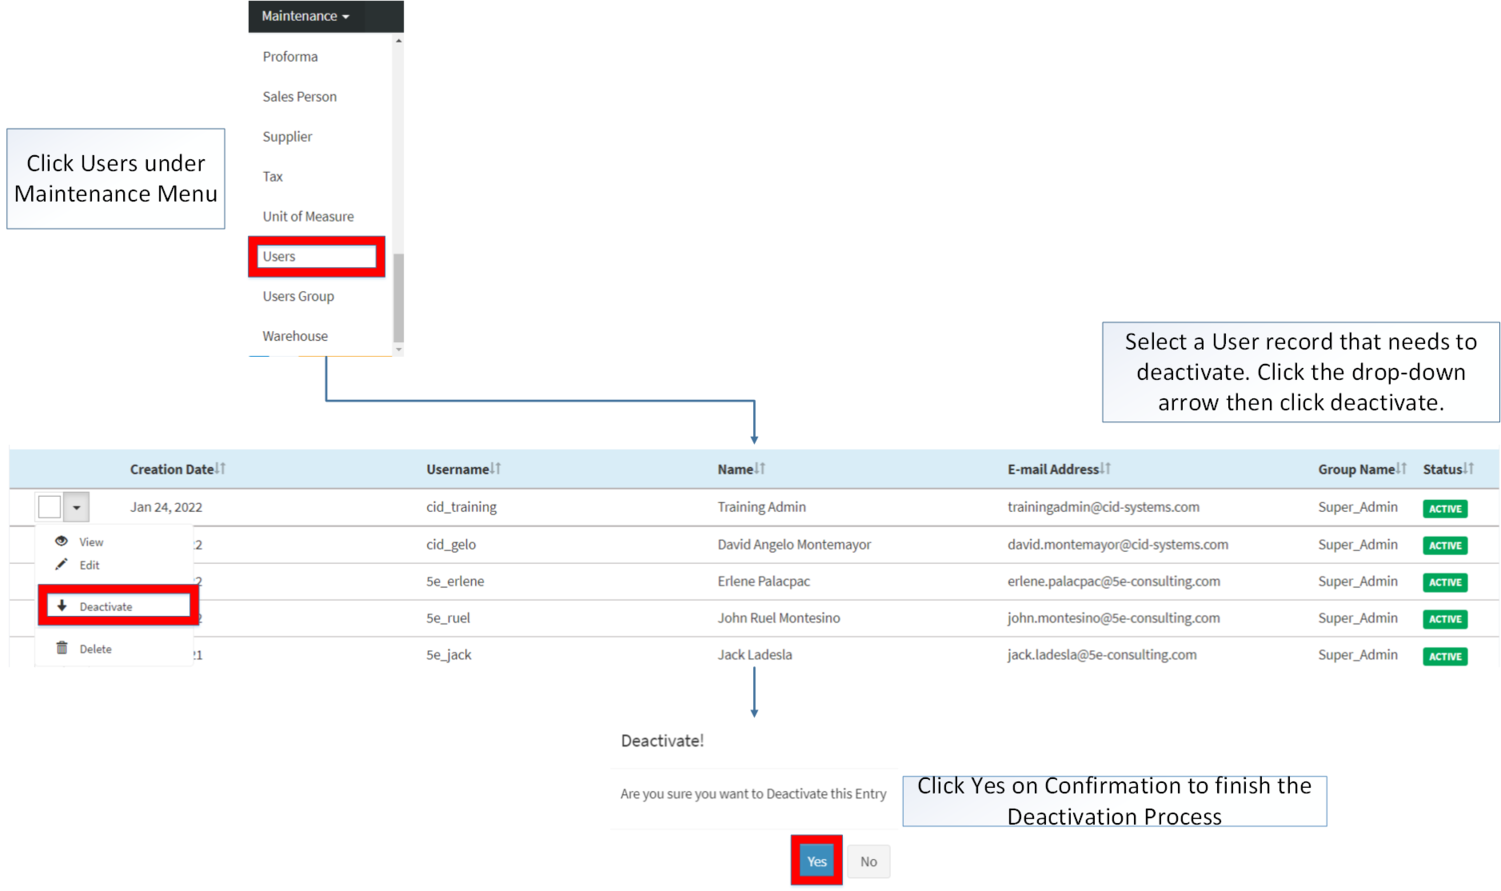
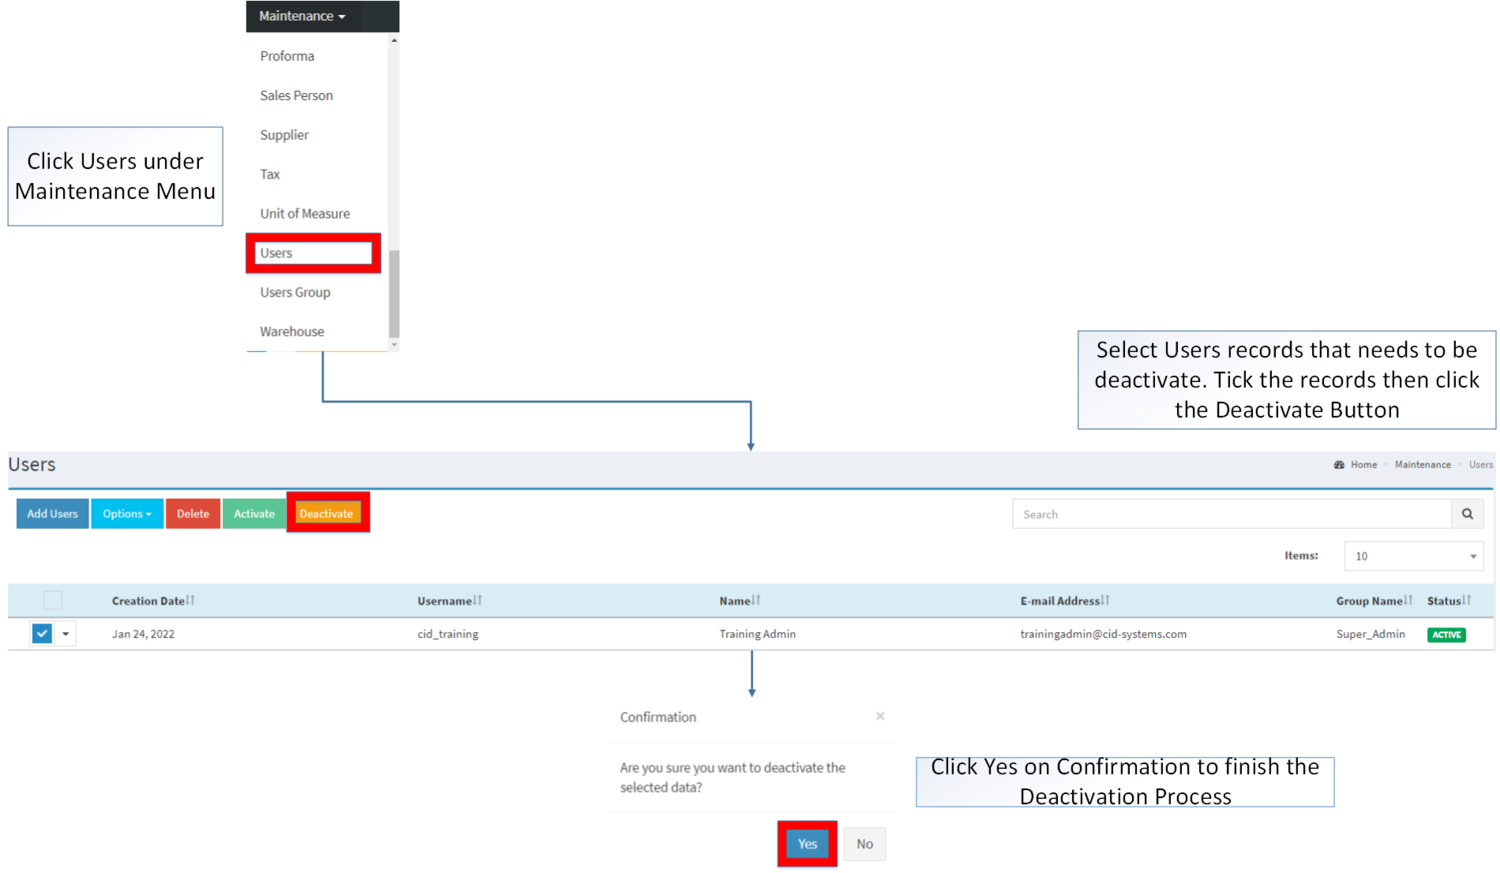
Deactivating Users Record
Users can be deactivated in two ways:
- Using drop-down arrow of a record can be used in single record deactivation
- Using Deactivate Button for deactivating multiple record
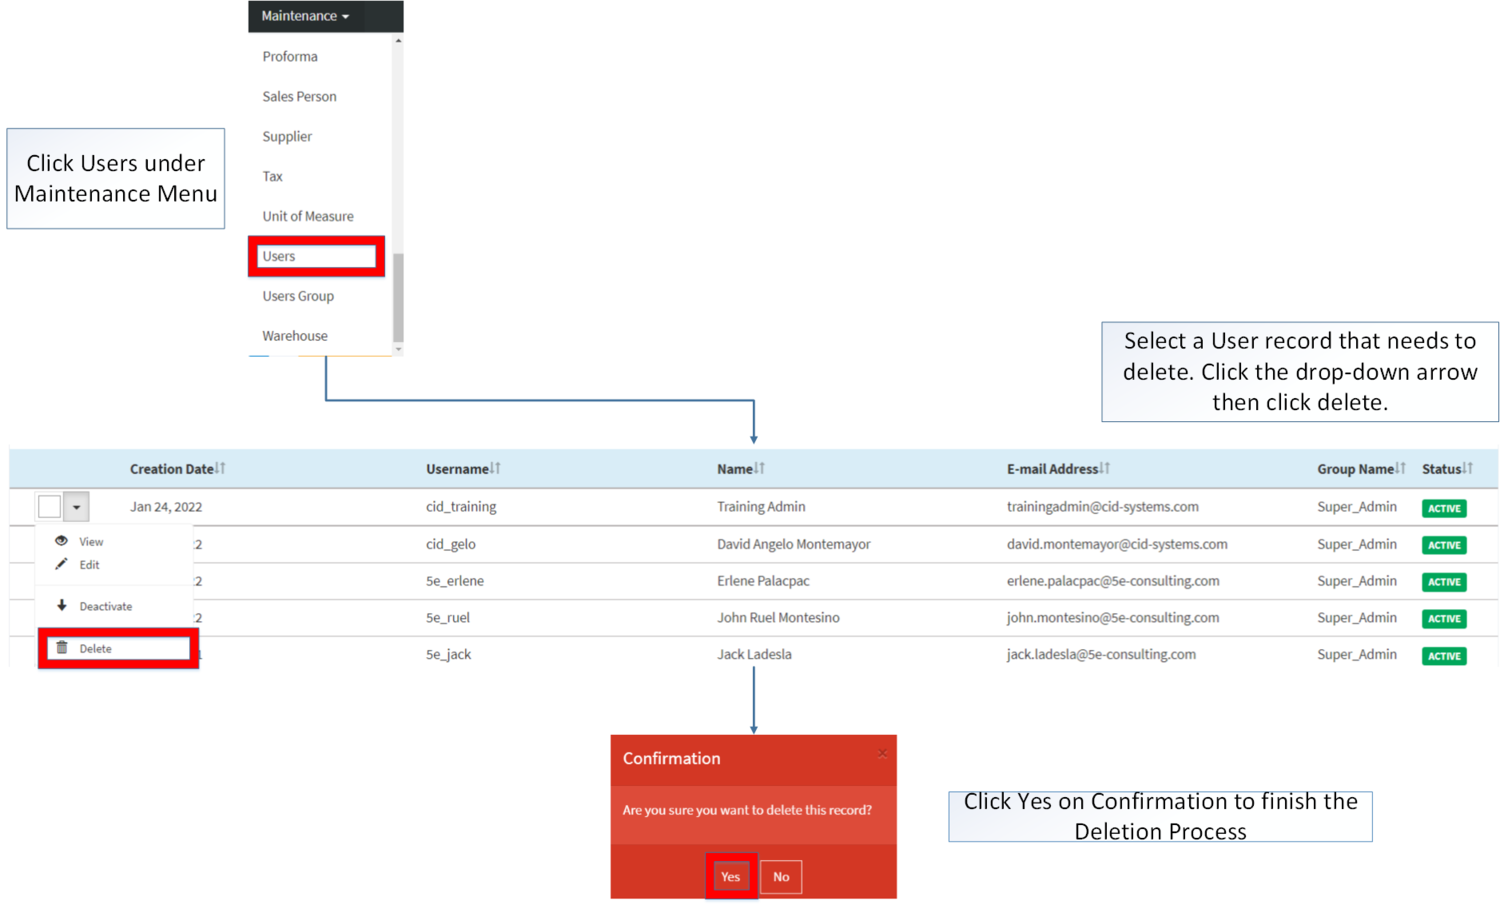
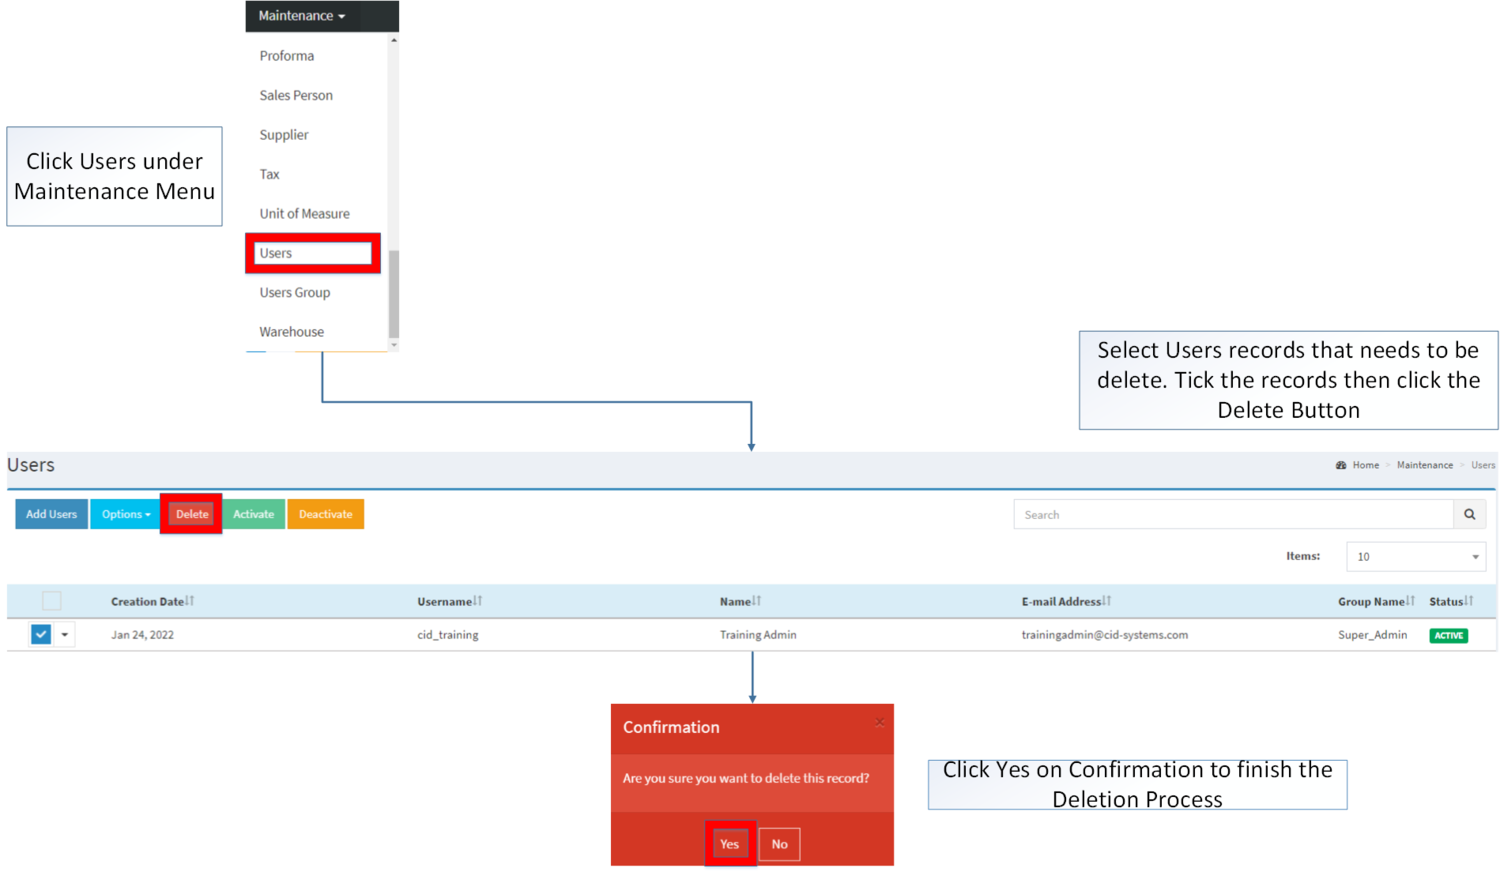
Deleting Users Record
Users can be deleted in two ways:
- Using drop-down arrow of a record can be used in single record deletion
- Using Delete Button for deleting multiple record
Users Record Option
| Status | View | Edit | Deactivate | Activate | Delete |
|---|---|---|---|---|---|
| ACTIVE | ☑ | ☑ | ☑ | ☑ | |
| INACTIVE | ☑ | ☑ | ☑ | ☑ |
Notes:
- The user cannot login to the system if its status is INACTIVE
- The user can edit the details while viewing the record.
- Activating/Deactivating and Deleting of Records can be done in two ways.
- For single records, the user may use the drop down arrow then the action that need to perform.
- For multiple records, the user may tick the records then click the action button that need to perform
- Click the Yes in the confirmation to proceed on the action taken.
| Modules | |
|---|---|
| Maintenance | Maintenance | Users | Users Group | Position |

