You are viewing an old version of this page. Return to the latest version.
Difference between revisions of "Purchase Return"
(Tag: Visual edit) |
(Tag: Visual edit) |
||
| Line 1: | Line 1: | ||
<div style="text-align: center;"> | <div style="text-align: center;"> | ||
| − | [[Inventory]] | [[Inventory Inquiry]] | [[Inventory Movement | + | [[Inventory]] | [[Inventory Inquiry]] | [[Inventory Movement]] |
</div> | </div> | ||
==Purchase Return== | ==Purchase Return== | ||
| Line 10: | Line 10: | ||
*#[[Item Master]] | *#[[Item Master]] | ||
*#[[Supplier]] | *#[[Supplier]] | ||
| + | *#[[Users Group]] | ||
*#[[Warehouse]] | *#[[Warehouse]] | ||
*#[[Purchase Receipt]] | *#[[Purchase Receipt]] | ||
| Line 25: | Line 26: | ||
| style="" |If the Purchase Return is cancelled | | style="" |If the Purchase Return is cancelled | ||
|} | |} | ||
| + | |||
| + | ===== Purchase Return Cycle ===== | ||
| + | [[File:Inventory - Purchase Return - Purchase Return Cycle.png|border|center|867x867px]] | ||
| + | <meta charset="utf-8" /> | ||
=====Purchase Return Record List===== | =====Purchase Return Record List===== | ||
=====Add Purchase Return===== | =====Add Purchase Return===== | ||
| − | # Go to Inventory then click [[Purchase Return]] | + | #Go to Inventory then click [[Purchase Return]] |
| − | # Click '''Add Purchase Return''' Button | + | #Click '''Add Purchase Return''' Button |
| − | # Select [[Supplier]] then tag the corresponding [[Purchase Receipt]] No. that needs to be return. | + | #Select [[Supplier]] then tag the corresponding [[Purchase Receipt]] No. that needs to be return. |
| − | # Tick the [[Item Master|Item]] that needs to be returned then put the Quantity that needs to be returned. Please take note that the Purchase Receipt must be on '''PAID''' status in order to use the Refund feature. | + | #Tick the [[Item Master|Item]] that needs to be returned then put the Quantity that needs to be returned. Please take note that the Purchase Receipt must be on '''PAID''' status in order to use the Refund feature. |
| − | # Click '''Save''' | + | #Click '''Save''' |
| − | # You can check the returned items in [[Inventory Movement]] | + | #You can check the returned items in [[Inventory Movement]] |
| + | [[File:Inventory - Purchase Return - Add.png|border|center|1500x1500px]] | ||
| + | <br /> | ||
{| class="wikitable" style="margin: auto;" | {| class="wikitable" style="margin: auto;" | ||
|+Creating Purchase Return Fields | |+Creating Purchase Return Fields | ||
| Line 126: | Line 133: | ||
*The user must setup the [[Account Codes]] for refund in order to use this feature. | *The user must setup the [[Account Codes]] for refund in order to use this feature. | ||
**The Purchase receipt must be on '''PAID''' status in order to use this feature. | **The Purchase receipt must be on '''PAID''' status in order to use this feature. | ||
| + | * [[Journal Voucher]] and [[Debit Voucher]] will be automatically generated after creating a Purchase Return Record | ||
| + | * Refund function can be activated under [[Users Group]] | ||
| + | |||
| + | ===== <span class="mw-headline" id="Printing_Sales_Return_Record" style="box-sizing: inherit;">Printing Purchase Return Record</span> ===== | ||
| + | |||
| + | # Click Inventory then click <span>[[Purchase Return]]</span> | ||
| + | # Select the <span>[[Purchase Return]]</span> that needs to print its details. Click the drop down arrow then Choose '''Print'''. | ||
| + | |||
| + | [[File:Inventory - Purchase Return - Print.png|border|center|1514x1514px]] | ||
| + | |||
| + | ===== <span class="mw-headline" id="Cancelling_Sales_Return_Record" style="box-sizing: inherit;">Cancelling Purchase Return Record</span> ===== | ||
| + | |||
| + | * Purchase Return can be cancelled in two ways: | ||
| + | ** Using drop-down arrow of a record can be used in single record cancellation | ||
| + | |||
| + | [[File:Inventory - Purchase Return - Cancel1.png|border|center|1500x1500px]] | ||
| + | |||
| + | * Using Cancel Button for cancelling multiple records | ||
| + | |||
| + | [[File:Inventory - Purchase Return - Cancel2.png|border|center|1500x1500px]] | ||
=====Purchase Return Record Options===== | =====Purchase Return Record Options===== | ||
{| class="wikitable" style="box-sizing: inherit; border-collapse: collapse; border-spacing: 0px; background-color: rgb(248, 249, 250); font-size: 14px; color: rgb(34, 34, 34); margin: auto; border: 1px solid rgb(162, 169, 177); font-family: "Open Sans", Roboto, arial, sans-serif; font-style: normal; font-variant-ligatures: normal; font-variant-caps: normal; font-weight: 400; letter-spacing: normal; orphans: 2; text-align: start; text-transform: none; white-space: normal; widows: 2; word-spacing: 0px; -webkit-text-stroke-width: 0px; text-decoration-thickness: initial; text-decoration-style: initial; text-decoration-color: initial;" data-ve-attributes="{"style":"box-sizing: inherit; border-collapse: collapse; border-spacing: 0px; background-color: rgb(248, 249, 250); font-size: 14px; color: rgb(34, 34, 34); margin: auto; border: 1px solid rgb(162, 169, 177); font-family: \"Open Sans\", Roboto, arial, sans-serif; font-style: normal; font-variant-ligatures: normal; font-variant-caps: normal; font-weight: 400; letter-spacing: normal; orphans: 2; text-align: start; text-transform: none; white-space: normal; widows: 2; word-spacing: 0px; -webkit-text-stroke-width: 0px; text-decoration-thickness: initial; text-decoration-style: initial; text-decoration-color: initial;"}" | {| class="wikitable" style="box-sizing: inherit; border-collapse: collapse; border-spacing: 0px; background-color: rgb(248, 249, 250); font-size: 14px; color: rgb(34, 34, 34); margin: auto; border: 1px solid rgb(162, 169, 177); font-family: "Open Sans", Roboto, arial, sans-serif; font-style: normal; font-variant-ligatures: normal; font-variant-caps: normal; font-weight: 400; letter-spacing: normal; orphans: 2; text-align: start; text-transform: none; white-space: normal; widows: 2; word-spacing: 0px; -webkit-text-stroke-width: 0px; text-decoration-thickness: initial; text-decoration-style: initial; text-decoration-color: initial;" data-ve-attributes="{"style":"box-sizing: inherit; border-collapse: collapse; border-spacing: 0px; background-color: rgb(248, 249, 250); font-size: 14px; color: rgb(34, 34, 34); margin: auto; border: 1px solid rgb(162, 169, 177); font-family: \"Open Sans\", Roboto, arial, sans-serif; font-style: normal; font-variant-ligatures: normal; font-variant-caps: normal; font-weight: 400; letter-spacing: normal; orphans: 2; text-align: start; text-transform: none; white-space: normal; widows: 2; word-spacing: 0px; -webkit-text-stroke-width: 0px; text-decoration-thickness: initial; text-decoration-style: initial; text-decoration-color: initial;"}" | ||
| − | |+ style="box-sizing: inherit; padding-top: 8px; padding-bottom: 8px; color: rgb(119, 119, 119); text-align: left; font-weight: bold;" data-ve-attributes="{"style":"box-sizing: inherit; padding-top: 8px; padding-bottom: 8px; color: rgb(119, 119, 119); text-align: left; font-weight: bold;"}" |Actions Available base on Purchase Return | + | |+ style="box-sizing: inherit; padding-top: 8px; padding-bottom: 8px; color: rgb(119, 119, 119); text-align: left; font-weight: bold;" data-ve-attributes="{"style":"box-sizing: inherit; padding-top: 8px; padding-bottom: 8px; color: rgb(119, 119, 119); text-align: left; font-weight: bold;"}" |Actions Available base on Purchase Return Record Status |
! style="background-color:rgb(234, 236, 240);text-align:center;" data-ve-attributes="{"style":"background-color:rgb(234, 236, 240);text-align:center;"}" |Status | ! style="background-color:rgb(234, 236, 240);text-align:center;" data-ve-attributes="{"style":"background-color:rgb(234, 236, 240);text-align:center;"}" |Status | ||
! style="background-color:rgb(234, 236, 240);text-align:center;" data-ve-attributes="{"style":"background-color:rgb(234, 236, 240);text-align:center;"}" |View | ! style="background-color:rgb(234, 236, 240);text-align:center;" data-ve-attributes="{"style":"background-color:rgb(234, 236, 240);text-align:center;"}" |View | ||
| Line 144: | Line 171: | ||
*[[Journal Voucher]] will be automatically updated when Purchase Return is updated. | *[[Journal Voucher]] will be automatically updated when Purchase Return is updated. | ||
| + | *[[Debit Voucher]] can be used to deduct the amount of the future [[Payment Voucher]] transactions. | ||
{| class="wikitable" style="margin: auto;" | {| class="wikitable" style="margin: auto;" | ||
| Line 154: | Line 182: | ||
|Purchase | |Purchase | ||
|[[Purchase Receipt]] | |[[Purchase Receipt]] | ||
| + | |- | ||
| + | |Financials | ||
| + | |[[Debit Voucher]]<nowiki> | </nowiki>[[Payment Voucher]] | ||
|- | |- | ||
|Maintenance | |Maintenance | ||
| − | |[[Account Codes]]<nowiki> | </nowiki>[[Supplier]]<nowiki> | </nowiki>[[ | + | |[[Account Codes]]<nowiki> | </nowiki>[[Supplier]]<nowiki> | </nowiki>[[Users Group]]<nowiki> | </nowiki>[[Warehouse]]<nowiki> | </nowiki>[[Item Master]] |
| − | |||
| − | |||
| − | |||
| − | |||
| − | |||
|} | |} | ||
Revision as of 14:15, 24 February 2022
Contents
Purchase Return
Allows the user to make returns of their purchases from the supplier.
Requirements before using Purchase Return
- The user should have the following records in order to proceed on using the Purchase Return
| Status | Description |
|---|---|
| RETURNED | If the Purchase Return is created and its items are returned |
| CANCELLED | If the Purchase Return is cancelled |
Purchase Return Cycle
<meta charset="utf-8" />
Purchase Return Record List
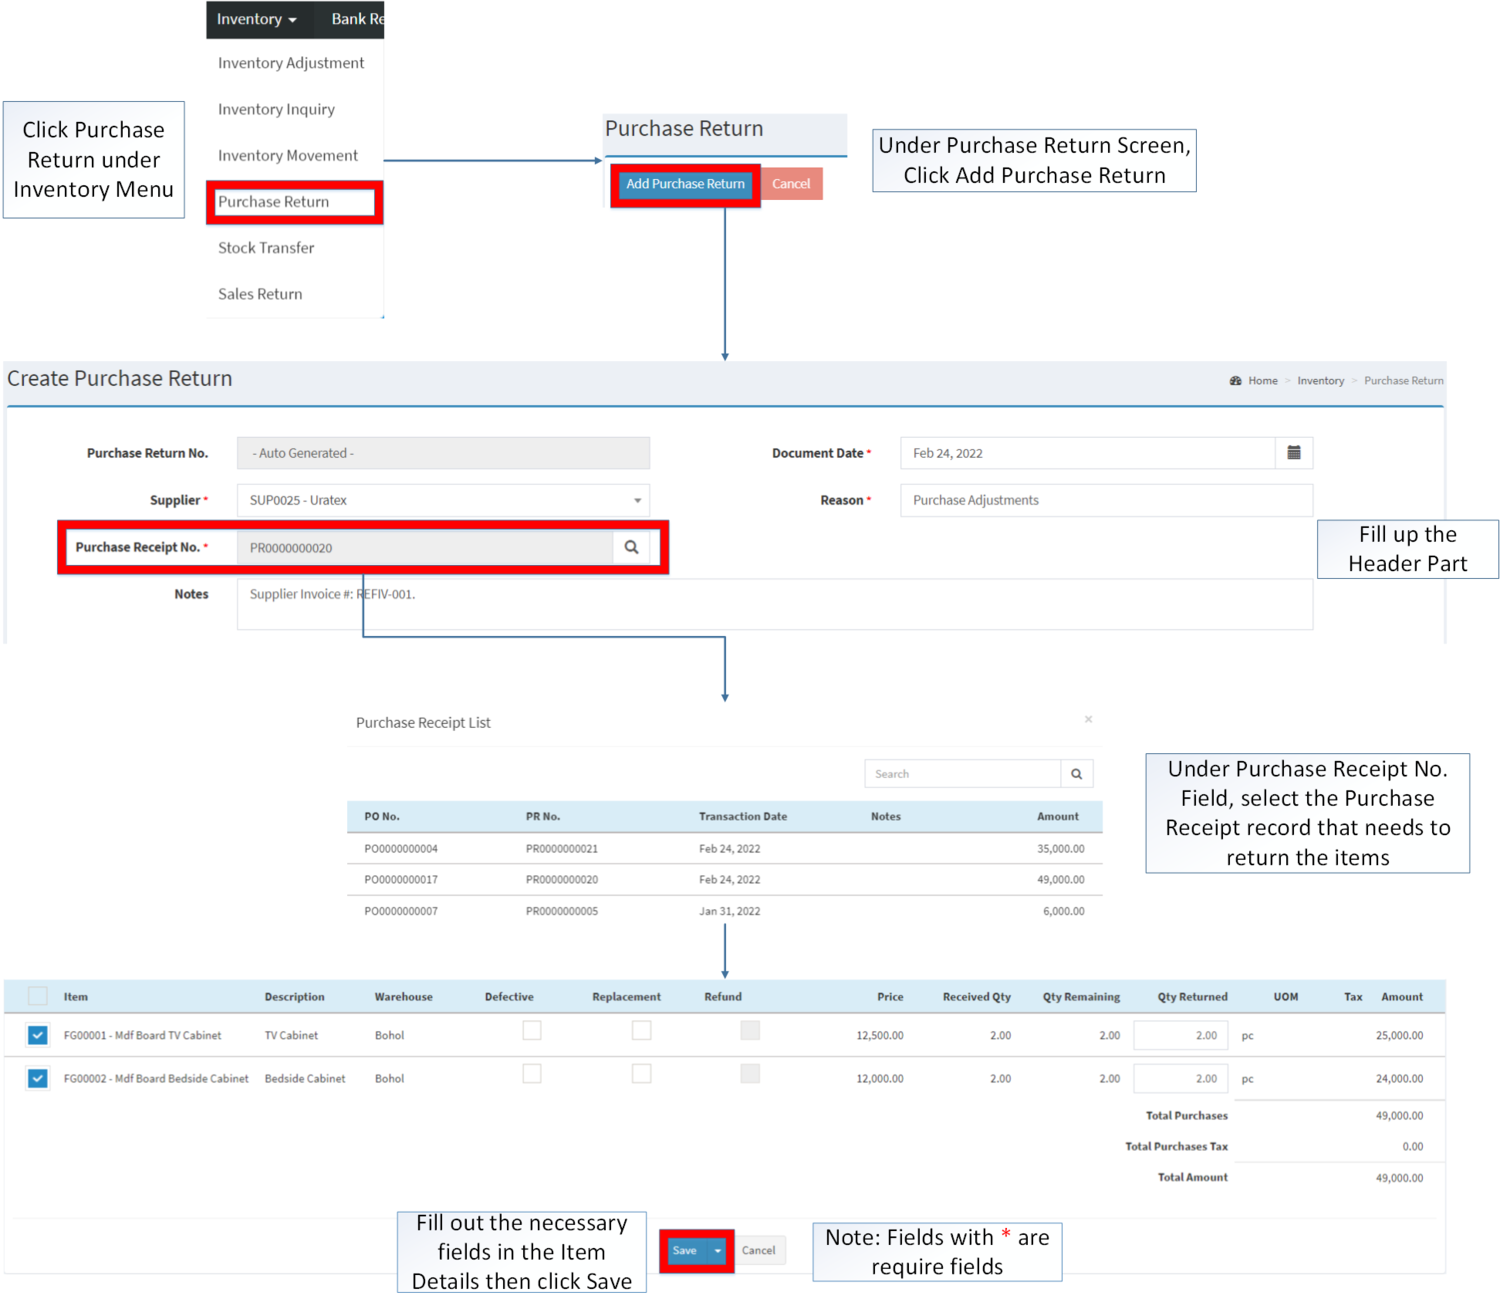
Add Purchase Return
- Go to Inventory then click Purchase Return
- Click Add Purchase Return Button
- Select Supplier then tag the corresponding Purchase Receipt No. that needs to be return.
- Tick the Item that needs to be returned then put the Quantity that needs to be returned. Please take note that the Purchase Receipt must be on PAID status in order to use the Refund feature.
- Click Save
- You can check the returned items in Inventory Movement
| Field | Description | Expected Values |
|---|---|---|
| 1.Purchase Return No. | •Purchase Return Reference No. upon creation | •Alphanumeric(Auto-Generated) |
| 2.Supplier | •Name of Supplier | •Supplier List Provided from the Supplier Maintenance Module |
| 3.Purchase Receipt No. | •Purchase Receipt Reference Number | •Purchase Receipt list provided by Purchase Receipt Financial Module |
| 4.Document Date | •Date when the Transaction was created | •Date |
| 5.Reason | •Reason why the item needs to be return | •Alphanumeric |
| 6.Notes | •Additional Remarks on the Transaction | •Alphanumeric |
| 7.Item | •Item to be returned | •Tick/Untick |
| 8.Description | •Any remarks or Description regarding the Item | •Alphanumeric(based from the Item details in Item Master Maintenance Module) |
| 9.Warehouse | •Assigned Warehouse where the item is placed | • |
| 10.Defective | •Classification if the item to be returned is defective or not | •Tick/Untick |
| 11.Replacement | •Classification if the item to be returned is for replacement | •Tick/Untick |
| 12.Refund | •Classification if the item to be returned is for refund | •Tick/Untick |
| 13.Price | •Price of the Item to be returned | •Number(Auto-generated based from the Pricelist used in Maintenance Module) |
| 14.Received Quantity | •Quantity currently received in the return | •Number |
| 15.Quantity Remaining | •Remaining quantity of item base from quantity received | •Number |
| 16.Quantity Returned | •Quantity of item to be returned | •Number |
| 17.Unit of Measure | •Unit of Measure of the Item | •Unit of Measure List based from Unit of Measure Maintenance Module) |
| 18.Tax | •Any type of Tax Applied on the Item | •List of Tax based from Tax Maintenance Module |
| 19.Amount | •Total Amount of the returned item | •Number |
Notes:
- Purchase Return Transactions cannot be edited.
- Activities regarding items returned using Purchase Return can be view on Inventory Movement under Financials Module.
- Service Class Items can be returned but cannot be view its activity on Inventory Movement.
- The user must setup the Account Codes for refund in order to use this feature.
- The Purchase receipt must be on PAID status in order to use this feature.
- Journal Voucher and Debit Voucher will be automatically generated after creating a Purchase Return Record
- Refund function can be activated under Users Group
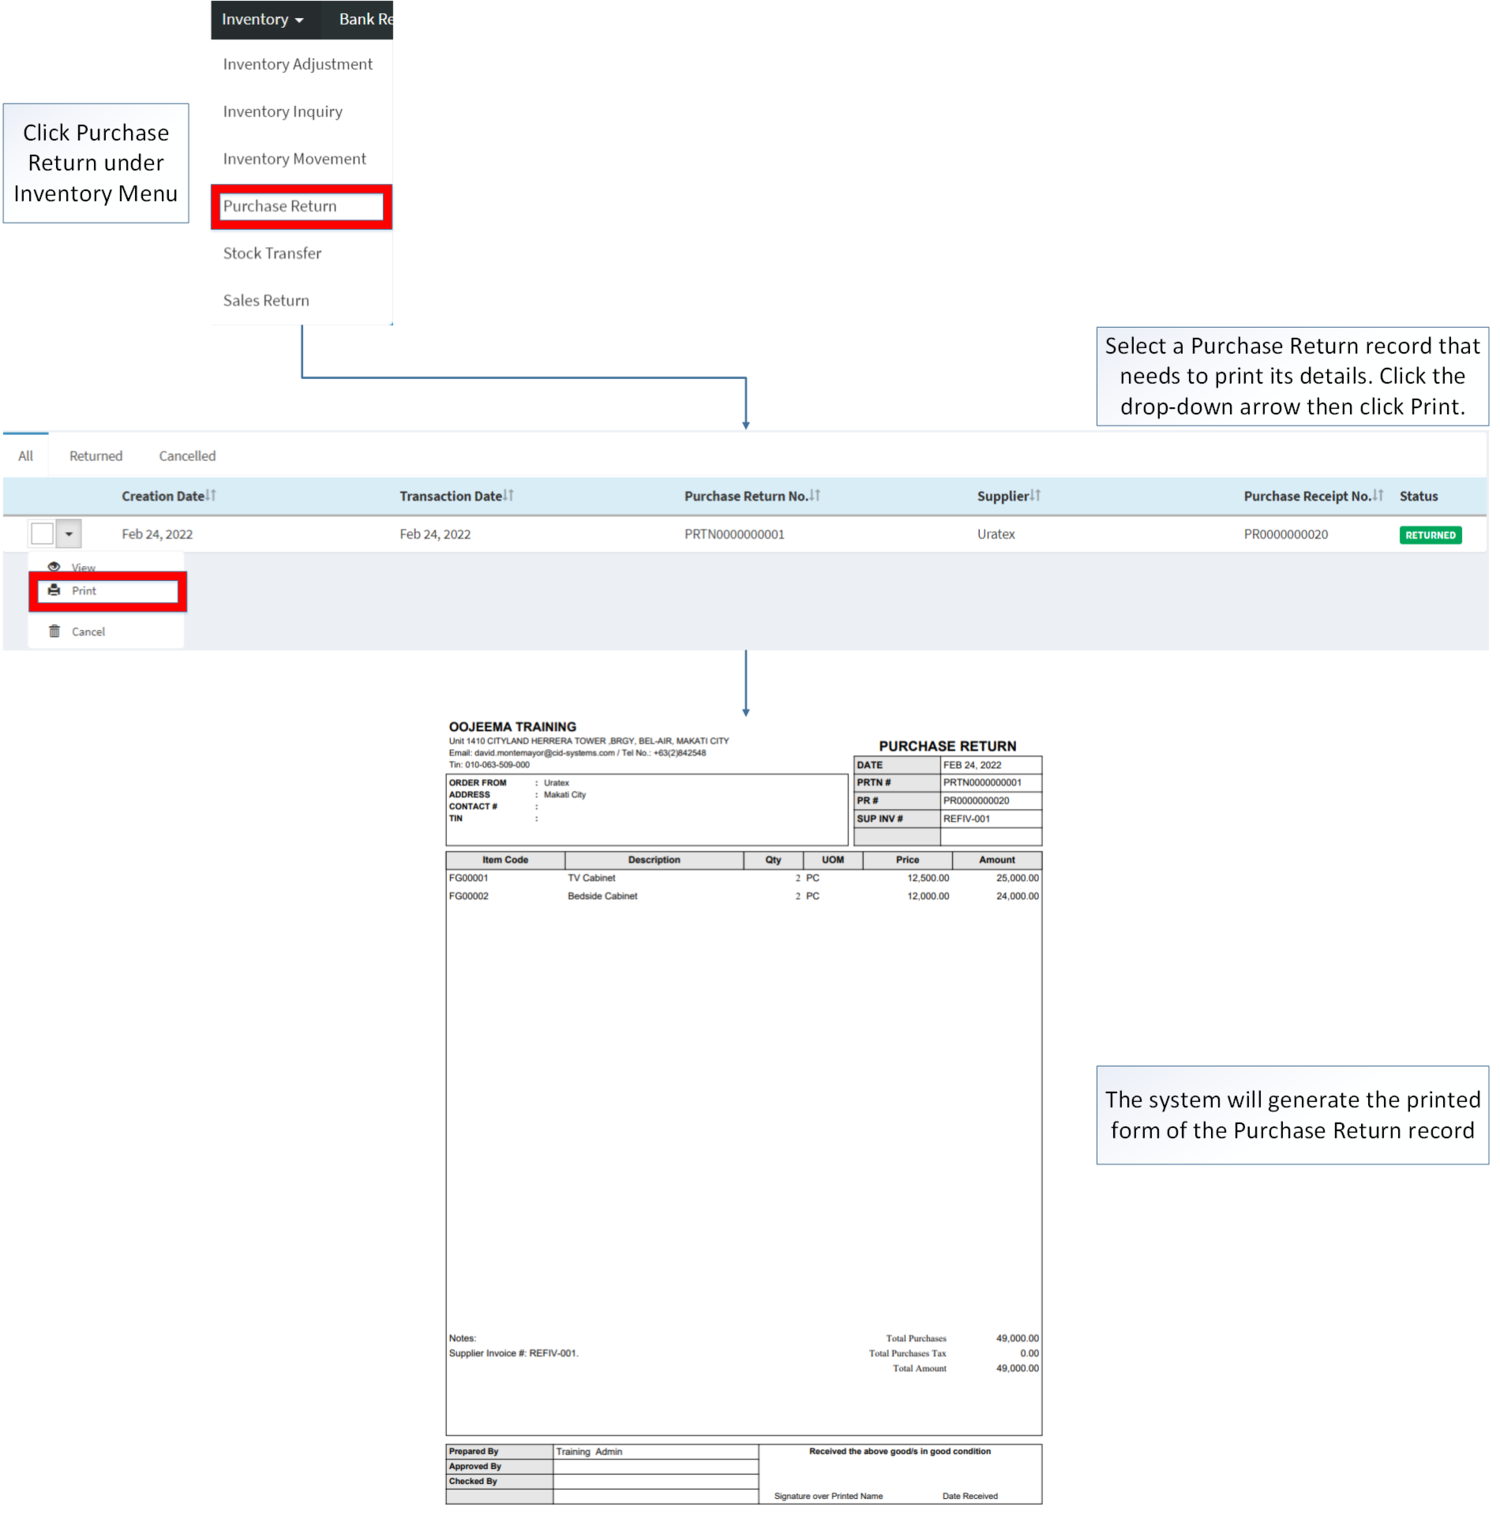
Printing Purchase Return Record
- Click Inventory then click Purchase Return
- Select the Purchase Return that needs to print its details. Click the drop down arrow then Choose Print.
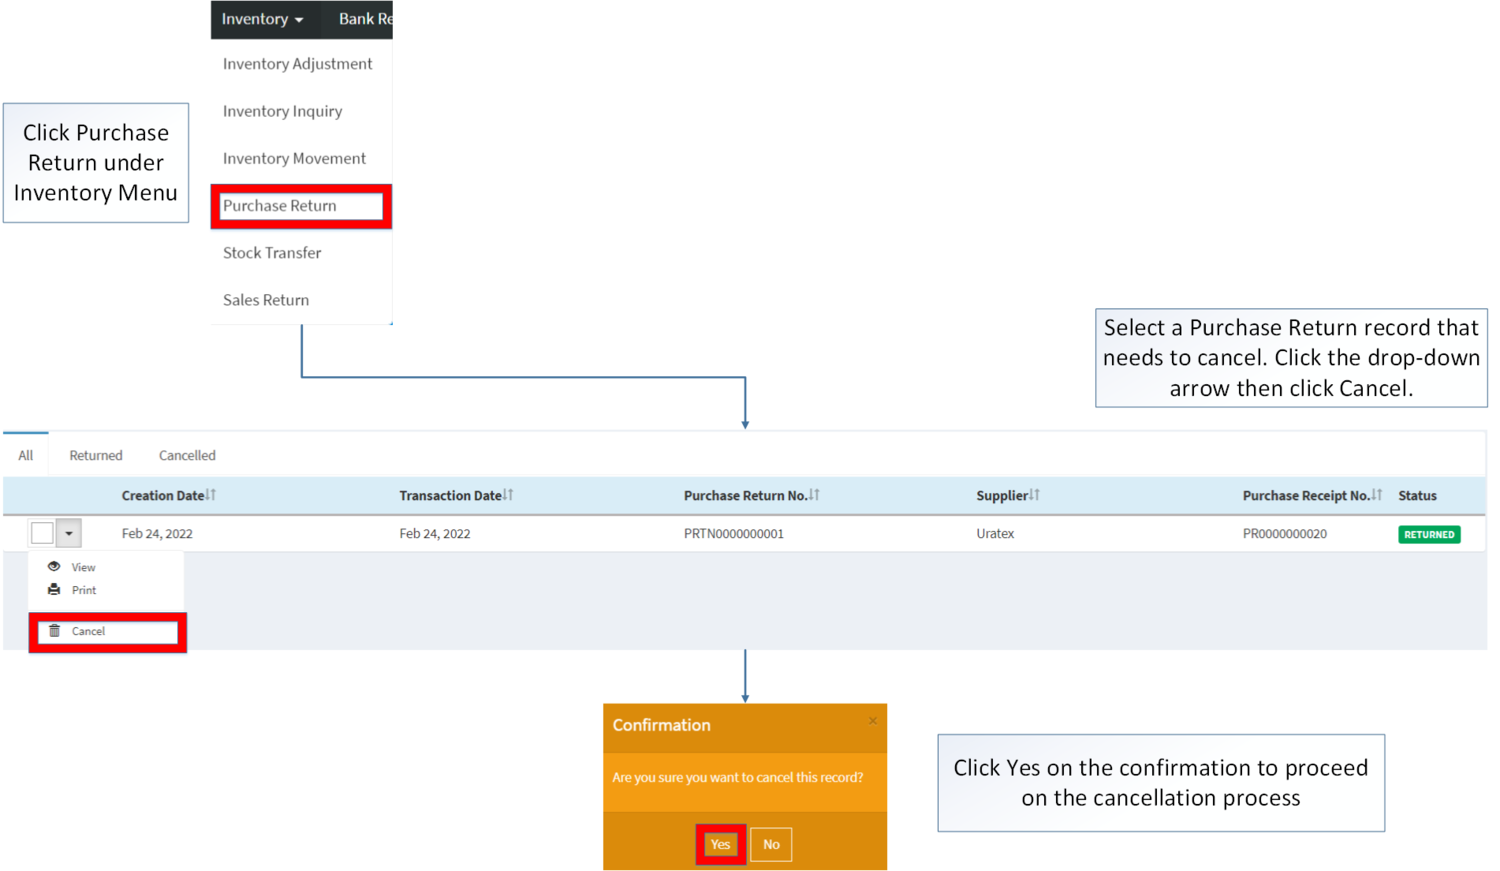
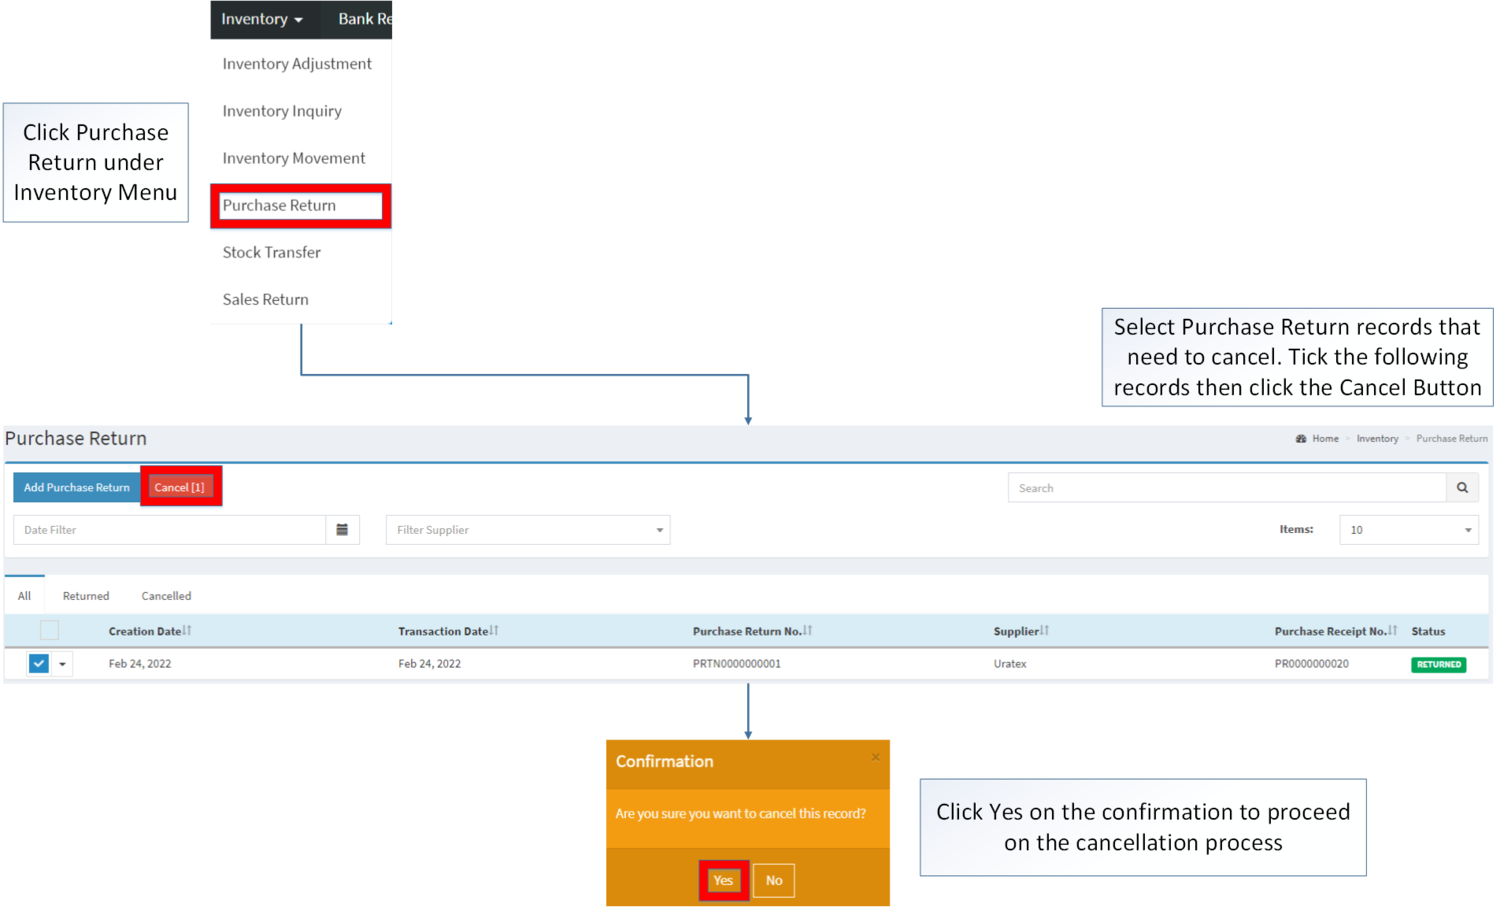
Cancelling Purchase Return Record
- Purchase Return can be cancelled in two ways:
- Using drop-down arrow of a record can be used in single record cancellation
- Using Cancel Button for cancelling multiple records
Purchase Return Record Options
| Status | View | |
|---|---|---|
| RETURNED | ☑ | ☑ |
| CANCELLED | ☑ | ☑ |
Notes:
- Journal Voucher will be automatically updated when Purchase Return is updated.
- Debit Voucher can be used to deduct the amount of the future Payment Voucher transactions.
| Modules | |
|---|---|
| Inventory | Purchase Return | Inventory Movement |
| Purchase | Purchase Receipt |
| Financials | Debit Voucher | Payment Voucher |
| Maintenance | Account Codes | Supplier | Users Group | Warehouse | Item Master |


