You are viewing an old version of this page. Return to the latest version.
Difference between revisions of "Receipt Voucher"
(Tag: Visual edit) |
(Tag: Visual edit) |
||
| Line 110: | Line 110: | ||
*By choosing Check as Payment Mode, Check details as well as [[Bank]] details are needed to fill up in order to reflect the details to Accounting details. | *By choosing Check as Payment Mode, Check details as well as [[Bank]] details are needed to fill up in order to reflect the details to Accounting details. | ||
| + | =====<span class="mw-headline ve-pasteProtect" id="Editing_Payment_Voucher" style="box-sizing: inherit;" data-ve-attributes="{"style":"box-sizing: inherit;"}">Viewing Receipt Voucher</span>===== | ||
| + | |||
| + | #Go to Financials then click Receipt Voucher | ||
| + | #Select Receipt Voucher record that needs to view its details. Click the drop-down arrow then click View. | ||
| + | #The user has an option to edit the Receipt Voucher upon viewing it. | ||
| + | |||
| + | [[File:Financials - Receipt Voucher - View.png|border|center|1518x1518px]] | ||
| + | <br /> | ||
=====<span class="mw-headline" id="Editing_Payment_Voucher" style="box-sizing: inherit;">Editing Receipt Voucher</span>===== | =====<span class="mw-headline" id="Editing_Payment_Voucher" style="box-sizing: inherit;">Editing Receipt Voucher</span>===== | ||
Revision as of 15:02, 18 March 2022
Contents
- 1 Receipt Voucher
- 1.1 Requirements before using Receipt Voucher
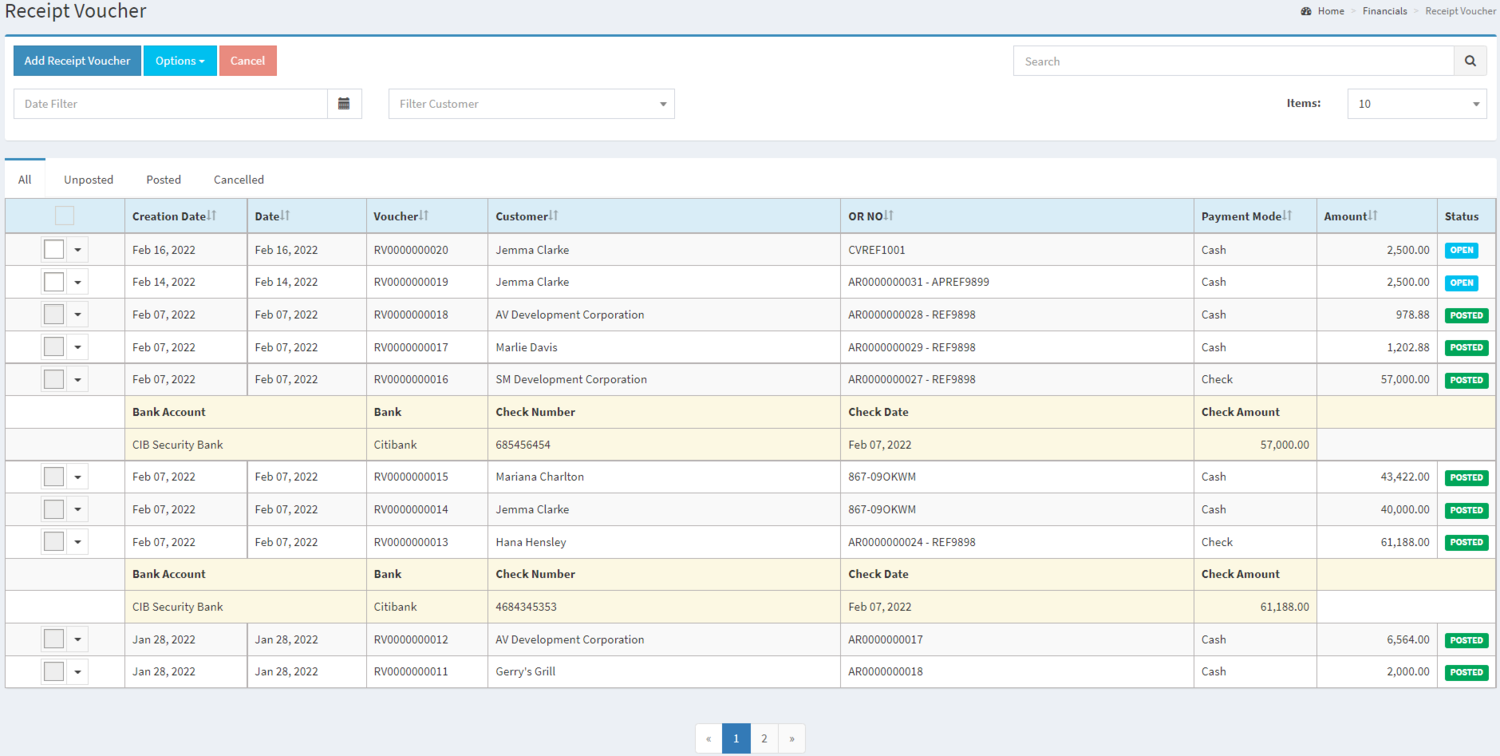
- 1.2 Receipt Voucher Record List
- 1.3 Adding Receipt Voucher
- 1.4 Viewing Receipt Voucher
- 1.5 Editing Receipt Voucher
- 1.6 Printing Receipt Voucher
- 1.7 Setting Up Payment Method
- 1.8 Applying Creditable Withholding Tax
- 1.9 Cancelling Receipt Voucher Record
- 1.10 Posting Receipt Voucher
- 1.11 Unposting Receipt Voucher
- 1.12 Exporting Receipt Voucher
- 1.13 Receipt Voucher Record Option
- 1.14 Creating Credit Voucher
- 1.15 Applying Credit Voucher
Receipt Voucher
Allows the user to create a transaction from Accounts Receivable for the amounts to be paid by the customer.
Requirements before using Receipt Voucher
- The user should setup the following Maintenance Module in order to proceed on using the Receipt Voucher
- The user should have the following records in order to proceed on using the Receipt Voucher
| Status | Description |
|---|---|
| UNPOSTED | If the Receipt Voucher is newly created and not yet posted |
| POSTED | If the Receipt Voucher is posted |
| CANCELLED | If the Receipt Voucher is Cancelled |
Receipt Voucher Record List
Adding Receipt Voucher
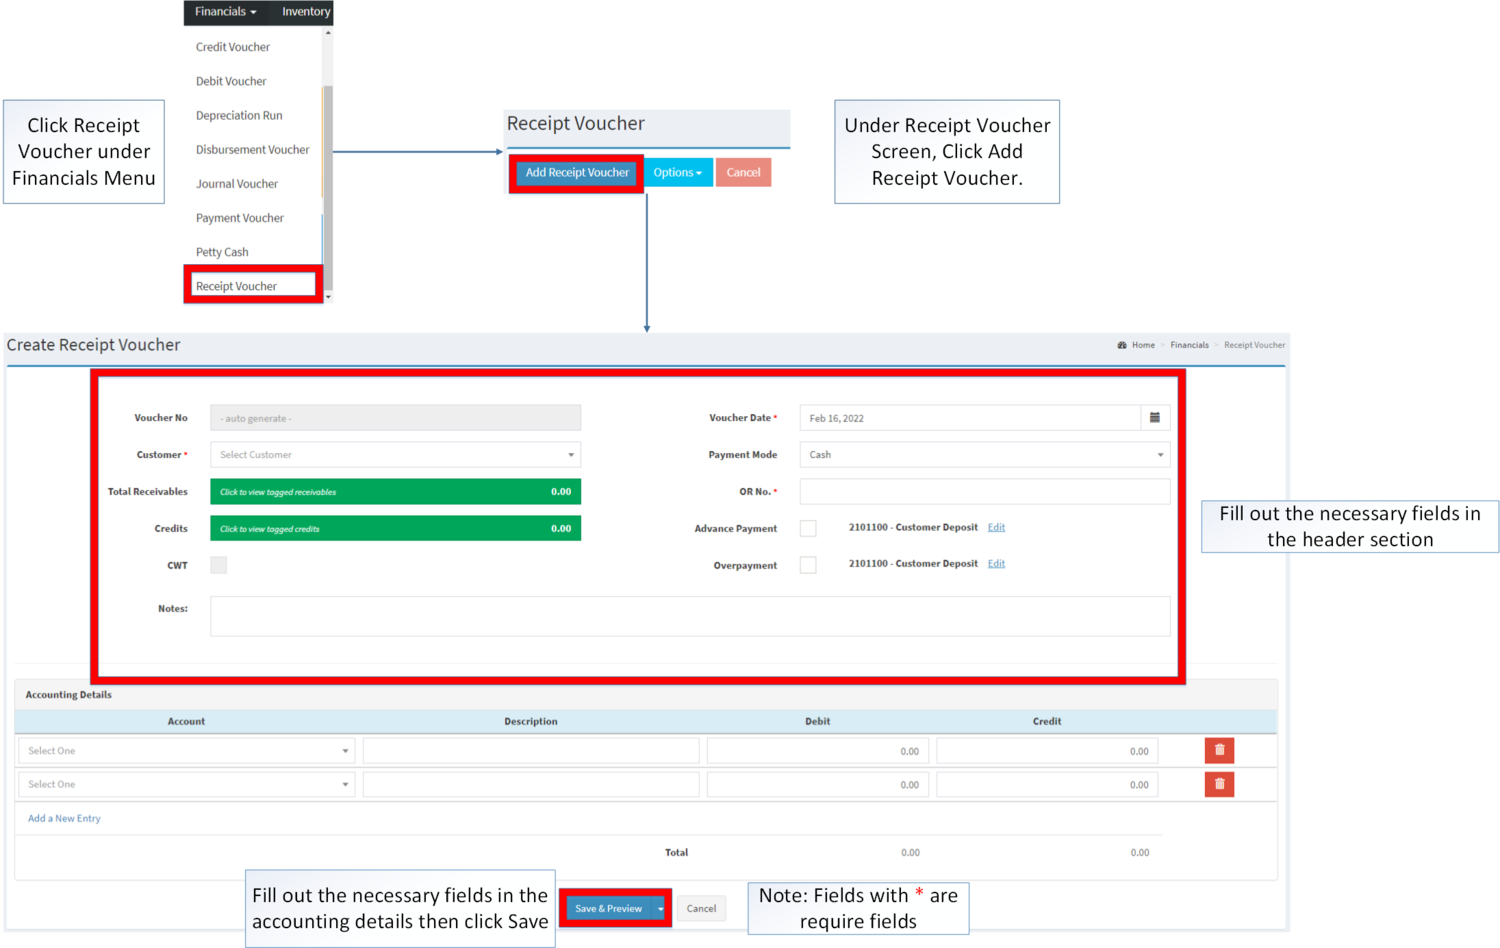
- Click Receipt Voucher under Financial menu
- Under Receipt Voucher Menu, click Add Receipt Voucher
- Fill up the required fields then click Save. Note: Fields with * are required to be filled up.
| Field | Description | Expected Value |
|---|---|---|
| 1.Voucher No | •Voucher Reference number generated upon creation | •Alphanumeric(Auto-Generated) |
| 2.Customer | •Name of Customer | •Customer List in the Supplier Maintenance Module |
| 3.Total Receivable | •Receivables to be tagged on the Transaction | •Accounts Receivables Provided in the Accounts Receivables Financial Module |
| 4.Credit | •Credit Vouchers to be tagged on the Transaction | •List of Credit Vouchers provided in the Credit Voucher Financial Module |
| 5.CWT | •Credit Withholding Tax | •Tick/Untick |
| 6.Voucher Date | •Date when the voucher was created | •Date |
| 7.Payment Mode | •Mode of Payment for the Transaction | •Cash/Check |
| 8.OR No. | •Original Receipt Number for Reference | •Alphanumeric |
| 9.Advance Payment | •Allows the user to create a credit voucher from the Transaction | •Tick/untick / Edit down payment Account |
| 10.Overpayment | •Allows the user to create a debit voucher from the transaction | •Tick/untick / Edit Overpayment Account |
| 11.Notes | •Adds additional remarks on the transaction | •Alphanumeric |
| 12.Account | •Account to be charged for credit and debit amount on the transaction | •Account list in the Chart of Accounts Maintenance Module |
| 14.Debit | •Debit Amount for the Transaction | •Number |
| 15.Credit | •Credit Amount for the Transaction | •Number |
Notes
- Customer should be on ACTIVE status when creating or editing a transaction.
- This can be seen in Customer Maintenance Module
- Account should be on ACTIVE status when using it upon creating or editing a transaction.
- This can be seen in Chart of Account Maintenance Module.
- By ticking Advance Payment, the user can create a Credit Voucher.
- Only one user can Add Receipt Voucher function at a time.
- By choosing Check as Payment Mode, Check details as well as Bank details are needed to fill up in order to reflect the details to Accounting details.
Viewing Receipt Voucher
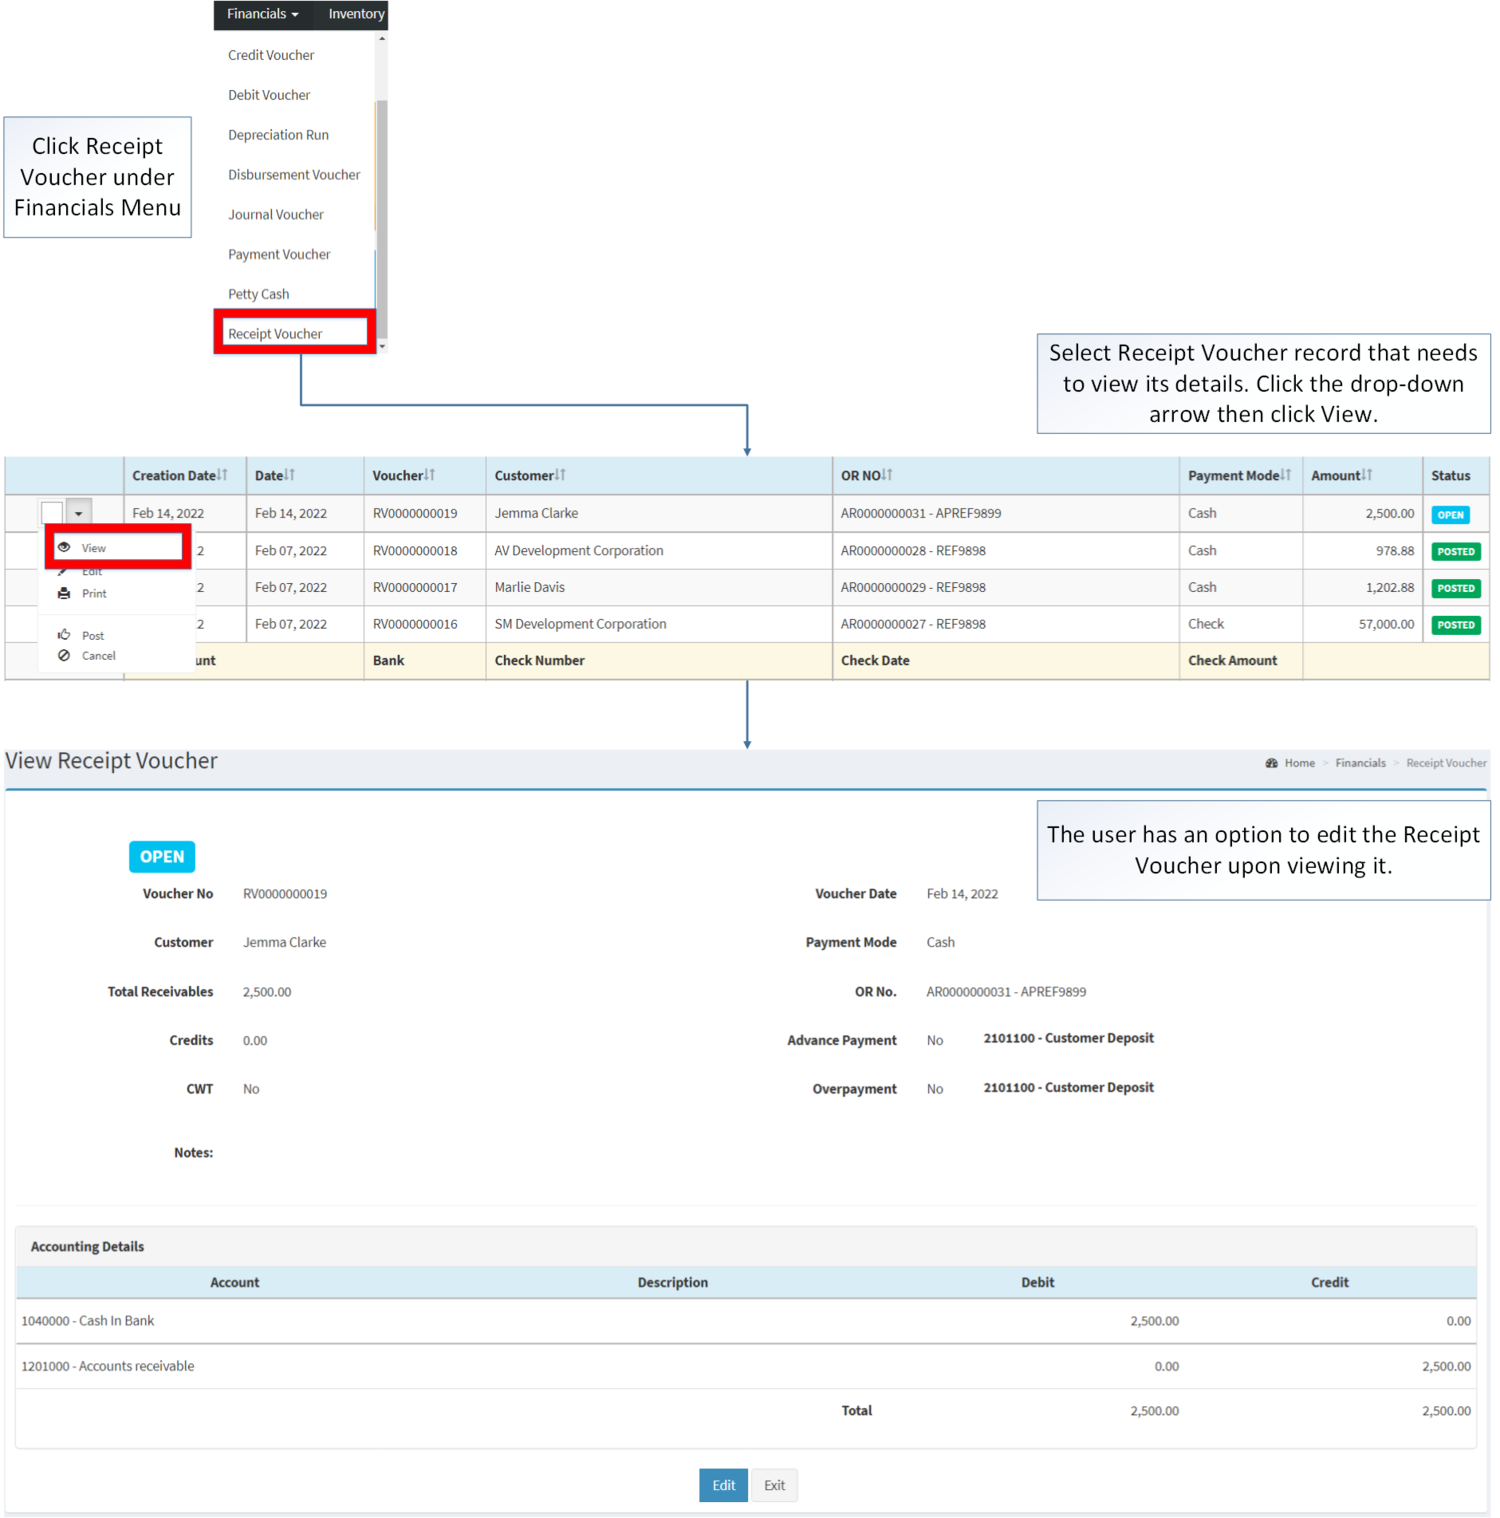
- Go to Financials then click Receipt Voucher
- Select Receipt Voucher record that needs to view its details. Click the drop-down arrow then click View.
- The user has an option to edit the Receipt Voucher upon viewing it.
Editing Receipt Voucher
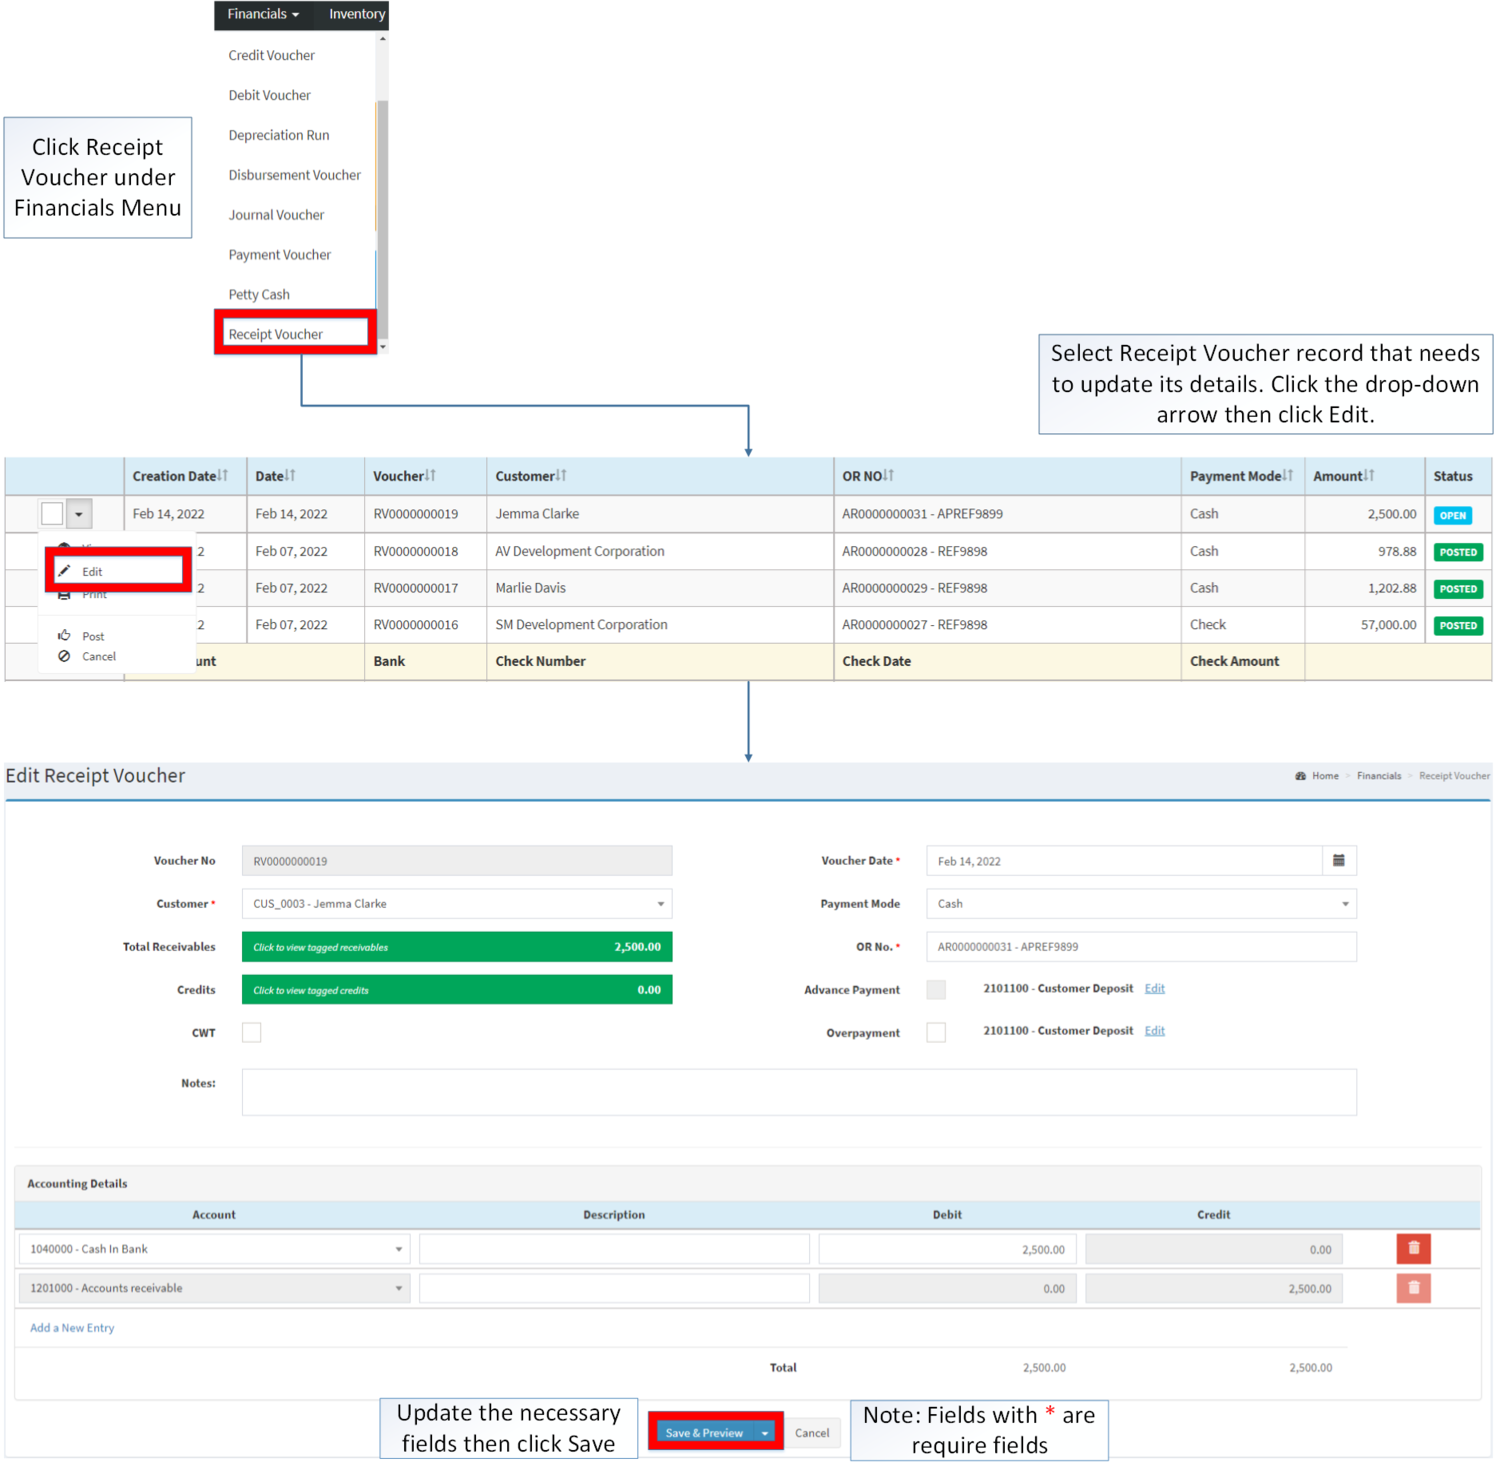
- Go to Financials then click Receipt Voucher
- Select the Receipt Voucher that needs an edit. Click the drop-down arrow then choose Edit.
- Update the necessary fields then click Save.
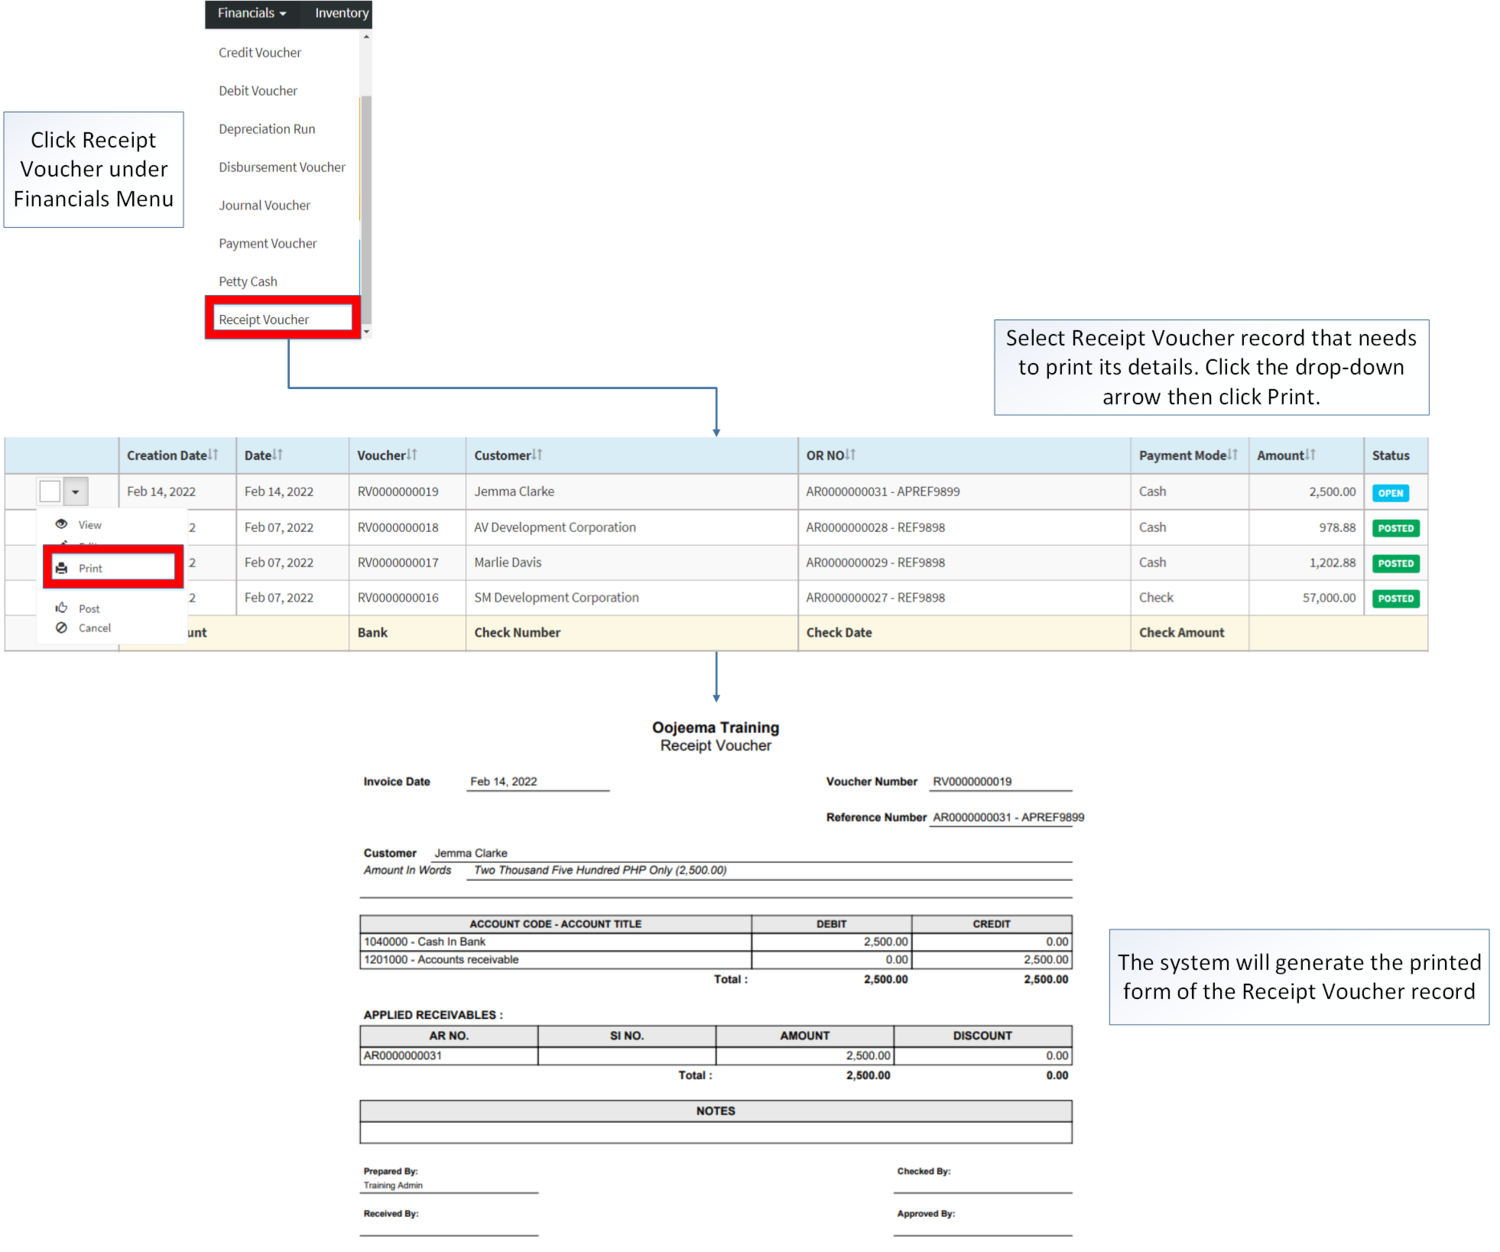
Printing Receipt Voucher
- Click Financials then click Receipt Voucher
- Select the Receipt Voucher that needs to print its details. Click the Drop-down Arrow then press Print.
Setting Up Payment Method
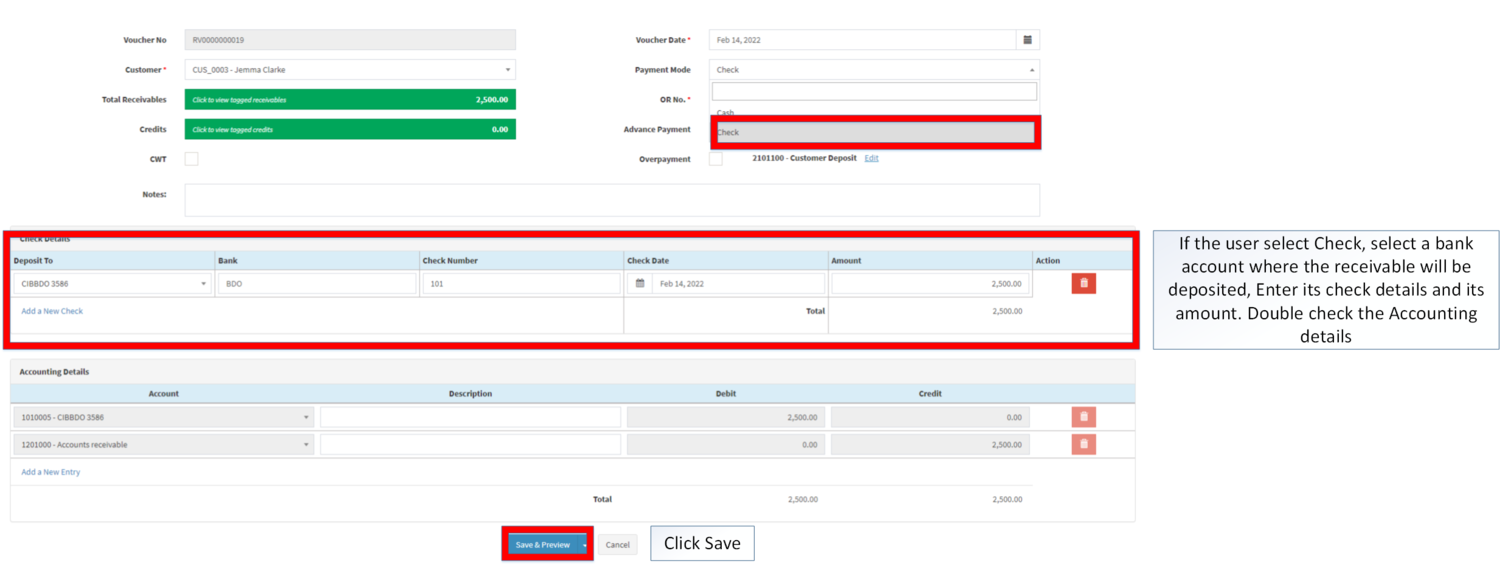
If the Selected Payment is Check
- Select Bank Account where the receivable will be deposited
- Enter Bank Name of received Check
- Enter received check’s Check Number
- Select Check Date
- Enter check’s amount
| Field | Description of Data Output |
|---|---|
| 1. Deposit To | Dropdown selection listing of all active banks from Bank Maintenance Module |
| 2. Bank | Manual Entry of Bank Name |
| 3. Check Number | Manual Entry of Check Number |
| 4. Check Date | Date when the Check Payment is deposited. |
| 5. Amount | Manual Entry of Amount to receive |
| 6. Delete | Deletes Check Detailes |
| 7. Add New Check | Add new Check Line |
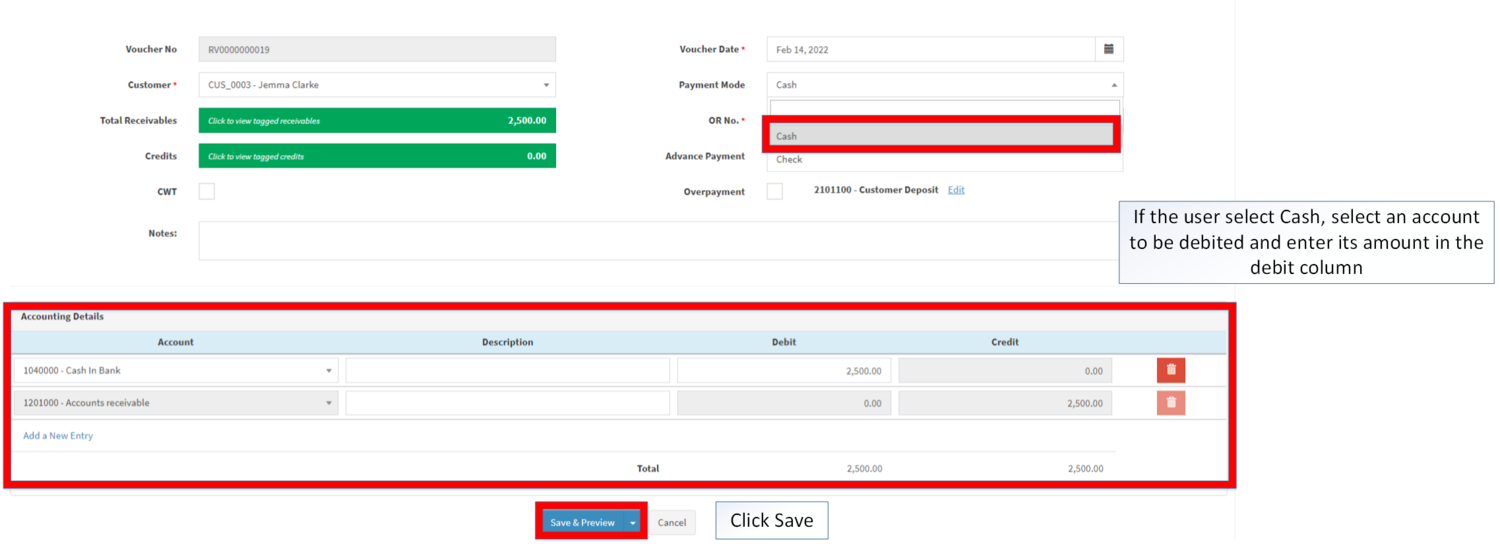
If the Selected Payment is Cash
- Select account to be debited
- OPTIONAL: You may also enter account description for easy referencing e.g. Payment for SO#123456
- Enter received amount on Debit column
| Field | Description of Data Output |
|---|---|
| 1. Account | Dropdown selection listing of Active Chart of Accounts under Chart of Accounts Maintenance Module |
| 2. Description | Manual Entry of Account Description |
| 3. Debit | Manual Entry of Debit Account |
| 4. Credit | Auto-Generated amount based from tagged receivable |
| 5. Delete(Line-Item) | Deletes Accounting Entry |
| 6. Add a New Entry | Adds a new Line Entry |
| 7. Total(Debit) | Auto-Calculated: Sum of Debit Entry |
| 8. Total(Credit) | Auto-Calculated: Sum of Credit Entry |
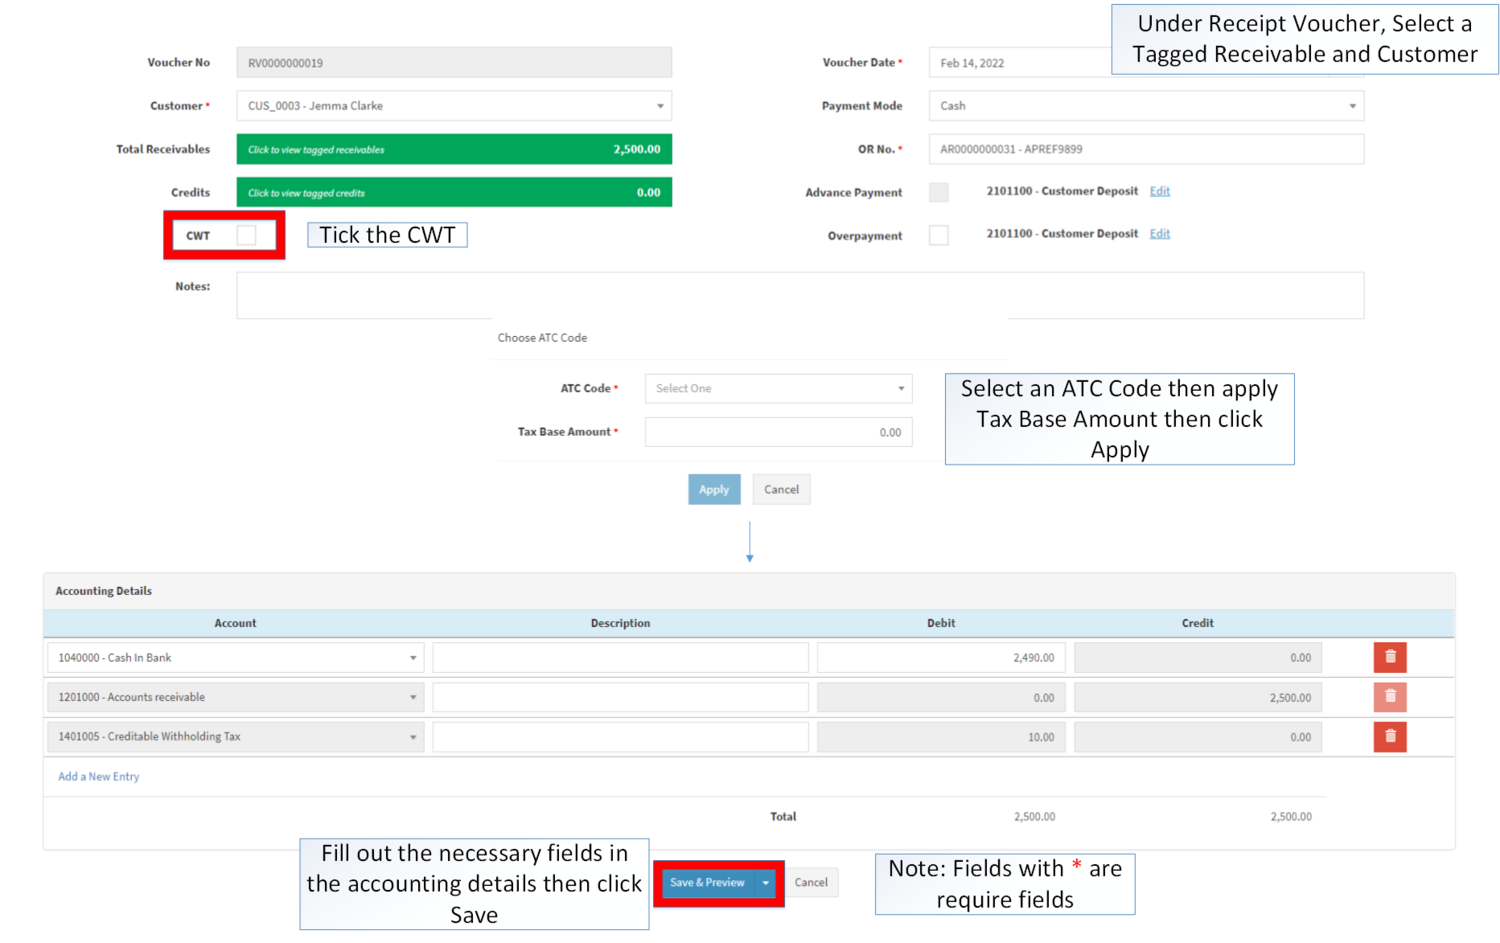
Applying Creditable Withholding Tax
- Under Create Receipt Voucher, Select a Tagged Receivable and Customer
- Tick the CWT
- Select an Appropriate ATC Code and apply its Base Tax Amount then Click Apply
- Double Check the Accounting Details then Click Save.
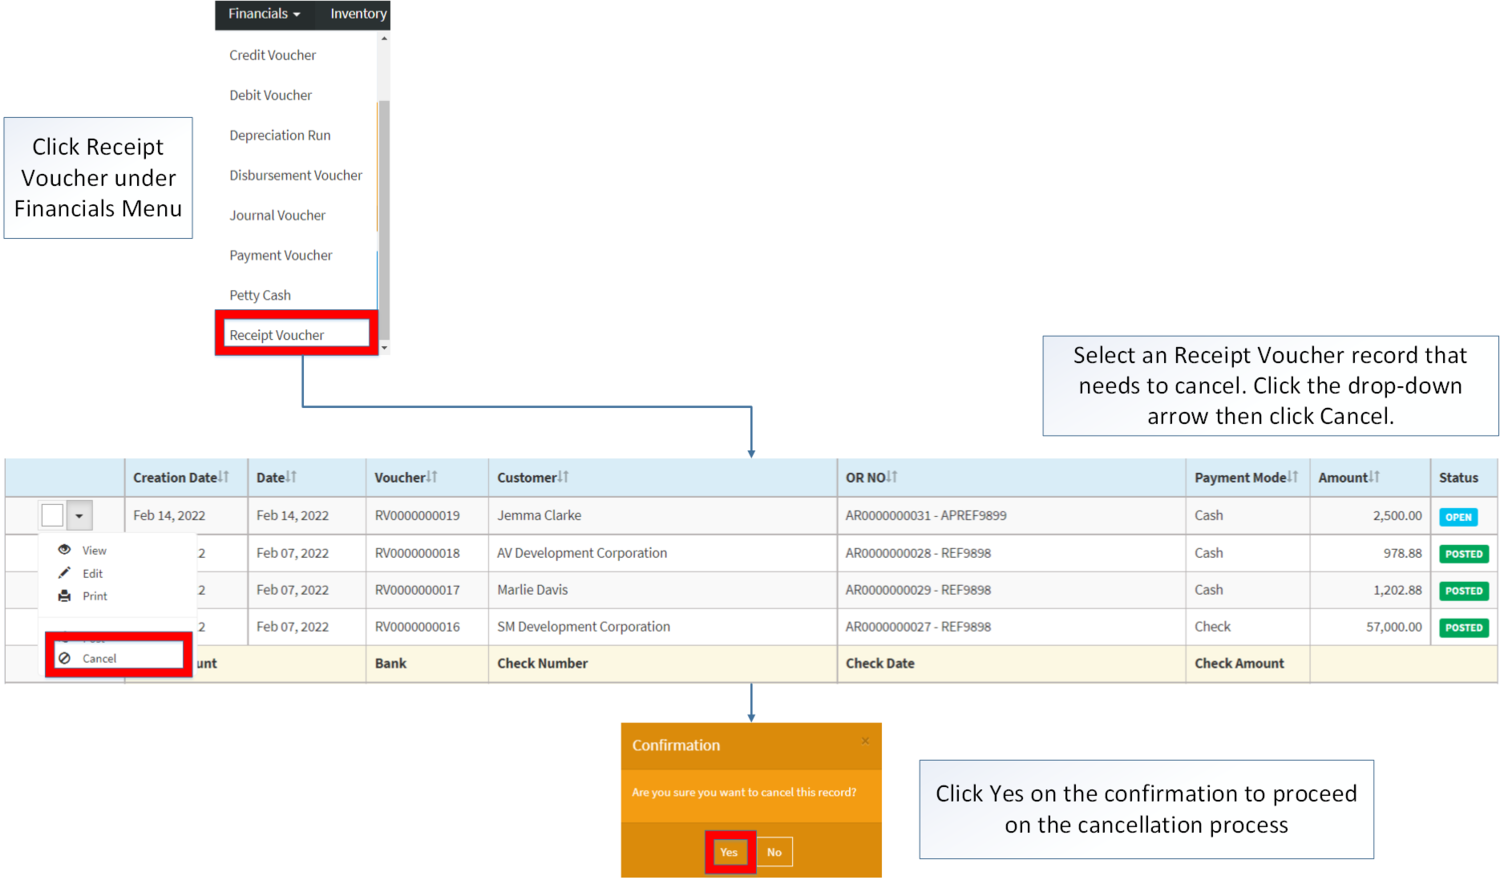
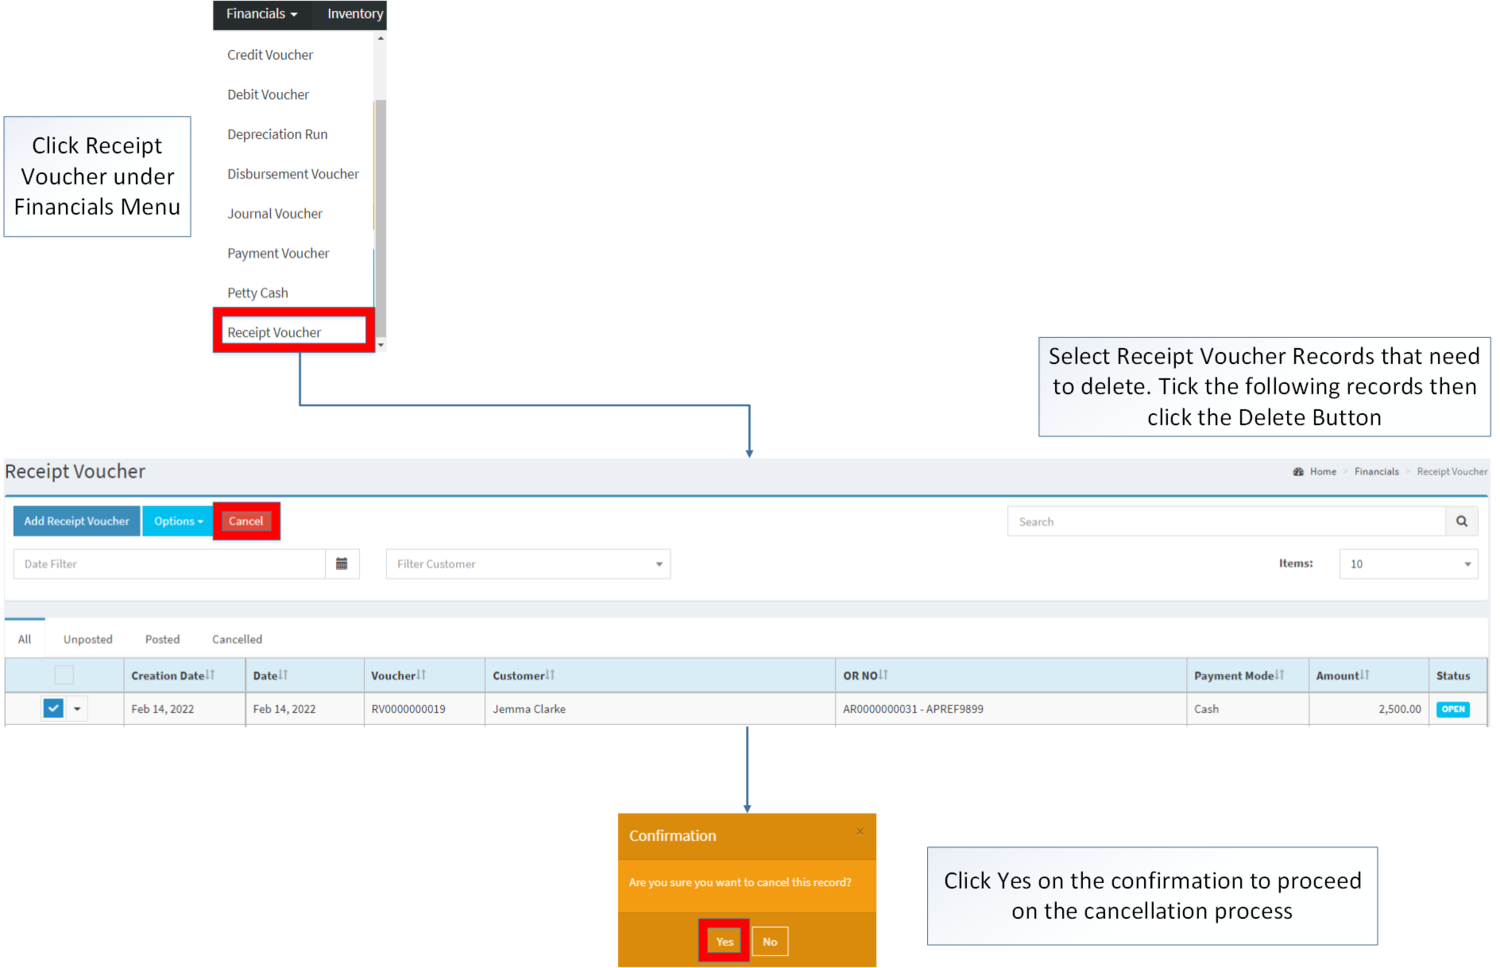
Cancelling Receipt Voucher Record
Receipt Voucher can be canceled in two ways:
- Using drop-down arrow of a record can be used in single record cancellation
- Using Cancel Button for cancelling multiple records
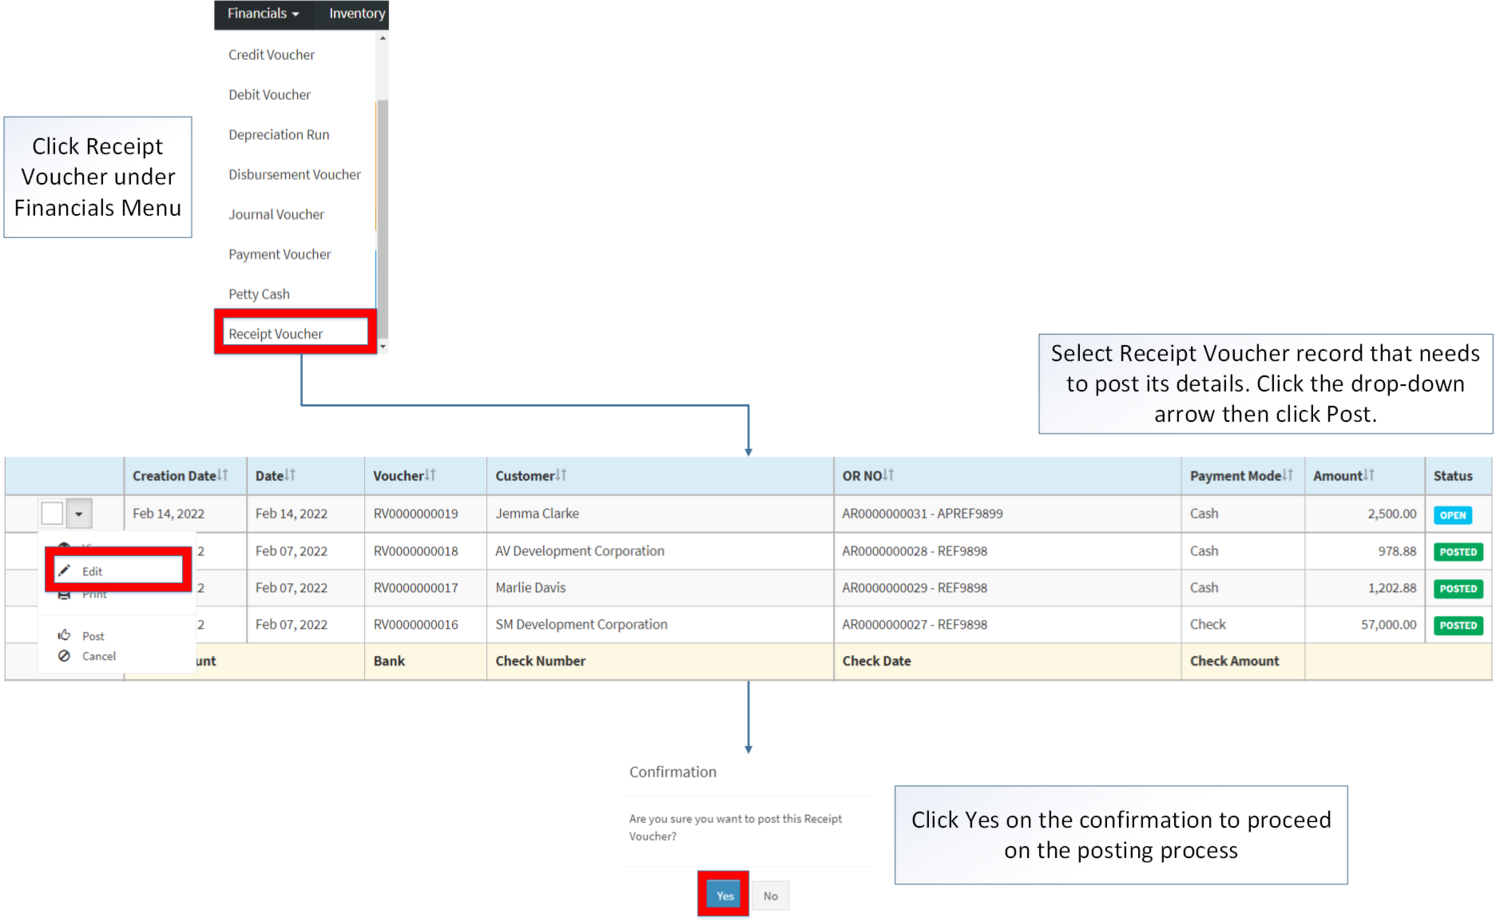
Posting Receipt Voucher
- Click Financials then click Receipt Voucher
- Select the Receipt Voucher that needs to post its details. Click the drop-down arrow then click Post
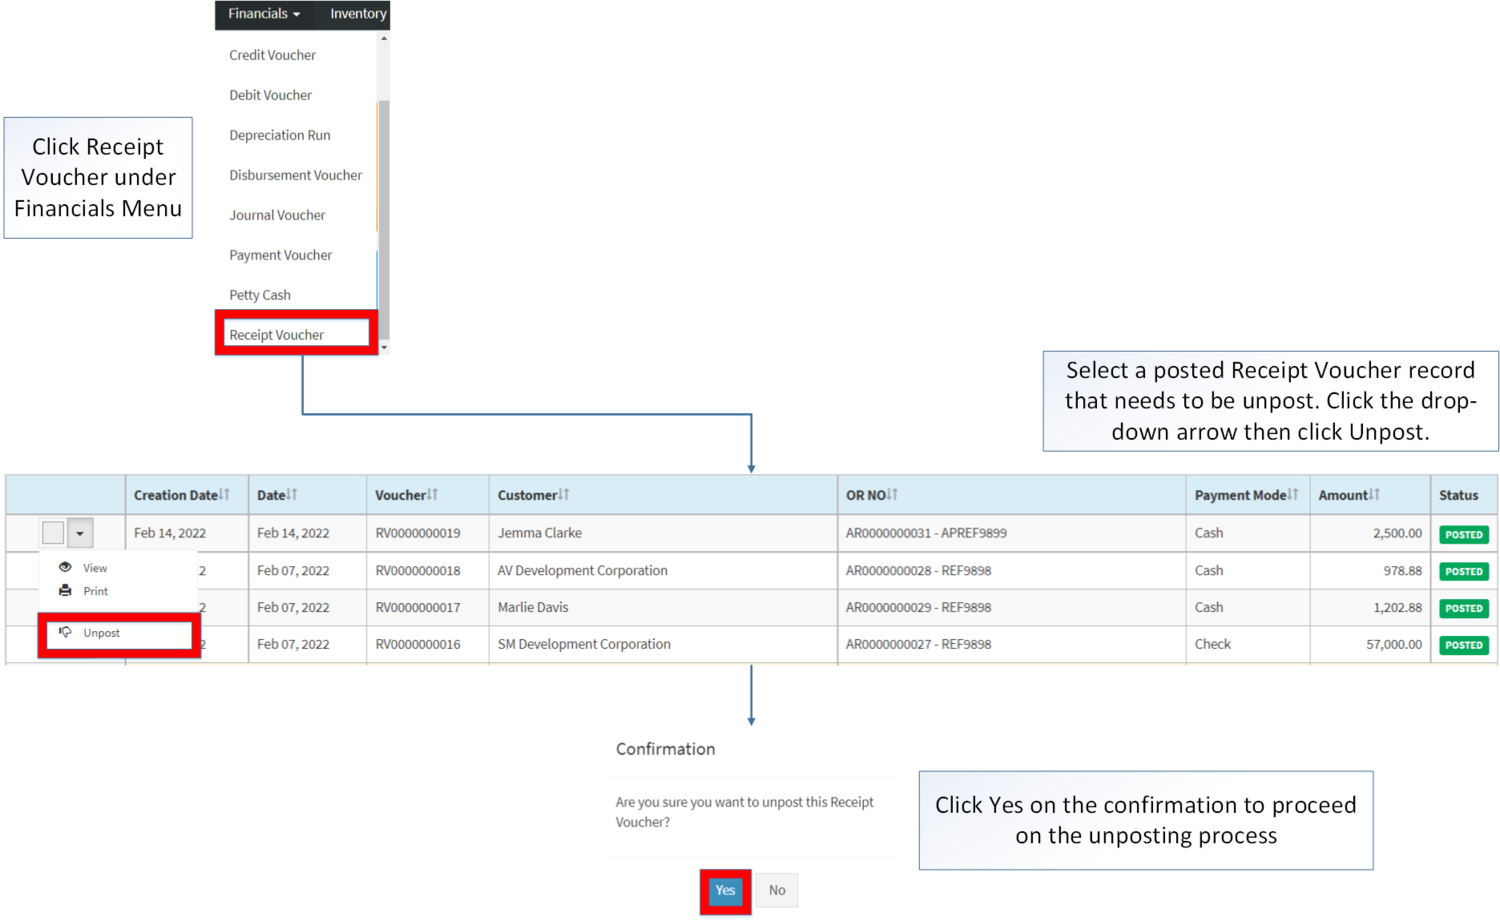
Unposting Receipt Voucher
- Click Financials then click Receipt Voucher
- Select a Posted Receipt Voucher that needs to post its details. Click the drop-down arrow then click Unpost
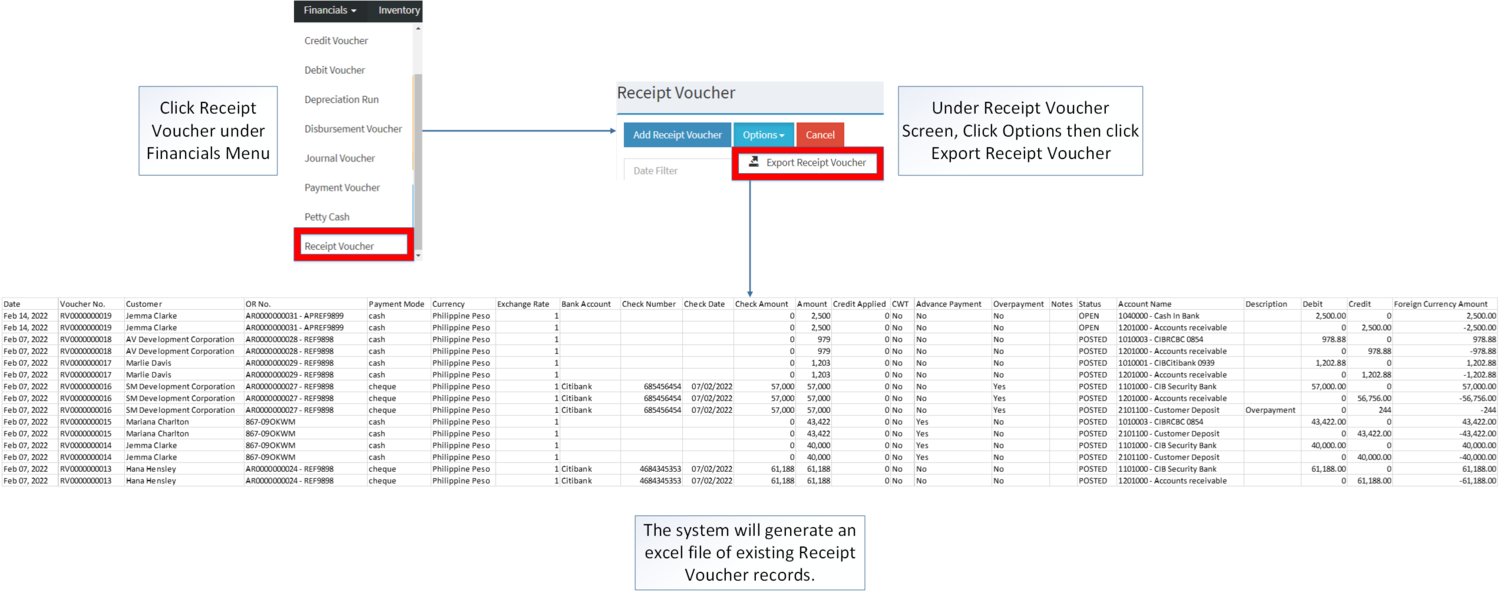
Exporting Receipt Voucher
- Go to Financials then click Receipt Voucher
- Click Options then click Export Receipt Voucher. Take note that you can filter the Date Range and the Customer for precise exportation of data.
Receipt Voucher Record Option
| Status | View | Edit | Post | Unpost | Cancel | |
|---|---|---|---|---|---|---|
| UNPOSTED | ☑ | ☑ | ☑ | ☑ | ☑ | |
| POSTED | ☑ | ☑ | ☑ | |||
| CANCELLED | ☑ | ☑ |
Notes:
- The user has an option to Edit the Record while viewing it
- The user can only Edit the Record if it is still in OPEN status
- If the Receipt Voucher is Posted, Unposting the record will leave its status to OPEN thus can now be edited.
- The user can only Cancel the Receipt Voucher if the status of the said Voucher is still on OPEN Status
- Credit Voucher tagged will revert it status to Active when the Receipt Voucher has been Cancelled.
- Partially used Credit Voucher cannot be edited even the Receipt Voucher corresponding to it is still open.
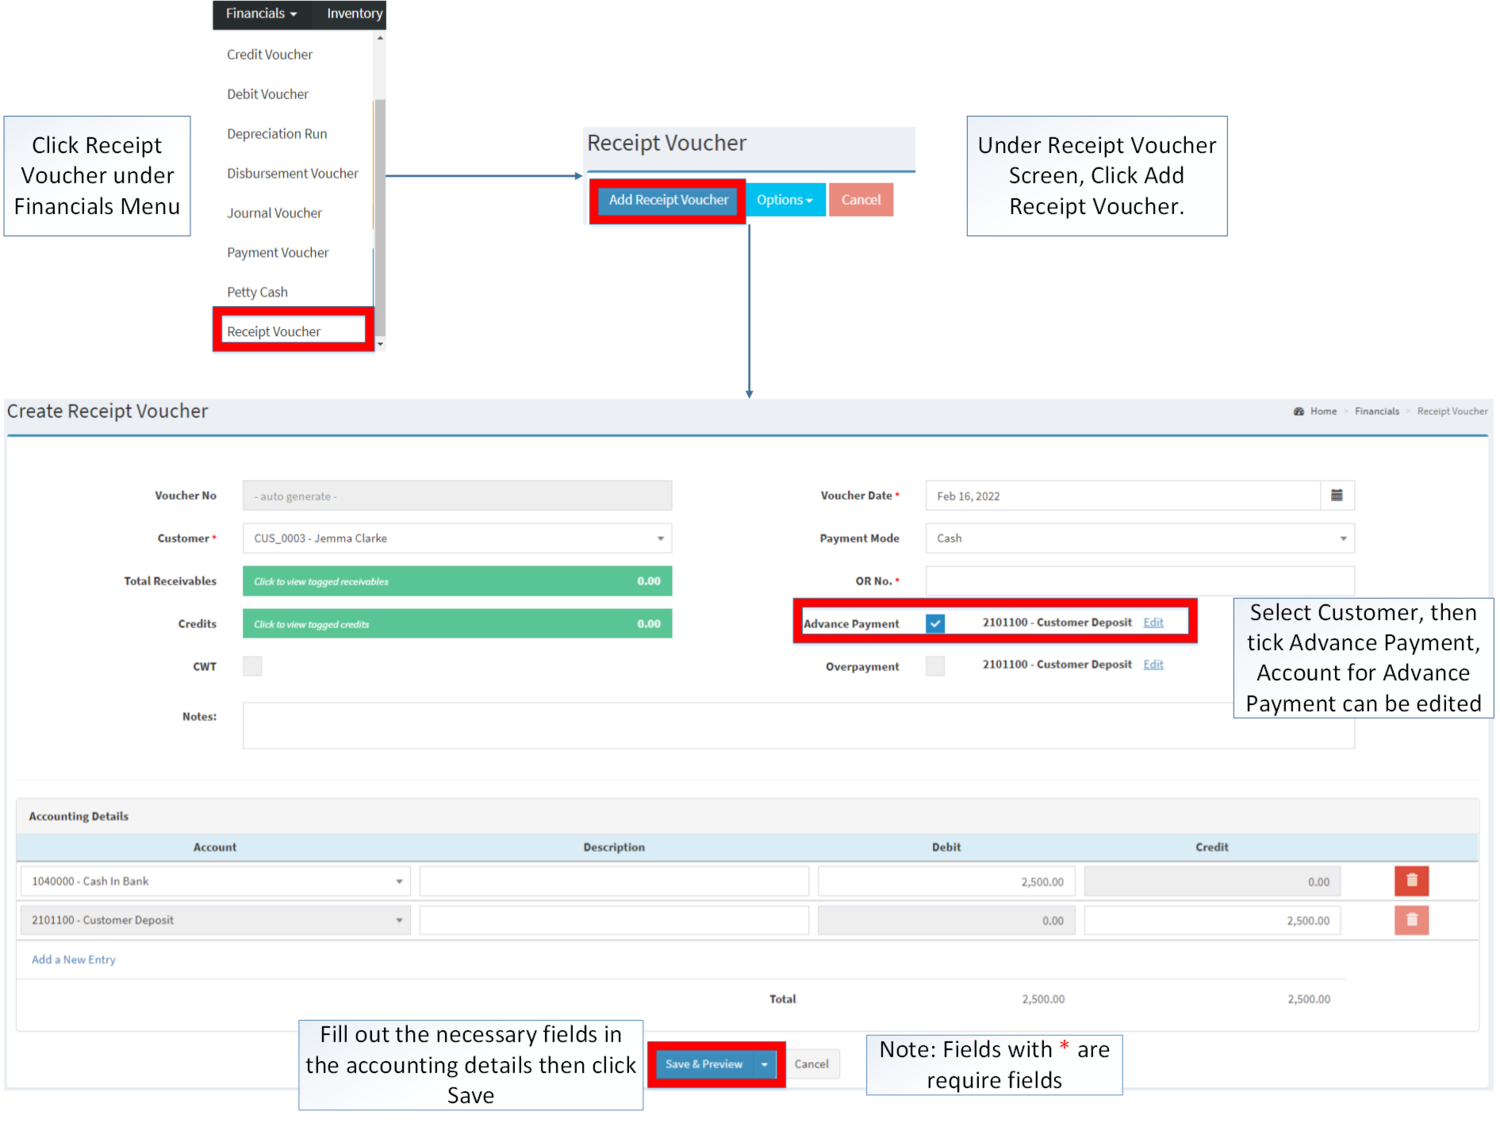
Creating Credit Voucher
- Click Receipt Voucher from Financial Module
- Under Receipt Voucher, Click Add Receipt Voucher
- Select a Customer then tick the Advance Payment Option
- Fill up the required fields for Header and Accounting details then click Save
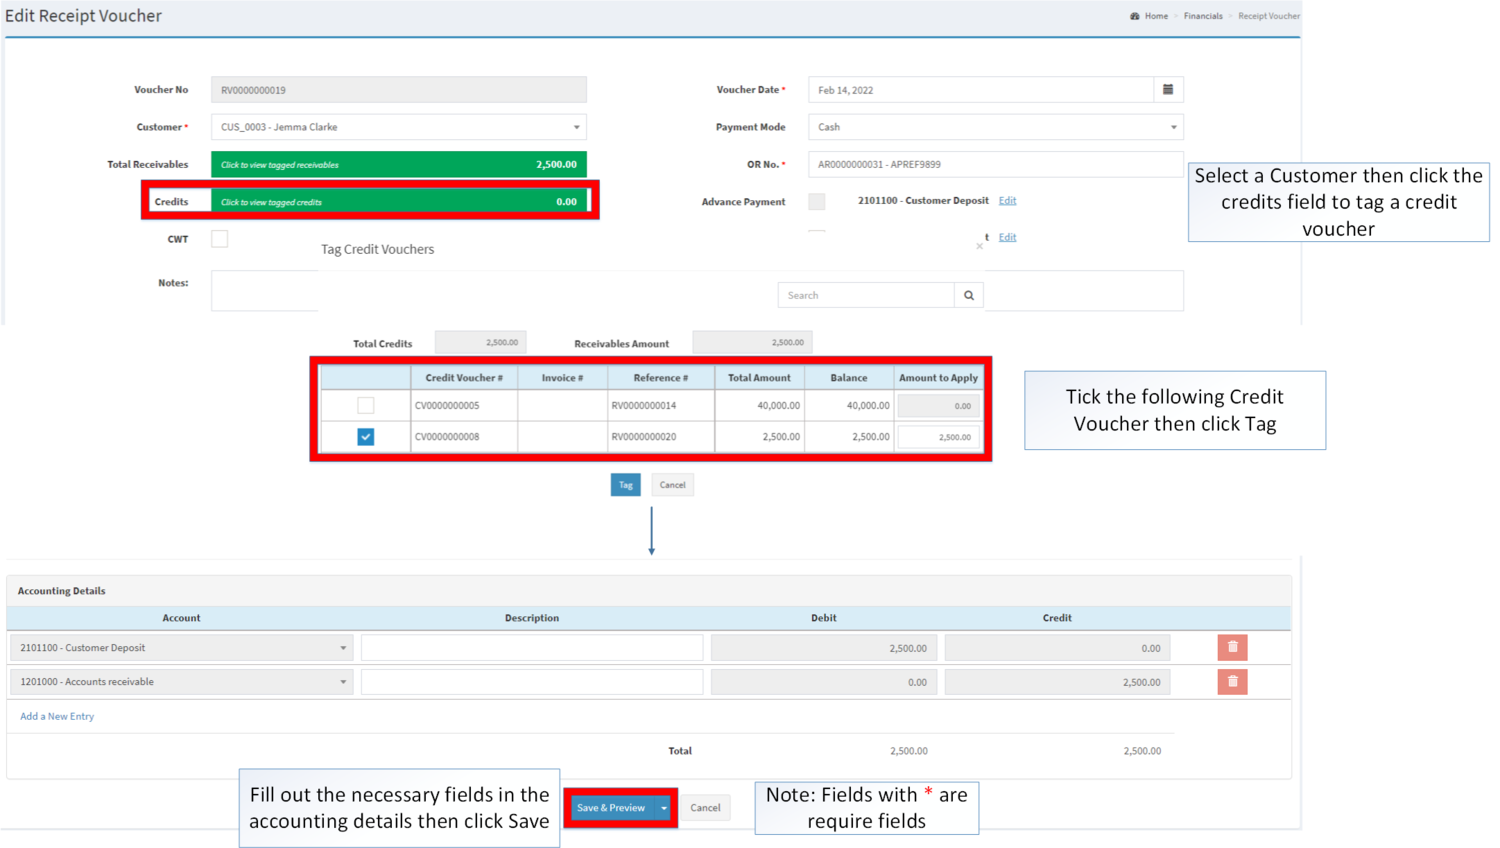
Applying Credit Voucher
- Under Create Receipt Voucher, Select A Customer and tagged a Receivable
- Click Credits
- Click the Vouchers need to Apply in the Transaction then click Tag
| Modules | |
|---|---|
| Financials | Accounts Receivable | Credit Voucher | Financials |
| Maintenance | ATC Code | Bank | Customer | Chart of Account |
