Difference between revisions of "Sales Person"
(Tag: Visual edit) |
(Tag: Visual edit) |
||
| Line 20: | Line 20: | ||
=====Adding Sales Person===== | =====Adding Sales Person===== | ||
| − | # | + | #Click [[Sales Person]] under Maintenance Menu |
| − | #Click | + | #Under Sales Person Screen, Click Add Sales Person |
| − | #Fill | + | #Fill out the necessary fields then click Save. Note: Fields with * are require fields. |
[[File:Maintenance - Sales Person - Add.png|border|center|1500x1500px]] | [[File:Maintenance - Sales Person - Add.png|border|center|1500x1500px]] | ||
| Line 65: | Line 65: | ||
=====Viewing Sales Person===== | =====Viewing Sales Person===== | ||
| − | # | + | #Click [[Sales Person]] under Maintenance Menu |
#Select a Sales Person record that needs to view its details. Click the drop-down arrow then click View. | #Select a Sales Person record that needs to view its details. Click the drop-down arrow then click View. | ||
#The user has an option to edit the Sales Person Record upon viewing it. | #The user has an option to edit the Sales Person Record upon viewing it. | ||
| Line 73: | Line 73: | ||
=====Editing Sales Person===== | =====Editing Sales Person===== | ||
| − | # | + | #Click [[Sales Person]] under Maintenance Menu |
#Click '''Add Sales Person''' Button | #Click '''Add Sales Person''' Button | ||
#Fill up the necessary fields. Please make sure that all tabs are filled out then click '''Save.''' | #Fill up the necessary fields. Please make sure that all tabs are filled out then click '''Save.''' | ||
| Line 119: | Line 119: | ||
*When Importing the records, the user should follow the following steps provided in the Importing Sales Person Screen such as | *When Importing the records, the user should follow the following steps provided in the Importing Sales Person Screen such as | ||
| − | |||
| − | |||
| − | |||
[[File:Maintenance - Sales Person - Import.png|border|center|1500x1500px]] | [[File:Maintenance - Sales Person - Import.png|border|center|1500x1500px]] | ||
| Line 196: | Line 193: | ||
=====Sales Person Tag Customer===== | =====Sales Person Tag Customer===== | ||
| − | # | + | #Click [[Sales Person]] under Maintenance Menu |
| − | #Select the Sales Person that needs to Tag [[Customer]]. Click the Drop-down arrow then select '''Tag | + | #Select the Sales Person that needs to Tag [[Customer]]. Click the Drop-down arrow then select '''Tag Customers''' |
| − | #Tick the | + | #Under Tag Customers to Sales Person Template Screen, Tick the following Customers that need to the Sales Person then click Save |
[[File:Maintenance - Sales Person - Tag Customers.png|border|center|1625x1625px]] | [[File:Maintenance - Sales Person - Tag Customers.png|border|center|1625x1625px]] | ||
| Line 212: | Line 209: | ||
=====Importing Customer in Sales Person===== | =====Importing Customer in Sales Person===== | ||
| − | # | + | #Click [[Sales Person]] under Maintenance Menu |
| − | #Select the Sales Person that needs to | + | #Select the Sales Person record that needs to tag multiple [[Customer|Customers]]. Click the Drop-down arrow then select '''Import Customers''' |
| − | #Download the Template | + | #Download the Template link provided under step 1 |
| − | #Fill | + | #Fill up the information needed for each columns of the template |
| − | # | + | #Upload the update file then click Import |
| − | [[File:Maintenance - Sales Person - Import Customers.png|border|center| | + | [[File:Maintenance - Sales Person - Import Customers.png|border|center|1889x1889px]] |
<br /> | <br /> | ||
=====Transferring Customer in Sales Person===== | =====Transferring Customer in Sales Person===== | ||
| − | # | + | #Click [[Sales Person]] under Maintenance Menu |
| − | #Select | + | #Select a Sales Person that needs to Transfer [[Customer|Customers]] to another Sales Person. Click the Drop-down arrow then select '''Transfer Customers''' |
| − | # | + | #Under Transfer Customer Screen, Select a Sales person to transfer the customers from the current Sales Person then click Transfer. |
[[File:Maintenance - Sales Person - Transfer Customers.png|border|center|1500x1500px]] | [[File:Maintenance - Sales Person - Transfer Customers.png|border|center|1500x1500px]] | ||
Revision as of 13:56, 24 March 2022
Contents
- 1 Sales Person
- 1.1 Requirements before using Sales Person
- 1.2 Sales Person Record List
- 1.3 Adding Sales Person
- 1.4 Viewing Sales Person
- 1.5 Editing Sales Person
- 1.6 Importing and Exporting Sales Person
- 1.7 Sales Person Tag Customer
- 1.8 Importing Customer in Sales Person
- 1.9 Transferring Customer in Sales Person
- 1.10 Activating Sales Person Record
- 1.11 Deactivating Sales Person Record
- 1.12 Deleting Sales Person Record
- 1.13 Sales Person Record Option
Sales Person
This maintenance screen allows the user to configure and add Sales Person to be assigned on the transactions.
Requirements before using Sales Person
- The user should setup the following Maintenance Module in order to proceed on using the Sales Person
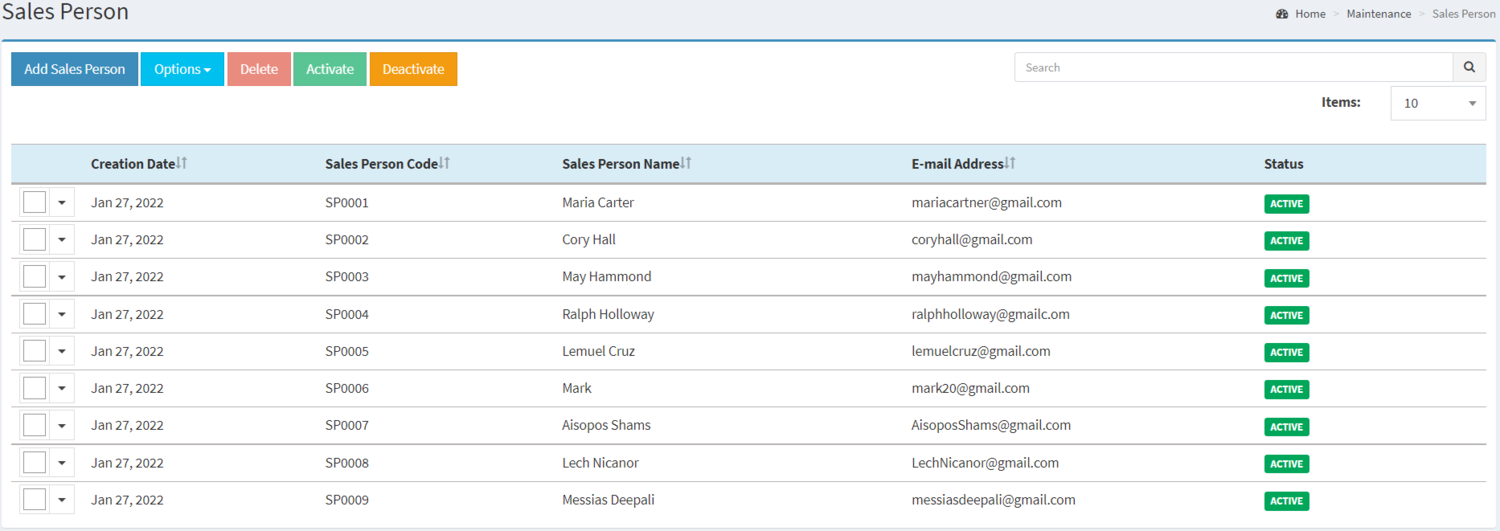
Sales Person Record List
Notes:
- Sales Person must be on ACTIVE status in order to use it on Sales Order module.
- INACTIVE person can still be used on past Sales Order Transactions as long as it is tag prior to its deactivation.
Adding Sales Person
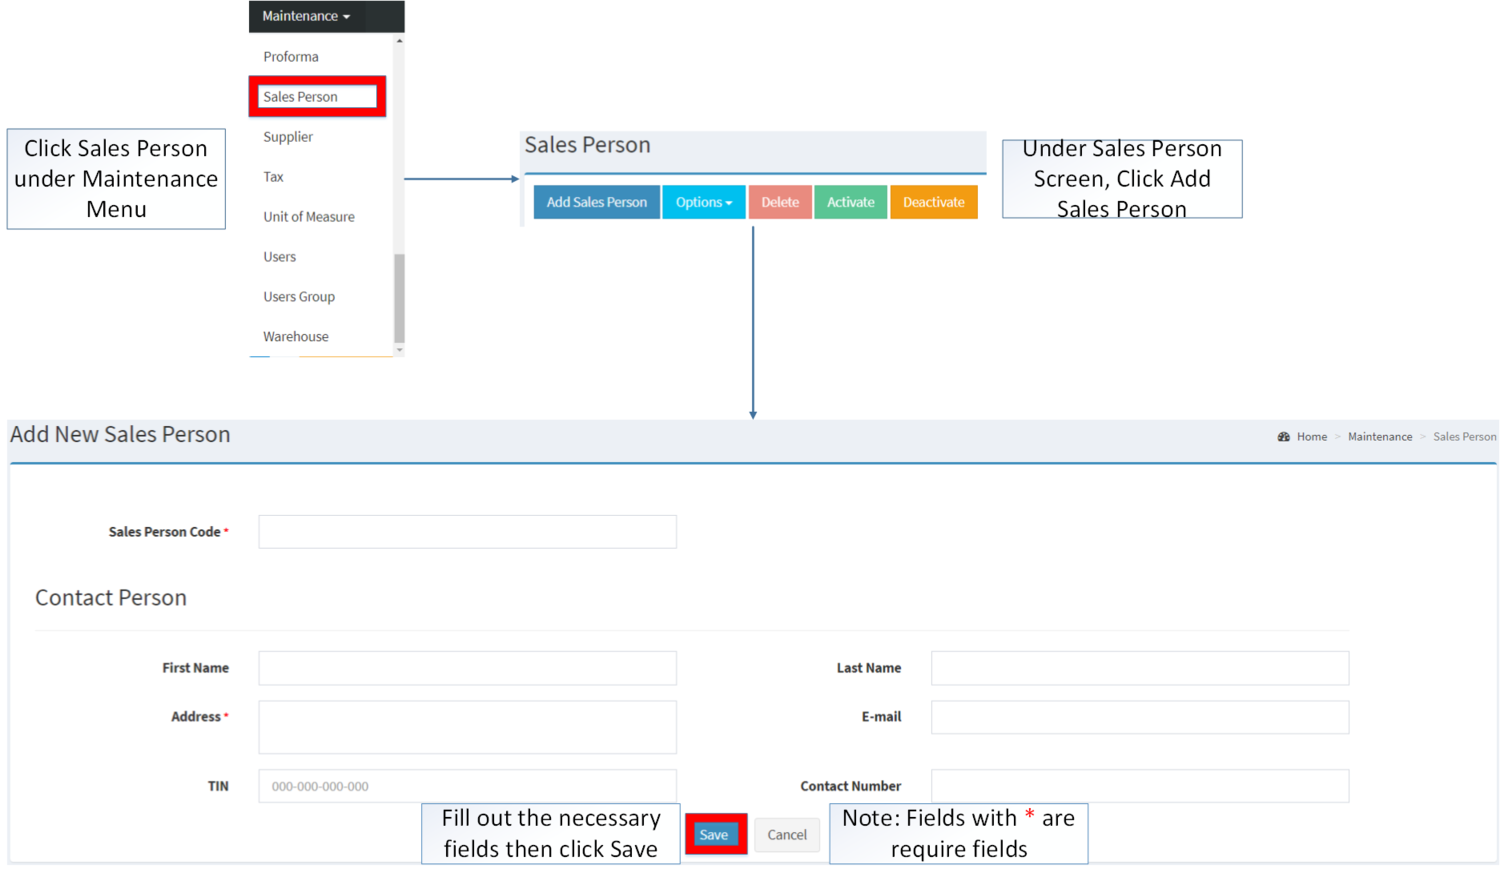
- Click Sales Person under Maintenance Menu
- Under Sales Person Screen, Click Add Sales Person
- Fill out the necessary fields then click Save. Note: Fields with * are require fields.
| Field | Description | Expected Values |
|---|---|---|
| 1.Sales Person Code | •Reference Code for Sales Person | •Alphanumeric |
| 2.First Name | •First Name of the Sales Person | •Alphanumeric |
| 3.Last Name | •Last Name of the Sales Person | •Alphanumeric |
| 4.Address | •Address of the Sales Person | •Alphanumeric |
| 5.Email | •Email Address of the Sales Person | •Alphanumeric |
| 6.TIN | •Tax Identification Number of the Sales Person | •Number |
| 7.Contact Number | •Contact Number of the Sales Person | •Number |
Notes
- Sales Person Code is a Unique field in the module. You cannot edit this field once created.
Viewing Sales Person
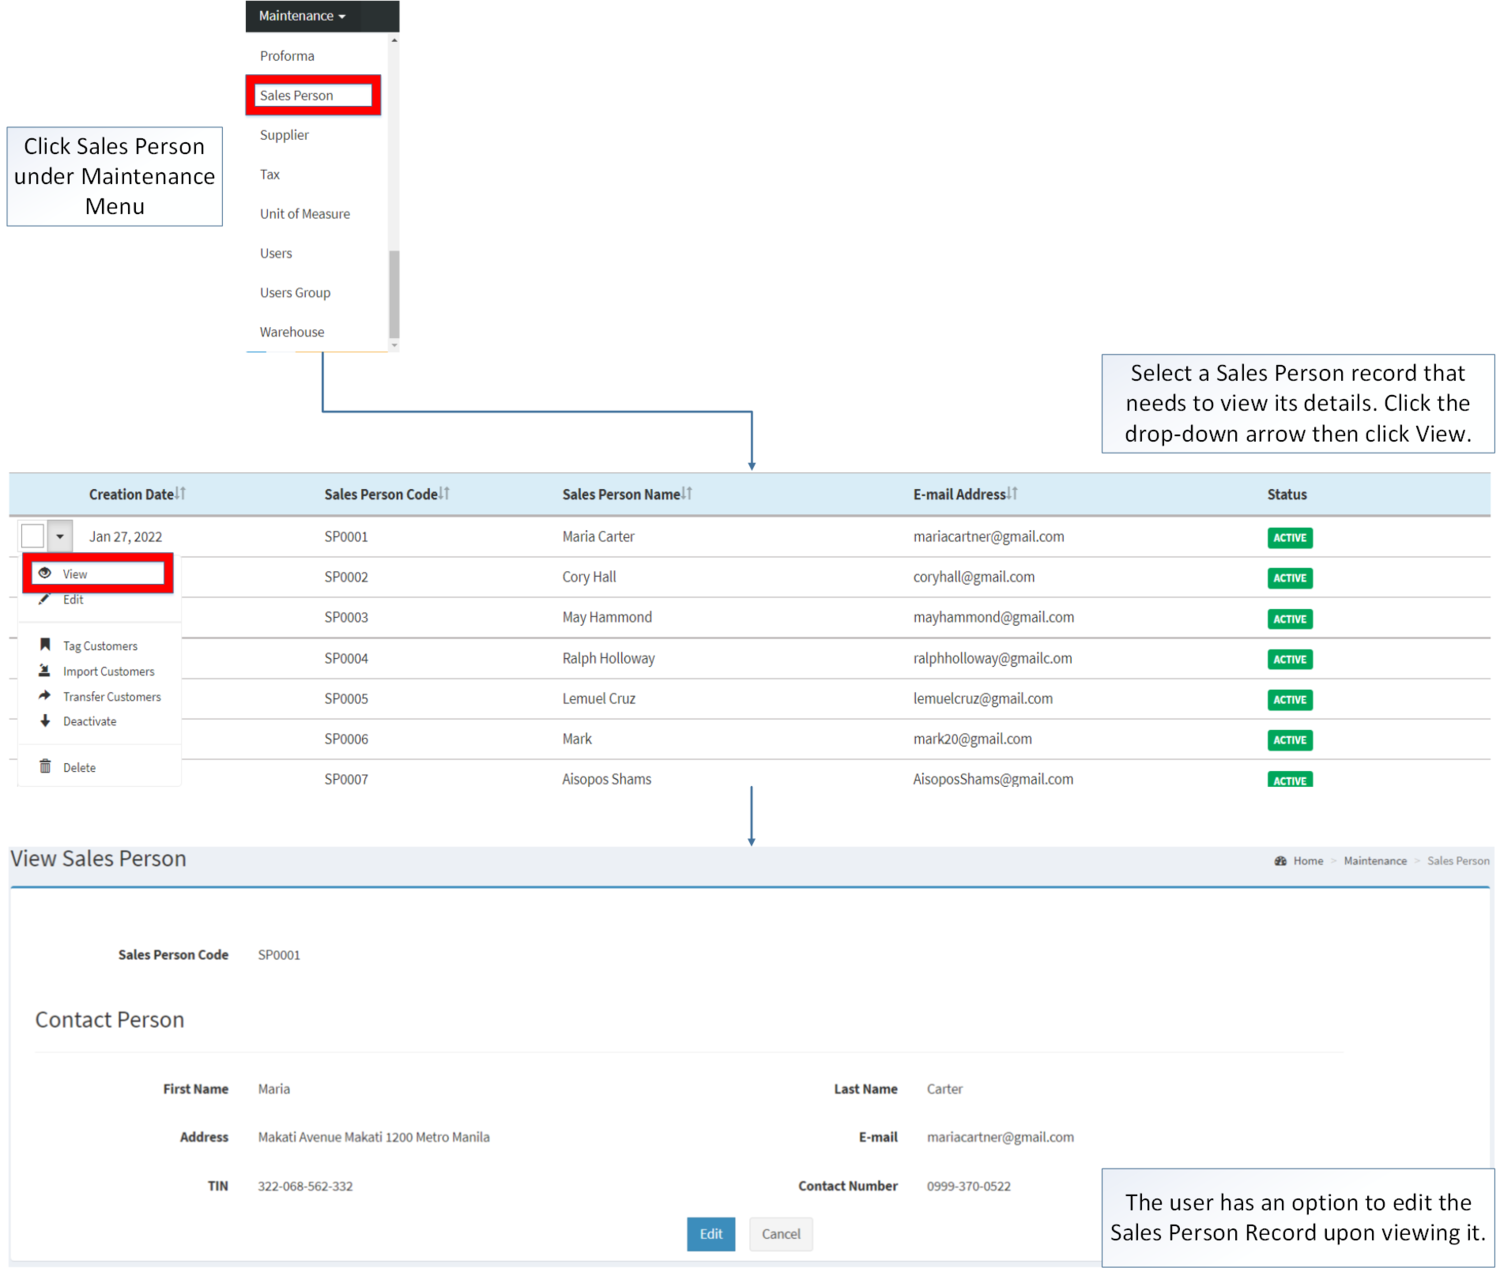
- Click Sales Person under Maintenance Menu
- Select a Sales Person record that needs to view its details. Click the drop-down arrow then click View.
- The user has an option to edit the Sales Person Record upon viewing it.
Editing Sales Person
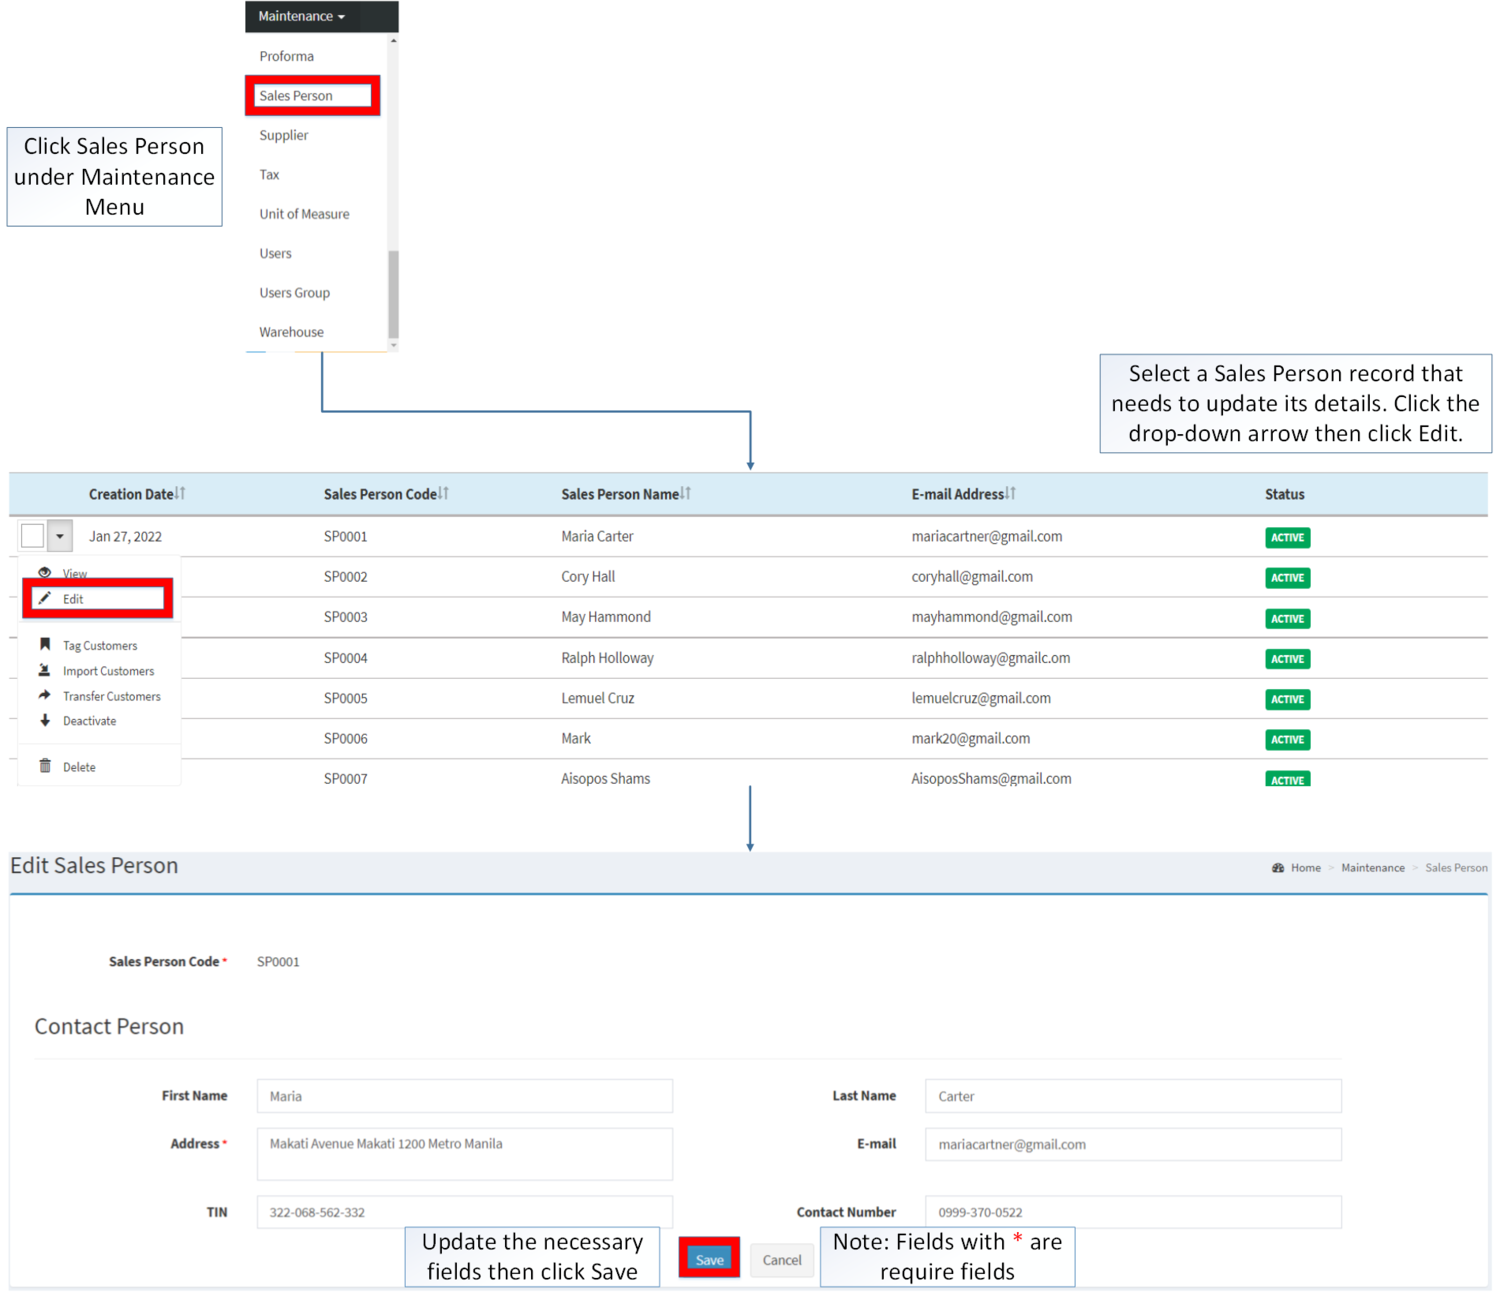
- Click Sales Person under Maintenance Menu
- Click Add Sales Person Button
- Fill up the necessary fields. Please make sure that all tabs are filled out then click Save.
| Field | Description | Expected Values |
|---|---|---|
| 1.First Name | •First Name of the Sales Person | •Alphanumeric |
| 2.Last Name | •Last Name of the Sales Person | •Alphanumeric |
| 3.Address | •Address of the Sales Person | •Alphanumeric |
| 4.Email | •Email Address of the Sales Person | •Alphanumeric |
| 5.TIN | •Tax Identification Number of the Sales Person | •Number |
| 8.Contact Number | •Contact Number of the Sales Person | •Number |
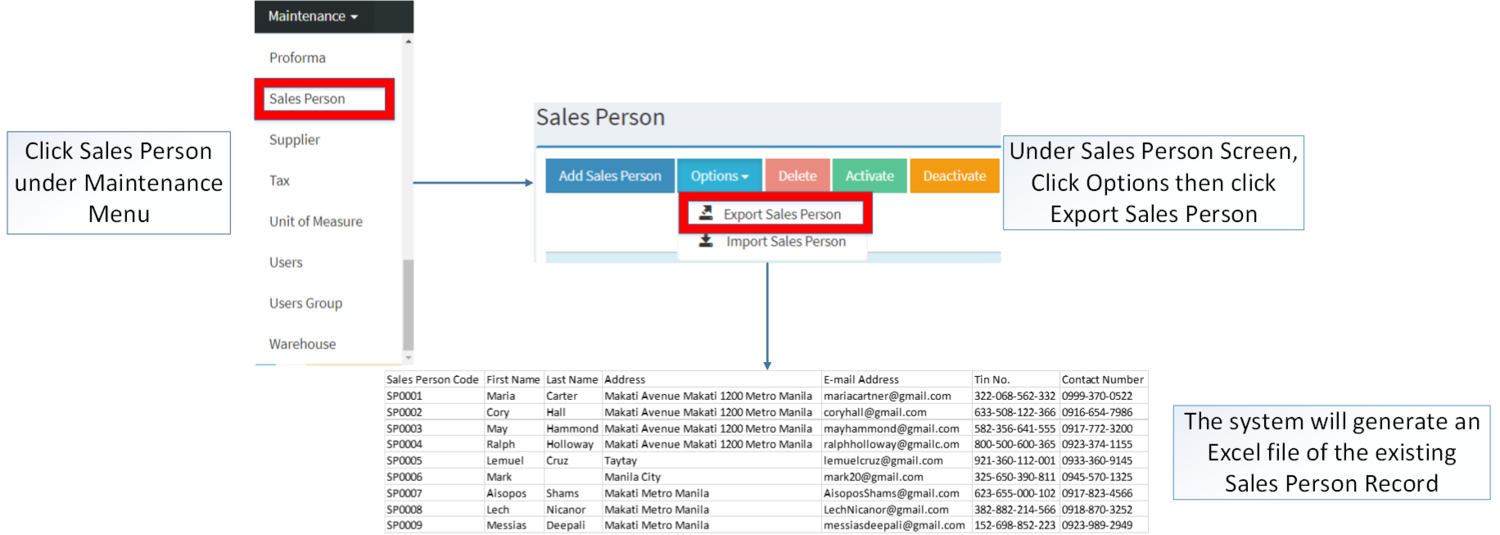
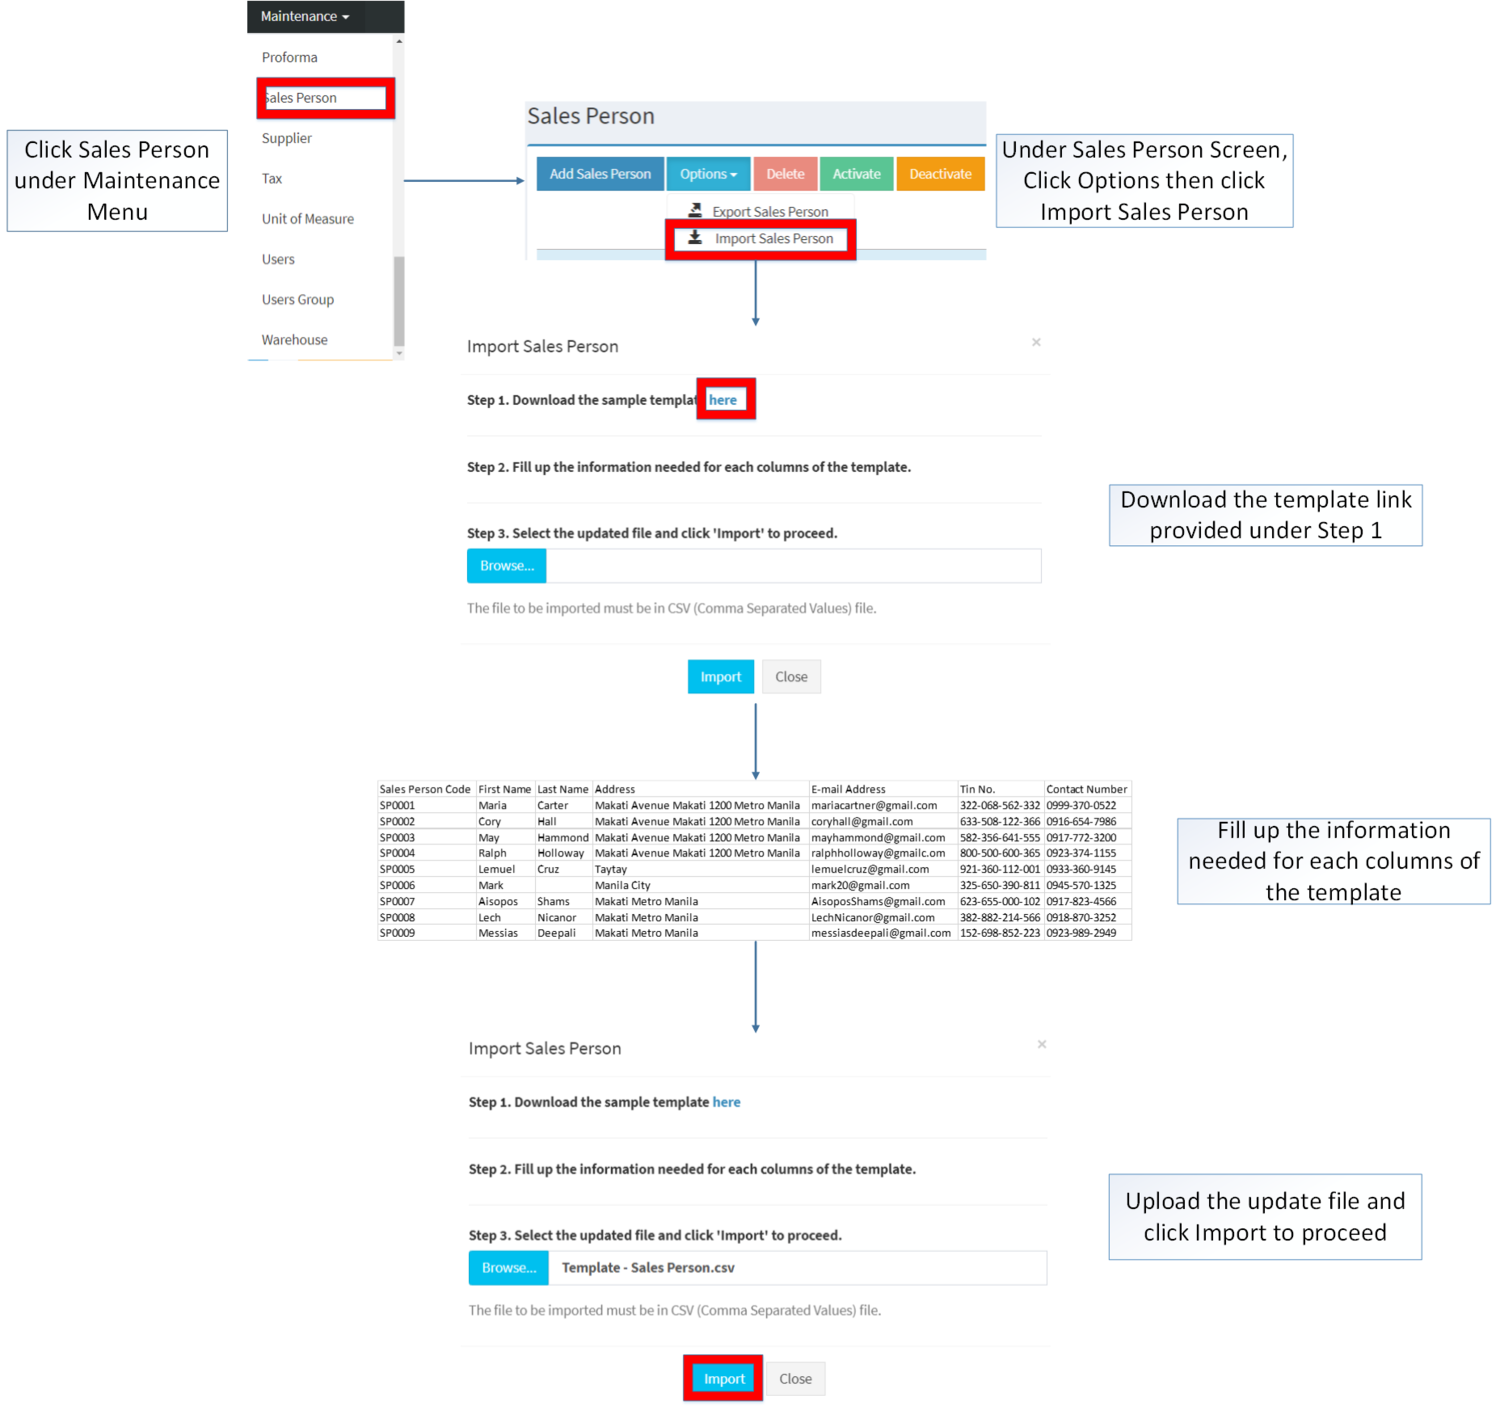
Importing and Exporting Sales Person
1. Under Sales Person, Click Options
2. Under Options, The user may Export or Import The Record
- When Exporting the records, the user may also use the filter options through tabs for precise searching and exporting of records.
- When Importing the records, the user should follow the following steps provided in the Importing Sales Person Screen such as
| Field | Description | Allowed Inputs | Input Restrictions | Required Field? |
|---|---|---|---|---|
| 1.Sales Person Code | Reference Code for Sales Person | *Alphanumeric
*Dash "-" *Underscore "_" |
*Up to 20 characters
*Other Special Characters |
Yes |
| 2.First Name | First Name of the Sales Person | *Alphanumeric
*Special Characters (Period, Comma, Space, Percent, Ampersand, Left Parenthesis, Right Parenthesis, Left Bracket, Right Bracket, Underscore, Minus, Plus, Equal, Slash, Dollar Sign, Number Sign, At Sign, Exclamation, Single Quote, Double Quote, Colon, and Semicolon) |
*Up to 50 characters
*Other Special Characters not mentioned |
No |
| 3.Last Name | Last Name of the Sales Person | *Alphanumeric
*Special Characters (Period, Comma, Space, Percent, Ampersand, Left Parenthesis, Right Parenthesis, Left Bracket, Right Bracket, Underscore, Minus, Plus, Equal, Slash, Dollar Sign, Number Sign, At Sign, Exclamation, Single Quote, Double Quote, Colon, and Semicolon) |
*Up to 50 characters
*Other Special Characters not mentioned |
No |
| 4.Address | Address of the Sales Person | *Alphanumeric
*Special Characters (Period, Comma, Space, Percent, Ampersand, Left Parenthesis, Right Parenthesis, Left Bracket, Right Bracket, Underscore, Minus, Plus, Equal, Slash, Dollar Sign, Number Sign, At Sign, Exclamation, Single Quote, Double Quote, Colon, and Semicolon) |
*Up to 105 characters
*Other Special Characters not mentioned |
Yes |
| 5.Email | Email Address of the Sales Person | *Alphanumeric
*Dash "-" *Underscore "_" *Must follow the format ___@__.__ |
*Up to 150 characters
*Any Special Characters except Dash and Underscore |
No |
| 6.TIN | Tax Identification Number of the Sales Person | *Numeric | *Up to 12 characters
*Any inputs except numbers |
No |
| 7.Contact Number | Contact Number of the Sales Person | Numeric | *Up to 11 characters
*Any inputs except numbers |
No |
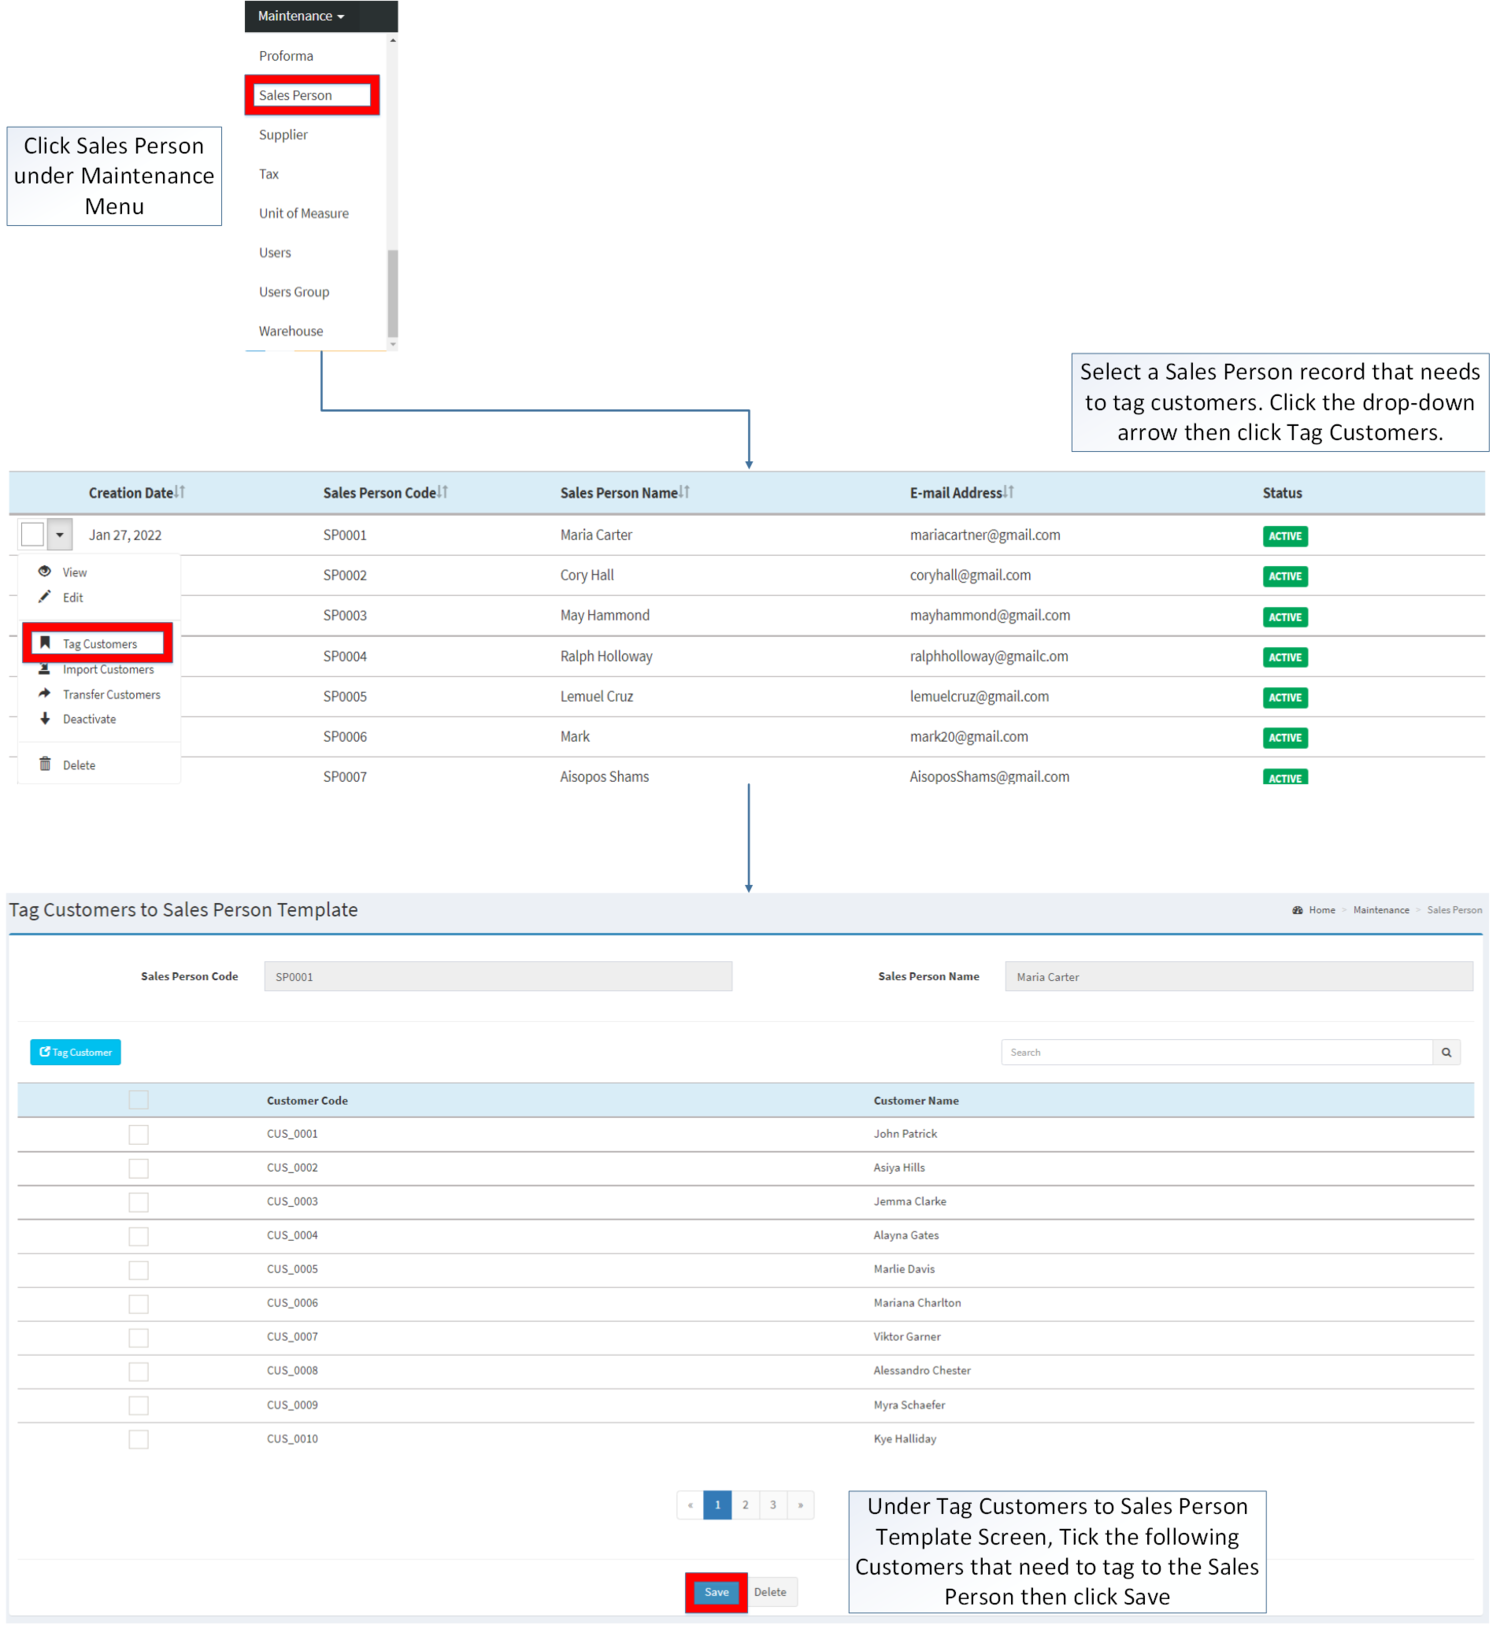
Sales Person Tag Customer
- Click Sales Person under Maintenance Menu
- Select the Sales Person that needs to Tag Customer. Click the Drop-down arrow then select Tag Customers
- Under Tag Customers to Sales Person Template Screen, Tick the following Customers that need to the Sales Person then click Save
Notes:
- The Customer status should be ACTIVE when tagging it to the Sales Person.
- Clicking the Tag Customer under Tag Customer Sales Person Template will allow the user to tag multiple user using the import function of the system.
- When using the customer on a transaction. The tagged Sales Person will be used as default.
- The status can be seen in Customer Maintenance Module.
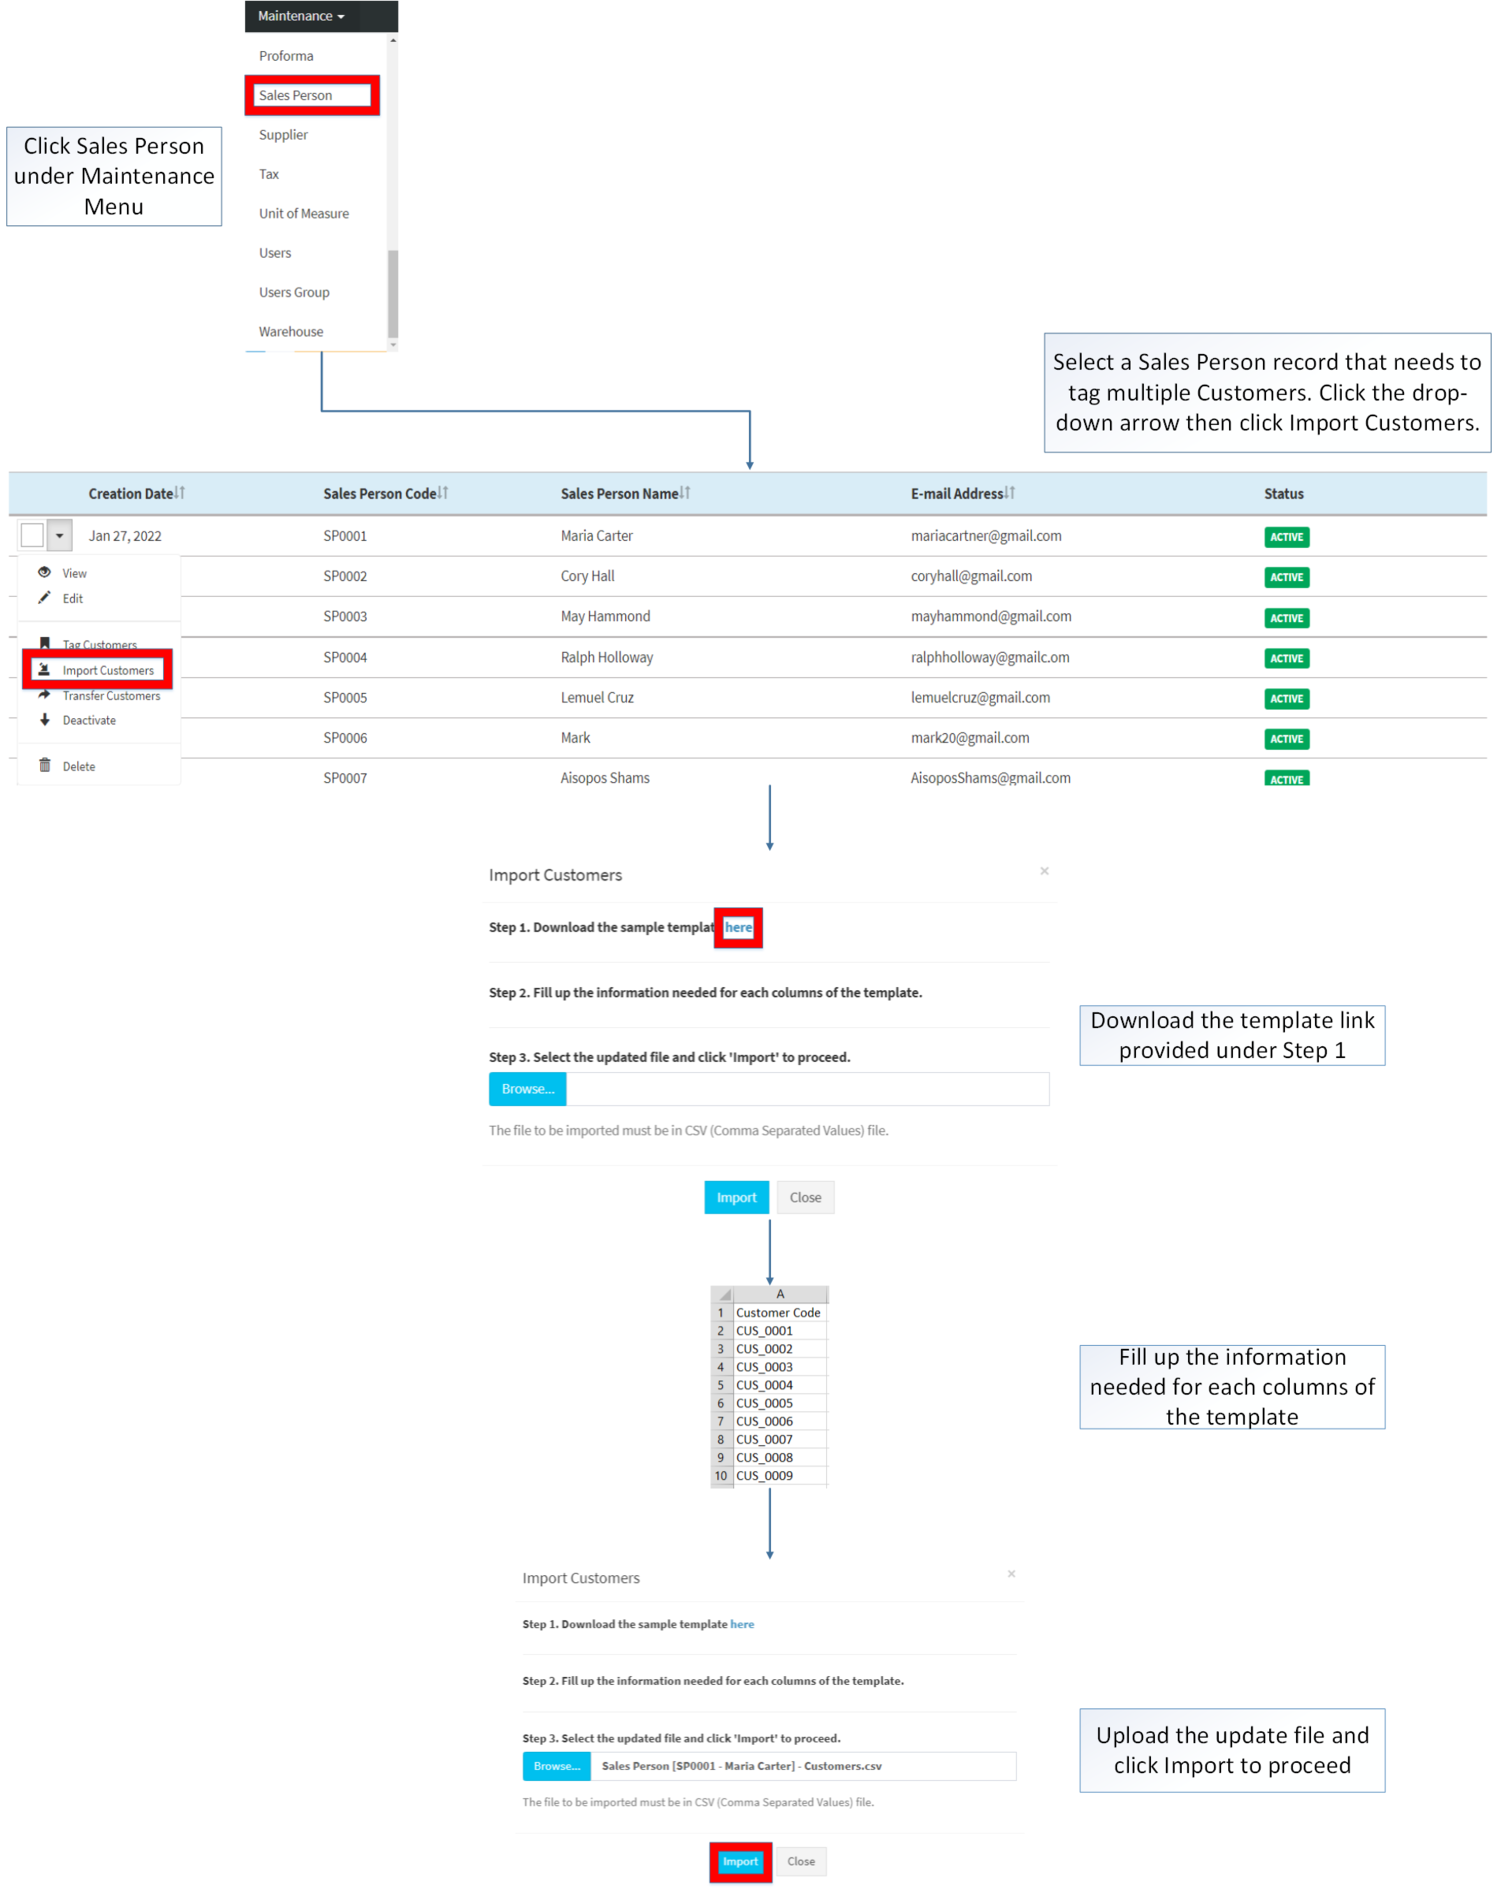
Importing Customer in Sales Person
- Click Sales Person under Maintenance Menu
- Select the Sales Person record that needs to tag multiple Customers. Click the Drop-down arrow then select Import Customers
- Download the Template link provided under step 1
- Fill up the information needed for each columns of the template
- Upload the update file then click Import
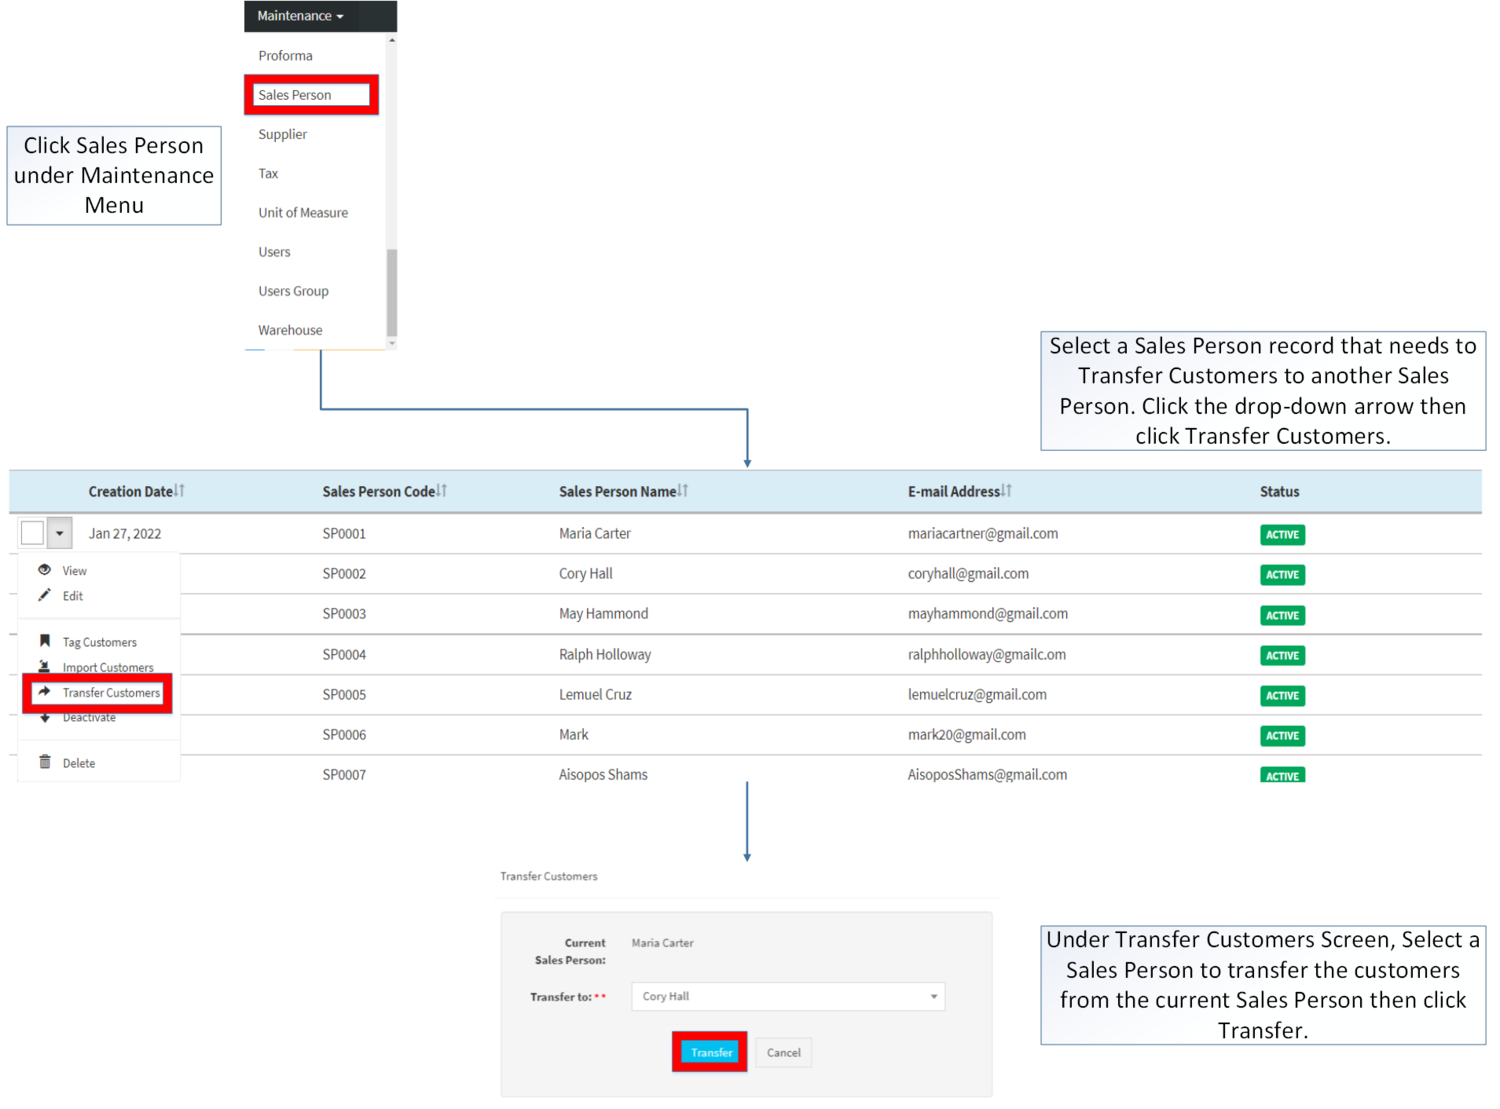
Transferring Customer in Sales Person
- Click Sales Person under Maintenance Menu
- Select a Sales Person that needs to Transfer Customers to another Sales Person. Click the Drop-down arrow then select Transfer Customers
- Under Transfer Customer Screen, Select a Sales person to transfer the customers from the current Sales Person then click Transfer.
Notes:
- Sales Person must be Active in order to be transferred to another Sales Person
- Sales Person to be transfer to must be ACTIVE to proceed.
- Sales Person to be transfer to must be ACTIVE to proceed.
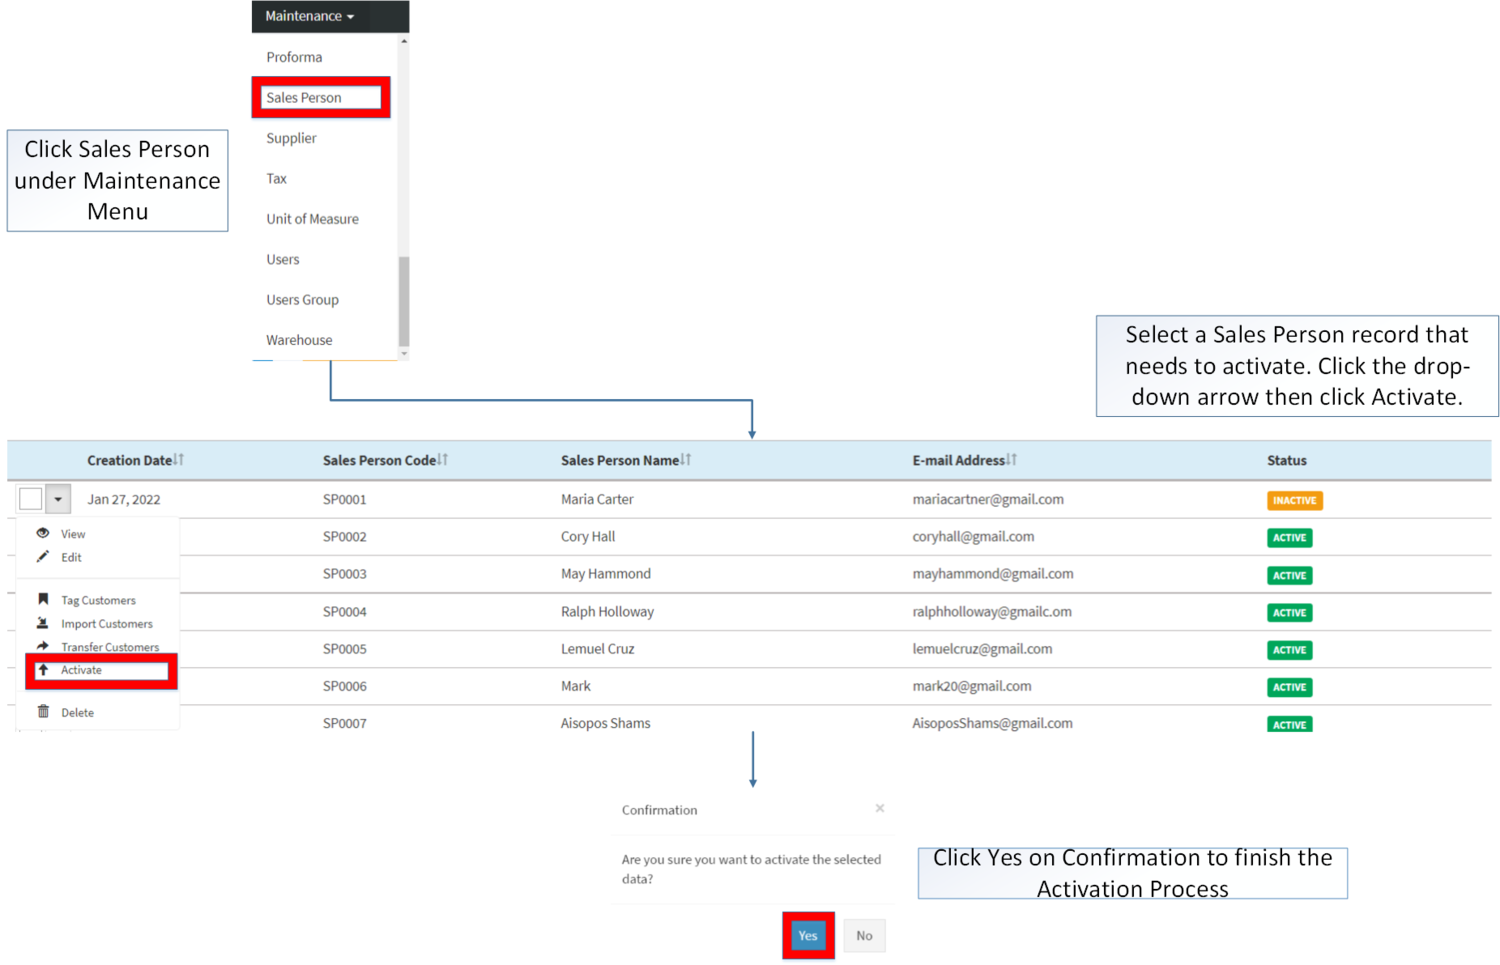
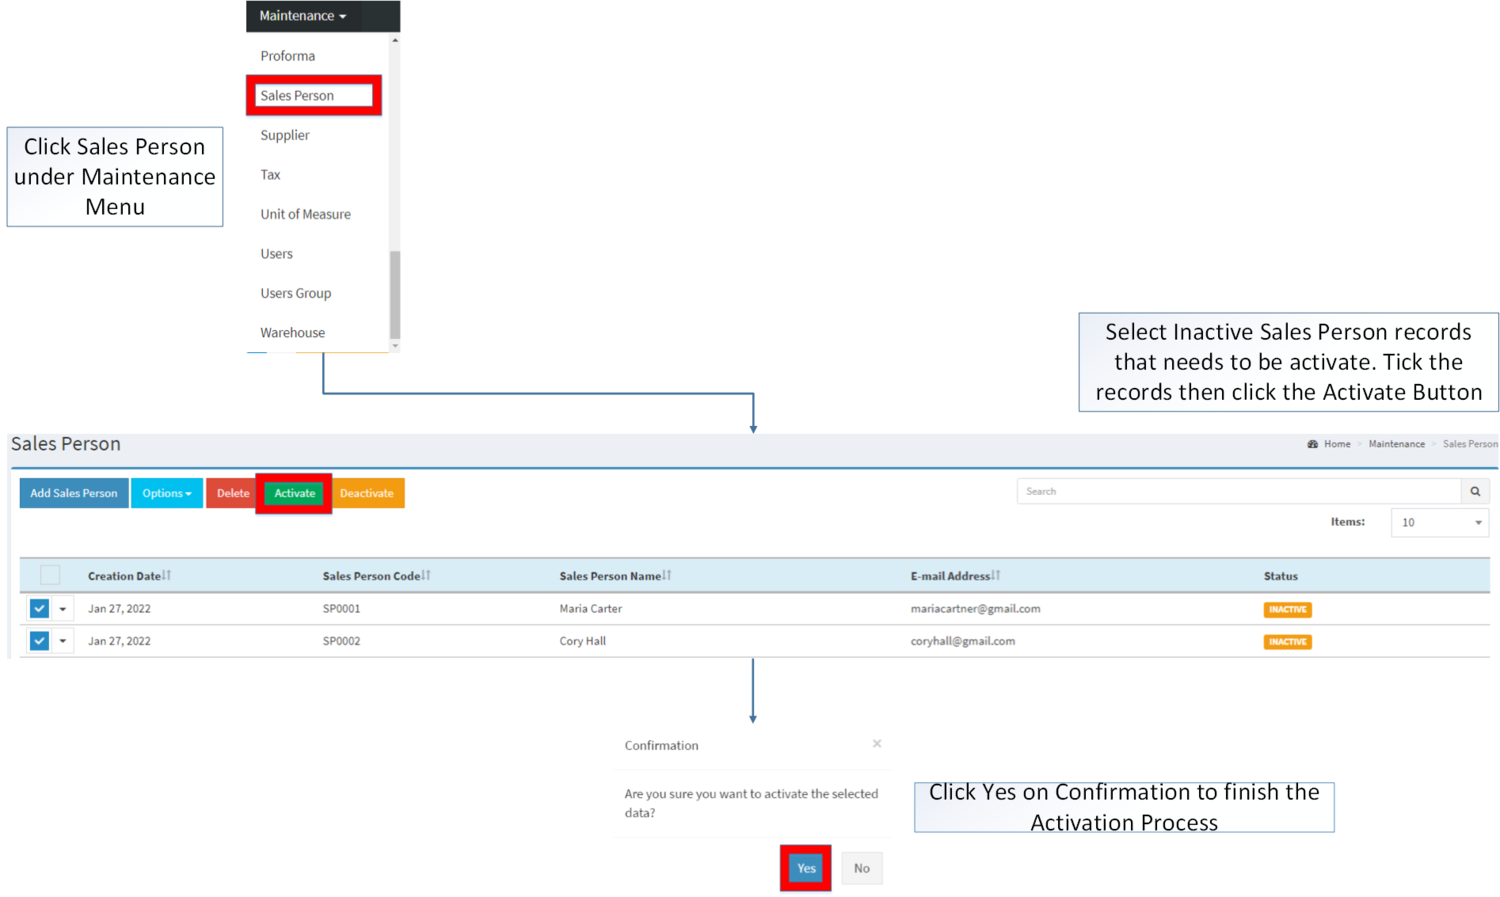
Activating Sales Person Record
Sales Person can be Activated in two ways:
- Using drop-down arrow of a record can be used in single record Activation
- Using Activate Button for activating multiple record.
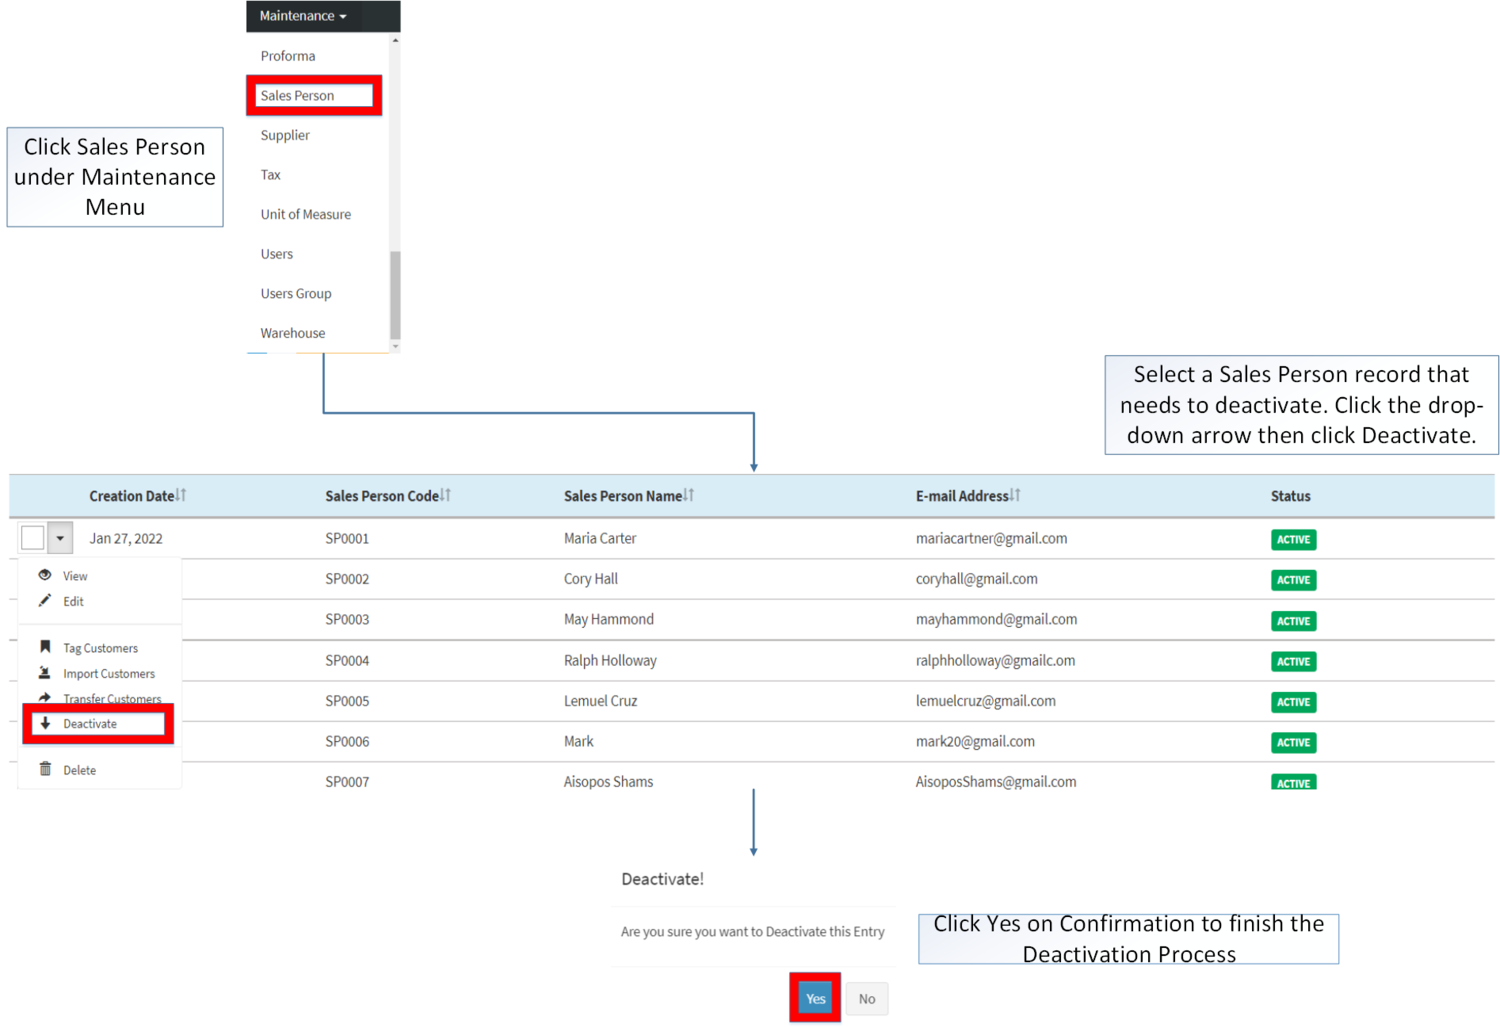
Deactivating Sales Person Record
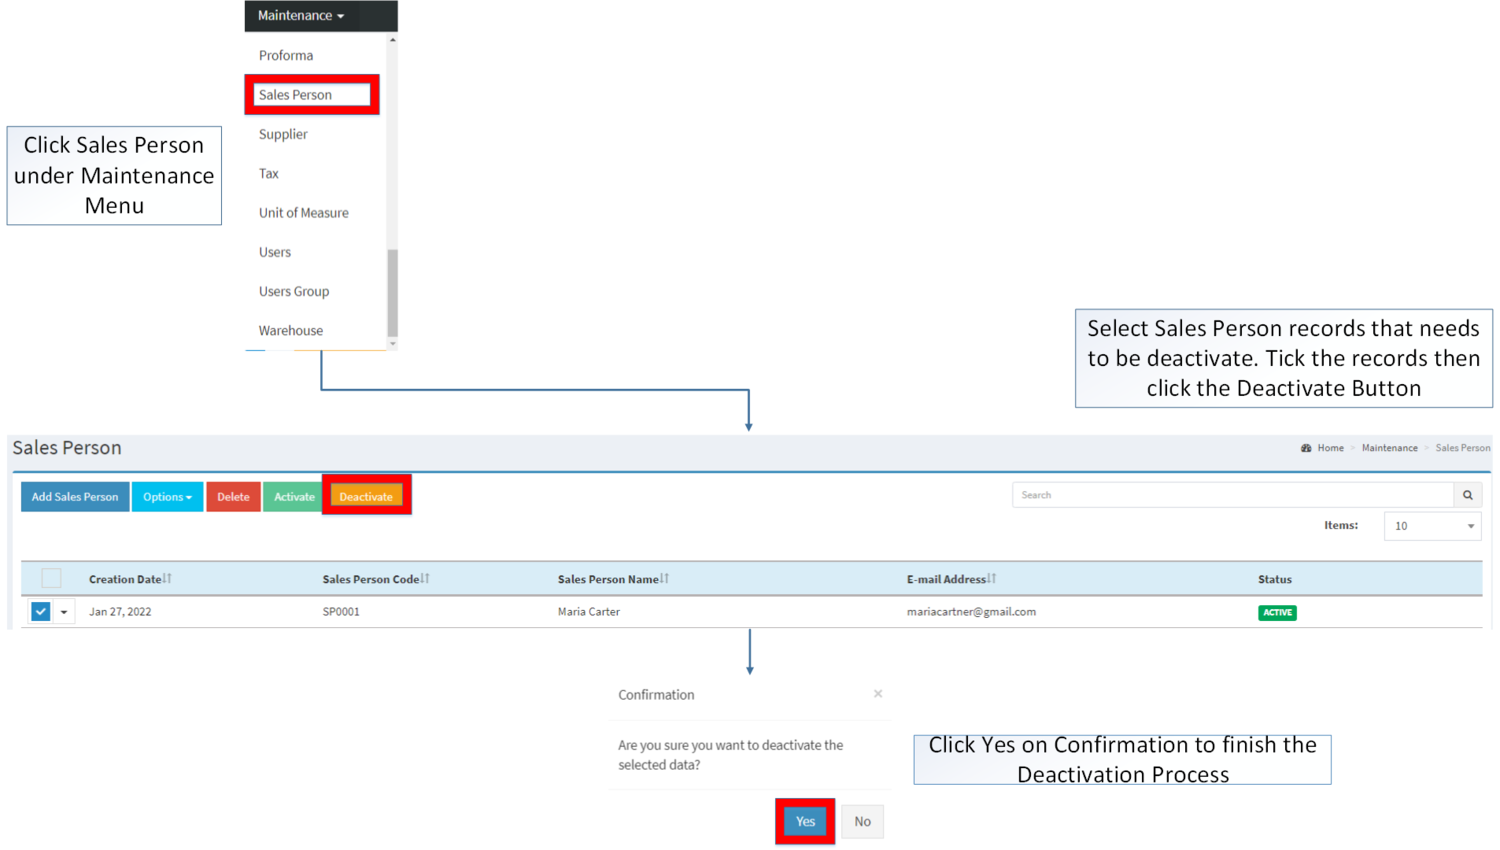
Sales Person can be deactivated in two ways:
- Using drop-down arrow of a record can be used in single record deactivation
- Using Deactivate Button for deactivating multiple record
Deleting Sales Person Record
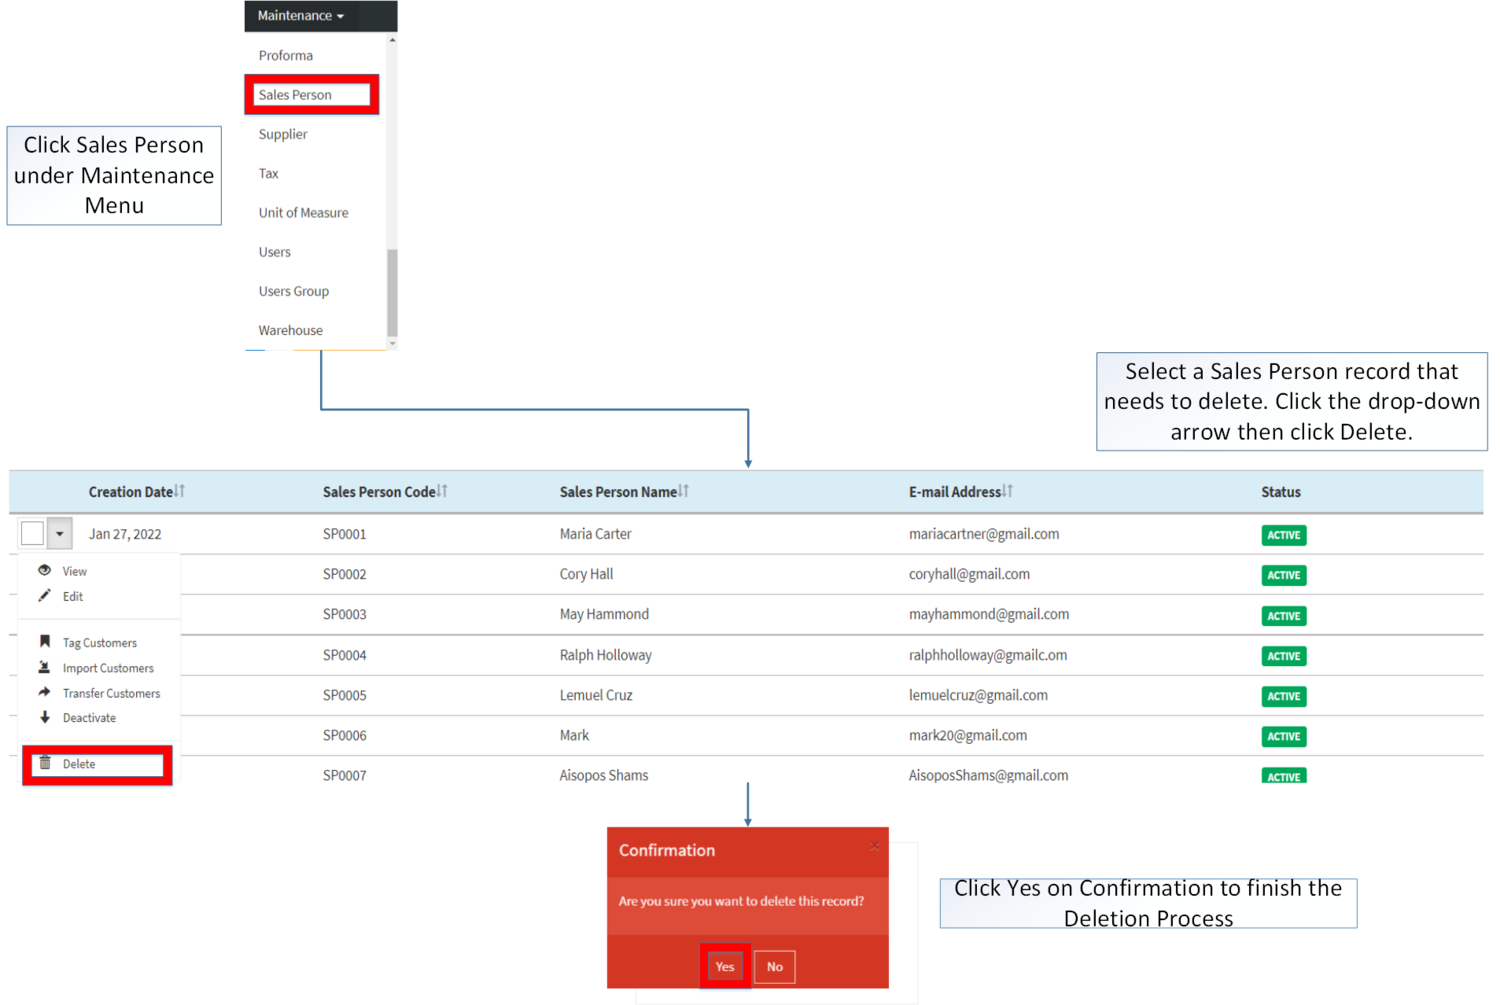
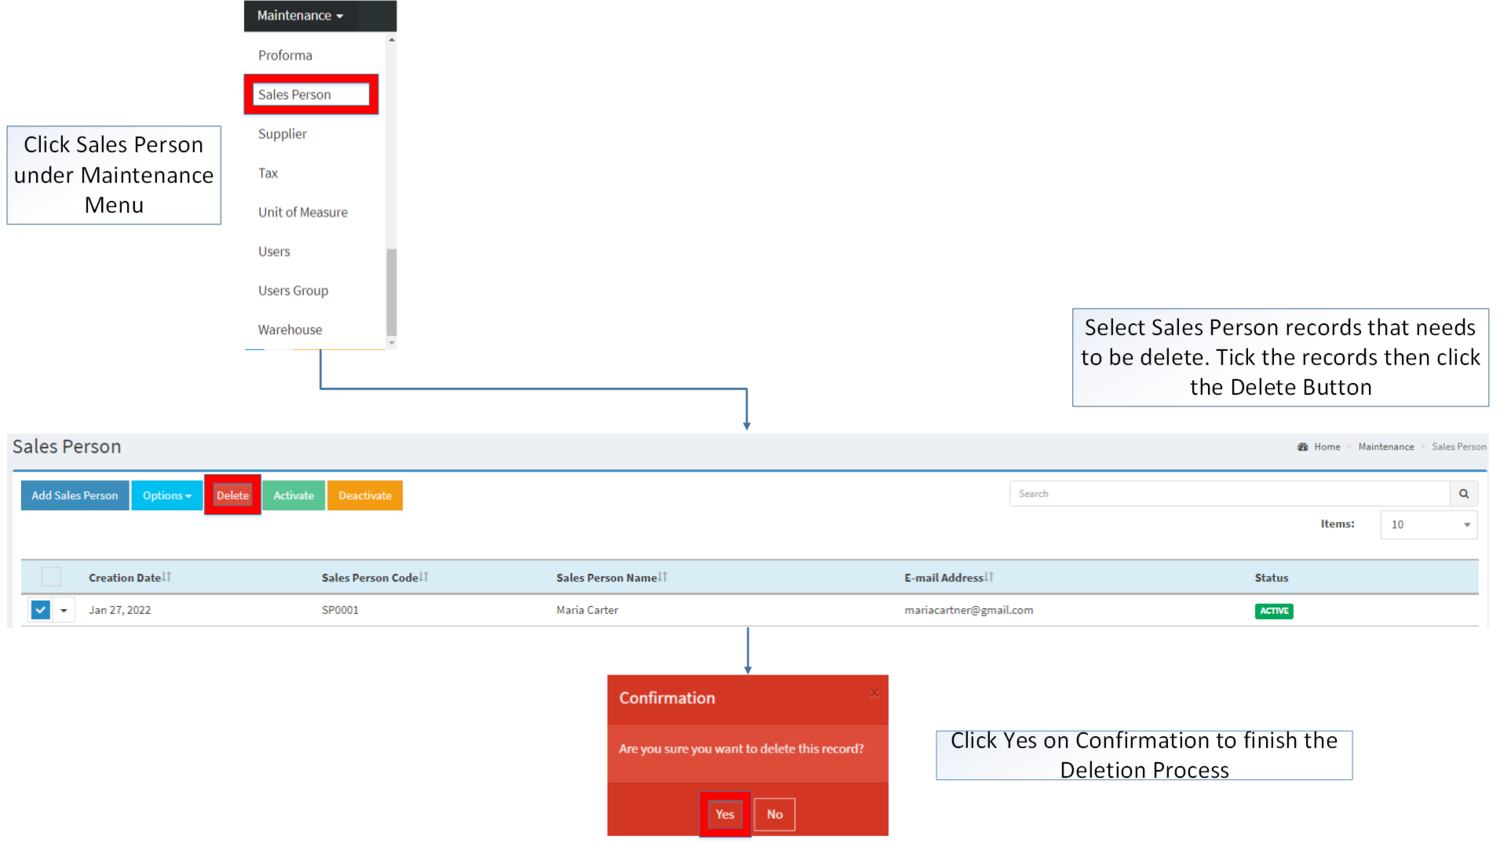
Sales Person can be deleted in two ways:
- Using drop-down arrow of a record can be used in single record deletion
- Using Delete Button for deleting multiple record
Sales Person Record Option
| Status | View | Edit | Tag Customers | Import Customers | Transfer Customers | Deactivate | Activate | Delete |
|---|---|---|---|---|---|---|---|---|
| ACTIVE | ☑ | ☑ | ☑ | ☑ | ☑ | ☑ | ☑ | |
| INACTIVE | ☑ | ☑ | ☑ | ☑ | ☑ | ☑ | ☑ |
Notes
- Customer should be on ACTIVE status in order to use is on the Customer related functions namely: Tag Customer, Import Customers and Transfer Customers.
- This can be seen in Customer Maintenance Module
- The user is allowed to edit the details when viewing the record.
- Activating/Deactivating and Deleting of Records can be done in two ways.
- For single records, the user may use the drop down arrow then the action that need to perform.
- For multiple records, the user may tick the records then click the action button that need to perform
- Click the Yes in the confirmation to proceed on the action taken.
| Modules | |
|---|---|
| Maintenance | Maintenance | Sales Person | Customer |
| Sales | Sales Order |
