You are viewing an old version of this page. Return to the latest version.
Difference between revisions of "Warehouse"
(Tag: Visual edit) |
(Tag: Visual edit) |
||
| Line 19: | Line 19: | ||
=====Adding Warehouse===== | =====Adding Warehouse===== | ||
| − | # | + | #Click [[Warehouse]] under Maintenance Menu |
| − | #Click '''Add Warehouse''' Button | + | #Under Warehouse Menu Screen, Click '''Add Warehouse''' Button |
| − | #Fill out the necessary fields then click '''Save''' | + | #Fill out the necessary fields then click '''Save. Note: Fields with * are require fields''' |
[[File:Maintenance - Warehouse - Add.png|border|center|1500x1500px]] | [[File:Maintenance - Warehouse - Add.png|border|center|1500x1500px]] | ||
| Line 47: | Line 47: | ||
=====View Warehouse===== | =====View Warehouse===== | ||
| − | # | + | #Click [[Warehouse]] under Maintenance Menu |
#Select a Warehouse that needs to view its details. Click the drop-down arrow then click View. | #Select a Warehouse that needs to view its details. Click the drop-down arrow then click View. | ||
#The user has an option to Edit the Warehouse record upon viewing it. | #The user has an option to Edit the Warehouse record upon viewing it. | ||
| Line 55: | Line 55: | ||
=====Editing Warehouse===== | =====Editing Warehouse===== | ||
| − | # | + | #Click [[Warehouse]] under Maintenance Menu |
| − | # | + | #Select a Warehouse Entry that needs to updates its details. Click the Drop-down Arrow then choose '''Edit.''' |
| − | #Update the fields then click | + | #Update the necessary fields then click Save |
[[File:Maintenance - Warehouse - Edit.png|border|center|1500x1500px]] | [[File:Maintenance - Warehouse - Edit.png|border|center|1500x1500px]] | ||
| Line 85: | Line 85: | ||
*When Importing the records, the user should follow the following steps provided in the Importing Warehouse Screen such as | *When Importing the records, the user should follow the following steps provided in the Importing Warehouse Screen such as | ||
| − | |||
| − | |||
| − | |||
[[File:Maintenance - Warehouse - Import.png|border|center|1710x1710px]] | [[File:Maintenance - Warehouse - Import.png|border|center|1710x1710px]] | ||
| Line 206: | Line 203: | ||
|Inventory | |Inventory | ||
|[[Inventory Adjustment]]<nowiki> | </nowiki>[[Inventory Inquiry]]<nowiki> | </nowiki>[[Inventory Movement]]<nowiki> | </nowiki>[[Stock Transfer]]<nowiki> | </nowiki>[[Purchase Return]]<nowiki> | </nowiki>[[Sales Return]] | |[[Inventory Adjustment]]<nowiki> | </nowiki>[[Inventory Inquiry]]<nowiki> | </nowiki>[[Inventory Movement]]<nowiki> | </nowiki>[[Stock Transfer]]<nowiki> | </nowiki>[[Purchase Return]]<nowiki> | </nowiki>[[Sales Return]] | ||
| + | |- | ||
| + | ! colspan="2" |'''Reports''' | ||
| + | |- | ||
| + | |Sales Reports | ||
| + | |[[Sales per Warehouse]] | ||
|} | |} | ||
Revision as of 14:39, 24 March 2022
Maintenance | Sales | Purchase | Inventory
Contents
Warehouse
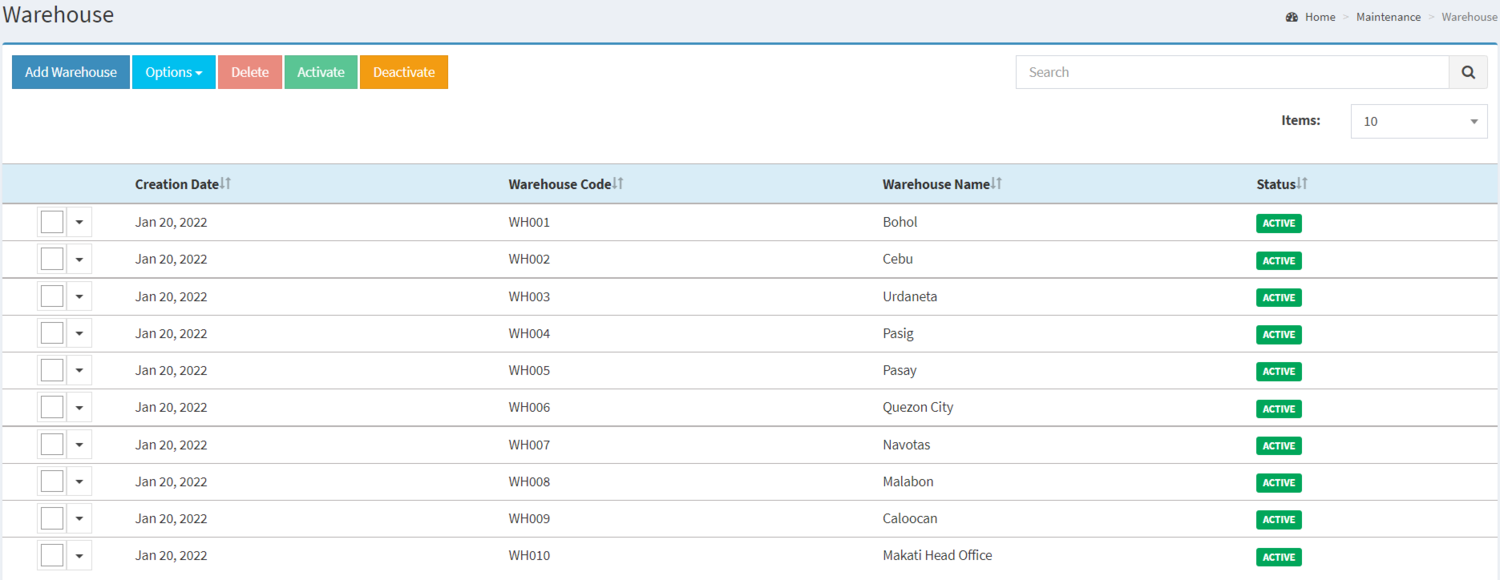
This maintenance screen allows the user to configure and add Warehouse to be used when adjusting, transferring stocks to be used on their transactions.
Warehouse Record List
Notes:
- Warehouse can be used as long its status is ACTIVE
- Items and Transactions tagged in the Warehouse are kept even it is deactivate.
- Inventory Adjustment and Stock Transfer cannot be done if the warehouse is INACTIVE
- Transactions under Sales Module, Purchase Module, Financials Module and Inventory Modules that uses Warehouse cannot be used if the status is INACTIVE
- INACTIVE warehouse used on past transactions prior to its deactivation can still be used.
Adding Warehouse
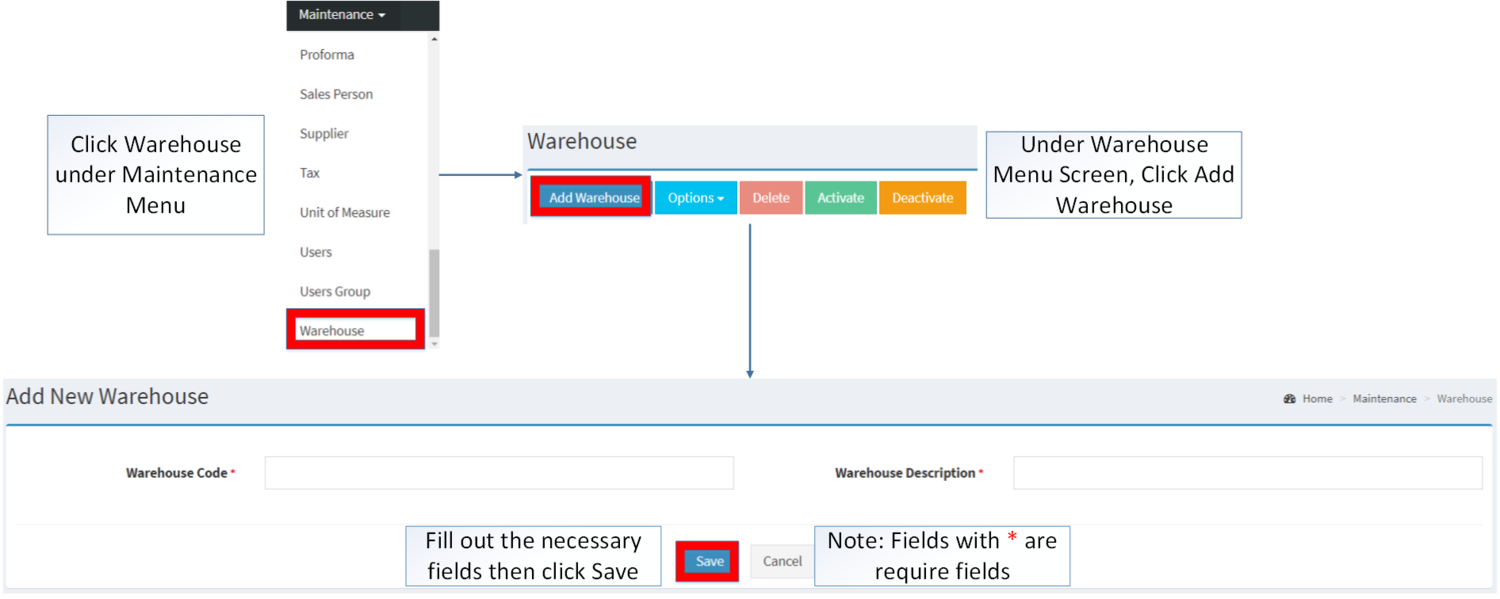
- Click Warehouse under Maintenance Menu
- Under Warehouse Menu Screen, Click Add Warehouse Button
- Fill out the necessary fields then click Save. Note: Fields with * are require fields
| Field | Description | Expected Values |
|---|---|---|
| 1.Warehouse Code | •Reference Code for Warehouse | •Alphanumeric |
| 2.Warehouse Description | •Description for Warehouse | •Alphanumeric |
Notes:
- Warehouse Code is a required unique field in the module. This field is cannot be edited once the record is created.
- For detailed instructions on how to create a Warehouse, the user may visit Warehouse Job Aids which can be found here
View Warehouse
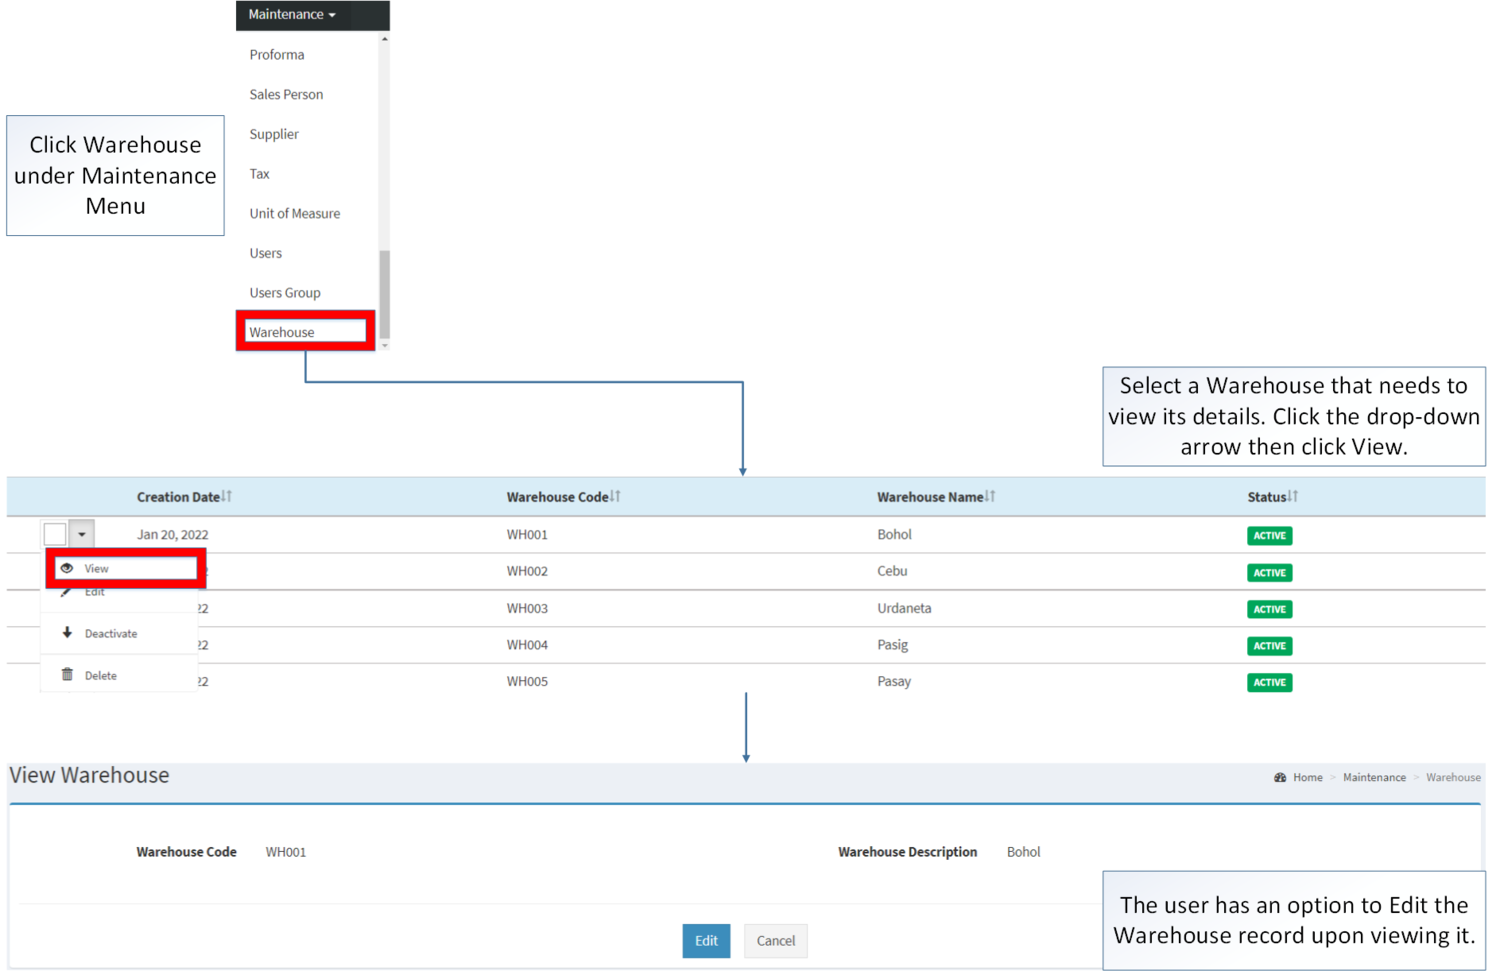
- Click Warehouse under Maintenance Menu
- Select a Warehouse that needs to view its details. Click the drop-down arrow then click View.
- The user has an option to Edit the Warehouse record upon viewing it.
Editing Warehouse
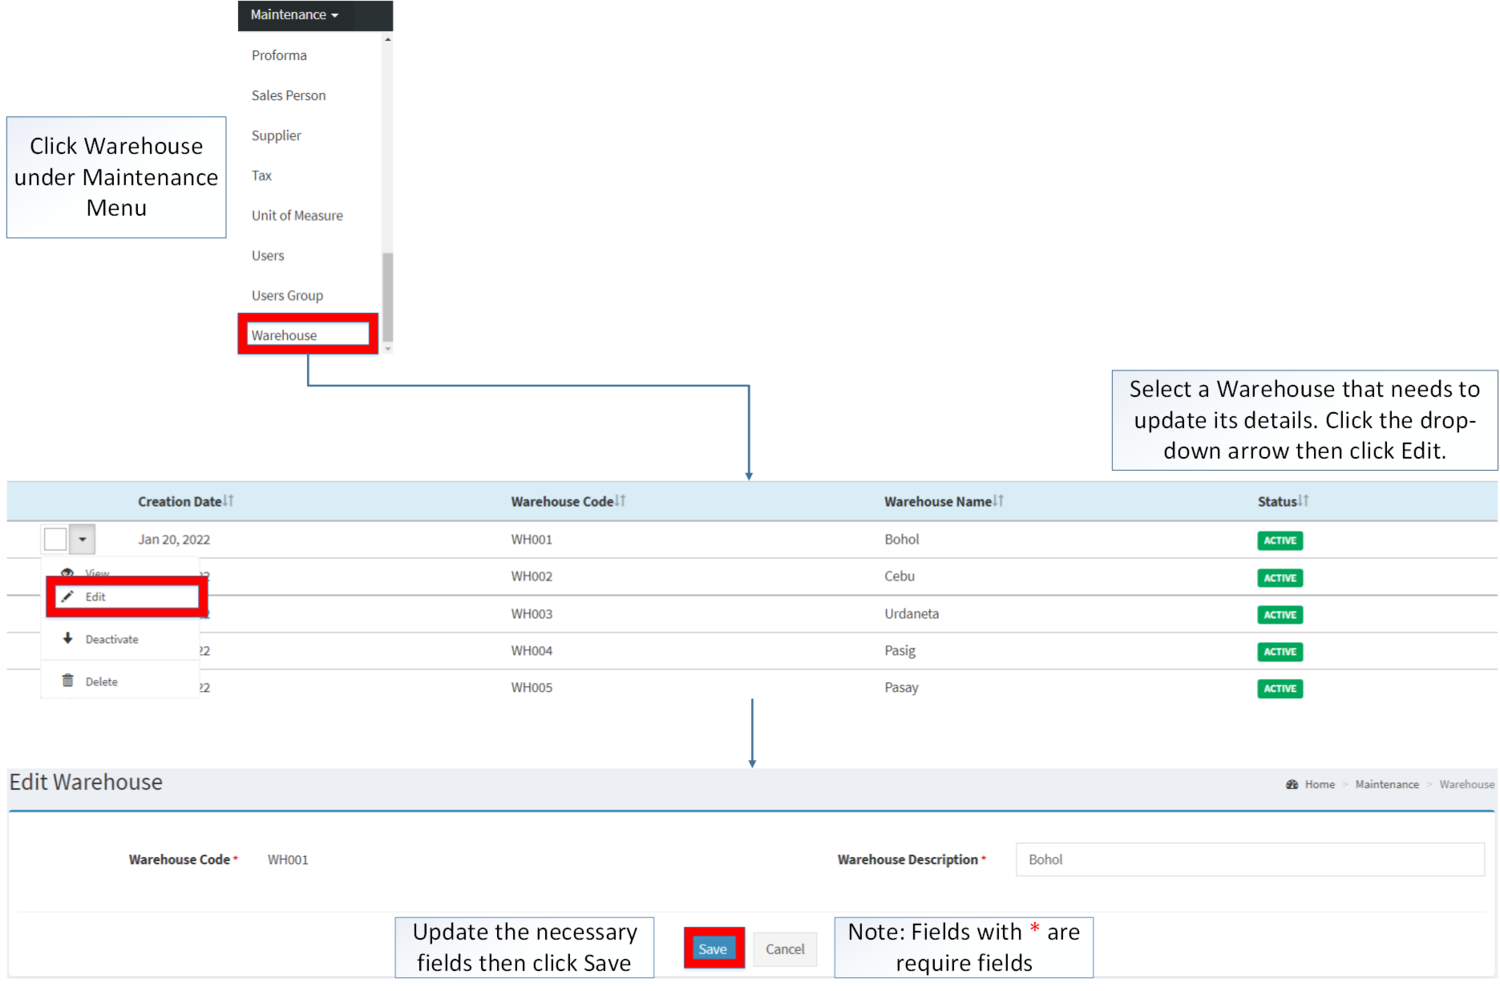
- Click Warehouse under Maintenance Menu
- Select a Warehouse Entry that needs to updates its details. Click the Drop-down Arrow then choose Edit.
- Update the necessary fields then click Save
| Field | Description | Expected Values |
|---|---|---|
| 1.Warehouse Description | •Description for Warehouse | •Alphanumeric |
Notes:
- Warehouse Code is a unique field, the said field cannot be edited once created
Importing and Exporting Warehouse
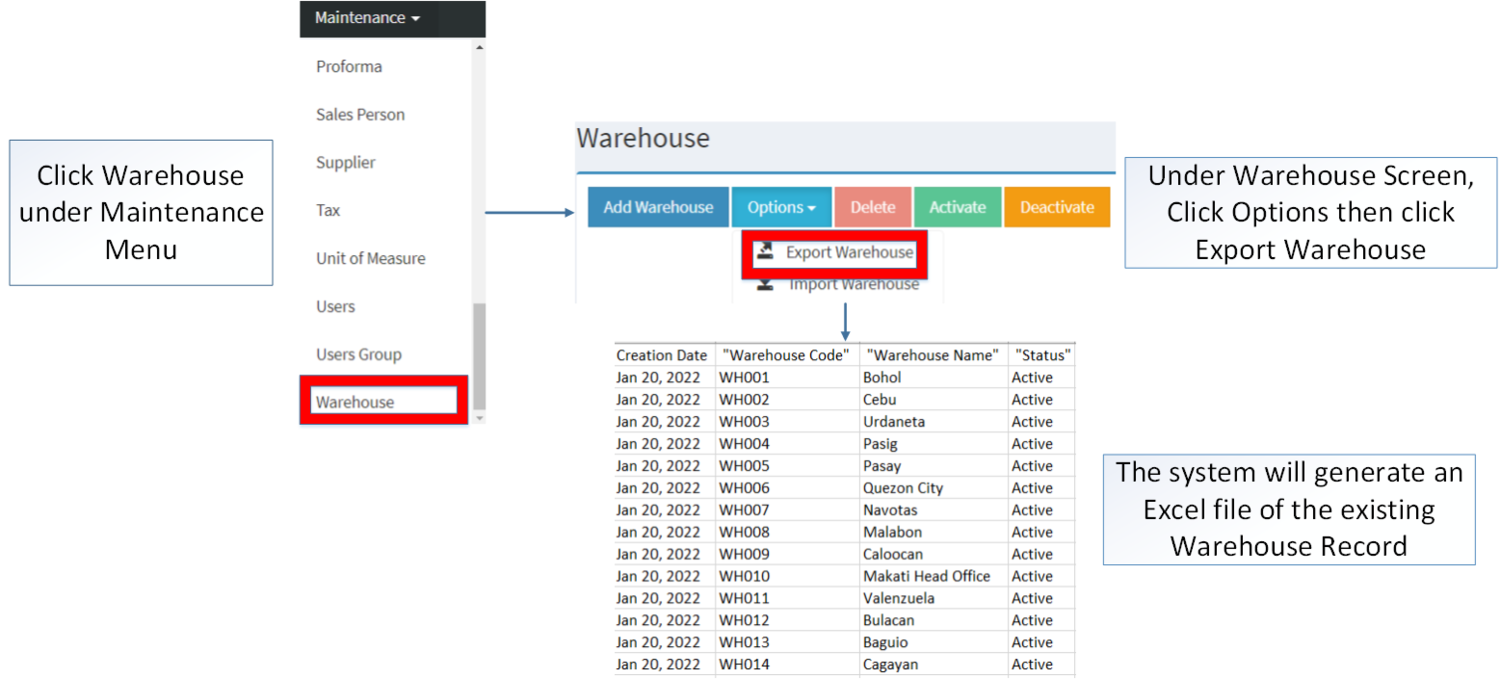
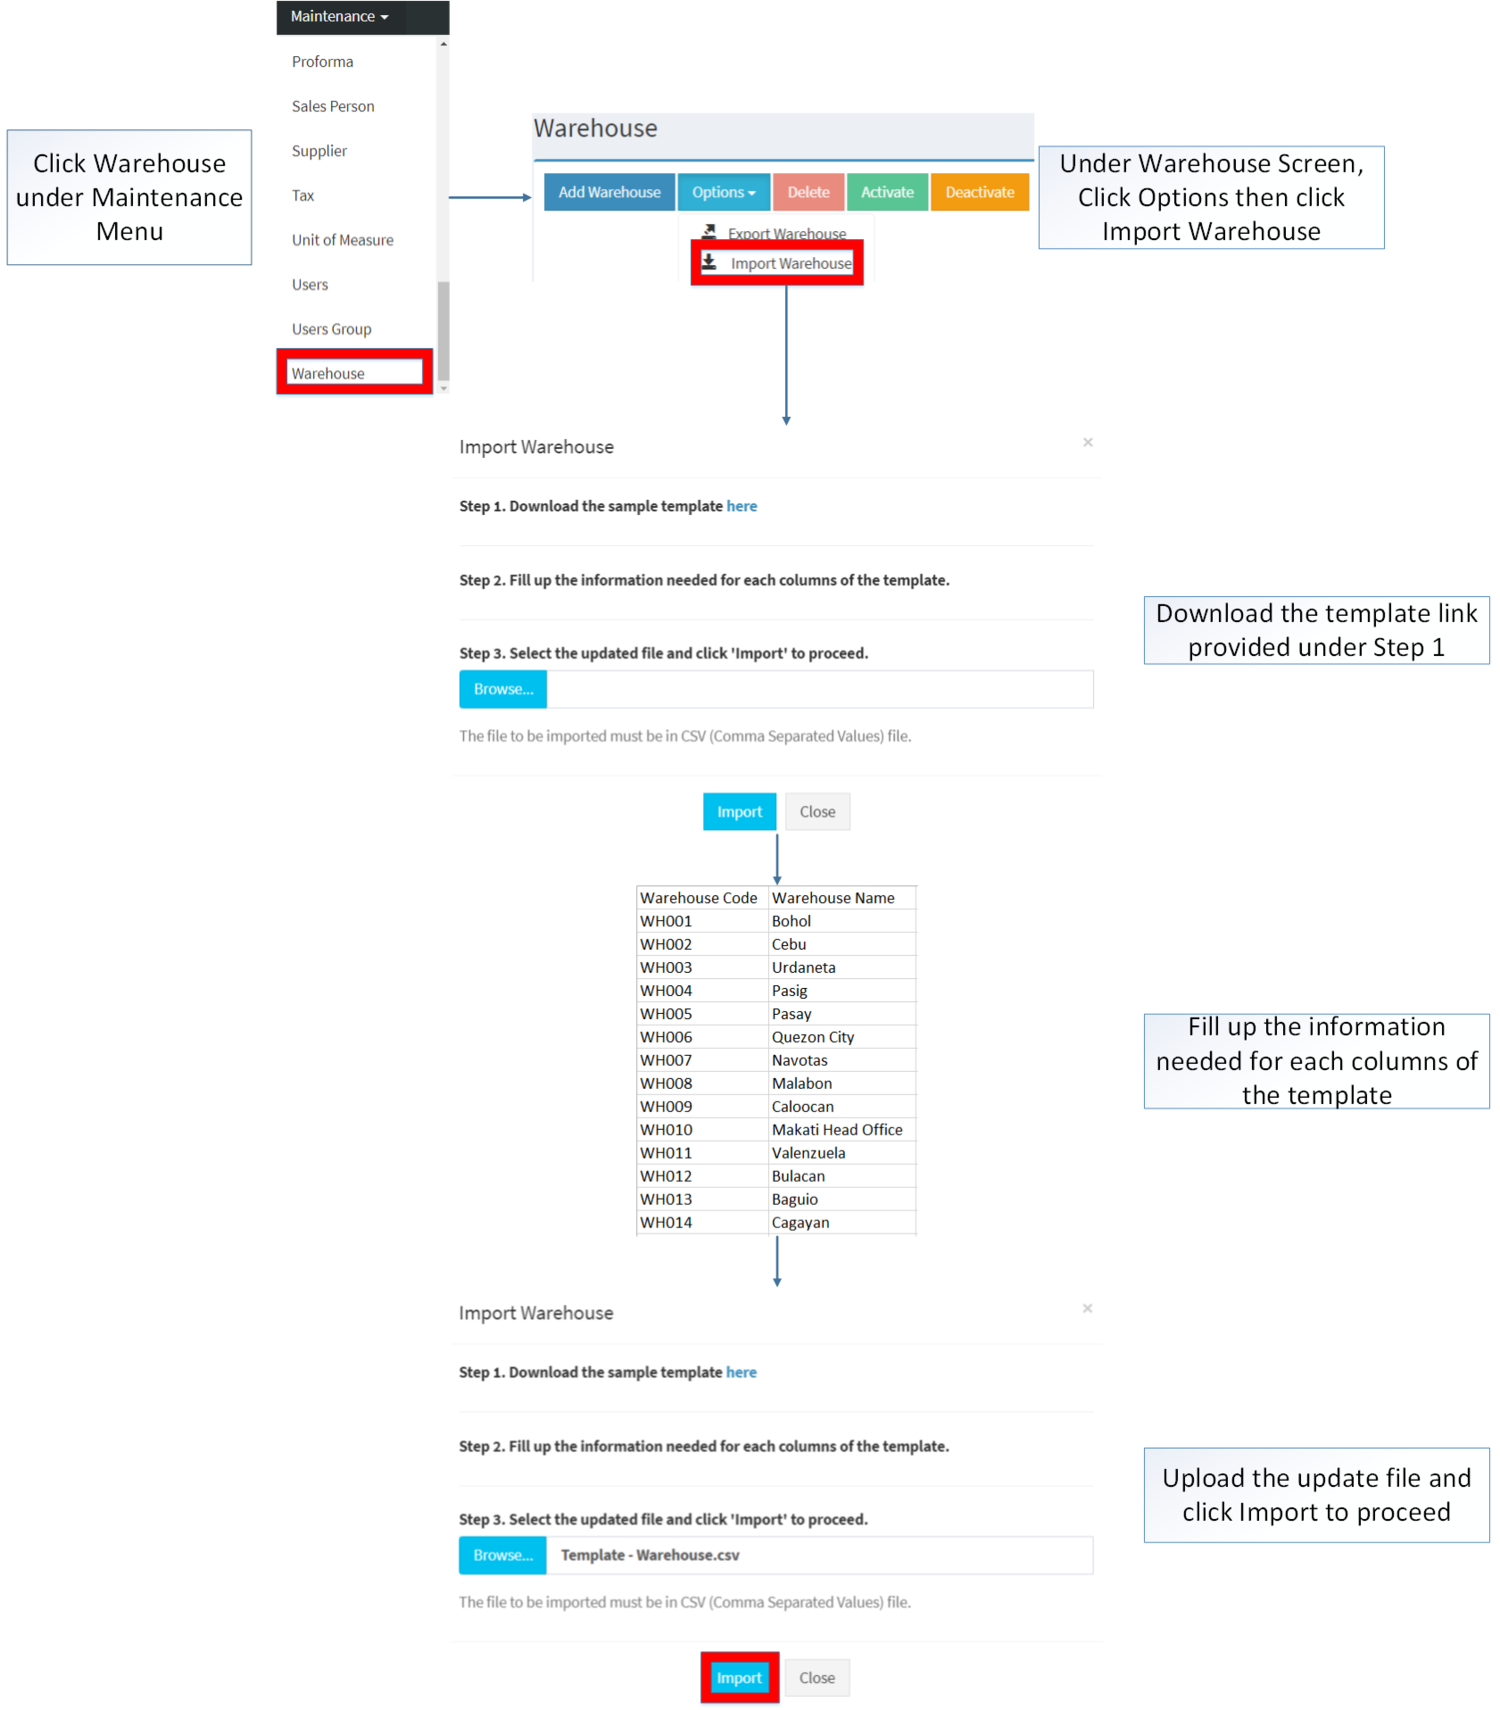
1. Under Warehouse, Click Options
2. Under Options, The user may Export or Import The Record
- When Exporting the records, the user may also use the filter options through tabs for precise searching and exporting of records.
- When Importing the records, the user should follow the following steps provided in the Importing Warehouse Screen such as
| Field | Description | Allowed Inputs | Input Restrictions | Required Field? |
|---|---|---|---|---|
| 1.Warehouse Code | Reference Code for Warehouse | *Alphanumeric
*Dash "-" *Underscore "_" |
*Up to 15 characters
*Other Special Characters |
Yes |
| 2.Warehouse Description | Description for Warehouse | *Alphanumeric
*Special Characters |
*Up to 25 characters | Yes |
Activating Warehouse Record
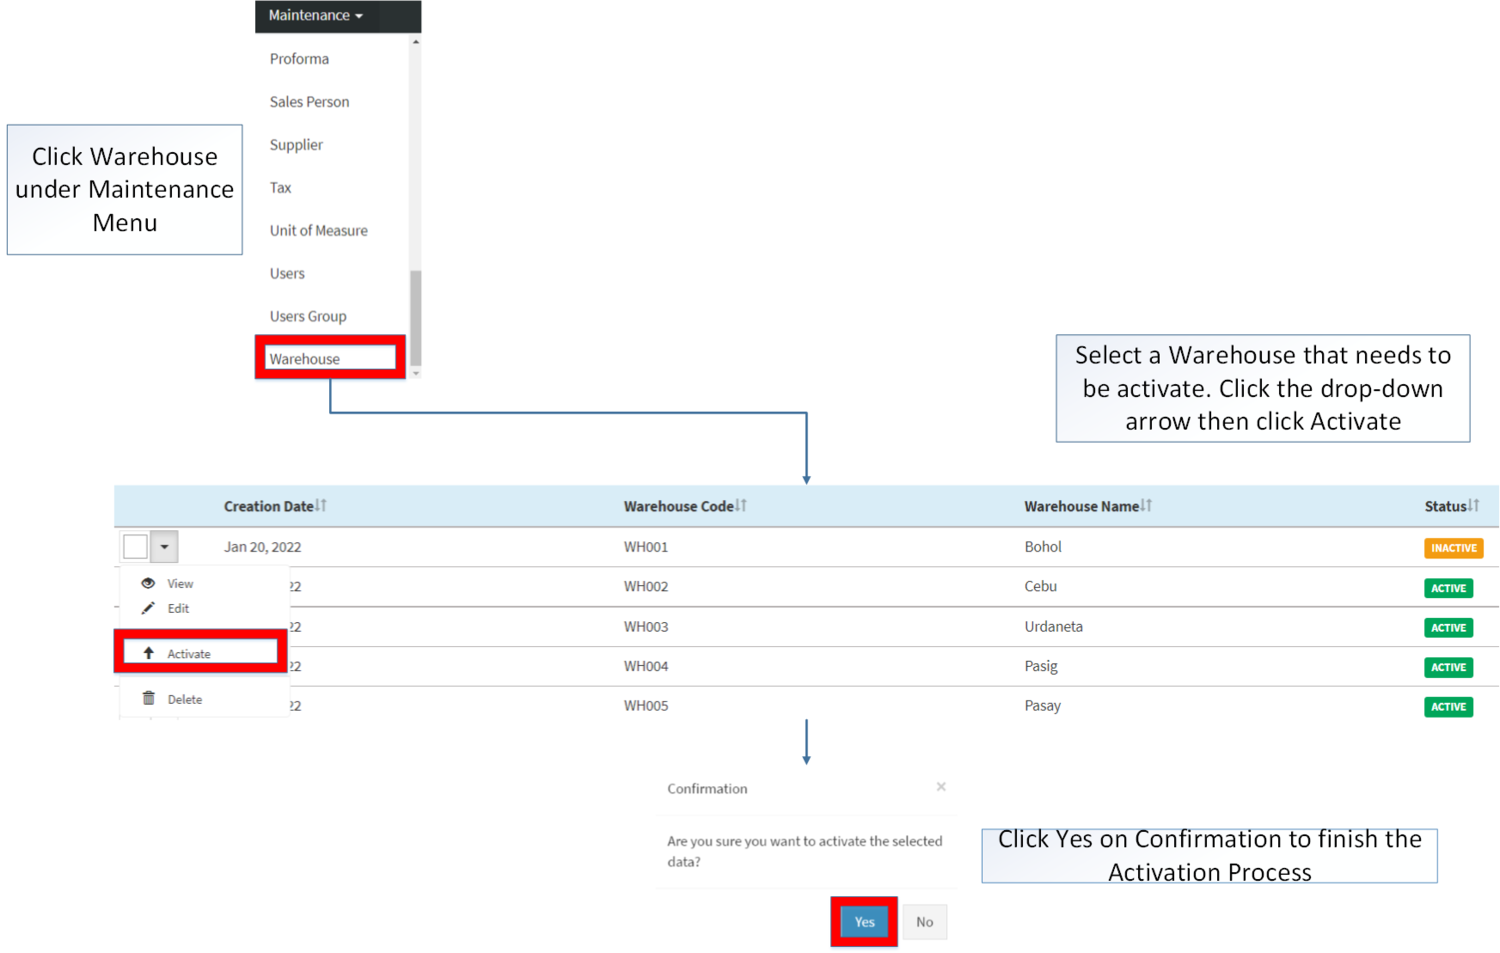
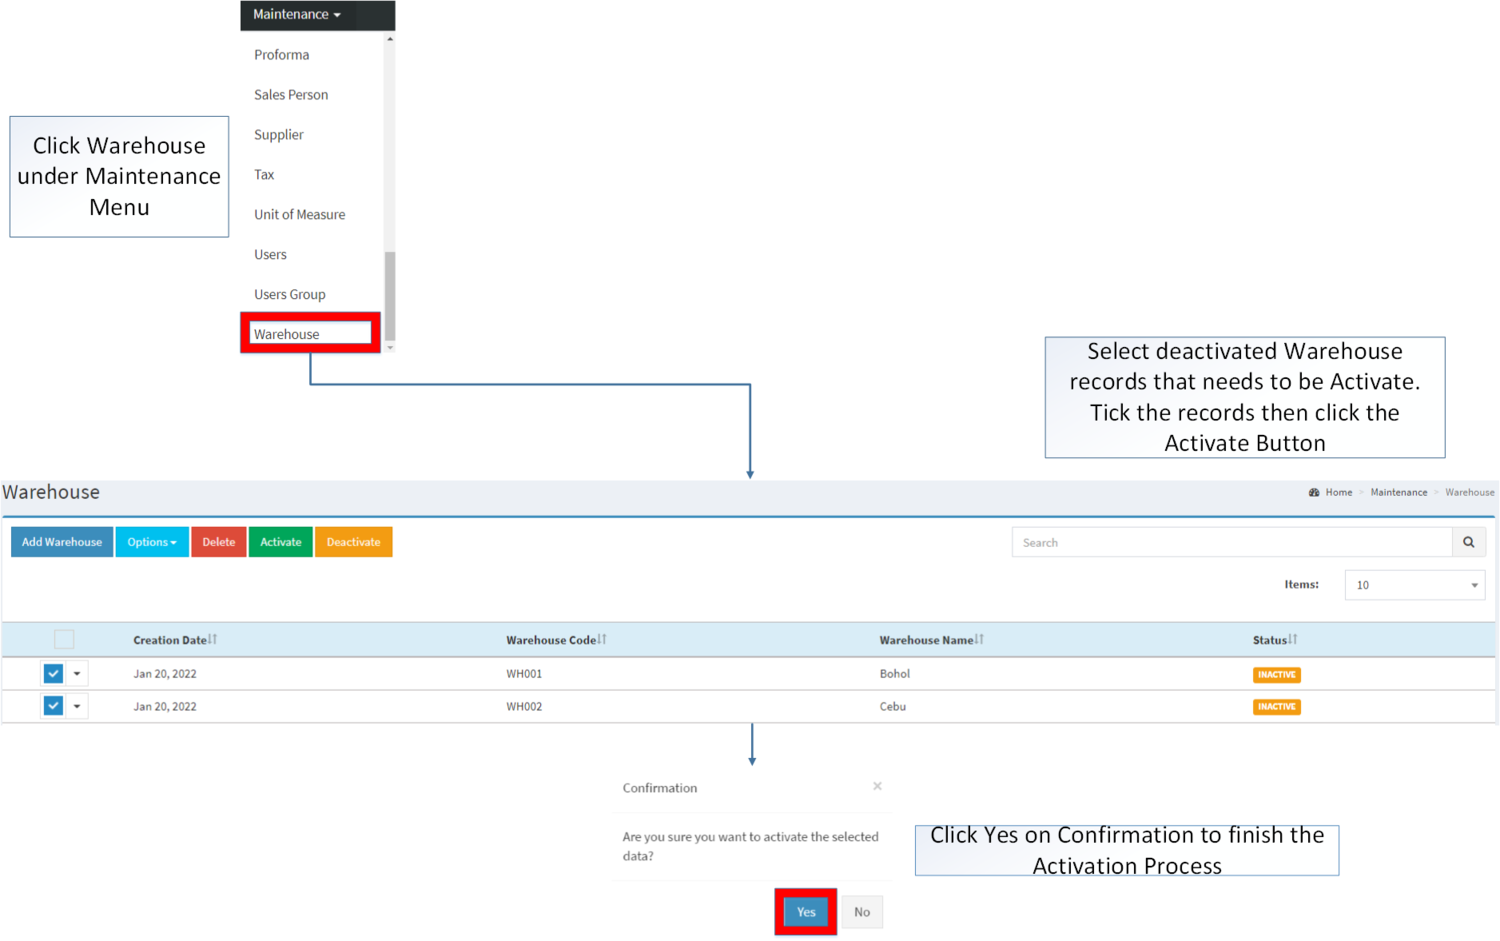
Warehouse can be Activated in two ways:
- Using drop-down arrow of a record can be used in single record Activation
- Using Activate Button for activating multiple record
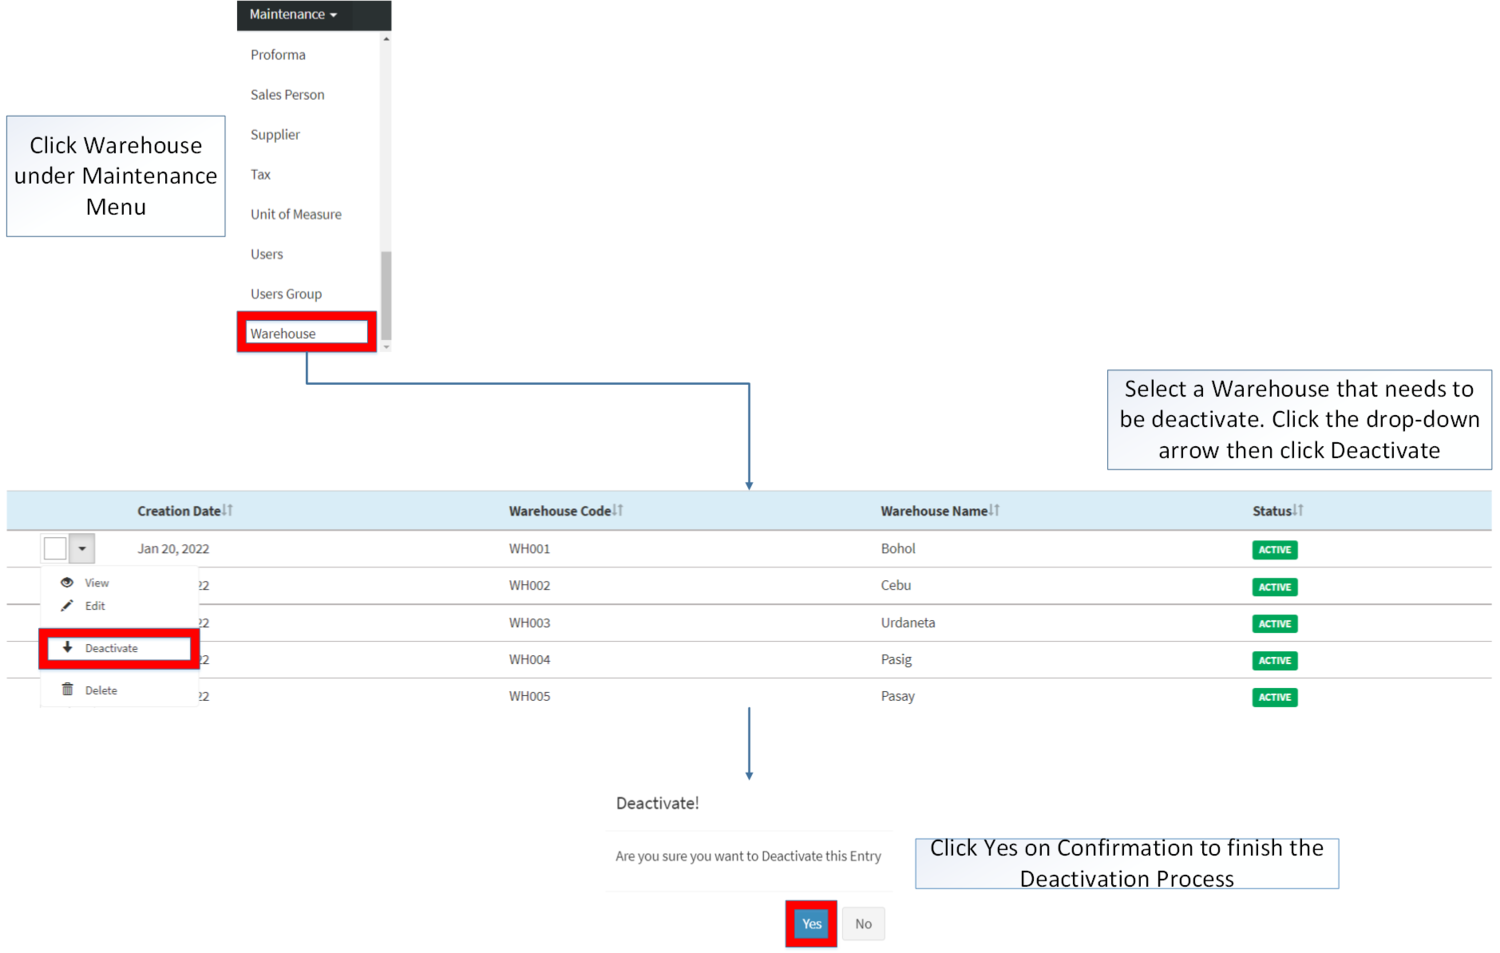
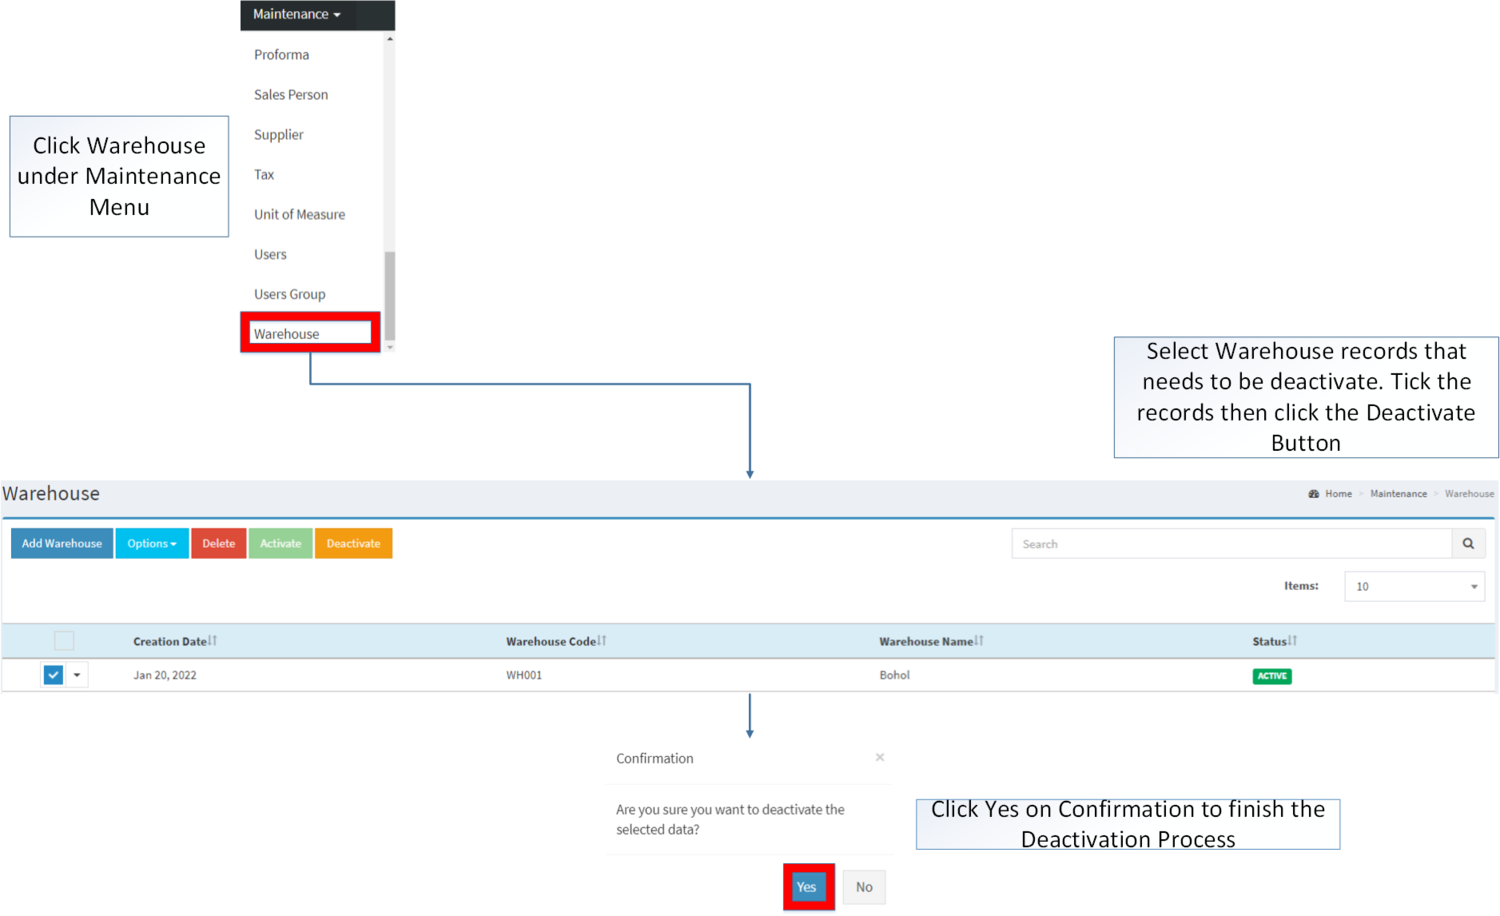
Deactivating Warehouse Record
Warehouse can be deactivated in two ways:
- Using drop-down arrow of a record can be used in single record deactivation
- Using Deactivate Button for deactivating multiple record
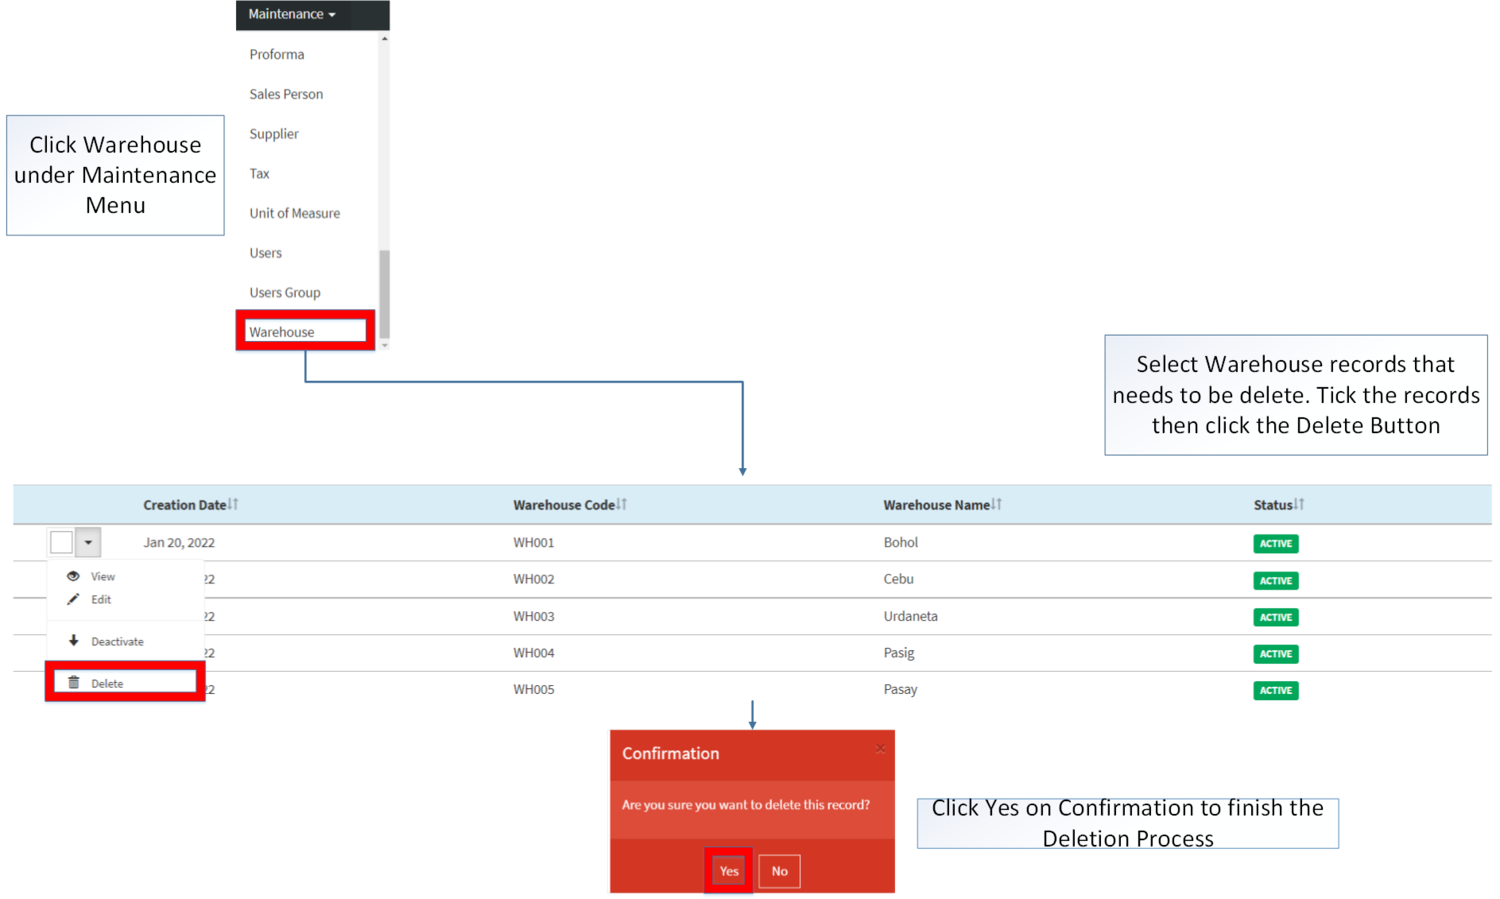
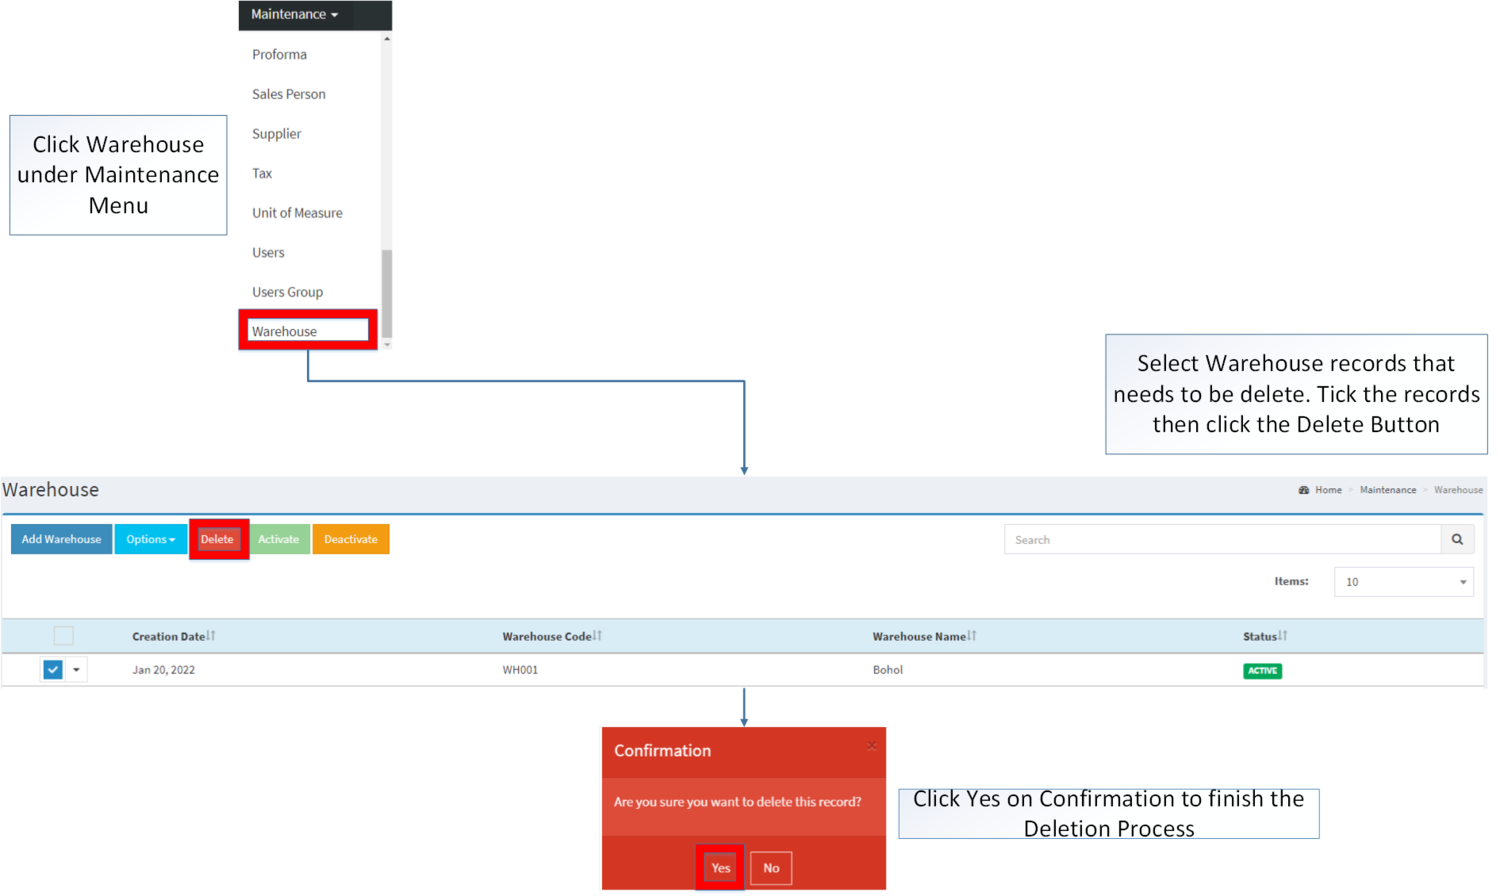
Deleting Warehouse Record
Warehouse can be deleted in two ways:
- Using drop-down arrow of a record can be used in single record deletion
- Using Delete Button for deleting multiple record
Warehouse Record Option
| Status | View | Edit | Deactivate | Activate | Delete |
|---|---|---|---|---|---|
| ACTIVE | ☑ | ☑ | ☑ | ☑ | |
| INACTIVE | ☑ | ☑ | ☑ | ☑ |
Notes:
- Warehouse record can be edited by the user while viewing its details.
- Activating/Deactivating and Deleting of Records can be done in two ways.
- For single records, the user may use the drop down arrow then the action that need to perform.
- For multiple records, the user may tick the records then click the action button that need to perform
- Click the Yes in the confirmation to proceed on the action taken.
| Modules | |
|---|---|
| Maintenance | Maintenance | Warehouse |
| Sales | Sales | Sales Quotation | Sales Order | Delivery Receipt |
| Purchase | Import Purchase Order | Purchase Requisition | Purchase Order | Purchase Receipt |
| Inventory | Inventory Adjustment | Inventory Inquiry | Inventory Movement | Stock Transfer | Purchase Return | Sales Return |
| Reports | |
| Sales Reports | Sales per Warehouse |
