You are viewing an old version of this page. Return to the latest version.
Difference between revisions of "Accounts Payable"
(Tag: Visual edit) |
(Tag: Visual edit) |
||
| Line 39: | Line 39: | ||
#Go to Financials then Click [[Accounts Payable]] | #Go to Financials then Click [[Accounts Payable]] | ||
| − | #Click '''Add Accounts Payable''' | + | #Under Accounts Payable Screen, Click '''Add Accounts Payable''' |
| − | #Fill out the necessary forms on the Header | + | #Fill out the necessary forms on the Header Section |
| − | #Fill out the Account Details | + | #Fill out the necessary fields in the Account Details then click Save. Note: Fields with * are require fields |
[[File:Financials - Accounts Payable - Add.png|border|center|1501x1501px]] | [[File:Financials - Accounts Payable - Add.png|border|center|1501x1501px]] | ||
| Line 156: | Line 156: | ||
=====Viewing Accounts Payable===== | =====Viewing Accounts Payable===== | ||
| − | #Click | + | #Click [[Accounts Payable]] under Financials Menu |
#Select an Accounts Payable record that needs to view its details. Click the drop-down arrow then click View. | #Select an Accounts Payable record that needs to view its details. Click the drop-down arrow then click View. | ||
| − | #The user has an option to issue payment or to edit the Accounts Payable upon viewing if it is manually created. | + | #The user has an option to issue payment or to edit the Accounts Payable upon viewing if it is manually created. |
[[File:Financials - Accounts Payable - View.png|border|center|1708x1708px]] | [[File:Financials - Accounts Payable - View.png|border|center|1708x1708px]] | ||
| Line 164: | Line 164: | ||
=====Editing Accounts Payable===== | =====Editing Accounts Payable===== | ||
| − | #Click | + | #Click [[Accounts Payable]] under Financials Menu |
| − | #Select | + | #Select an Accounts Payable that needs to update its details. Click the Drop-down Arrow then click '''Edit.''' |
| − | #Update the necessary | + | #Update the necessary fields then click '''Save.''' |
[[File:Financials - Accounts Payable - Edit.png|border|center|1659x1659px]] | [[File:Financials - Accounts Payable - Edit.png|border|center|1659x1659px]] | ||
| Line 336: | Line 336: | ||
=====<span class="mw-headline" id="Printing_Accounts_Receivable" style="box-sizing: inherit;"><span class="mw-headline ve-pasteProtect" id="Editing_Import_Purchase_Order" data-ve-attributes="{"style":"box-sizing: inherit;"}" style="box-sizing: inherit;">Printing Accounts Payable</span></span>===== | =====<span class="mw-headline" id="Printing_Accounts_Receivable" style="box-sizing: inherit;"><span class="mw-headline ve-pasteProtect" id="Editing_Import_Purchase_Order" data-ve-attributes="{"style":"box-sizing: inherit;"}" style="box-sizing: inherit;">Printing Accounts Payable</span></span>===== | ||
| − | #Click | + | #Click [[Accounts Payable]] under Financials Menu |
| − | #Select | + | #Select an Accounts Payable that needs to print its details. Click the Drop-down Arrow then press Print'''.''' |
| − | |||
| − | |||
| + | [[File:Financials - Accounts Payable - Print.png|border|center|1501x1501px]] | ||
=====<span class="mw-headline" id="Receiving_Payment_in_Accounts_Receivable" style="box-sizing: inherit;"><span class="mw-headline ve-pasteProtect" id="Editing_Import_Purchase_Order" data-ve-attributes="{"style":"box-sizing: inherit;"}" style="box-sizing: inherit;">Issuing Payment in Accounts Payable</span></span>===== | =====<span class="mw-headline" id="Receiving_Payment_in_Accounts_Receivable" style="box-sizing: inherit;"><span class="mw-headline ve-pasteProtect" id="Editing_Import_Purchase_Order" data-ve-attributes="{"style":"box-sizing: inherit;"}" style="box-sizing: inherit;">Issuing Payment in Accounts Payable</span></span>===== | ||
| − | #Click | + | #Click [[Accounts Payable]] under Financials Menu |
| − | #Select | + | #Select a posted Accounts Payable that needs to issue payment, Click the drop-down arrow then click Issue Payment |
| − | # | + | #Fill out the necessary fields in the header section |
| − | # | + | #Fill out the necessary fields in the accounting details then click Save |
| + | #Go to <span>[[Payment Voucher]] and</span> select the newly created payment voucher, then click Post. | ||
[[File:Financials - Accounts Payable - Issue Payment.png|border|center|1768x1768px]] | [[File:Financials - Accounts Payable - Issue Payment.png|border|center|1768x1768px]] | ||
| Line 375: | Line 375: | ||
*When Importing the records, the user should follow the following steps provided in the Importing Accounts Payable Screen such as | *When Importing the records, the user should follow the following steps provided in the Importing Accounts Payable Screen such as | ||
| − | |||
| − | |||
| − | |||
[[File:Financials - Accounts Payable - Import.png|border|center|1500x1500px]] | [[File:Financials - Accounts Payable - Import.png|border|center|1500x1500px]] | ||
| Line 494: | Line 491: | ||
|Financial Statements | |Financial Statements | ||
|[[Accounts Payable Aging]]<nowiki> | </nowiki>[[AP Detailed Report]]<nowiki> | </nowiki>[[AP Transaction Report]] | |[[Accounts Payable Aging]]<nowiki> | </nowiki>[[AP Detailed Report]]<nowiki> | </nowiki>[[AP Transaction Report]] | ||
| + | |- | ||
| + | |Tax Reports | ||
| + | |[[Purchase Journal]]<nowiki> | </nowiki>[[Purchase Relief]] | ||
|} | |} | ||
Revision as of 14:39, 28 March 2022
Contents
- 1 Accounts Payable
- 1.1 Requirements before using Accounts Payable
- 1.2 Accounts Payable Status
- 1.3 Accounts Payable Record List
- 1.4 Adding Accounts Payable
- 1.5 Viewing Accounts Payable
- 1.6 Editing Accounts Payable
- 1.7 Accounts Payable Record Option
- 1.8 Printing Accounts Payable
- 1.9 Issuing Payment in Accounts Payable
- 1.10 Cancelling Accounts Payable Record
- 1.11 Importing and Exporting Accounts Payable Record
Accounts Payable
Allows the user to create a transaction for the amounts due to vendors or suppliers received that have not yet been paid for.
Requirements before using Accounts Payable
- The user should setup the following records in order to proceed on using the Accounts Payable
Accounts Payable Status
| Status | Description |
|---|---|
| UNPAID | If there are no payments posted |
| WITH PARTIAL PAYMENT | If there are any partial payments posted. |
| PAID | If the payable is full paid and its Payment Voucher is Posted. |
| CANCELLED | Accounts Payable is cancelled |
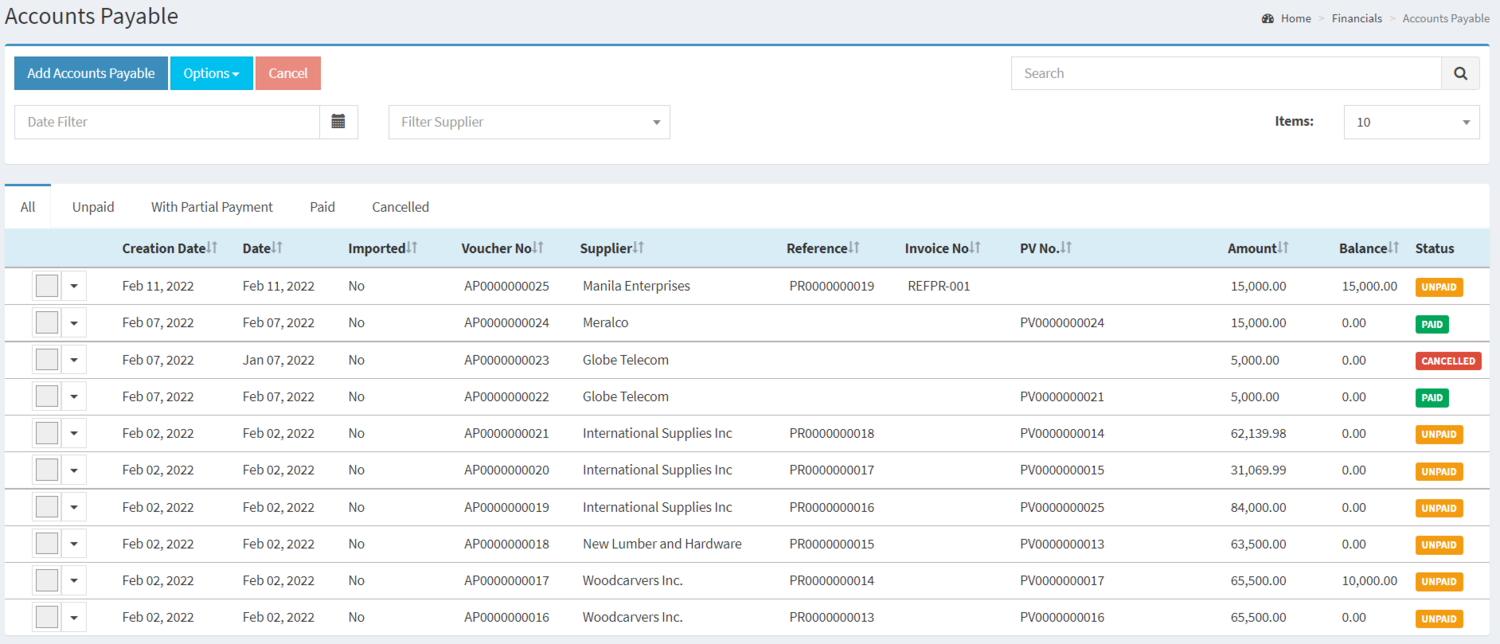
Accounts Payable Record List
Adding Accounts Payable
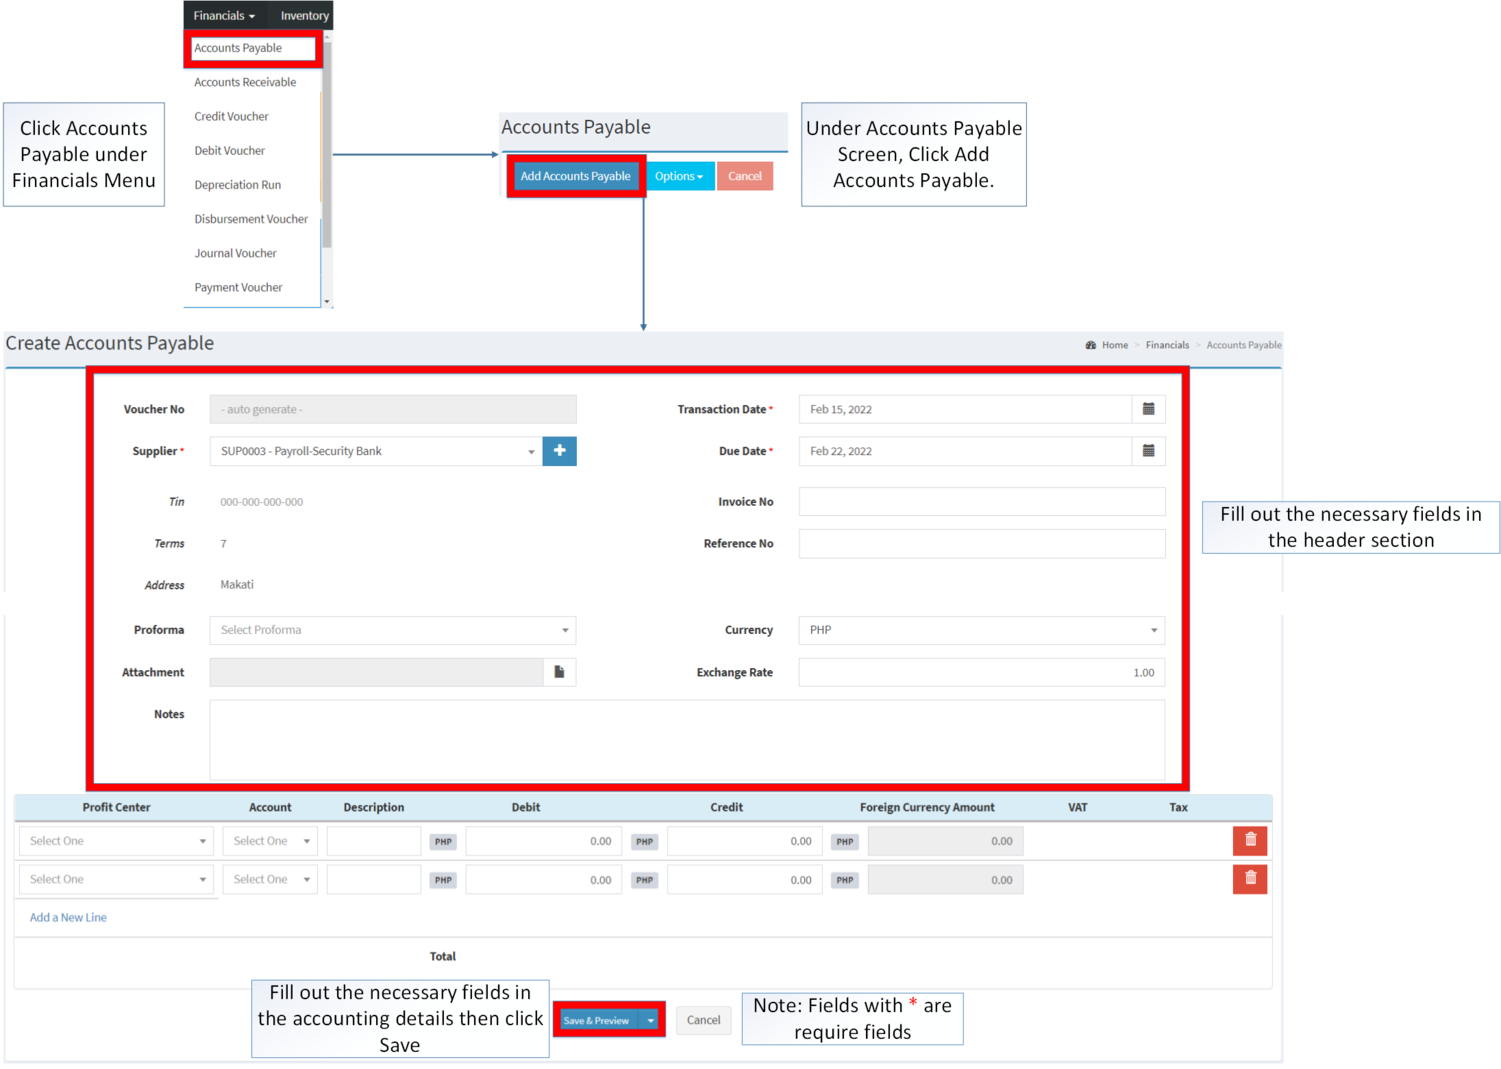
- Go to Financials then Click Accounts Payable
- Under Accounts Payable Screen, Click Add Accounts Payable
- Fill out the necessary forms on the Header Section
- Fill out the necessary fields in the Account Details then click Save. Note: Fields with * are require fields
| Field | Description | Expected Values |
|---|---|---|
| 1.Voucher No. | •Voucher Reference number generated upon creation | •Alphanumeric(Auto-Generated) |
| 2.Supplier | •Name of Supplier | •Supplier List in the Supplier Maintenance Module |
| 3.Tax Identification Number(TIN) | •TIN of the Supplier | •Number(Auto-Generated base from Supplier profile) |
| 4.Terms | •Number of Days on completing the purchase | •Number |
| 5. Address | •Address of the Supplier | •Alphanumeric(Auto-Generated based from Supplier details) |
| 6.Proforma | •Financial statements is to facilitate comparisons of historic data and projections of future performance. | •Proforma list provided in the Proforma Maintenance Module |
| 7.Attachment | •Attachment as proof or any other remarks with regards to transaction | •PDF/JPG/PNG File Type |
| 8.Transaction Date | •Date when the Payable Transaction was created | •Date |
| 9.Due Date | •Due date of Payable Transaction | •Date |
| 10.Invoice No | •Invoice number reference for the transaction | •Alphanumeric |
| 11.Reference No | •Reference No for the transaction | •Number |
| 12.Currency | •Type of Currency used in the transaction | •Number |
| 13.Exchange Rate | •Currency Conversion Amount | •Number |
| 14.Notes | •Other Remarks for the Transaction | •Alphanumeric |
| 15.Account | •Account to be charged for credit and debit amount on the transaction | •Account list in the Chart of Accounts Maintenance Module |
| 16.Description | •Any remarks or Notes in the Account Line of the transaction | •Alphanumeric |
| 17.Debit | •Debit Amount for the Transaction | •Number |
| 18.Credit | •Credit Amount for the Transaction | •Number |
| 19.Foreign Amount Currency | •The conversion of the current amount into different currency | •Number |
| 20.Value Added Tax(VAT) | •VAT to be applied in the amount on the accounting details in the transaction | •Tick/Untick |
| 21.Tax | •Type of Tax to be applied when the VAT is ticked | •Tax List provided in the Tax Maintenance Module |
Notes:
- Accounts Payable Transactions are auto-generated when created from Purchase Receipt,
- Account should be on ACTIVE status when using it upon creating or editing a transaction.
- This can be seen in Chart of Account Maintenance Module.
- Supplier should be on ACTIVE status when using it upon creating or editing a transaction.
- This can be seen in Supplier Maintenance Module
- Proforma should be on ACTIVE status when using it upon creating or editing a transaction.
- This can be seen in Proforma Maintenance Module
- Currency should be on ACTIVE status when using it upon creating or editing a transaction
- This can be seen in Currency Maintenance Module
- The user may use this maintenance if they have Import Purchase Order module
- Tax should be on ACTIVE status when using it upon creating or editing a transaction.
- This can be seen in Tax Maintenance Module
- This will be only available in the transaction when the VAT column is checked.
Viewing Accounts Payable
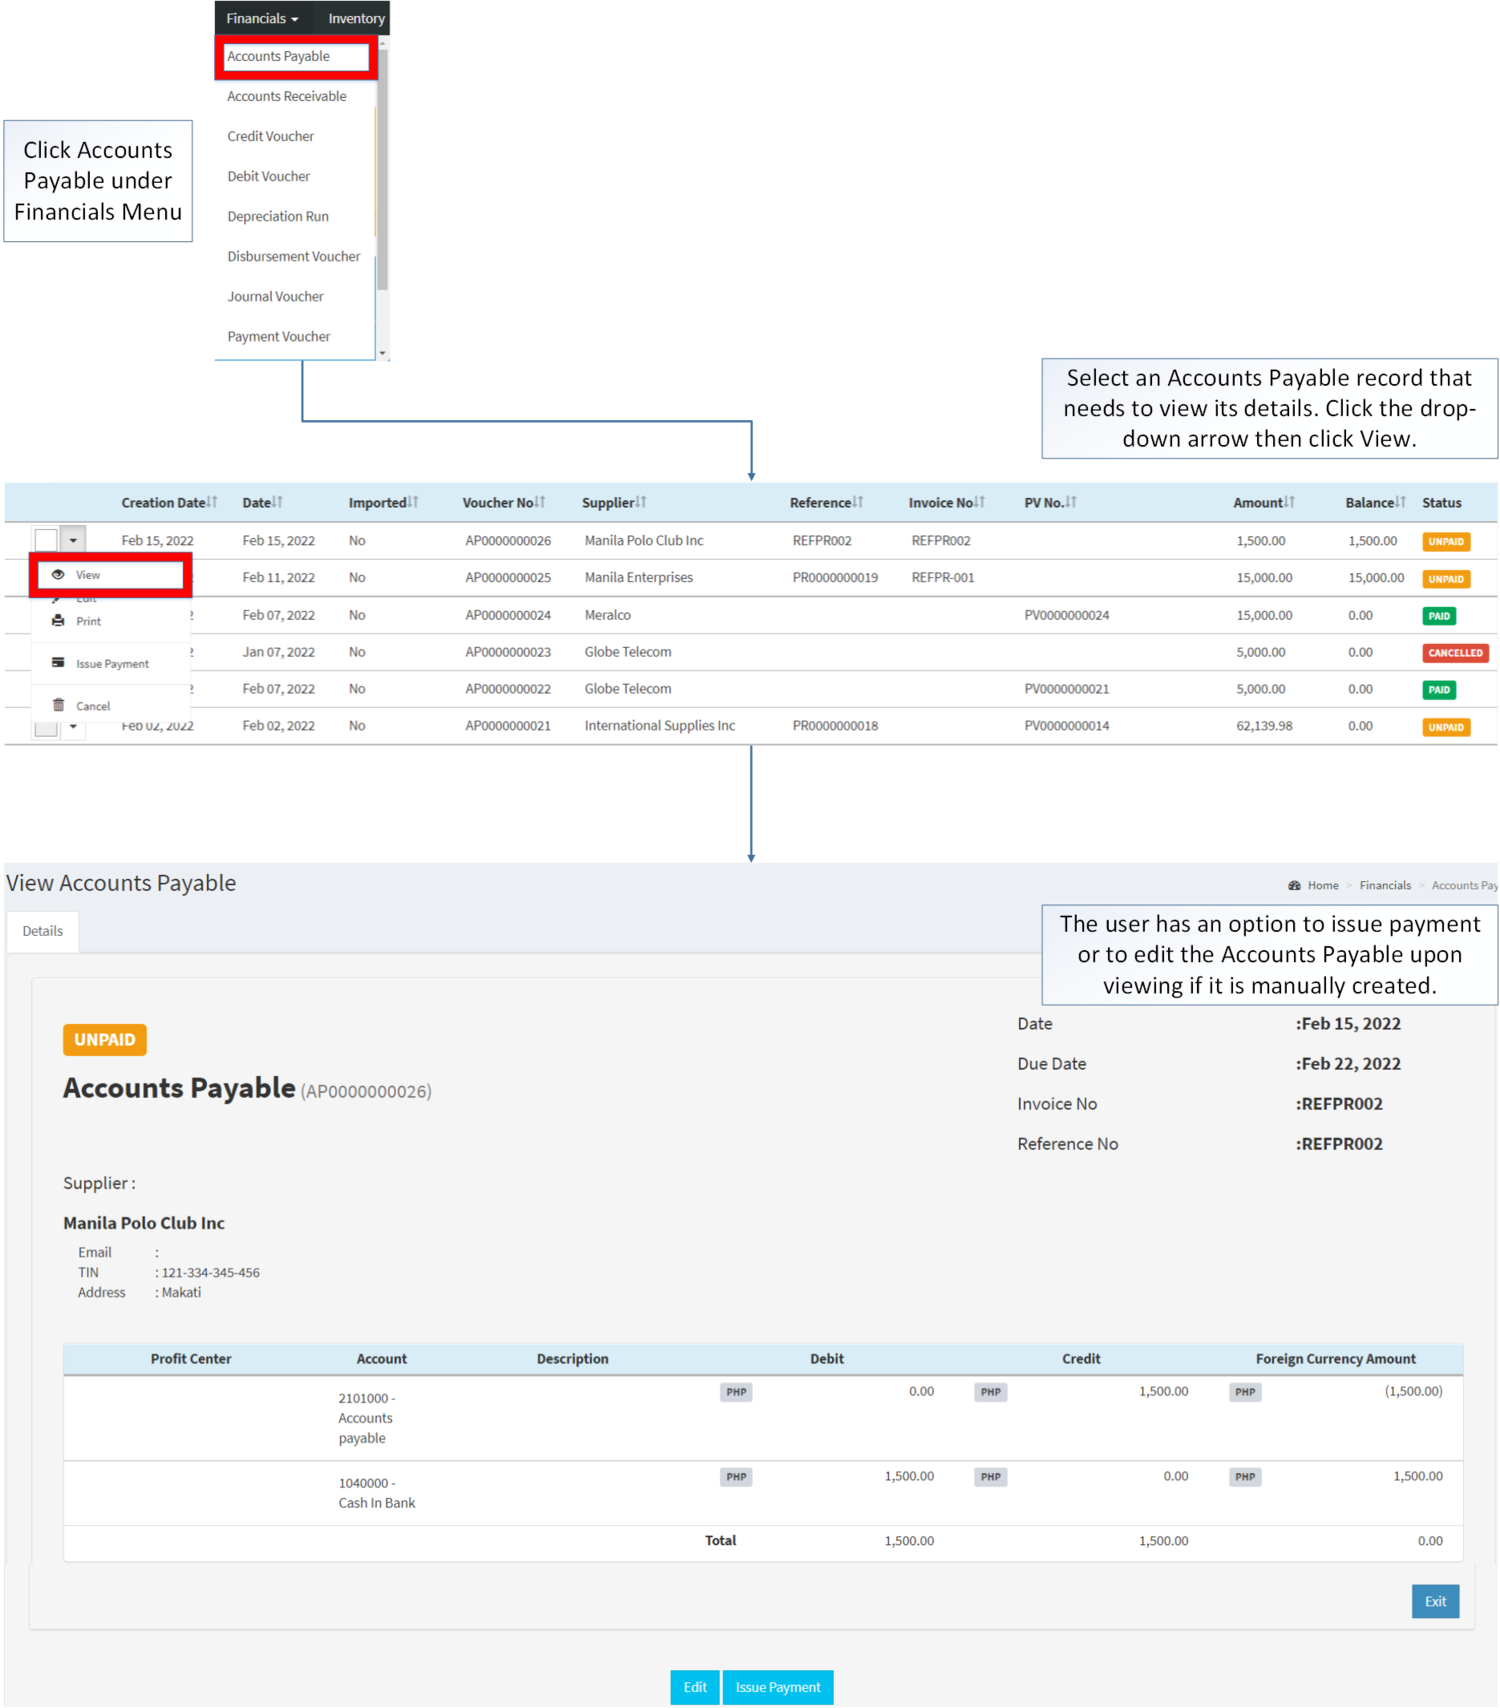
- Click Accounts Payable under Financials Menu
- Select an Accounts Payable record that needs to view its details. Click the drop-down arrow then click View.
- The user has an option to issue payment or to edit the Accounts Payable upon viewing if it is manually created.
Editing Accounts Payable
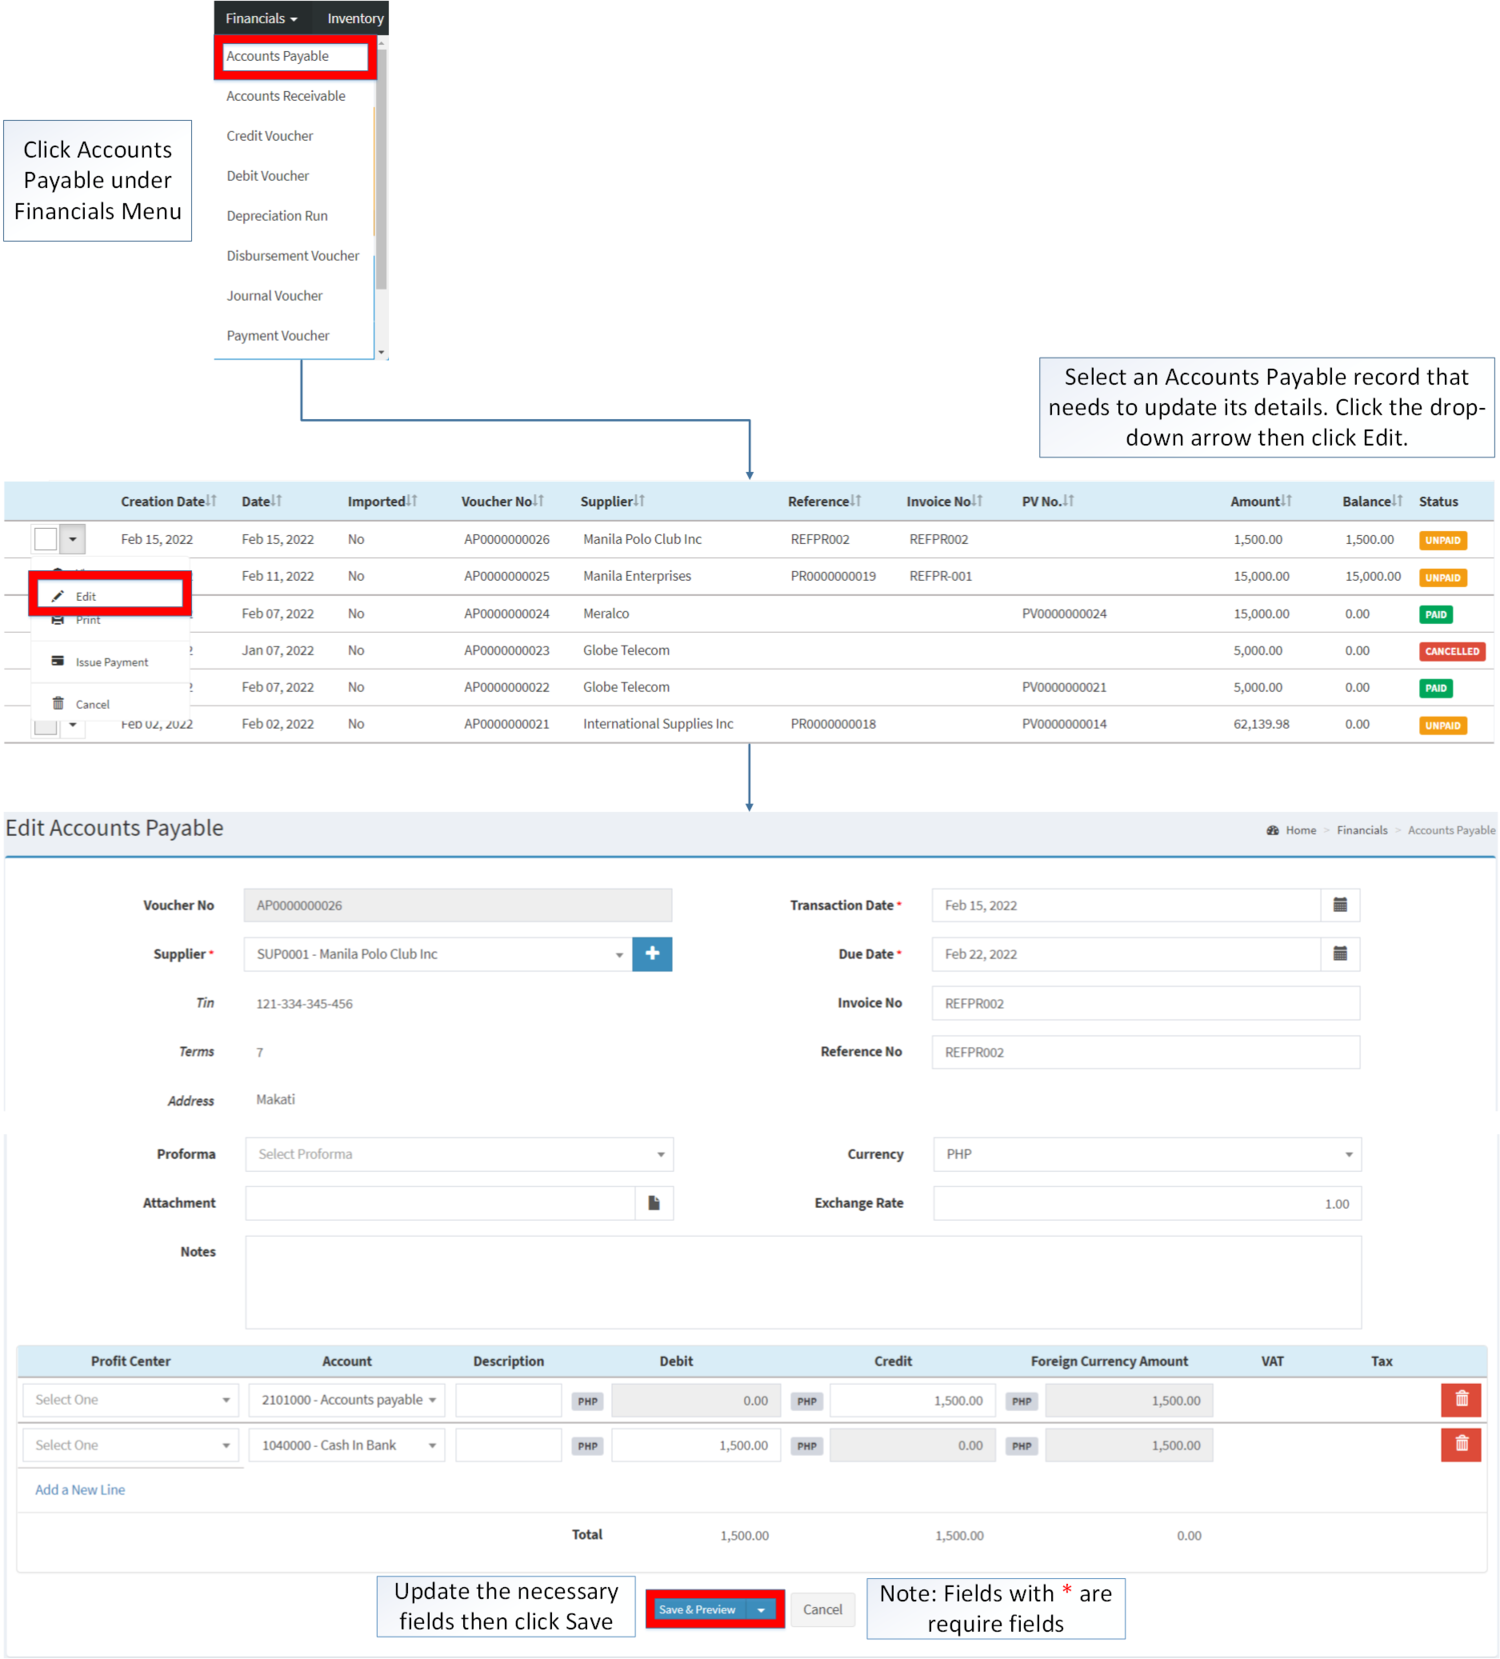
- Click Accounts Payable under Financials Menu
- Select an Accounts Payable that needs to update its details. Click the Drop-down Arrow then click Edit.
- Update the necessary fields then click Save.
| Field | Description | Expected Values |
|---|---|---|
| 1.Voucher No. | •Voucher Reference number generated upon creation | •Alphanumeric(Auto-Generated) |
| 2.Supplier | •Name of Supplier | •Supplier List in the Supplier Maintenance Module |
| 3.Tax Identification Number(TIN) | •TIN of the Supplier | •Number(Auto-Generated base from Supplier profile) |
| 4.Terms | •Number of Days on completing the purchase | •Number |
| 5. Address | •Address of the Supplier | •Alphanumeric(Auto-Generated based from Supplier details) |
| 6.Proforma | •Financial statements is to facilitate comparisons of historic data and projections of future performance. | •Proforma list provided in the Proforma Maintenance Module |
| 7.Attachment | •Attachment as proof or any other remarks with regards to transaction | •PDF/JPG/PNG File Type |
| 8.Transaction Date | •Date when the Payable Transaction was created | •Date |
| 9.Due Date | •Due date of Payable Transaction | •Date |
| 10.Invoice No | •Invoice number reference for the transaction | •Alphanumeric |
| 11.Reference No | •Reference No for the transaction | •Number |
| 12.Currency | •Type of Currency used in the transaction | •Number |
| 13.Exchange Rate | •Currency Conversion Amount | •Number |
| 14.Notes | •Other Remarks for the Transaction | •Alphanumeric |
| 15.Account | •Account to be charged for credit and debit amount on the transaction | •Account list in the Chart of Accounts Maintenance Module |
| 16.Description | •Any remarks or Notes in the Account Line of the transaction | •Alphanumeric |
| 17.Debit | •Debit Amount for the Transaction | •Number |
| 18.Credit | •Credit Amount for the Transaction | •Number |
| 19.Foreign Amount Currency | •The conversion of the current amount into different currency | •Number |
| 20.Value Added Tax(VAT) | •VAT to be applied in the amount on the accounting details in the transaction | •Tick/Untick |
| 21.Tax | •Type of Tax to be applied when the VAT is ticked | •Tax List provided in the Tax Maintenance Module |
Notes:
- Supplier, Proforma and Reference Code cannot be edited when the Accounts Payable created is auto-generated from Purchase Receipt.
- Account should be on ACTIVE status when using it upon creating or editing a transaction.
- This can be seen in Chart of Account Maintenance Module.
- Past Transactions with INACTIVE status prior to its deactivation can still be used.
- Supplier should be on ACTIVE status when using it upon creating or editing a transaction.
- This can be seen in Supplier Maintenance Module
- Past Transactions with INACTIVE status prior to its deactivation can still be used.
- Currency should be on ACTIVE status when using it upon creating or editing a transaction.
- This can be seen in Currency Maintenance Module
- The currency maintenance will only be available if the user has Import Purchase Order Module
- Past Transactions with INACTIVE status prior to its deactivation can still be used.
- Proforma should be on ACTIVE status when using it upon creating or editing a transaction.
- This can be seen in Proforma Maintenance Module
- Past Transactions with INACTIVE status prior to its deactivation can still be used
- Tax should be on ACTIVE status when using it upon creating or editing a transaction.
- This can be seen in Tax Maintenance Module
- This will be only available in the transaction when the VAT column is checked.
Accounts Payable Record Option
| Status | Available Action Buttons | ||||
|---|---|---|---|---|---|
| View | Edit | Issue Payment | Cancel | ||
| UNPAID | ✓ | ✓ | ✓ | ✓ | ✓ |
| PARTIAL | ✓ | ✓ | ✓ | ||
| PAID | ✓ | ✓ | |||
| CANCELLED | ✓ | ✓ | |||
Notes:
- The user can only edit Manually Created Accounts Payable Transaction and if that transaction is still on UNPAID status.
- Auto-Generated Accounts Payable cannot be edited or cancelled.
- The user can only Issue Payment the Accounts Payable if it is in UNPAID status and it has a Purchase Receipt tagged on it.
- The user can Issue payment while viewing the details of the record.
- This is only available when the Accounts Payable status is UNPAID.
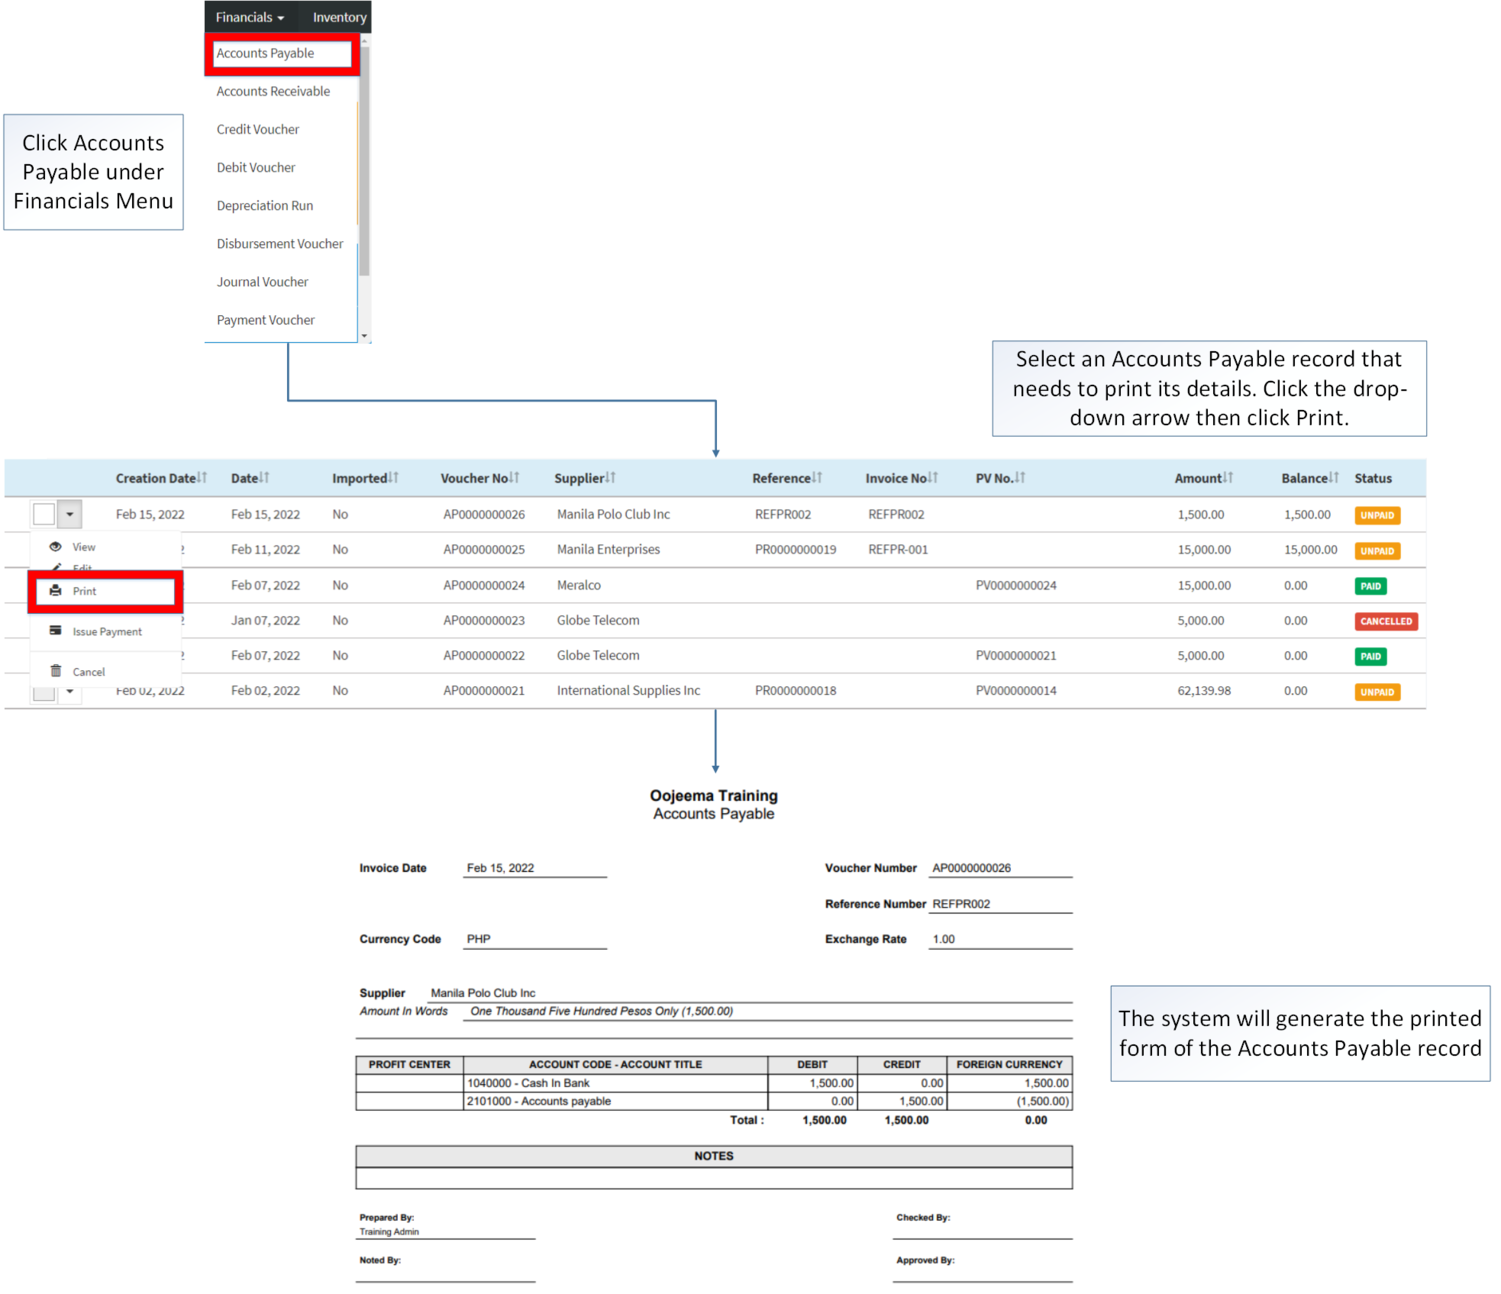
Printing Accounts Payable
- Click Accounts Payable under Financials Menu
- Select an Accounts Payable that needs to print its details. Click the Drop-down Arrow then press Print.
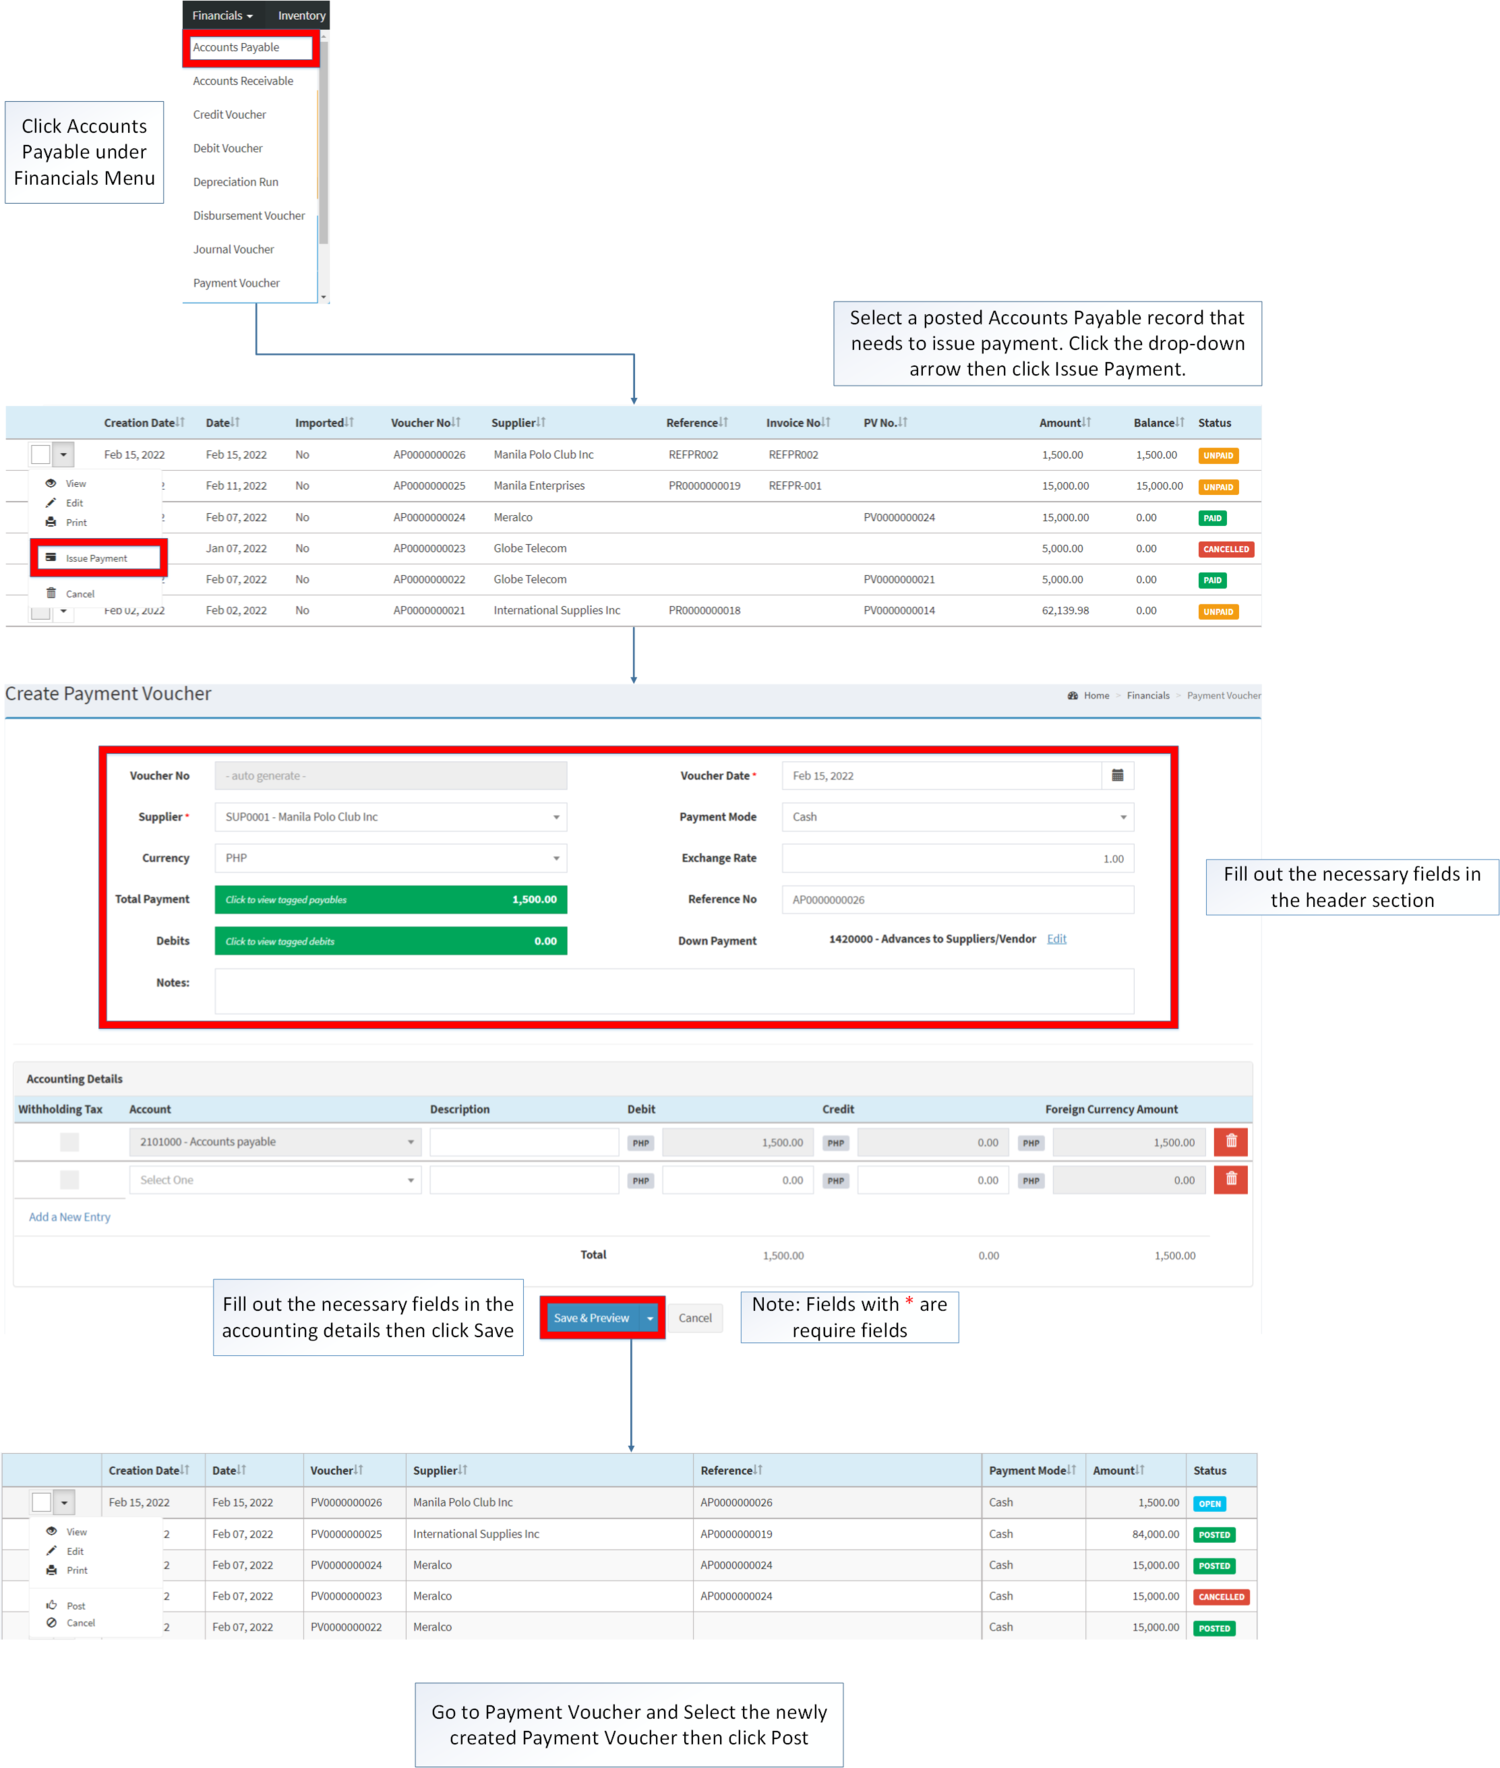
Issuing Payment in Accounts Payable
- Click Accounts Payable under Financials Menu
- Select a posted Accounts Payable that needs to issue payment, Click the drop-down arrow then click Issue Payment
- Fill out the necessary fields in the header section
- Fill out the necessary fields in the accounting details then click Save
- Go to Payment Voucher and select the newly created payment voucher, then click Post.
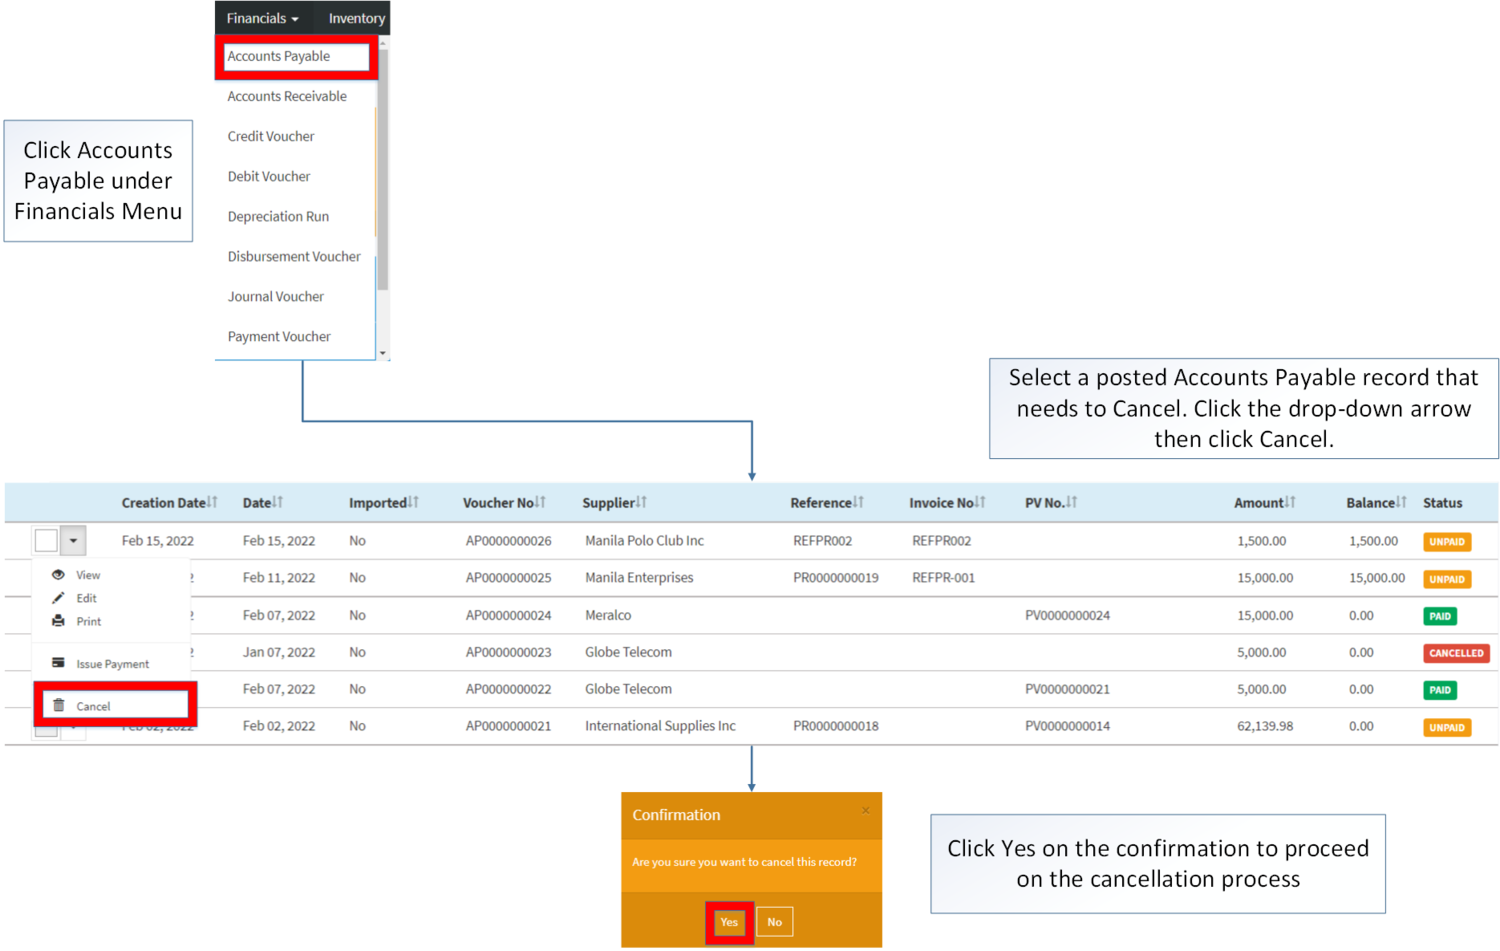
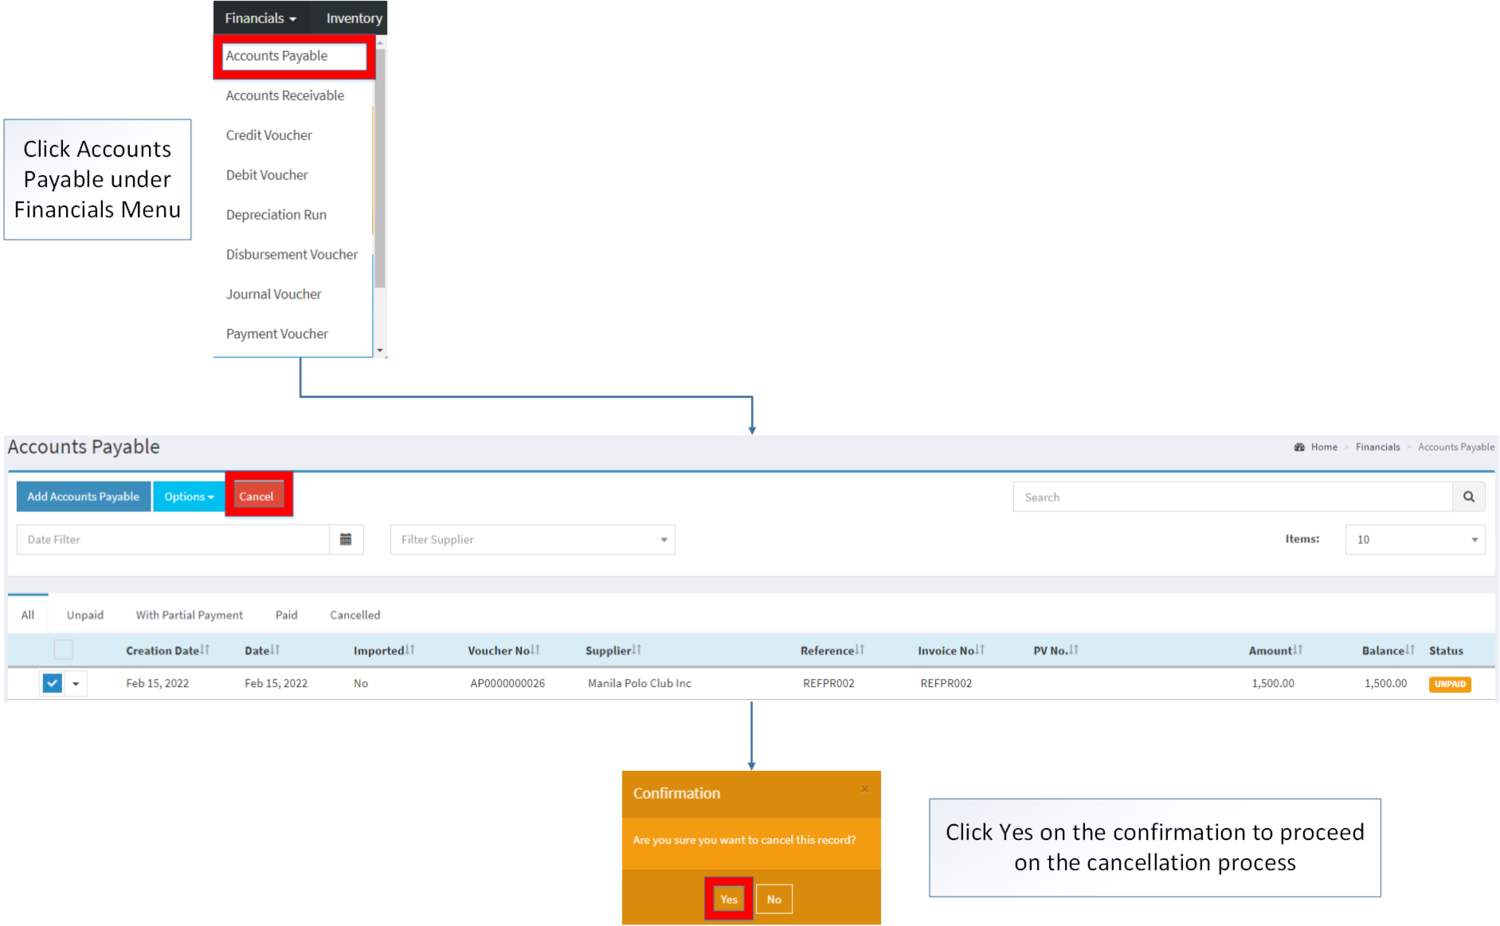
Cancelling Accounts Payable Record
Accounts Payable can be canceled in two ways:
- Using drop-down arrow of a record can be used in single record cancellation
- Using Cancel Button for cancelling multiple records
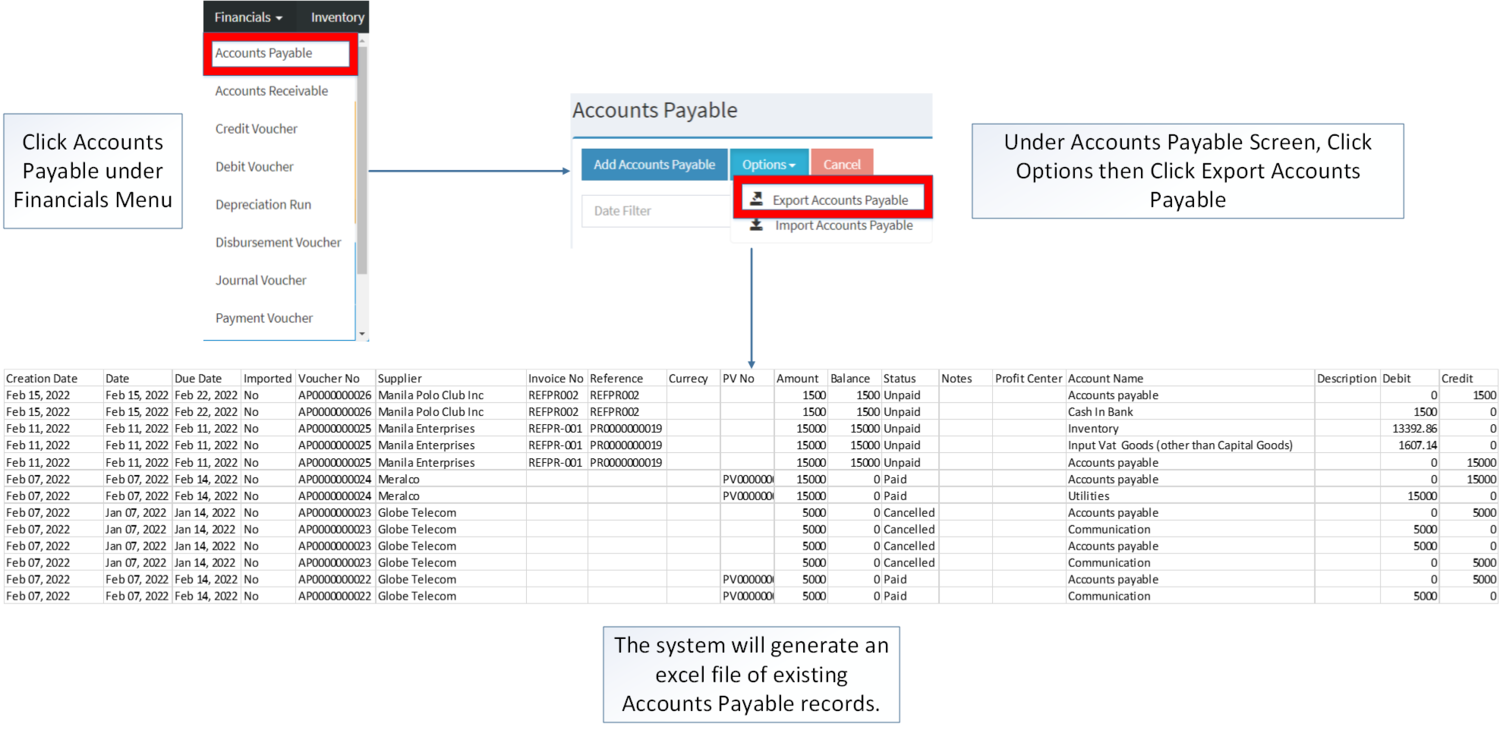
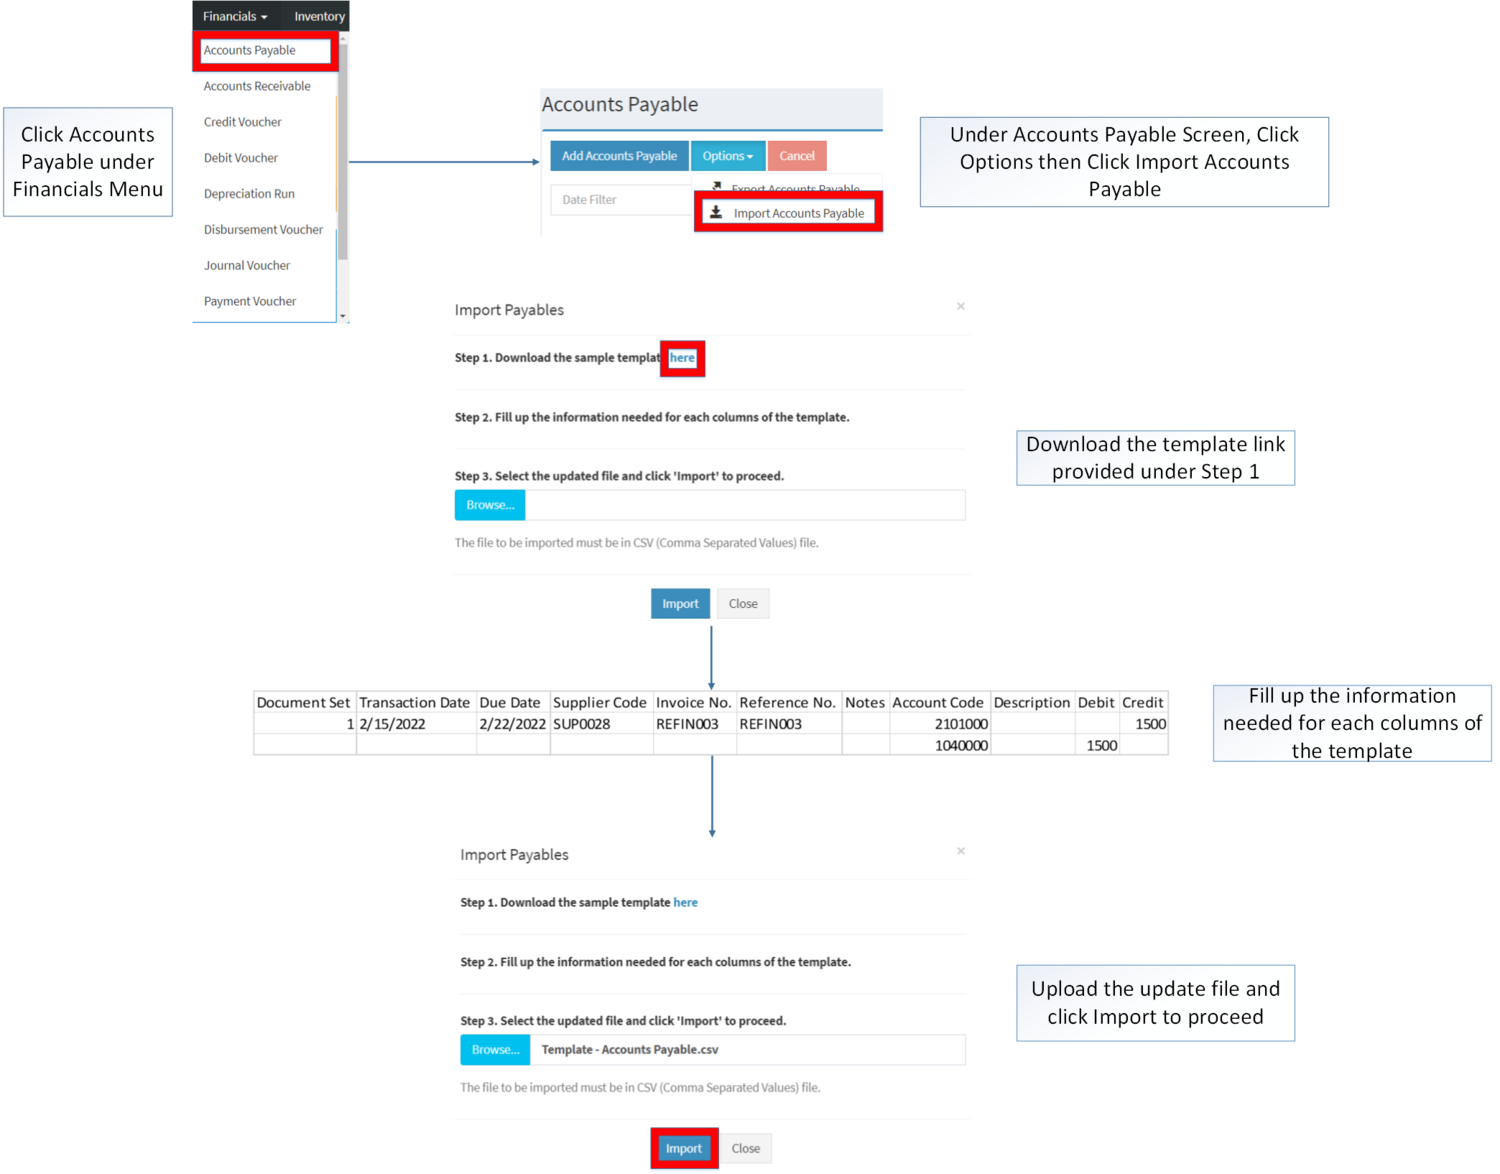
Importing and Exporting Accounts Payable Record
1. Under Accounts Payable Screen, Click Options
2. Under Options, The user may Export or Import The Record
- When Exporting the records, the user may also use the filter options such as Date Filter, Search Bar and Supplier filter for precise searching and exporting of records.
- When Importing the records, the user should follow the following steps provided in the Importing Accounts Payable Screen such as
| Field | Description of Data Output | Allowed Inputs | Input Restrictions | Required(Y/N) |
|---|---|---|---|---|
| Document Set | Manual entry of Document Set of Accounts Payable (e.g., 1, 2, 3, A, B, C) | *Alphanumeric
*Underscore (_) |
*Other special characters not mentioned | Y |
| Transaction Date | Manual entry of Transaction Date of Accounts Payable | *Numeric
*Dash (-), Backslash (/) |
*Other special characters not mentioned | Y |
| Due Date | Manual entry of Due Date of Accounts Payable – must be based on Customer’s payment terms | *Numeric
*Dash (-), Backslash (/) |
*Other special characters not mentioned | Y |
| Supplier Code | Manual entry of Supplier code – must be based from Supplier Data maintenance | *Numeric
*Customer Code based from Customer maintenance |
*Any input not mentioned in the required inputs | Y |
| Invoice No. | Manual entry of Accounts Payable Invoice No. | *Alphanumeric
*Underscore (_), Dash (-) |
*Other special characters not mentioned | N |
| Reference No. | Manual entry of Accounts Payable Reference No. | *Alphanumeric
*Underscore (_), Dash (-) |
*Other special characters not mentioned | N |
| Notes | Manual entry of Accounts Payable Notes | *Alphanumeric
*Underscore (_), Dash (-) |
*Other special characters not mentioned | N |
| Account Code | Manual entry of Account Code – must be based from Chart of Accounts maintenance | *Numeric
*Account Code based from Chart of Accounts maintenance |
*Any input not mentioned in the required inputs | Y |
| Description | Manual entry of Account Description | *Alphanumeric
*Special Characters |
*None | N |
| Debit | Manual entry of Debit amount | *Numeric | *Any input excepts numbers | Y |
| Credit | Manual entry of Credit amount | *Numeric | *Any input excepts numbers | Y |
| Modules | |
|---|---|
| Financials | Financials | Accounts Payable | Payment Voucher | Debit Voucher |
| Purchase | Purchase Order | Import Purchase Order | Purchase Order | Purchase Receipt |
| Maintenance | Supplier | Currency | Exchange Rate | Proforma | Chart of Account |
| Reports | |
| Purchase Reports | Purchase Report |
| Financial Statements | Accounts Payable Aging | AP Detailed Report | AP Transaction Report |
| Tax Reports | Purchase Journal | Purchase Relief |
