You are viewing an old version of this page. Return to the latest version.
Version of 11:58, 20 April 2022 by Gelo
Difference between revisions of "Pro Chart of Accounts"
(Created page with "<span class="bs-visualeditorconnector-cancel-edit oo-ui-widget oo-ui-widget-enabled oo-ui-buttonElement oo-ui-buttonElement-frameless oo-ui-iconElement oo-ui-buttonWidget oo-u...") (Tag: Visual edit) |
(Tag: Visual edit) |
||
| Line 1: | Line 1: | ||
| − | <span class="bs-visualeditorconnector-cancel-edit oo-ui-widget oo-ui-widget-enabled oo-ui-buttonElement oo-ui-buttonElement-frameless oo-ui-iconElement oo-ui-buttonWidget oo-ui-buttonElement-active | + | <span class="bs-visualeditorconnector-cancel-edit oo-ui-widget oo-ui-widget-enabled oo-ui-buttonElement oo-ui-buttonElement-frameless oo-ui-iconElement oo-ui-buttonWidget oo-ui-buttonElement-active" style="box-sizing: inherit; display: inline-block; line-height: normal; vertical-align: middle; position: relative; margin-right: 0px; border-left: 1px solid rgb(200, 204, 209); padding: 5px;" aria-disabled="false"><span class="oo-ui-iconElement-icon oo-ui-icon-clear" title="Cancel edit. Unsaved changes will be discarded" style="box-sizing: inherit; background-image: linear-gradient(transparent, transparent), url("data:image/svg+xml,%3Csvg xmlns=%22http://www.w3.org/2000/svg%22 width=%2220%22 height=%2220%22 viewBox=%220 0 20 20%22%3E%3Ctitle%3Eclear%3C/title%3E%3Cpath d=%22M10 0a10 10 0 1 0 10 10A10 10 0 0 0 10 0zm5.66 14.24l-1.41 1.41L10 11.41l-4.24 4.25-1.42-1.42L8.59 10 4.34 5.76l1.42-1.42L10 8.59l4.24-4.24 1.41 1.41L11.41 10z%22/%3E%3C/svg%3E"); background-size: contain; background-position: center center; background-repeat: no-repeat; position: absolute; top: 0px; min-width: 20px; width: 1.42857em; min-height: 20px; height: 26.25px; display: block; transform: translateZ(0px); opacity: 0.87; transition: opacity 100ms ease 0s; left: 0.357143em;"></span><span class="oo-ui-labelElement-label" style="box-sizing: inherit;"></span></span> |
| − | |||
==Adding New Account== | ==Adding New Account== | ||
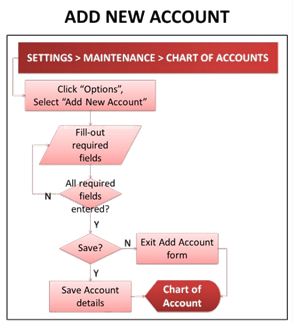
[[File:Oojeema Pro - Add New Account Process Flow.png|center|thumb|324x324px]]<span style="font-size:12.0pt;line-height:115%">To add an Account:</span> | [[File:Oojeema Pro - Add New Account Process Flow.png|center|thumb|324x324px]]<span style="font-size:12.0pt;line-height:115%">To add an Account:</span> | ||
Latest revision as of 12:03, 20 April 2022
Contents
Adding New Account
To add an Account:
- Click on the Gear icon in the system header. Select "Maintenance", then select “Chart of Accounts”. The Chart of Accounts will be displayed.
- Click “Options” button, then select “Add New Account”.
- Add New Account form will be displayed. Fill it out:
- Account Codes – accepts alphanumeric, max of 15 characters
- Account Name – accepts alphanumeric, special character, max of 100 characters
- Account class – for account class selection (displays “none” by default).
- FS Presentation – for financial statements (Balance Sheet, Income Statement) selection (displays “none” by default).
- Account Type – for account type (Both, Child, Parent) selection (displays “Both” by default).
- Parent Account Title – for parent account selection (displays “none” by default).
- Account Nature – for account nature (Debit, Credit) selection (displays “none” by default).
- After filling-out the form, click “Save” button to store new account details. Otherwise, click “Exit”, to discard entries and exit the form.
Importing New Accounts
To add new accounts by batch:
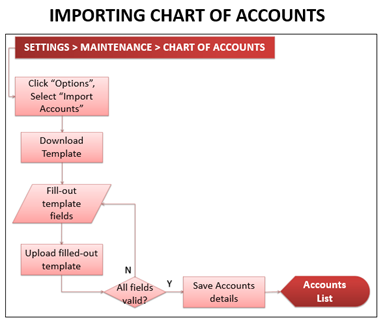
- Click on the Gear icon in the system header. Select "Maintenance", then select “Chart of Accounts”. The Chart of Accounts will be displayed.
- Click “Options” button, then select “Import Accounts”. Import Accounts pop-up window will be displayed.
- Download the sample template by clicking the “here” link, and open the downloaded file.
- On the downloaded template, fill-out the information needed for each columns of the template:
- Sample filled-out Import Accounts template
- After filling out the form, save it on your computer and upload it back to the system, then back to the Import Account pop-up window, click “Import”. Imported Accounts will be displayed in the Chart of Account list.
Viewing, Editing, Deleting Account
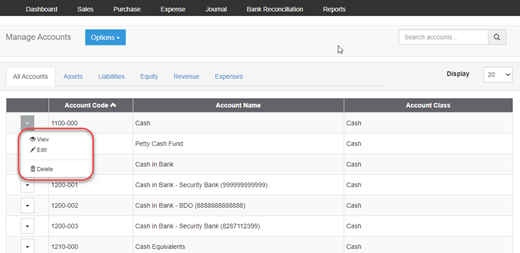
User can view, edit, delete accounts by clicking the corresponding function’s link in the Chart of Accounts list-specific account dropdown menu list.
Exporting Chart of Accounts
User can export the chart of accounts by clicking “Options” button, then click “Export Accounts”.


