You are viewing an old version of this page. Return to the latest version.
Difference between revisions of "Inventory Adjustment"
(Tag: Visual edit) |
(Tag: Visual edit) |
||
| (14 intermediate revisions by the same user not shown) | |||
| Line 1: | Line 1: | ||
| − | == Inventory Adjustment == | + | <div style="text-align: center;"> |
| + | [[Inventory]] | [[Inventory Movement]] | [[Inventory Inquiry]] | ||
| + | </div> | ||
| + | ==Inventory Adjustment== | ||
Allows the user to adjust the quantity of items on a specific warehouse | Allows the user to adjust the quantity of items on a specific warehouse | ||
| + | =====Requirements before using Inventory Adjustment===== | ||
| + | |||
| + | *The user should setup the following [[Maintenance]] Module in order to proceed on using the [[Inventory Adjustment]] | ||
| + | *#[[Brand]] | ||
| + | *#[[Chart of Account]] | ||
| + | *#[[Item Master]] | ||
| + | *#[[Warehouse]] | ||
| + | |||
| + | =====Inventory Adjustment Notice===== | ||
| + | [[File:Inventory - Inventory Adjustment - Notice.png|border|center|641x641px]] | ||
| + | |||
| − | |||
| − | |||
Notes: | Notes: | ||
*The system will lock for a mean time when a user proceed to use the Inventory Adjustment. | *The system will lock for a mean time when a user proceed to use the Inventory Adjustment. | ||
| − | ===== Inventory Adjustment List ===== | + | =====Inventory Adjustment List===== |
| − | [[File:Inventory Adjustment List.png|center| | + | [[File:Inventory - Inventory Adjustment - Record List.png|border|center|1500x1500px]] |
| + | |||
Notes: | Notes: | ||
| − | *The Warehouse status should be active to proceed on the Inventory Adjustment. | + | *For easier access on a specific Item, the user can filter the search by [[Warehouse]], [[Brand]], [[Item Master|Item]] or both |
| + | |||
| + | *The [[Warehouse]] status should be active to proceed on the Inventory Adjustment. | ||
| + | **This can be seen in [[Warehouse]] Maintenance Module | ||
*The Item status should be active in order to adjust the item quantity on the Inventory Adjustment. | *The Item status should be active in order to adjust the item quantity on the Inventory Adjustment. | ||
| + | **Items can be seen in [[Item Master]] Maintenance Module | ||
| + | *Every Inventory Adjustment performed will be seen in [[Inventory Movement]] Module. | ||
| − | ===== | + | =====<span class="mw-headline" id="Performing_Inventory_Adjustment" style="box-sizing: inherit;">Performing Inventory Adjustment</span>===== |
| − | |||
| − | ===== | + | #Click [[Inventory Adjustment]] under Inventory Menu |
| − | [[File:Inventory Adjustment | + | #Take note that there is also other users that using the system. Make sure to give them a heads-up that you will be doing an inventory adjustments. Click '''Proceed''' to continue. |
| + | #Select [[Warehouse]] | ||
| + | #Choose an Item that needs to be Adjusted then adjust its Quality using the (+) and (-) Button. | ||
| + | #An adjustment modal will appear. Make sure to fill up the necessary information on the fields then click '''Save. Note: Fields with * are require fields''' | ||
| + | #The movement of items can be seen in [[Inventory Movement]] Module. Clicking the Reference No. of the Adjustment will provide a clearer detail of the adjustment | ||
| + | #*The user may print the inventory adjustment record by clicking the print button under view Adjustment in Inventory Movement Record | ||
| + | |||
| + | [[File:Inventory - Inventory Adjustment - Performing.png|border|center|2945x2945px]] | ||
| + | =====Beginning Balance Setup===== | ||
| + | The user should set up the following modules in order to Import Beginning Balances. | ||
| + | |||
| + | #[[Item Class]] | ||
| + | #[[Item Master]] | ||
| + | #[[Item Type]] | ||
| + | #[[Unit of Measure]] | ||
| + | #[[Warehouse]] | ||
| + | |||
| + | =====Import Beginning Balance===== | ||
| + | |||
| + | #Click [[Inventory Adjustment]] under Inventory Menu | ||
| + | #Take note that there is also other users that using the system. Make sure to give them a heads-up that you will be doing an inventory adjustments. Click '''Proceed''' to continue. | ||
| + | #Under Inventory, Click Import Beginning Balance | ||
| + | #Choose the date of the Beginning Balance to take effect before proceeding or click skip. | ||
| + | #Download the Template provided in Step 1. | ||
| + | #Fill up the information needed for each column of the template. | ||
| + | #Upload the updated template then click Import to proceed | ||
| + | |||
| + | [[File:Inventory - Inventory Adjustment - Import Beginning Balance.png|border|center|1853x1853px]] | ||
| + | {| class="wikitable" | ||
| + | |+Import Beginning Balance Fields | ||
| + | !'''Field''' | ||
| + | !'''Description''' | ||
| + | !'''Allowed Inputs''' | ||
| + | !'''Input Restrictions''' | ||
| + | !'''Required Field''' | ||
| + | |- | ||
| + | |1.Item Code | ||
| + | |Reference Code of an Item | ||
| + | |Item Code provided in Item Master Maintenance Module | ||
| + | |Any inputs not mentioned in the required inputs | ||
| + | | style="vertical-align:middle;text-align:center;" |Yes | ||
| + | |- | ||
| + | |2.Item Name | ||
| + | |Name of an Item corresponds to its Item Code | ||
| + | |Item Name provided in Item Master Maintenance Module | ||
| + | |Any inputs not mentioned in the required inputs | ||
| + | | style="vertical-align:middle;text-align:center;" |Yes | ||
| + | |- | ||
| + | |3.Warehouse | ||
| + | |Warehouse assigned to the item | ||
| + | |Warehouse Name provided in Warehouse Maintenance Module | ||
| + | |Any inputs not mentioned in the required inputs | ||
| + | | style="vertical-align:middle;text-align:center;" |Yes | ||
| + | |- | ||
| + | |4.Quantity | ||
| + | |Quantity of an Item | ||
| + | |Numeric | ||
| + | |Any inputs not mentioned in the required inputs | ||
| + | | style="vertical-align:middle;text-align:center;" |Yes | ||
| + | |- | ||
| + | |5.Price | ||
| + | |Beginning Unit Price of an Item | ||
| + | |Numeric | ||
| + | |Any inputs not mentioned in the required inputs | ||
| + | | style="vertical-align:middle;text-align:center;" |Yes | ||
| + | |} | ||
| + | Notes: | ||
| − | * | + | *Import Beginning Balance will only be available if there are no transaction records done by the user. |
| − | |||
| − | |||
<br /> | <br /> | ||
| + | {| class="wikitable" style="margin: auto;" | ||
| + | |+Categories: | ||
| + | ! colspan="2" |'''Modules''' | ||
| + | |- | ||
| + | |Inventory | ||
| + | |[[Inventory Adjustment]]<nowiki> | </nowiki>[[Inventory Movement]]<nowiki> | </nowiki>[[Inventory Inquiry]] | ||
| + | |- | ||
| + | |Maintenance | ||
| + | |[[Chart of Account]]<nowiki> | </nowiki>[[Item Class]]<nowiki> | </nowiki>[[Item Master]]<nowiki> | </nowiki>[[Item Type]]<nowiki> | </nowiki>[[Unit of Measure]]<nowiki> | </nowiki>[[Warehouse]] | ||
| + | |} | ||
| + | [[Category:Inventory]] | ||
Latest revision as of 12:04, 20 April 2022
Contents
Inventory Adjustment
Allows the user to adjust the quantity of items on a specific warehouse
Requirements before using Inventory Adjustment
- The user should setup the following Maintenance Module in order to proceed on using the Inventory Adjustment
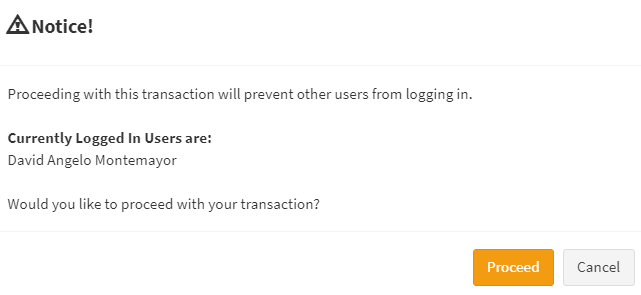
Inventory Adjustment Notice
Notes:
- The system will lock for a mean time when a user proceed to use the Inventory Adjustment.
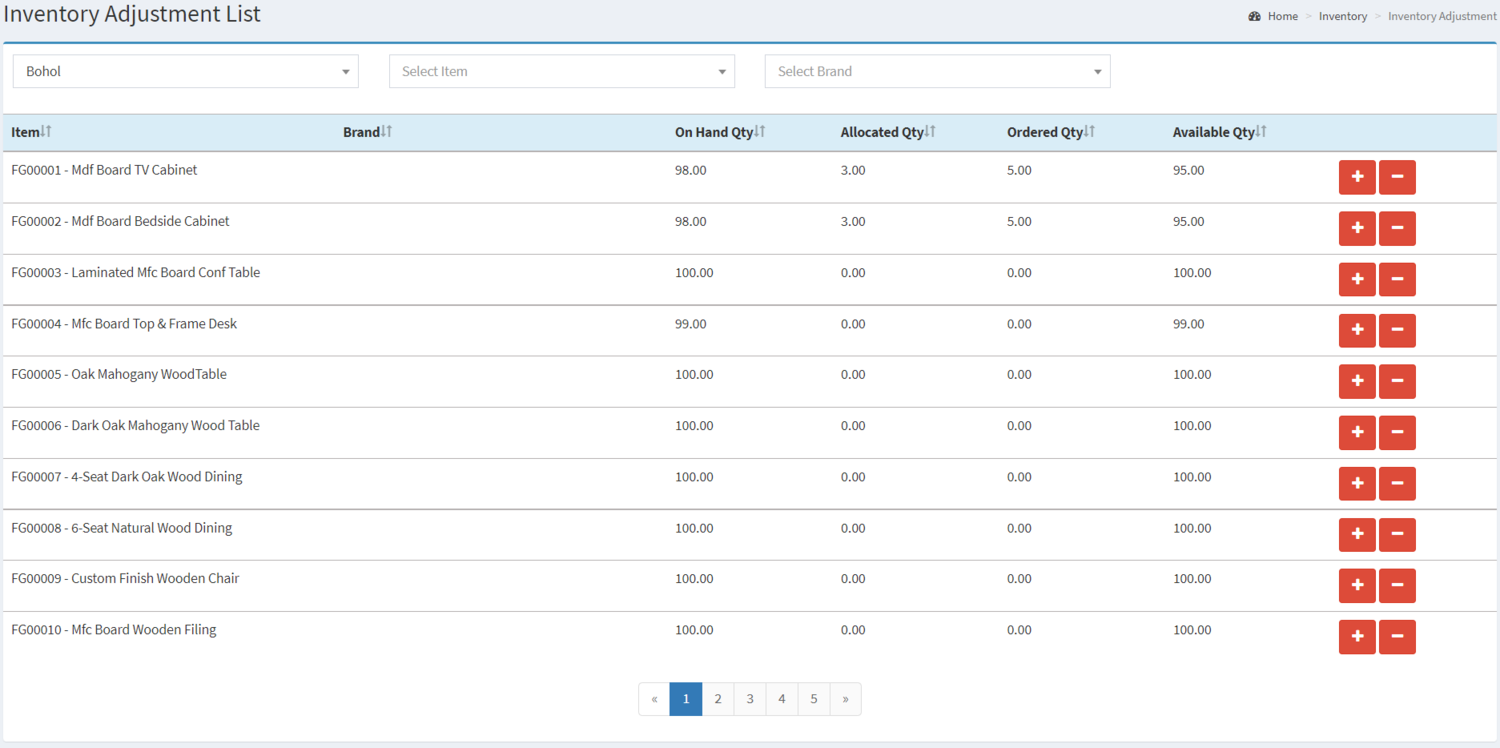
Inventory Adjustment List
Notes:
- For easier access on a specific Item, the user can filter the search by Warehouse, Brand, Item or both
- The Warehouse status should be active to proceed on the Inventory Adjustment.
- This can be seen in Warehouse Maintenance Module
- The Item status should be active in order to adjust the item quantity on the Inventory Adjustment.
- Items can be seen in Item Master Maintenance Module
- Every Inventory Adjustment performed will be seen in Inventory Movement Module.
Performing Inventory Adjustment
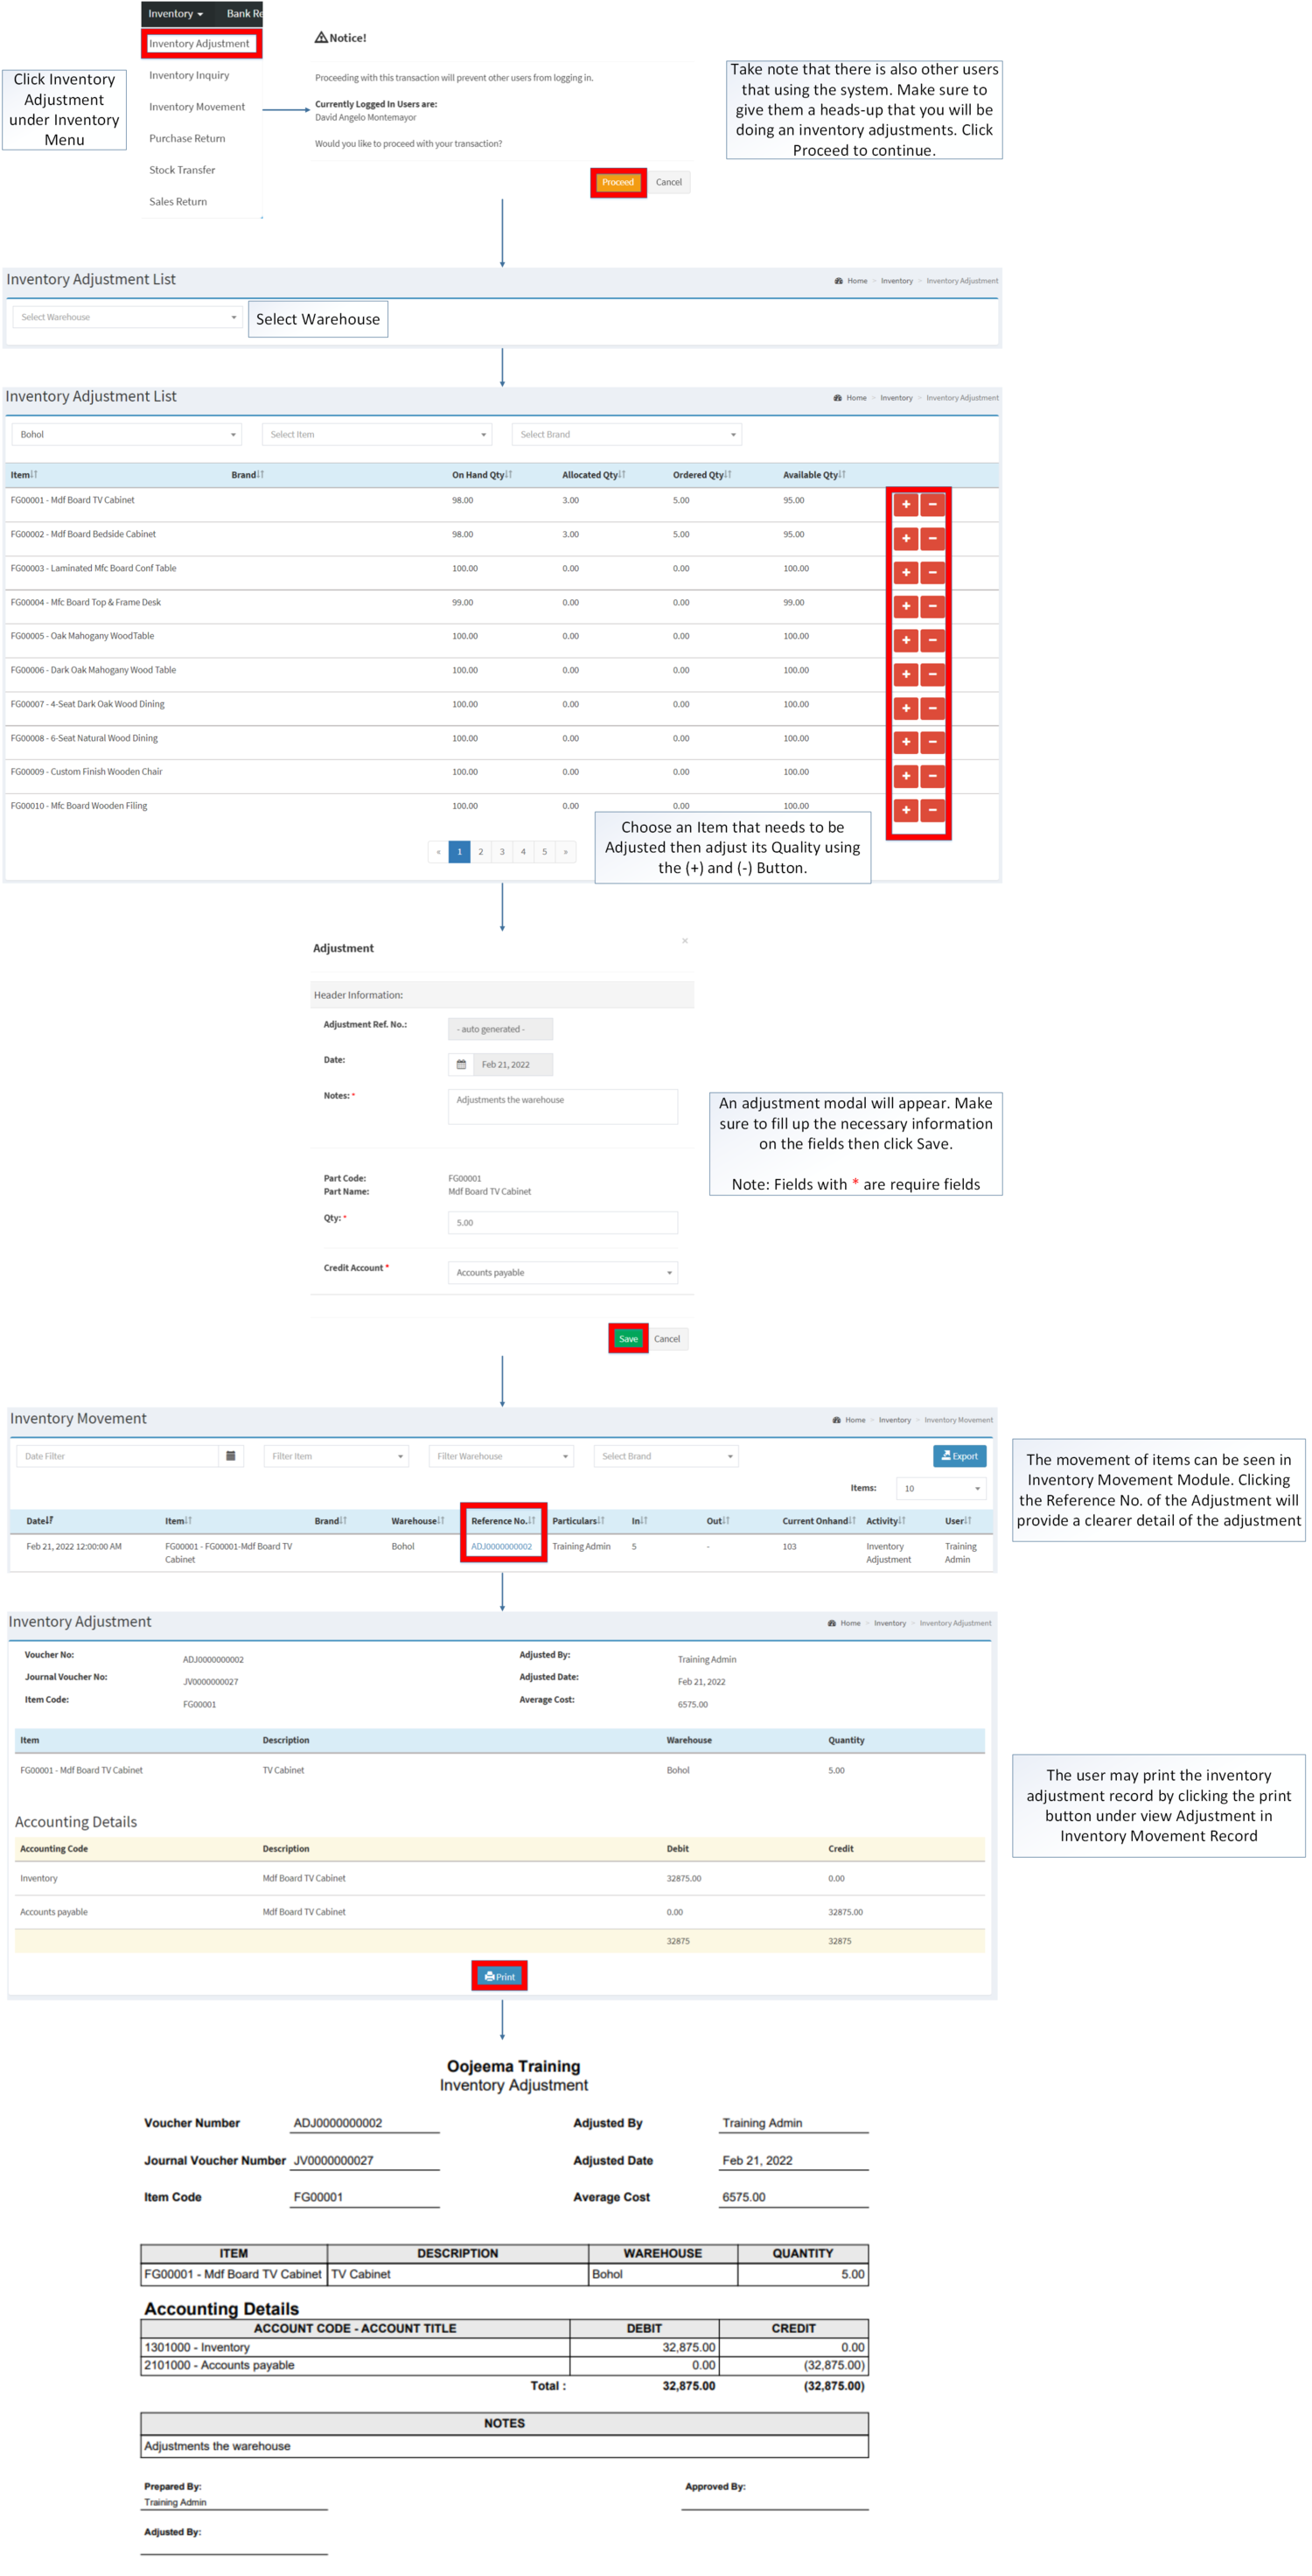
- Click Inventory Adjustment under Inventory Menu
- Take note that there is also other users that using the system. Make sure to give them a heads-up that you will be doing an inventory adjustments. Click Proceed to continue.
- Select Warehouse
- Choose an Item that needs to be Adjusted then adjust its Quality using the (+) and (-) Button.
- An adjustment modal will appear. Make sure to fill up the necessary information on the fields then click Save. Note: Fields with * are require fields
- The movement of items can be seen in Inventory Movement Module. Clicking the Reference No. of the Adjustment will provide a clearer detail of the adjustment
- The user may print the inventory adjustment record by clicking the print button under view Adjustment in Inventory Movement Record
Beginning Balance Setup
The user should set up the following modules in order to Import Beginning Balances.
Import Beginning Balance
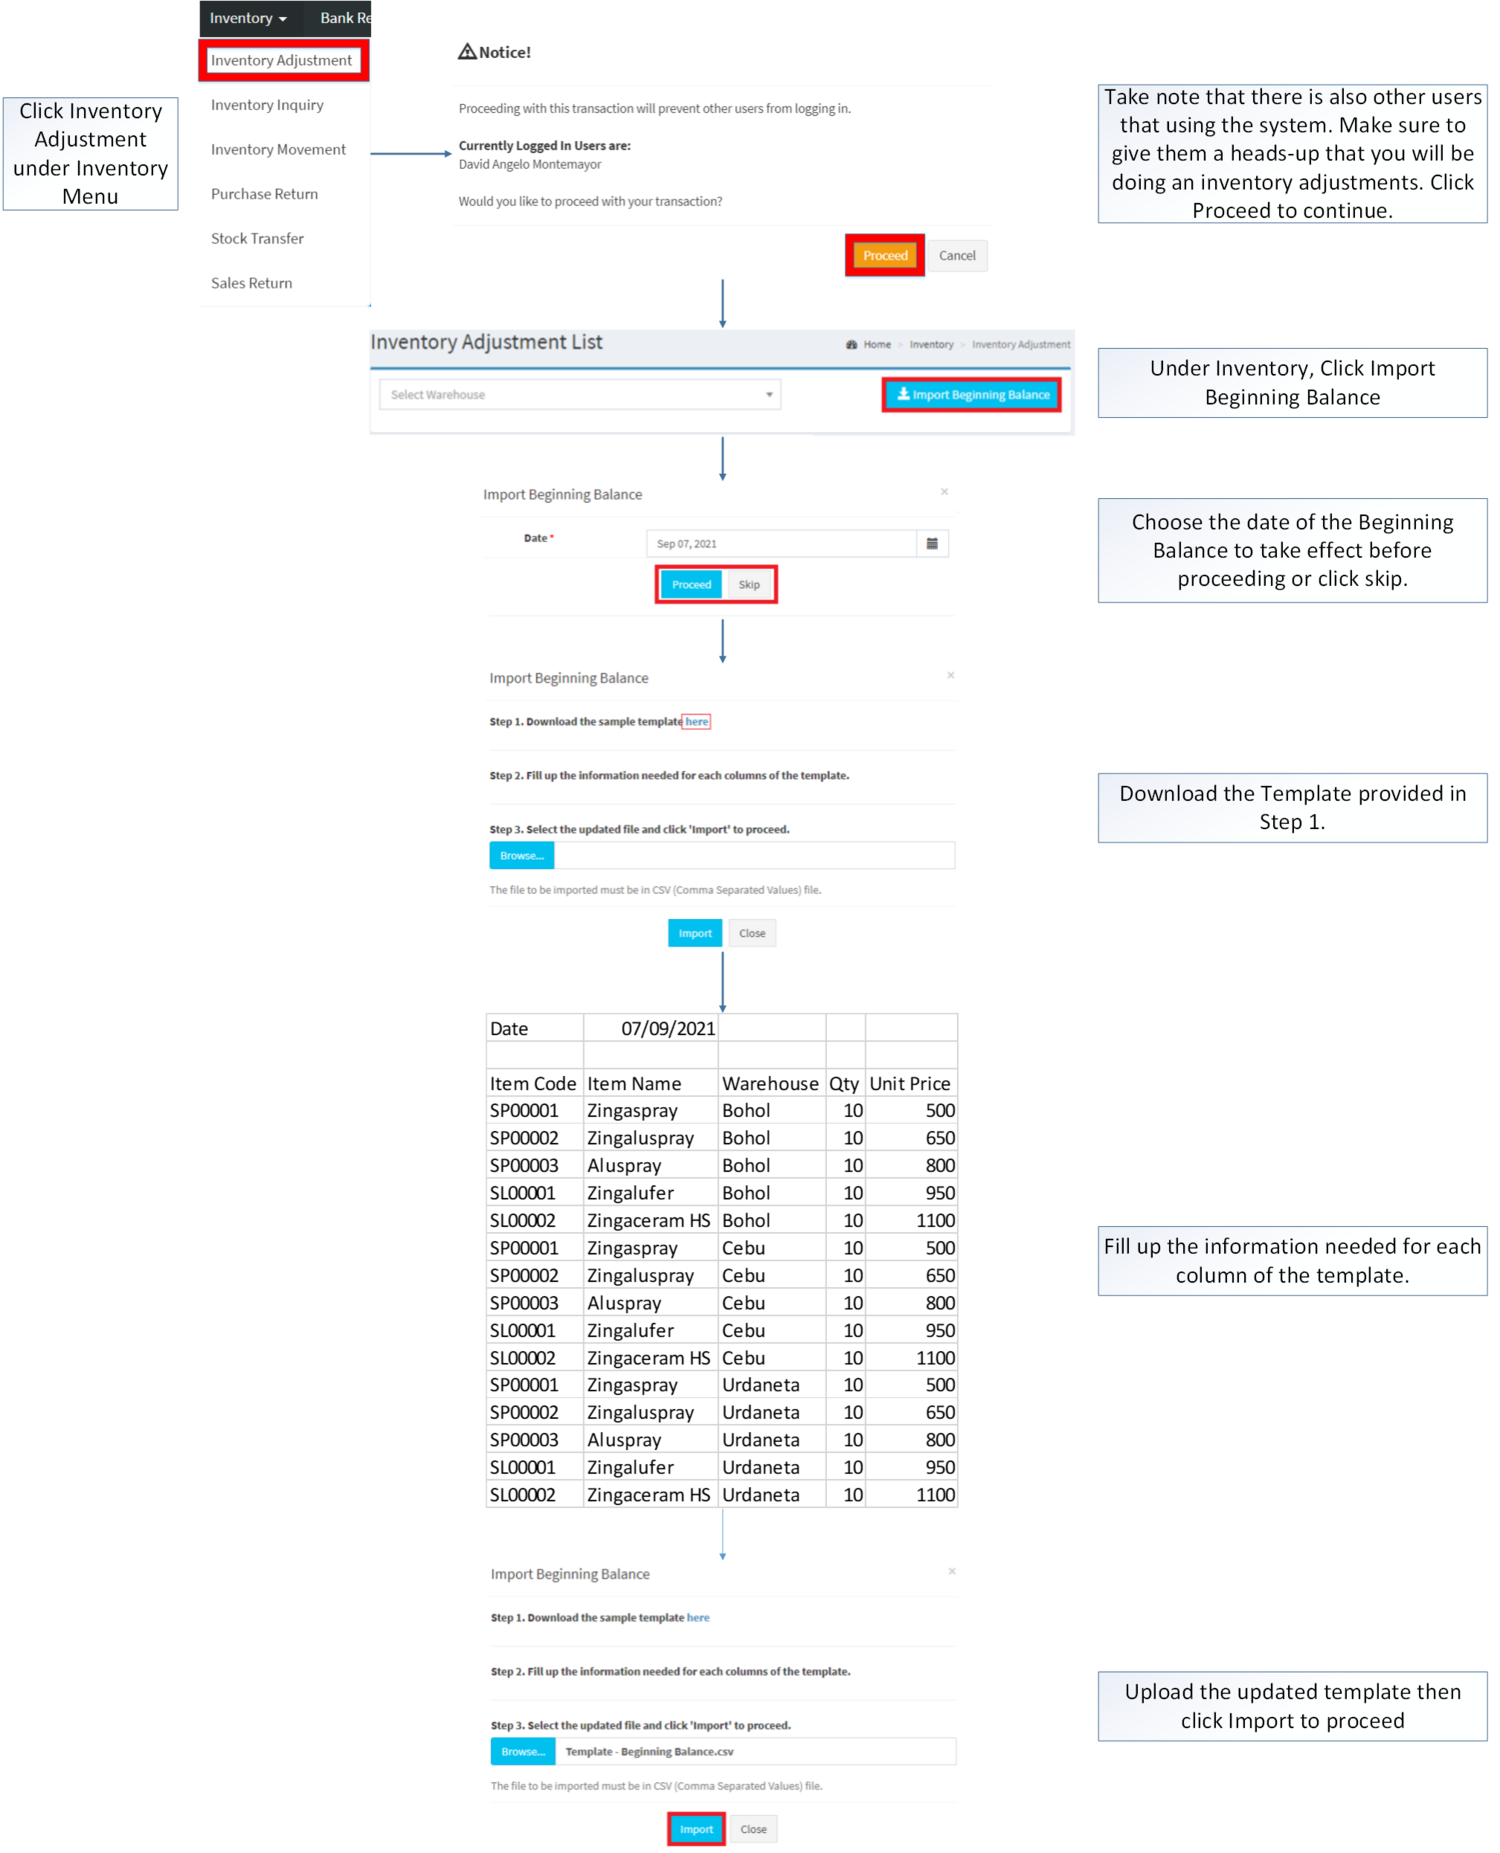
- Click Inventory Adjustment under Inventory Menu
- Take note that there is also other users that using the system. Make sure to give them a heads-up that you will be doing an inventory adjustments. Click Proceed to continue.
- Under Inventory, Click Import Beginning Balance
- Choose the date of the Beginning Balance to take effect before proceeding or click skip.
- Download the Template provided in Step 1.
- Fill up the information needed for each column of the template.
- Upload the updated template then click Import to proceed
| Field | Description | Allowed Inputs | Input Restrictions | Required Field |
|---|---|---|---|---|
| 1.Item Code | Reference Code of an Item | Item Code provided in Item Master Maintenance Module | Any inputs not mentioned in the required inputs | Yes |
| 2.Item Name | Name of an Item corresponds to its Item Code | Item Name provided in Item Master Maintenance Module | Any inputs not mentioned in the required inputs | Yes |
| 3.Warehouse | Warehouse assigned to the item | Warehouse Name provided in Warehouse Maintenance Module | Any inputs not mentioned in the required inputs | Yes |
| 4.Quantity | Quantity of an Item | Numeric | Any inputs not mentioned in the required inputs | Yes |
| 5.Price | Beginning Unit Price of an Item | Numeric | Any inputs not mentioned in the required inputs | Yes |
Notes:
- Import Beginning Balance will only be available if there are no transaction records done by the user.
| Modules | |
|---|---|
| Inventory | Inventory Adjustment | Inventory Movement | Inventory Inquiry |
| Maintenance | Chart of Account | Item Class | Item Master | Item Type | Unit of Measure | Warehouse |


