Difference between revisions of "Setting Up Oojeema Prime"
(Tag: Visual edit) |
(→Users Group) (Tag: Visual edit) |
||
| (7 intermediate revisions by one other user not shown) | |||
| Line 2: | Line 2: | ||
====Users Group==== | ====Users Group==== | ||
| + | [[File:Maintenance - Users Group - Record List.png|border|center|1075x1075px]] | ||
| + | |||
| + | |||
'''<span style="color: #000000">Us</span><span style="color: #000000">ers Group</span>''' <span style="color: #000000">maintenance screen allows the user to configure and add User on a specific group. This is also used to restrict specific modules that a specific user can use.</span> | '''<span style="color: #000000">Us</span><span style="color: #000000">ers Group</span>''' <span style="color: #000000">maintenance screen allows the user to configure and add User on a specific group. This is also used to restrict specific modules that a specific user can use.</span> | ||
=====Creating Users Group===== | =====Creating Users Group===== | ||
| − | #Click | + | #Click [[Users Group]] under Maintenance Menu |
| − | #Under Users Group | + | #Under [[Users Group]] Screen, Click '''Add Users Group''' |
| − | #Fill up the | + | #Fill up the necessary fields and tick the modules that needs to enable for the users group then click '''Save''' |
| + | [[File:Maintenance - Users Group - Add.png|border|center|974x974px]] | ||
| + | <br /> | ||
====Position==== | ====Position==== | ||
| + | [[File:Maintenance - Position - Record List.png|border|center|1066x1066px]] | ||
| + | |||
| + | |||
The '''Position''' maintenance allows the users to configure the position of the other users that will be using the system. | The '''Position''' maintenance allows the users to configure the position of the other users that will be using the system. | ||
| + | =====Adding Position===== | ||
| − | + | #Click [[Position]] under Maintenance Menu | |
| − | + | #Under [[Position]] Screen, Click Add Position | |
| − | #Click Maintenance | + | #Fill out the necessary fields then click Save. |
| − | #Under Position | ||
| − | #Fill | ||
| + | [[File:Maintenance - Position - Add.png|border|center|1123x1123px|link=https://docs.oojeema.com/File:Maintenance_-_Position_-_Add.png]]<br /> | ||
=====Importing Position===== | =====Importing Position===== | ||
| − | #Click Maintenance | + | #Click [[Position]] under Maintenance Menu |
| − | #Under Position | + | #Under [[Position]] Screen, click Options then click '''Import Position''' |
#Download the Template provided in Step 1. | #Download the Template provided in Step 1. | ||
#Fill up the information needed for each column of the template. | #Fill up the information needed for each column of the template. | ||
| − | #Upload the updated | + | #Upload the updated file then click '''Import''' to proceed |
| + | [[File:Maintenance - Position - Import.png|border|center|1079x1079px|link=https://docs.oojeema.com/File:Maintenance_-_Position_-_Import.png]]<br /> | ||
====Users==== | ====Users==== | ||
| + | [[File:Maintenance - Users - Record List.png|border|center|1100x1100px]] | ||
| + | |||
| + | |||
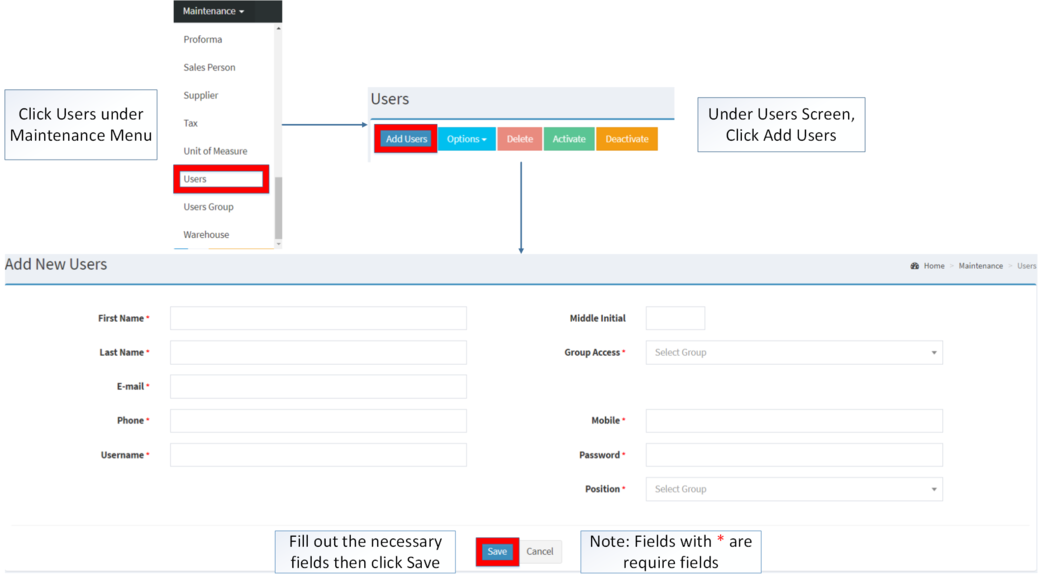
'''Users''' maintenance screen allows the user to configure and add Users that can use their system. | '''Users''' maintenance screen allows the user to configure and add Users that can use their system. | ||
| − | ===== | + | =====<span class="mw-headline" id="Adding_Users" style="box-sizing: inherit;">Adding Users</span>===== |
| − | #Click Maintenance | + | #Click [[Users]] under Maintenance Module |
| − | #Under Users | + | #Under [[Users]] Screen, Click Add Users |
| − | #Fill | + | #Fill out the necessary fields then click Save. Note: Fields with * are require fields |
| + | [[File:Maintenance - Users - Add.png|border|center|1038x1038px]] | ||
| + | <br /> | ||
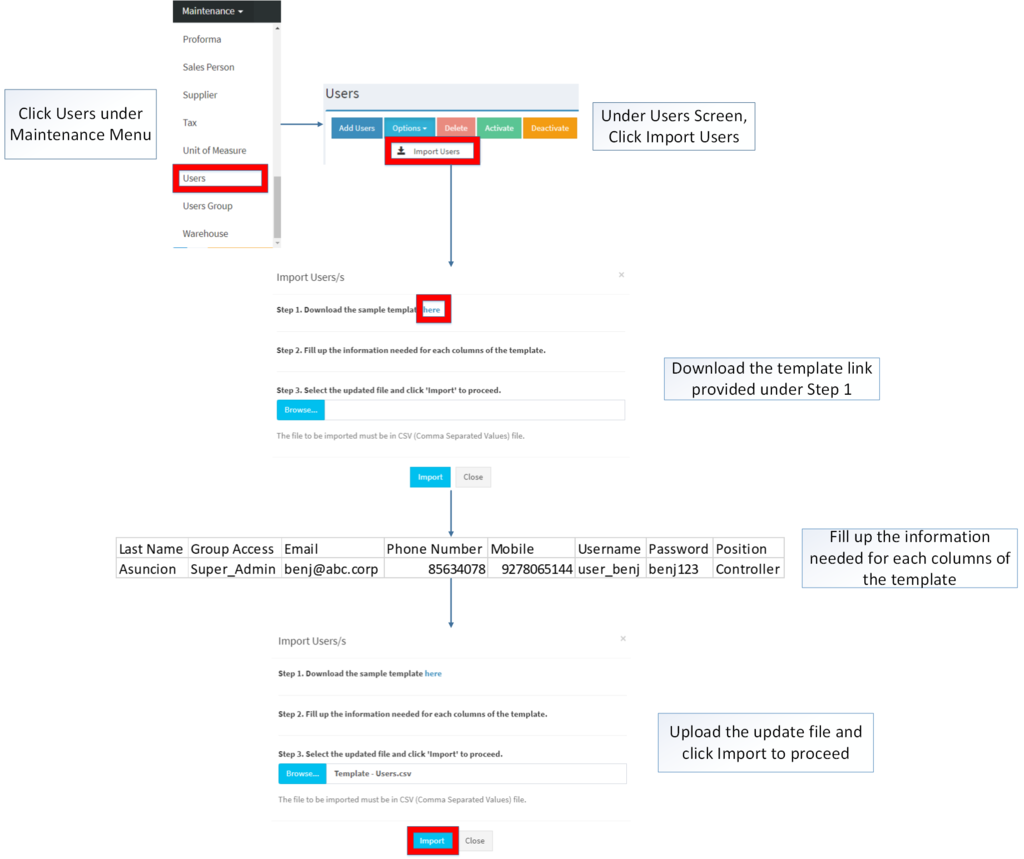
=====Importing Users===== | =====Importing Users===== | ||
| − | #Click Maintenance | + | #Click [[Users]] under Maintenance Menu |
| − | #Under Users Menu, click Options then | + | #Under [[Users]] Menu, click Options then click '''Import Users''' |
#Download the Template provided in Step 1. | #Download the Template provided in Step 1. | ||
#Fill up the information needed for each column of the template. | #Fill up the information needed for each column of the template. | ||
| − | #Upload the updated | + | #Upload the updated file then click '''Import''' to proceed |
| + | [[File:Maintenance - Users - Import.png|border|center|1024x1024px]] | ||
| + | <br /> | ||
====Chart of Accounts==== | ====Chart of Accounts==== | ||
| − | The Chart of Account maintenance lists all the financial accounts included in the financial statements of a company. This maintenance module categorizes financial transactions that are conducted by the company during a specific accounting period. | + | [[File:Maintenance - Chart of Account - Record List.png|border|center|1107x1107px]] |
| + | |||
| + | |||
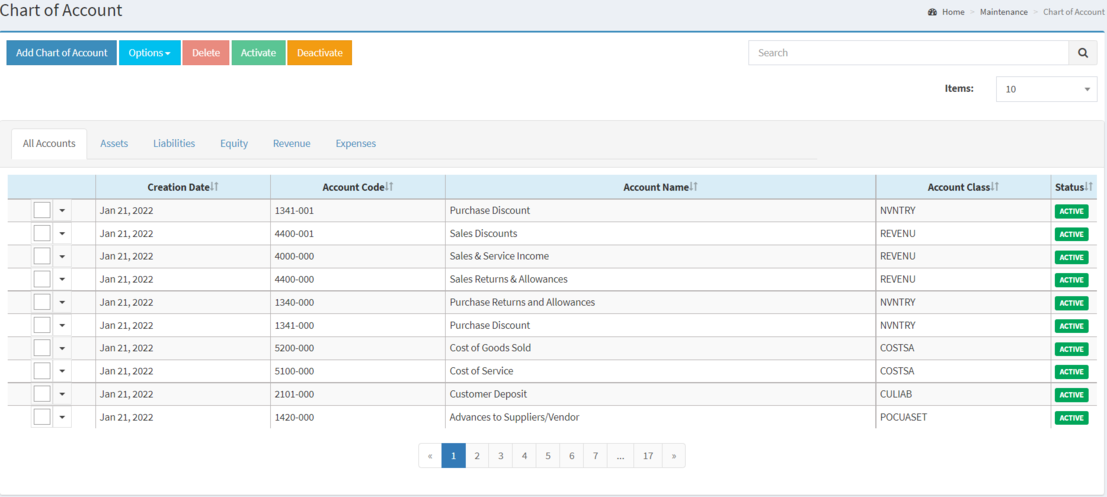
| + | The '''Chart of Account''' maintenance lists all the financial accounts included in the financial statements of a company. This maintenance module categorizes financial transactions that are conducted by the company during a specific accounting period. | ||
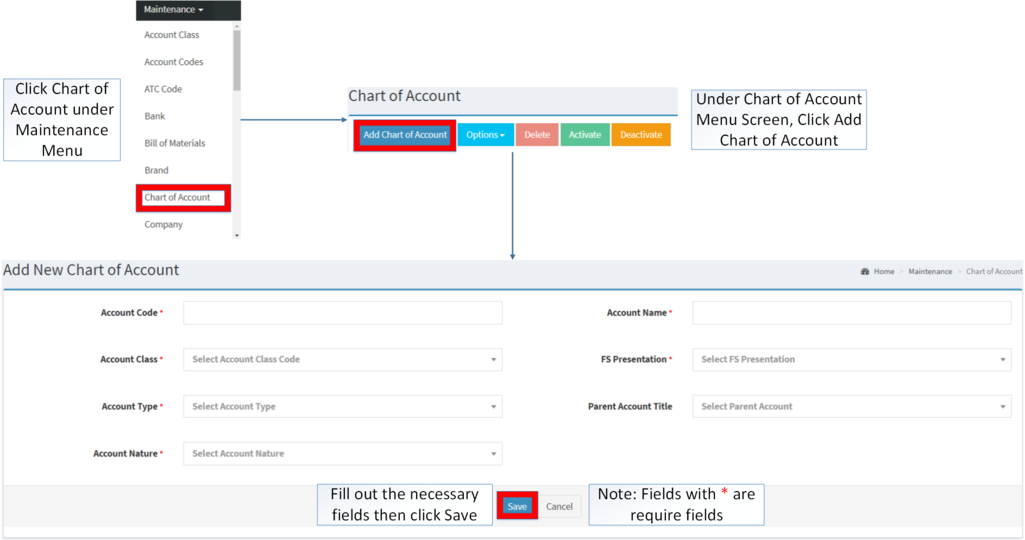
=====Creating Chart of Accounts===== | =====Creating Chart of Accounts===== | ||
| − | #Click | + | #Click [[Chart of Account]] under Maintenance Menu |
| − | #Under Chart of | + | #Under Chart of Account Menu Screen, Click Add Chart of Account |
#Fill up the required fields then click Save. Note: Fields with * are required to be filled up | #Fill up the required fields then click Save. Note: Fields with * are required to be filled up | ||
| + | [[File:Maintenance - Chart of Account - Add.png|border|center|1025x1025px]] | ||
| + | <br /> | ||
=====Importing Chart of Accounts===== | =====Importing Chart of Accounts===== | ||
| − | #Click | + | #Click [[Chart of Account]] under Maintenance Menu |
| − | #Under Chart of | + | #Under [[Chart of Account]] Menu, Click Options then click Import Chart of Account |
#Download the Template provided in Step 1. | #Download the Template provided in Step 1. | ||
#Fill up the information needed for each column of the template. Note: There should be an existing Parent Account record in the system before importing Child Accounts. | #Fill up the information needed for each column of the template. Note: There should be an existing Parent Account record in the system before importing Child Accounts. | ||
| − | #Upload the updated | + | #Upload the updated file then click Import to Proceed |
| + | [[File:Maintenance - Chart of Account - Import.png|border|center|1017x1017px]] | ||
| + | <br /> | ||
====Account Codes==== | ====Account Codes==== | ||
The Account Codes Maintenance screen allows users to configure accounting entry preferences for transactions. Note: Chart of Accounts must be setup in order to edit the Account Codes | The Account Codes Maintenance screen allows users to configure accounting entry preferences for transactions. Note: Chart of Accounts must be setup in order to edit the Account Codes | ||
| Line 66: | Line 89: | ||
=====Setting up Account Codes===== | =====Setting up Account Codes===== | ||
| − | #Click | + | #Click [[Account Codes]] under Maintenance Menu |
| − | #Under Account Codes. The user can edit the Sales Account and Purchase Account of a specific Account code by clicking the drop-down arrow then click Save | + | #Under Account Codes. The user can edit the Sales Account and Purchase Account of a specific Account code by clicking the drop-down arrow of Purchase Account or Sales Account then click Save |
| + | |||
| + | [[File:Maintenance - Account Codes - Edit.png|border|center|1039x1039px]] | ||
| + | <br /> | ||
| + | ====ATC Code==== | ||
| + | [[File:Maintenance - ATC Codes - Record List.png|border|center|1065x1065px]] | ||
| + | |||
| − | |||
Alphanumeric Tax Codes or ATC Codes or ATCs are codes used to identify the type of tax that has to be paid. Note: Chart of Accounts must be set up in order to create and import ATC Codes. | Alphanumeric Tax Codes or ATC Codes or ATCs are codes used to identify the type of tax that has to be paid. Note: Chart of Accounts must be set up in order to create and import ATC Codes. | ||
=====Creating ATC Records===== | =====Creating ATC Records===== | ||
| − | #Click | + | #Click [[ATC Code]] under Maintenance Menu |
| − | #Under ATC Code | + | #Under ATC Code Screen, Click Add ATC Code |
#Fill up the required fields then Click Save. Note: Fields with * are required to be filled up. | #Fill up the required fields then Click Save. Note: Fields with * are required to be filled up. | ||
| + | [[File:Maintenance - ATC Codes - Add.png|border|center|970x970px]] | ||
| + | <br /> | ||
=====Importing ATC Records===== | =====Importing ATC Records===== | ||
| − | #Click | + | #Click [[ATC Code]] under Maintenance Menu |
| − | #Under ATC Code | + | #Under ATC Code Screen, Click Options then click Import ATC Code |
| − | #Download the Template provided in Step 1. | + | #Download the Template link provided in Step 1. |
#Fill up the information needed for each column of the template. | #Fill up the information needed for each column of the template. | ||
#Upload the updated template then click Import to Proceed | #Upload the updated template then click Import to Proceed | ||
| + | [[File:Maintenance - ATC Codes - Import.png|center|1500x1500px]] | ||
| + | <br /> | ||
====Tax==== | ====Tax==== | ||
| + | [[File:Maintenance - Tax - Record List.png|border|center|1500x1500px]] | ||
| + | |||
| + | |||
Tax Maintenance screen allows the user to configure and add tax types to be used on their transactions. Note: Chart of Accounts should be setup before creating or importing Tax Records | Tax Maintenance screen allows the user to configure and add tax types to be used on their transactions. Note: Chart of Accounts should be setup before creating or importing Tax Records | ||
=====Creating Tax===== | =====Creating Tax===== | ||
| − | #Click Maintenance | + | #Click [[Tax]] under Maintenance Menu |
| − | #Under Tax Menu, click Add Tax | + | #Under Tax Menu Screen, click Add Tax |
#Fill up the required fields then click Save. Note: Fields with * are required to be filled up. | #Fill up the required fields then click Save. Note: Fields with * are required to be filled up. | ||
| + | [[File:Maintenance - Tax - Add.png|border|center|1500x1500px]] | ||
| + | <br /> | ||
=====Importing Tax===== | =====Importing Tax===== | ||
| − | #Click Maintenance | + | #Click [[Tax]] under Maintenance Menu |
| − | #Under Tax Menu, click options then | + | #Under Tax Menu, click options then click Import Tax |
| − | #Download the Template provided | + | #Download the Template provided under Step 1. |
#Fill up the information needed for each column of the template. | #Fill up the information needed for each column of the template. | ||
#Upload the updated template then click Import to Proceed | #Upload the updated template then click Import to Proceed | ||
| + | [[File:Maintenance - Tax - Import.png|border|center|1500x1500px]] | ||
| + | <br /> | ||
====Unit of Measure==== | ====Unit of Measure==== | ||
| + | [[File:Maintenance - Unit of Measure - Record List.png|border|center|1500x1500px]] | ||
| + | |||
| + | |||
Unit of Measure maintenance allows the user to configure and add Unit of Measure on the items. | Unit of Measure maintenance allows the user to configure and add Unit of Measure on the items. | ||
=====Creating Unit of Measure===== | =====Creating Unit of Measure===== | ||
| − | #Click | + | #Click [[Unit of Measure]] under Maintenance Menu |
| − | #Under Unit of Measure | + | #Under Unit of Measure Screen, click Add Unit of Measure |
#Fill up the required fields then click Save. Note: Fields with * are required to be filled up. | #Fill up the required fields then click Save. Note: Fields with * are required to be filled up. | ||
| + | [[File:Maintenance - Unit of Measure - Add.png|border|center|1500x1500px]] | ||
| + | <br /> | ||
====Item Class==== | ====Item Class==== | ||
| + | [[File:Maintenance - Item Class - Record List.png|border|center|1500x1500px]] | ||
| + | |||
| + | |||
The Item Class Maintenance screen allows the users to configure the item class to be used on categorizing their items. | The Item Class Maintenance screen allows the users to configure the item class to be used on categorizing their items. | ||
| Line 119: | Line 166: | ||
=====Creating Item Class===== | =====Creating Item Class===== | ||
| − | #Click | + | #Click [[Item Class]] under Maintenance Menu |
#Under Item Class Menu, click Add Item Class | #Under Item Class Menu, click Add Item Class | ||
#Fill up the required fields then Click Save. Note: Fields with * are required to be filled up. | #Fill up the required fields then Click Save. Note: Fields with * are required to be filled up. | ||
| + | [[File:Maintenance - Item Class - Add.png|border|center|1500x1500px]] | ||
| + | <br /> | ||
=====Importing Item Class===== | =====Importing Item Class===== | ||
| − | #Click | + | #Click [[Item Class]] under Maintenance Menu |
| − | #Under Item Class | + | #Under Item Class Screen, click options then click Import Item Class |
| − | #Download the Template provided in Step 1. | + | #Download the Template link provided in Step 1. |
#Fill up the information needed for each column of the template. | #Fill up the information needed for each column of the template. | ||
| − | #Upload the updated | + | #Upload the updated file then click Import to Proceed |
| + | [[File:Maintenance - Item Class - Import.png|border|center|1500x1500px]] | ||
| + | <br /> | ||
====Item Type==== | ====Item Type==== | ||
| + | [[File:Maintenance - Item Type - Record List.png|border|center|1500x1500px]] | ||
| + | |||
| + | |||
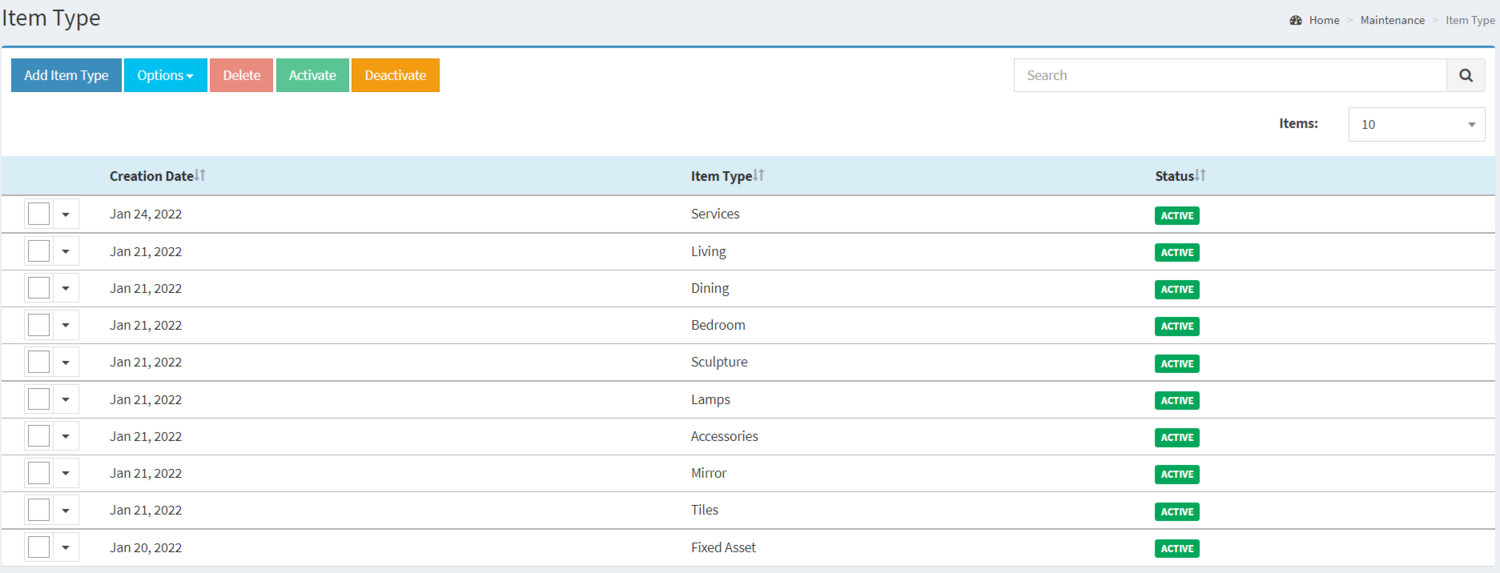
Item Type Maintenance screen allows the users to configure and add item type on their items. | Item Type Maintenance screen allows the users to configure and add item type on their items. | ||
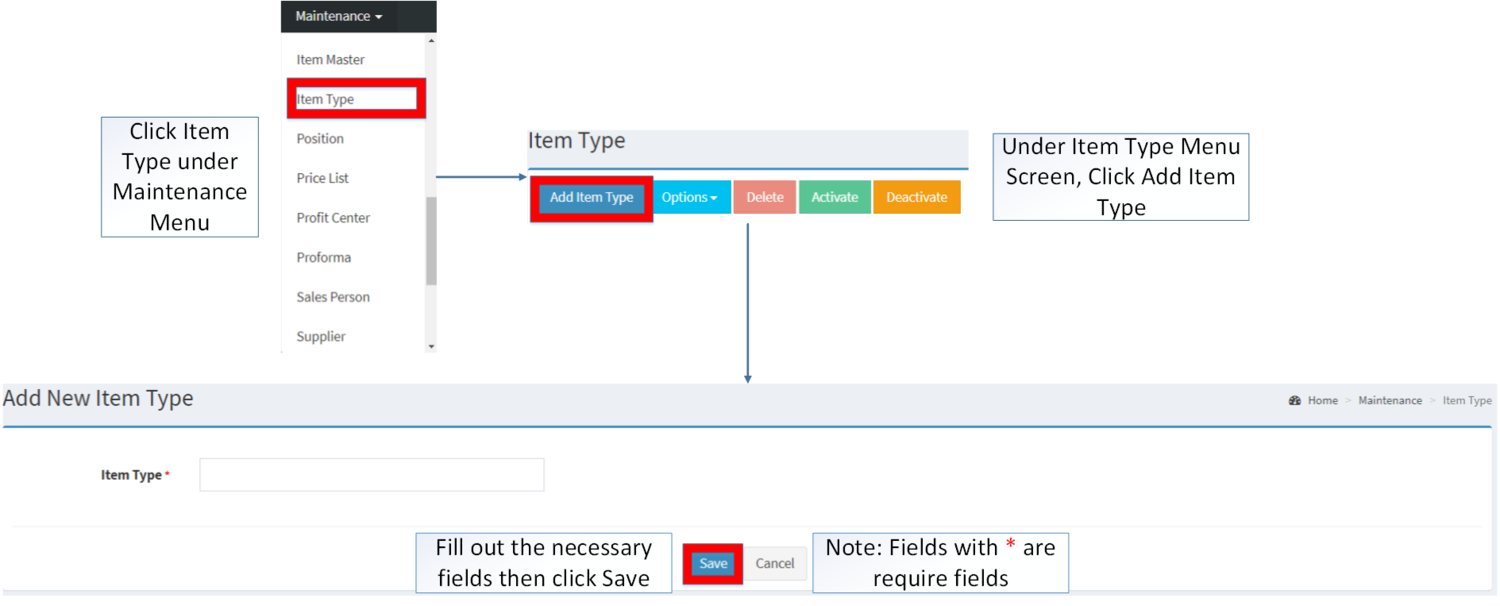
=====Creating Item Type===== | =====Creating Item Type===== | ||
| − | #Click | + | #Click [[Item Type]] under Maintenance Menu |
#Under Item Type Menu, click Add Item Type | #Under Item Type Menu, click Add Item Type | ||
#Fill up the required fields then click Save. Note: Fields with * are required to be filled up. | #Fill up the required fields then click Save. Note: Fields with * are required to be filled up. | ||
| + | [[File:Maintenance - Item Type - Add.png|border|center|1500x1500px]] | ||
| + | <br /> | ||
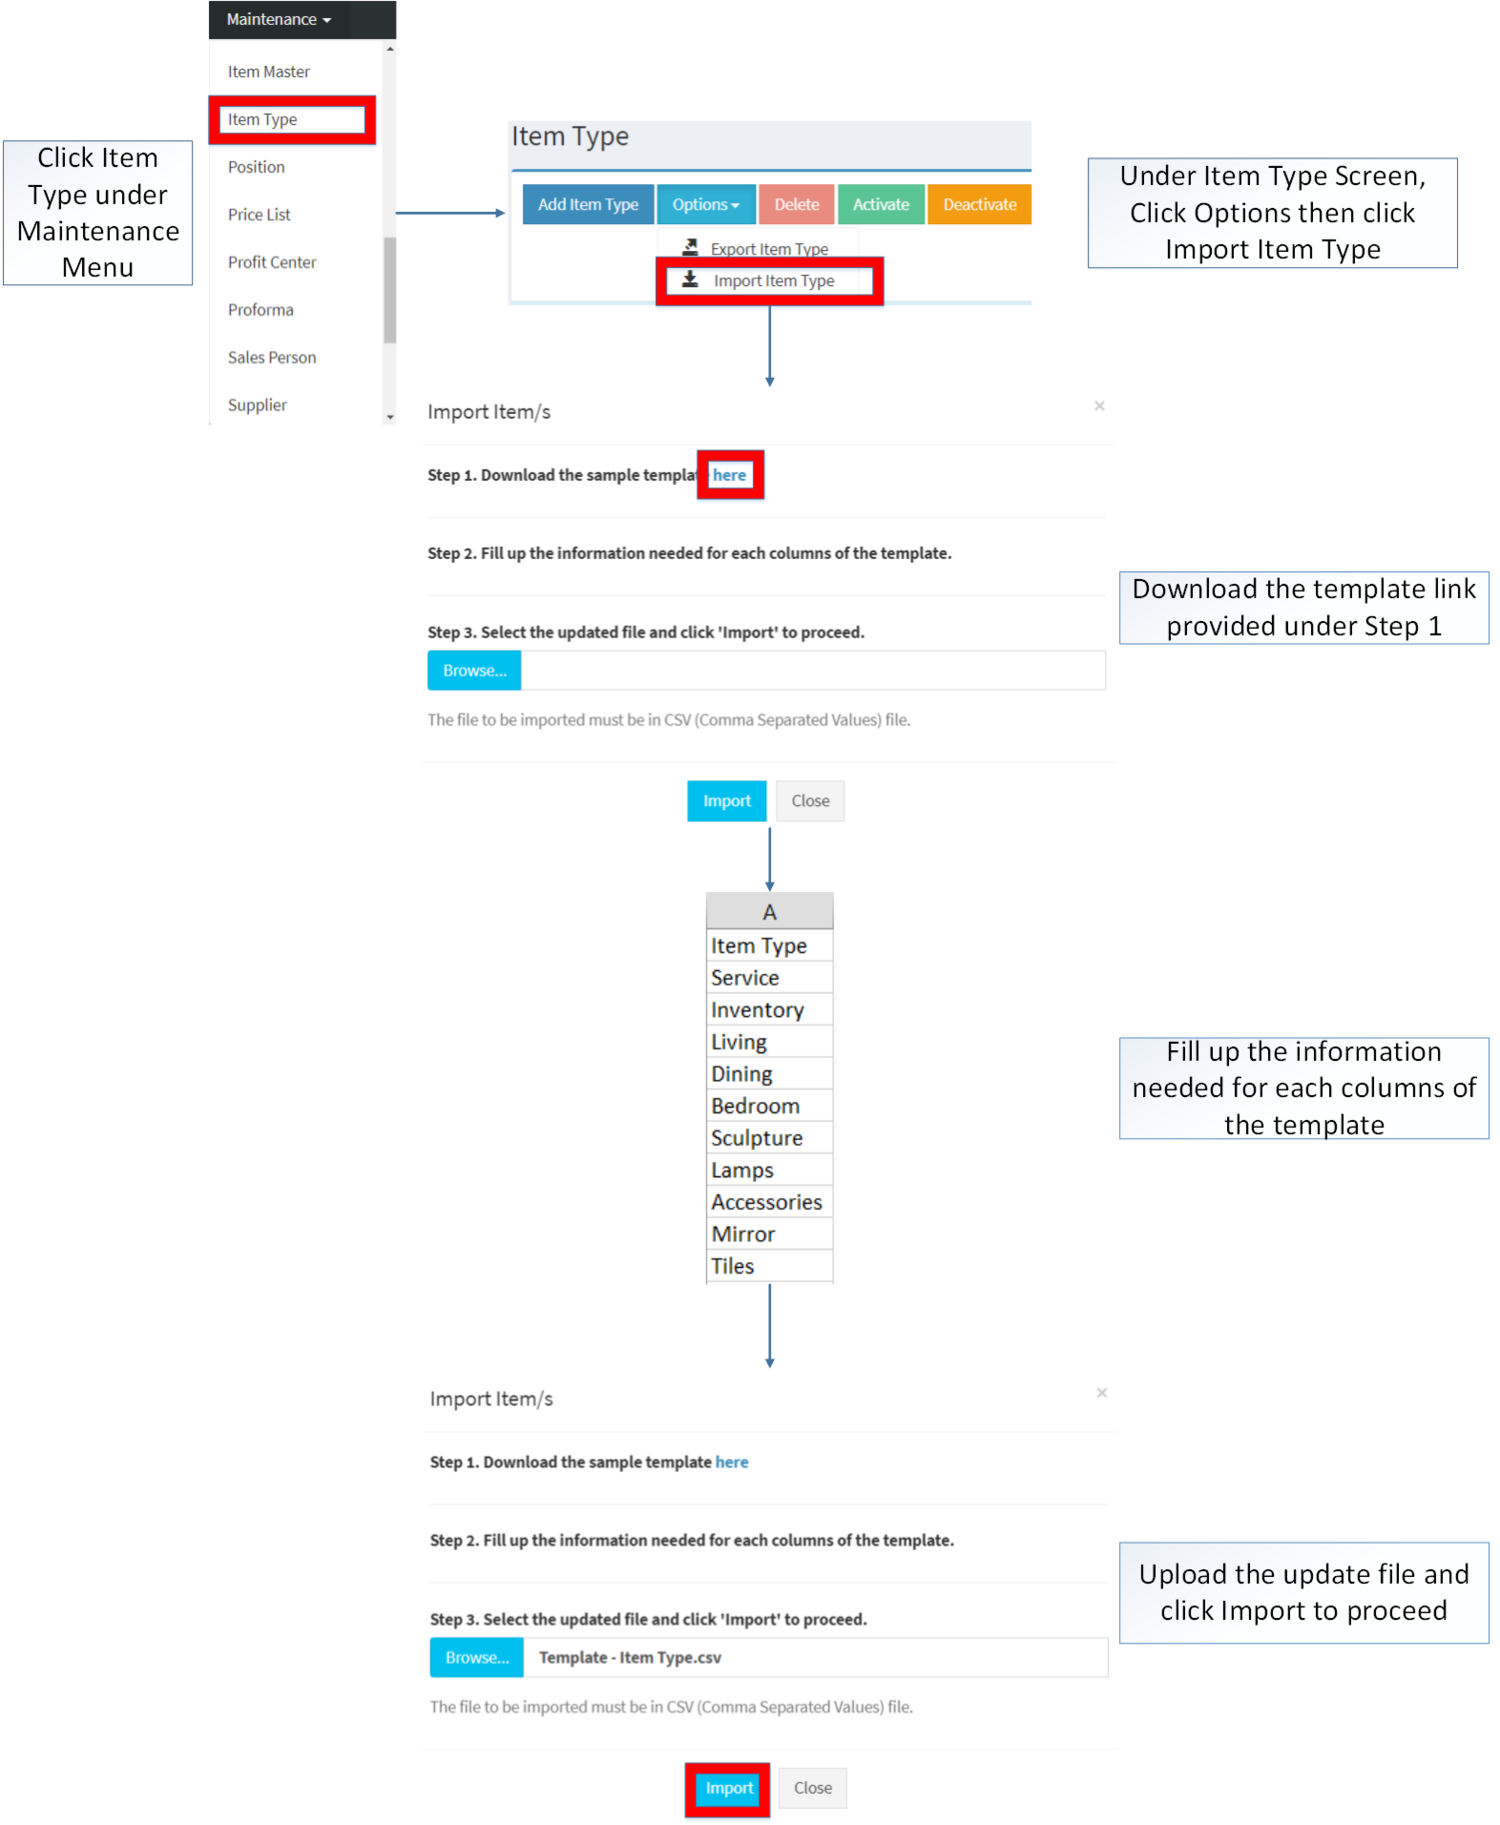
=====Importing Item Type===== | =====Importing Item Type===== | ||
| − | #Click | + | #Click [[Item Type]] under Maintenance Menu |
| − | #Under Item Type | + | #Under Item Type Screen, click options then click Import Item Type |
| − | #Download the Template provided in Step 1. | + | #Download the Template link provided in Step 1. |
#Fill up the information needed for each column of the template. | #Fill up the information needed for each column of the template. | ||
#Upload the updated template then click Import to Proceed | #Upload the updated template then click Import to Proceed | ||
| + | [[File:Maintenance - Item Type - Import.png|border|center|1825x1825px]] | ||
| + | <br /> | ||
====Brand==== | ====Brand==== | ||
| + | [[File:Maintenance - Brand - Record List.png|border|center|1500x1500px]] | ||
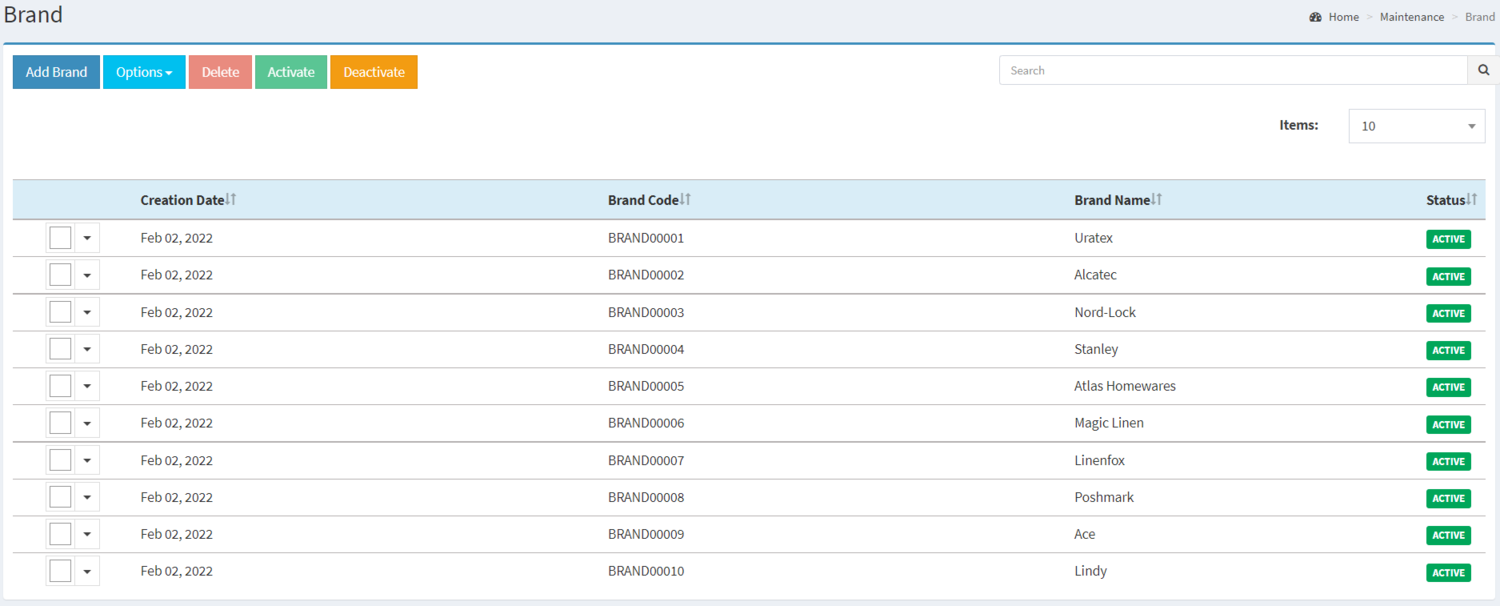
Brand maintenance screen allows users to add and configure Brand for their items. | Brand maintenance screen allows users to add and configure Brand for their items. | ||
=====Creating Brand===== | =====Creating Brand===== | ||
| − | #Click Maintenance | + | #Click [[Brand]] under Maintenance Menu |
| − | #Under Brand | + | #Under Brand Screen, click Add Brand |
#Fill up the required fields then click Save. Note: Fields with * are required to be filled up. | #Fill up the required fields then click Save. Note: Fields with * are required to be filled up. | ||
| + | [[File:Maintenance - Brand - Add.png|border|center|1500x1500px]] | ||
| + | <br /> | ||
=====Importing Brand===== | =====Importing Brand===== | ||
| − | #Click Maintenance | + | #Click [[Brand]] under Maintenance Menu |
| − | #Under Brand Menu, click options then | + | #Under Brand Menu, click options then click Import Brand |
| − | #Download the Template provided in Step 1. | + | #Download the Template link provided in Step 1. |
| − | #Fill up the information needed for each | + | #Fill up the information needed for each columns of the template. |
| − | #Upload the updated | + | #Upload the updated file then click Import to proceed |
| + | [[File:Maintenance - Brand - Import.png|border|center|1500x1500px]] | ||
| + | <br /> | ||
====Item Master==== | ====Item Master==== | ||
| + | [[File:Maintenance - Item Master - Record List.png|border|center|1500x1500px]] | ||
| + | |||
| + | |||
Item Master Maintenance screen allows the users to configure and add items to be used on their transaction. | Item Master Maintenance screen allows the users to configure and add items to be used on their transaction. | ||
=====Creating Item Master===== | =====Creating Item Master===== | ||
| − | #Click | + | #Click [[Item Master]] under Maintenance Menu |
#Under Item Master Menu, click Add Item Master | #Under Item Master Menu, click Add Item Master | ||
| − | #Fill up the required fields then click Save. | + | #Fill up the required fields then click Save. Note: Fields with * are required to be filled up. |
| + | |||
| + | [[File:Maintenance - Item Master - Add.png|border|center|1912x1912px]] | ||
Notes | Notes | ||
| − | |||
*When accounting entries are automatically created, it creates entries based on the defaulted accounting details for the Item. If no accounting detail is maintained in Item Master, it automatically uses the accounting details maintained for its Item Class. | *When accounting entries are automatically created, it creates entries based on the defaulted accounting details for the Item. If no accounting detail is maintained in Item Master, it automatically uses the accounting details maintained for its Item Class. | ||
=====Importing Item Master===== | =====Importing Item Master===== | ||
| − | #Click | + | #Click [[Item Master]] under Maintenance Menu |
| − | #Under Item Master Menu, click options then | + | #Under Item Master Menu, click options then click Import Item Master |
#Download the Template provided in Step 1. | #Download the Template provided in Step 1. | ||
#Fill up the information needed for each column of the template. | #Fill up the information needed for each column of the template. | ||
#Upload the updated template then click Import to proceed | #Upload the updated template then click Import to proceed | ||
| − | + | [[File:Maintenance - Item Master - Import.png|border|center|1500x1500px]] | |
| − | + | <br /> | |
| − | + | ====Warehouse==== | |
| − | + | [[File:Maintenance - Warehouse - Record List.png|border|center|1500x1500px|link=https://docs.oojeema.com/File:Maintenance_-_Warehouse_-_Record_List.png]] | |
| − | |||
| − | ==== | ||
| − | |||
| − | |||
| − | |||
| − | |||
Warehouse maintenance screen allows the user to configure and add Warehouse to be used when adjusting, transferring stocks to be used on their transactions. | Warehouse maintenance screen allows the user to configure and add Warehouse to be used when adjusting, transferring stocks to be used on their transactions. | ||
=====Creating Warehouse===== | =====Creating Warehouse===== | ||
| − | #Click Maintenance | + | #Click [[Warehouse]] under Maintenance Menu |
#Under Warehouse Menu, click Add Warehouse | #Under Warehouse Menu, click Add Warehouse | ||
#Fill up the required fields then click Save. Note: Fields with * are required to be filled up. | #Fill up the required fields then click Save. Note: Fields with * are required to be filled up. | ||
| + | [[File:Maintenance - Warehouse - Add.png|center|1500x1500px]] | ||
| + | <br /> | ||
=====Importing Warehouse===== | =====Importing Warehouse===== | ||
| − | #Click Maintenance | + | #Click [[Warehouse]] under Maintenance Menu |
| − | #Under Warehouse Menu, click Options then | + | #Under Warehouse Menu, click Options then click Import Warehouse |
| − | #Download the Template provided in Step 1. | + | #Download the Template link provided in Step 1. |
#Fill up the information needed for each column of the template. | #Fill up the information needed for each column of the template. | ||
| − | #Upload the updated | + | #Upload the updated file then click Import to proceed. |
| + | [[File:Maintenance - Warehouse - Import.png|border|center|1712x1712px]] | ||
| + | <br /> | ||
====Customer==== | ====Customer==== | ||
| + | [[File:Maintenance - Customer - Record List.png|border|center|1500x1500px]] | ||
| + | |||
| + | |||
Customer maintenance screen allows users to configure and add customers that will be used on their transactions. | Customer maintenance screen allows users to configure and add customers that will be used on their transactions. | ||
=====Creating Customer===== | =====Creating Customer===== | ||
| − | #Click Maintenance | + | #Click [[Customer]] under Maintenance Menu |
| − | #Under Customer | + | #Under Customer Screen, click Add Customer |
#Fill up the required fields then Click Save. Notes: Fields with * are required to be filled up. | #Fill up the required fields then Click Save. Notes: Fields with * are required to be filled up. | ||
| + | [[File:Maintenance - Customer - Add.png|link=https://docs.oojeema.com/File:Maintenance%20-%20Customer%20-%20Add.png|border|center|1500x1500px]] | ||
| + | <br /> | ||
=====Importing Customer===== | =====Importing Customer===== | ||
| − | #Click Maintenance then | + | #Click Maintenance then click Customer |
| − | #Under Customer | + | #Under Customer Screen, click Options then click Import Customer |
#Download the Template provided in Step 1. | #Download the Template provided in Step 1. | ||
#Fill up the information needed for each column of the template. | #Fill up the information needed for each column of the template. | ||
| − | #Upload the updated | + | #Upload the updated file then click Import to proceed |
| + | [[File:Maintenance - Customer - Import.png|border|center|1500x1500px]] | ||
| + | <br /> | ||
====Supplier==== | ====Supplier==== | ||
| + | [[File:Maintenance - Supplier - Record List.png|border|center|1500x1500px]] | ||
| + | |||
| + | |||
Supplier maintenance screen allows the user to configure and add Supplier to be assigned when creating purchasing transactions | Supplier maintenance screen allows the user to configure and add Supplier to be assigned when creating purchasing transactions | ||
=====Creating Supplier===== | =====Creating Supplier===== | ||
| − | #Click Maintenance | + | #Click [[Supplier]] under Maintenance Menu |
| − | #Under Supplier Menu, click Add Supplier | + | #Under Supplier Menu Screen, click Add Supplier |
#Fill up the required fields then Click Save. Notes: Fields with * are required to be filled up. | #Fill up the required fields then Click Save. Notes: Fields with * are required to be filled up. | ||
| + | [[File:Maintenance - Supplier - Add.png|border|center|1500x1500px]] | ||
| + | <br /> | ||
=====Importing Supplier===== | =====Importing Supplier===== | ||
| − | #Click Maintenance | + | #Click [[Supplier]] under Maintenance Menu |
| − | #Under Supplier Menu, click Options then | + | #Under Supplier Menu, click Options then click Import Supplier |
#Download the Template provided in Step 1. | #Download the Template provided in Step 1. | ||
#Fill up the information needed for each column of the template. | #Fill up the information needed for each column of the template. | ||
#Upload the updated template then click Import to proceed | #Upload the updated template then click Import to proceed | ||
| + | [[File:Maintenance - Supplier - Import.png|border|center|1501x1501px]] | ||
| + | <br /> | ||
====Price List==== | ====Price List==== | ||
| + | [[File:Maintenance - Price List - Record List.png|border|center|1500x1500px]] | ||
| + | |||
| + | |||
Price List maintenance screen allows the users to configure the prices of the items to be used in their transaction | Price List maintenance screen allows the users to configure the prices of the items to be used in their transaction | ||
=====Creating Price List===== | =====Creating Price List===== | ||
| − | #Click | + | #Click [[Price List]] under Maintenance Menu |
| − | #Under Price List | + | #Under Price List Screen, click Add Price List |
#Fill up the required fields then Click Save. Notes: Fields with * are required to be filled up. | #Fill up the required fields then Click Save. Notes: Fields with * are required to be filled up. | ||
| + | [[File:Maintenance - Price List - Add.png|center|1500x1500px]] | ||
| + | <br /> | ||
=====Importing Price List===== | =====Importing Price List===== | ||
| − | #Click | + | #Click [[Price List]] under Maintenance Menu |
| − | #Under Price List Menu, click Options then | + | #Under Price List Menu, click Options then click Import Price List |
#Download the Template provided in Step 1. | #Download the Template provided in Step 1. | ||
#Fill up the information needed for each column of the template. | #Fill up the information needed for each column of the template. | ||
#Upload the updated template then click Import to proceed | #Upload the updated template then click Import to proceed | ||
| − | ===== | + | [[File:Maintenance - Price List - Import.png|border|center|1870x1870px]] |
| + | <br /> | ||
| + | =====Adjusting Master Price List===== | ||
| − | #Click | + | #Click [[Price List]] under Maintenance Menu |
#Under Price List Menu, Click Master Price List | #Under Price List Menu, Click Master Price List | ||
| − | #Under Master | + | #Under Master List Menu, In selling price tab, Click the Pen shape button in order to edit its selling price |
#Click the Save Icon to Update the Prices | #Click the Save Icon to Update the Prices | ||
| + | [[File:Maintenance - Price List - Master Price List - Edit.png|border|center|1683x1683px]] | ||
| + | <br /> | ||
=====Importing Master Price List===== | =====Importing Master Price List===== | ||
| − | #Click | + | #Click [[Price List]] under Maintenance Menu |
| − | #Under Price List | + | #Under Price List Screen, click Master Price List |
| − | #Under Master | + | #Under Master List Menu, click Options then click Import Master List |
#Download the Template provided in Step 1. | #Download the Template provided in Step 1. | ||
#Fill up the information needed for each column of the template. | #Fill up the information needed for each column of the template. | ||
| − | #Upload the updated | + | #Upload the updated file then click Import to proceed |
| + | [[File:Maintenance - Price List - Master Price List - Import.png|border|center|2208x2208px]] | ||
| + | <br /> | ||
====Sales Person==== | ====Sales Person==== | ||
| + | [[File:Maintenance - Sales Person - Record List.png|border|center|1500x1500px]] | ||
| + | |||
| + | |||
Sales Person maintenance screen allows the user to configure and add Sales Person to be assigned on the transactions. | Sales Person maintenance screen allows the user to configure and add Sales Person to be assigned on the transactions. | ||
=====Creating Sales Person===== | =====Creating Sales Person===== | ||
| − | #Click | + | #Click [[Sales Person]] under Maintenance Menu |
| − | #Under Sales Person | + | #Under Sales Person Screen, click Add Sales Person |
#Fill up the required fields then Click Save. Notes: Fields with * are required to be filled up. | #Fill up the required fields then Click Save. Notes: Fields with * are required to be filled up. | ||
| + | [[File:Maintenance - Sales Person - Add.png|border|center|1500x1500px]] | ||
| + | <br /> | ||
=====Importing Sales Person===== | =====Importing Sales Person===== | ||
| − | #Click | + | #Click [[Sales Person]] under Maintenance Menu |
| − | #Under Sales Person | + | #Under Sales Person Screen, click Options then choose Import Sales Person |
#Download the Template provided in Step 1. | #Download the Template provided in Step 1. | ||
#Fill up the information needed for each column of the template. | #Fill up the information needed for each column of the template. | ||
| − | #Upload the updated | + | #Upload the updated file then click Import to proceed |
| + | [[File:Maintenance - Sales Person - Import.png|border|center|1500x1500px]] | ||
| + | <br /> | ||
====Currency==== | ====Currency==== | ||
| + | [[File:Maintenance - Currency - Record List.png|center|1500x1500px]] | ||
| + | |||
| + | |||
The Currency Maintenance screen allows users to configure and add the currencies that will be used on their transaction. | The Currency Maintenance screen allows users to configure and add the currencies that will be used on their transaction. | ||
=====Creating Currency===== | =====Creating Currency===== | ||
| − | #Click Maintenance | + | #Click [[Currency]] under Maintenance Menu |
| − | #Under Currency | + | #Under Currency Screen, click Add Currency |
#Fill up the required fields then Click Save. Notes: Fields with * are required to be filled up. | #Fill up the required fields then Click Save. Notes: Fields with * are required to be filled up. | ||
| + | [[File:Maintenance - Currency - Add.png|border|center|1500x1500px]] | ||
| + | <br /> | ||
====Exchange Rate==== | ====Exchange Rate==== | ||
| + | [[File:Maintenance - Exchange Rate - Record List.png|border|center|1500x1500px]] | ||
| + | |||
| + | |||
The Exchange Rate maintenance screen allows the users to configure the exchange rate from the base currency to a foreign currency. | The Exchange Rate maintenance screen allows the users to configure the exchange rate from the base currency to a foreign currency. | ||
=====Creating Exchange Rate===== | =====Creating Exchange Rate===== | ||
| − | #Click | + | #Click [[Exchange Rate]] under Maintenance Menu |
| − | #Under Exchange Rate | + | #Under Exchange Rate Screen, click Add Exchange Rate |
#Fill up the required fields then Click Save. Notes: Fields with * are required to be filled up. | #Fill up the required fields then Click Save. Notes: Fields with * are required to be filled up. | ||
| + | [[File:Maintenance - Exchange Rate - Add.png|border|center|1500x1500px]] | ||
| + | <br /> | ||
====Proforma==== | ====Proforma==== | ||
| + | [[File:Maintenance - Proforma - Record List.png|border|center|1500x1500px]] | ||
| + | |||
| + | |||
The Proforma maintenance screen allows the user to configure proforma entries that can be used in transactions such as Accounts Payable, Accounts Receivable, etc. | The Proforma maintenance screen allows the user to configure proforma entries that can be used in transactions such as Accounts Payable, Accounts Receivable, etc. | ||
=====Creating Proforma===== | =====Creating Proforma===== | ||
| − | #Click Maintenance | + | #Click [[Proforma]] under Maintenance Menu |
| − | #Under Proforma | + | #Under Proforma Screen, click Add Proforma |
#Fill up the required fields then Click Save. Notes: Fields with * are required to be filled up. | #Fill up the required fields then Click Save. Notes: Fields with * are required to be filled up. | ||
| − | + | [[File:Maintenance - Proforma - Add.png|border|center|1500x1500px]] | |
| − | |||
| − | |||
| − | |||
| − | |||
| − | |||
| − | |||
====Bank==== | ====Bank==== | ||
| + | [[File:Maintenance - Bank - Record List.png|border|center|1500x1500px]] | ||
The Bank maintenance screen allows users to configure and add the Bank that they will use in a transaction. | The Bank maintenance screen allows users to configure and add the Bank that they will use in a transaction. | ||
=====Creating Bank===== | =====Creating Bank===== | ||
| − | #Click Maintenance | + | #Click [[Bank]] under Maintenance Menu |
| − | #Under Bank Menu, click Add Bank | + | #Under Bank Menu Screen, click Add Bank |
#Fill up the required fields then Click Save. Notes: Fields with * are required to be filled up. | #Fill up the required fields then Click Save. Notes: Fields with * are required to be filled up. | ||
| + | |||
| + | [[File:Maintenance - Bank - Add.png|border|center|1500x1500px]] | ||
=====Importing Bank===== | =====Importing Bank===== | ||
| − | #Click Maintenance | + | #Click [[Bank]] under Maintenance Menu |
| − | #Under Bank Menu, click Options then | + | #Under Bank Menu, click Options then click Import Bank |
| − | #Download the Template provided in Step 1. | + | #Download the Template link provided in Step 1. |
#Fill up the information needed for each column of the template. | #Fill up the information needed for each column of the template. | ||
#Upload the updated template then click Import to proceed | #Upload the updated template then click Import to proceed | ||
| + | [[File:Maintenance - Bank - Import.png|border|center|1500x1500px]] | ||
| + | <br /> | ||
====Beginning Balance Setup==== | ====Beginning Balance Setup==== | ||
| Line 356: | Line 465: | ||
The user should set up the following modules in order to Import Beginning Balances. | The user should set up the following modules in order to Import Beginning Balances. | ||
| − | *Item Class | + | *[[Item Class]] |
| − | *Item Type | + | *[[Item Type]] |
| − | *Unit of Measure | + | *[[Unit of Measure]] |
| − | *Item Master | + | *[[Item Master]] |
| − | *Warehouse | + | *[[Warehouse]] |
| − | =====Beginning Balance | + | =====Import Beginning Balance===== |
| − | #Click Inventory | + | #Click [[Inventory Adjustment]] under Inventory Menu |
| − | #Under Inventory | + | #Take note that there is also other users that using the system. Make sure to give them a heads-up that you will be doing an inventory adjustments. Click '''Proceed''' to continue. |
| + | #Under Inventory, Click Import Beginning Balance | ||
#Choose the date of the Beginning Balance to take effect before proceeding or click skip. | #Choose the date of the Beginning Balance to take effect before proceeding or click skip. | ||
#Download the Template provided in Step 1. | #Download the Template provided in Step 1. | ||
| Line 371: | Line 481: | ||
#Upload the updated template then click Import to proceed | #Upload the updated template then click Import to proceed | ||
| − | + | [[File:Inventory - Inventory Adjustment - Import Beginning Balance.png|link=https://docs.oojeema.com/File:Inventory%20-%20Inventory%20Adjustment%20-%20Import%20Beginning%20Balance.png|border|center|1853x1853px]] | |
| − | + | Notes: | |
| − | |||
| − | |||
| − | |||
| − | |||
| − | |||
| − | |||
| − | |||
| − | |||
| − | |||
| − | |||
| − | |||
| − | |||
| − | |||
| − | |||
| − | |||
| − | |||
| − | |||
| − | |||
| − | |||
| − | |||
| − | |||
| − | |||
| − | |||
| − | |||
| − | |||
| − | |||
| − | |||
| − | |||
| − | |||
| − | |||
| − | |||
| − | |||
| − | |||
| − | |||
| − | |||
| − | |||
| − | |||
| − | |||
| − | |||
| − | |||
| − | |||
| − | |||
| − | |||
| − | |||
| − | |||
| − | |||
| − | |||
| − | |||
| − | |||
| − | |||
| − | |||
| − | |||
| − | |||
| − | |||
| − | |||
| − | |||
| − | |||
| − | |||
| − | |||
| − | |||
| − | |||
| − | |||
| − | |||
| − | |||
| − | |||
| − | |||
| − | |||
| − | |||
| − | |||
| − | |||
| − | |||
| − | |||
| − | |||
| − | |||
| − | |||
| − | |||
| − | |||
| − | |||
| − | |||
| − | |||
| − | |||
| − | |||
| − | |||
| − | |||
| − | |||
| − | |||
| − | |||
| − | |||
| − | |||
| − | |||
| − | |||
| − | |||
| − | |||
| − | |||
| − | |||
| − | |||
| − | |||
| − | |||
| − | |||
| − | |||
| − | |||
| − | |||
| − | |||
| − | |||
| − | |||
| − | |||
| − | |||
| − | |||
| − | |||
| − | |||
| − | |||
| − | |||
| − | |||
| − | |||
| − | |||
| − | |||
| − | |||
| − | |||
| − | |||
| − | |||
| − | |||
| − | |||
| − | |||
| − | |||
| − | |||
| − | |||
| − | |||
| − | |||
| − | |||
| − | |||
| − | |||
| − | |||
| − | |||
| − | |||
| − | |||
| − | |||
| − | |||
| − | |||
| − | |||
| − | |||
| − | |||
| − | |||
| − | |||
| − | |||
| − | |||
| − | |||
| − | |||
| − | |||
| − | |||
| − | |||
| − | |||
| − | |||
| − | |||
| − | |||
| − | |||
| − | |||
| − | |||
| − | |||
| − | |||
| − | |||
| − | |||
| − | |||
| − | |||
| − | |||
| − | |||
| − | |||
| − | |||
| − | |||
| − | |||
| − | |||
| − | |||
| − | |||
| − | |||
| − | |||
| − | |||
| − | |||
| − | |||
| − | |||
| − | |||
| − | |||
| − | |||
| − | |||
| − | |||
| − | |||
| − | |||
| − | |||
| − | |||
| − | |||
| − | |||
| − | |||
| − | |||
| − | |||
| − | |||
| − | |||
| − | |||
| − | |||
| − | |||
| − | |||
| − | |||
| − | |||
| − | |||
| − | |||
| − | |||
| − | |||
| − | |||
| − | |||
| − | |||
| − | |||
| − | |||
| − | |||
| − | |||
| − | |||
| − | |||
| − | |||
| − | |||
| − | |||
| − | |||
| − | |||
| − | |||
| − | |||
| − | |||
| − | |||
| − | |||
| − | |||
| − | |||
| − | |||
| − | |||
| − | |||
| − | |||
| − | |||
| − | |||
| − | |||
| − | |||
| − | |||
| − | |||
| − | |||
| − | |||
| − | |||
| − | |||
| − | |||
| − | |||
| − | |||
| − | |||
| − | |||
| − | |||
| − | |||
| − | |||
| − | |||
| − | |||
| − | |||
| − | |||
| − | |||
| − | |||
| − | |||
| − | |||
| − | |||
| − | |||
| − | |||
| − | |||
| − | |||
| − | |||
| − | |||
| − | |||
| − | |||
| − | |||
| − | |||
| − | |||
| − | |||
| − | |||
| − | |||
| − | |||
| − | |||
| − | |||
| − | |||
| − | |||
| − | |||
| − | |||
| − | |||
| − | |||
| − | |||
| − | |||
| − | |||
| − | |||
| − | |||
| − | |||
| − | |||
| − | |||
| − | |||
| − | |||
| − | |||
| − | |||
| − | |||
| − | |||
| − | |||
| − | |||
| − | |||
| − | |||
| − | |||
| − | |||
| − | |||
| − | |||
| − | |||
| − | |||
| − | |||
| − | |||
| − | |||
| − | |||
| − | |||
| − | |||
| − | |||
| − | |||
| − | |||
| − | |||
| − | |||
| − | |||
| − | |||
| − | |||
| − | |||
| − | |||
| − | |||
| − | |||
| − | |||
| − | |||
| − | |||
| − | |||
| − | |||
| − | |||
| − | |||
| − | |||
| − | |||
| − | |||
| − | |||
| − | |||
| − | |||
| − | |||
| − | |||
| − | |||
| − | |||
| − | |||
| − | |||
| − | |||
| − | |||
| − | |||
| − | |||
| − | |||
| − | |||
| − | |||
| − | |||
| − | |||
| − | |||
| − | |||
| − | |||
| − | |||
| − | |||
| − | |||
| − | |||
| − | |||
| − | |||
| − | |||
| − | |||
| − | |||
| − | |||
| − | |||
| − | |||
| − | |||
| − | |||
| − | |||
| − | |||
| − | |||
| − | |||
| − | |||
| − | |||
| − | |||
| − | |||
| − | |||
| − | |||
| − | |||
| − | |||
| − | |||
| − | |||
| − | |||
| − | |||
| − | |||
| − | |||
| − | |||
| − | |||
| − | |||
| − | |||
| − | |||
| − | |||
| − | |||
| − | |||
| − | |||
| − | |||
| − | + | *Import Beginning Balance will only be available if there are no transaction records done by the user.<br /> | |
| − | + | {| class="wikitable" style="margin: auto;" | |
| − | + | |+ style="box-sizing: inherit; padding-top: 8px; padding-bottom: 8px; color: rgb(119, 119, 119); text-align: left; font-weight: bold;" |Categories: | |
| − | + | ! colspan="2" style="background-color:rgb(234, 236, 240);text-align:center;" |'''Modules''' | |
| − | + | |- style="box-sizing: inherit;" | |
| − | + | | style="" |Maintenance | |
| − | + | | style="" |[[Maintenance]]<nowiki> | </nowiki>[[Users Group]]<nowiki> | </nowiki>[[Position]]<nowiki> | </nowiki>[[Users]]<nowiki> | </nowiki>[[Chart of Account]]<nowiki> | </nowiki>[[Account Codes]]<nowiki> | </nowiki>[[ATC Code]]<nowiki> | </nowiki>[[Tax]]<nowiki> | </nowiki>[[Unit of Measure]]<nowiki> | </nowiki>[[Item Class]]<nowiki> | </nowiki>[[Item Type]]<nowiki> | </nowiki>[[Brand]]<nowiki> | </nowiki>[[Item Master]]<nowiki> | </nowiki>[[Warehouse]]<nowiki> | </nowiki>[[Customer]]<nowiki> | </nowiki>[[Supplier]]<nowiki> | </nowiki>[[Price List]]<nowiki> | </nowiki>[[Sales Person]]<nowiki> | </nowiki>[[Currency]]<nowiki> | </nowiki>[[Exchange Rate]]<nowiki> | </nowiki>[[Proforma]]<nowiki> | </nowiki>[[Bank]] | |
| − | + | |- style="box-sizing: inherit;" | |
| − | + | | style="" |Inventory | |
| − | == | + | | style="" |[[Inventory Adjustment]] |
| − | + | |} | |
| − | = | ||
| − | |||
| − | == | ||
| − | |||
| − | |||
| − | |||
| − | |||
| − | |||
| − | |||
| − | |||
| − | |||
| − | = | ||
| − | |||
| − | |||
| − | |||
| − | |||
| − | |||
| − | |||
| − | |||
| − | |||
| − | |||
| − | |||
| − | |||
| − | |||
| − | |||
Latest revision as of 13:56, 10 May 2024
Contents
- 1 Maintenance Setup
- 2 Users Group
- 3 Position
- 4 Users
- 5 Chart of Accounts
- 6 Account Codes
- 7 ATC Code
- 8 Tax
- 9 Unit of Measure
- 10 Item Class
- 11 Item Type
- 12 Brand
- 13 Item Master
- 14 Warehouse
- 15 Customer
- 16 Supplier
- 17 Price List
- 18 Sales Person
- 19 Currency
- 20 Exchange Rate
- 21 Proforma
- 22 Bank
- 23 Beginning Balance Setup
Maintenance Setup
Users Group
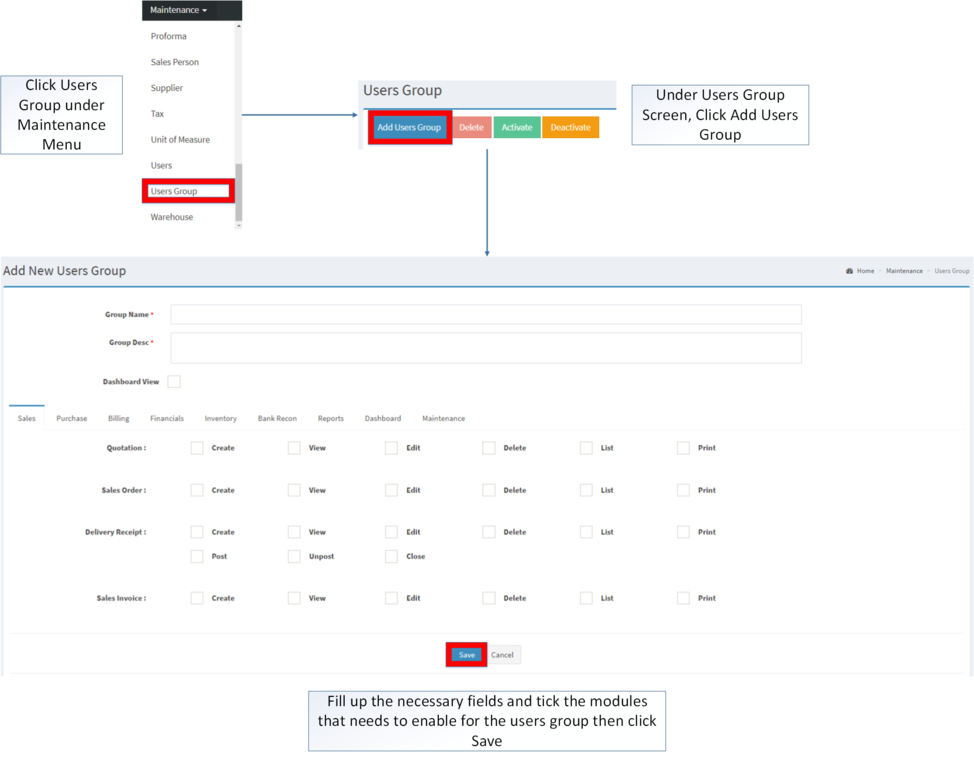
Users Group maintenance screen allows the user to configure and add User on a specific group. This is also used to restrict specific modules that a specific user can use.
Creating Users Group
- Click Users Group under Maintenance Menu
- Under Users Group Screen, Click Add Users Group
- Fill up the necessary fields and tick the modules that needs to enable for the users group then click Save
Position
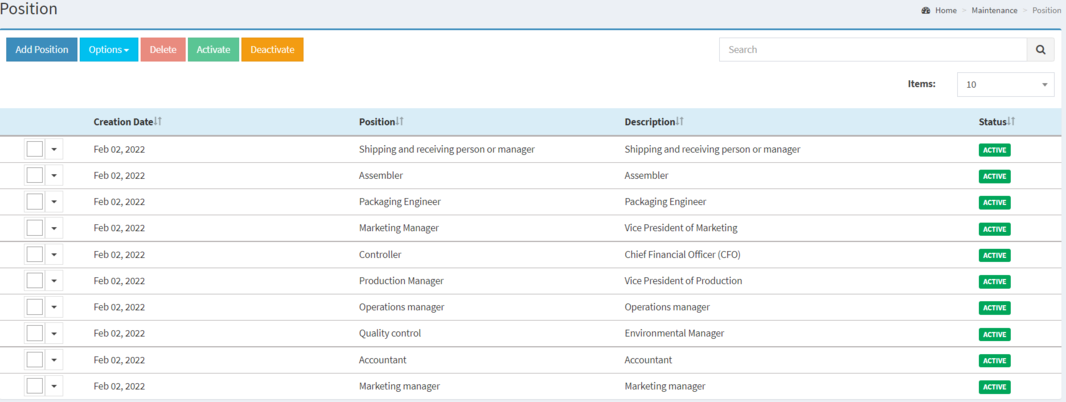
The Position maintenance allows the users to configure the position of the other users that will be using the system.
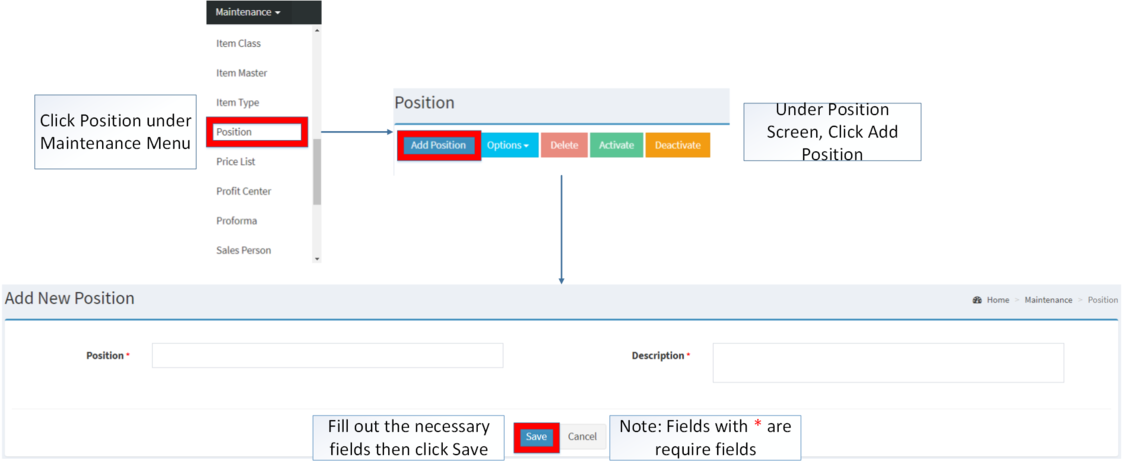
Adding Position
- Click Position under Maintenance Menu
- Under Position Screen, Click Add Position
- Fill out the necessary fields then click Save.
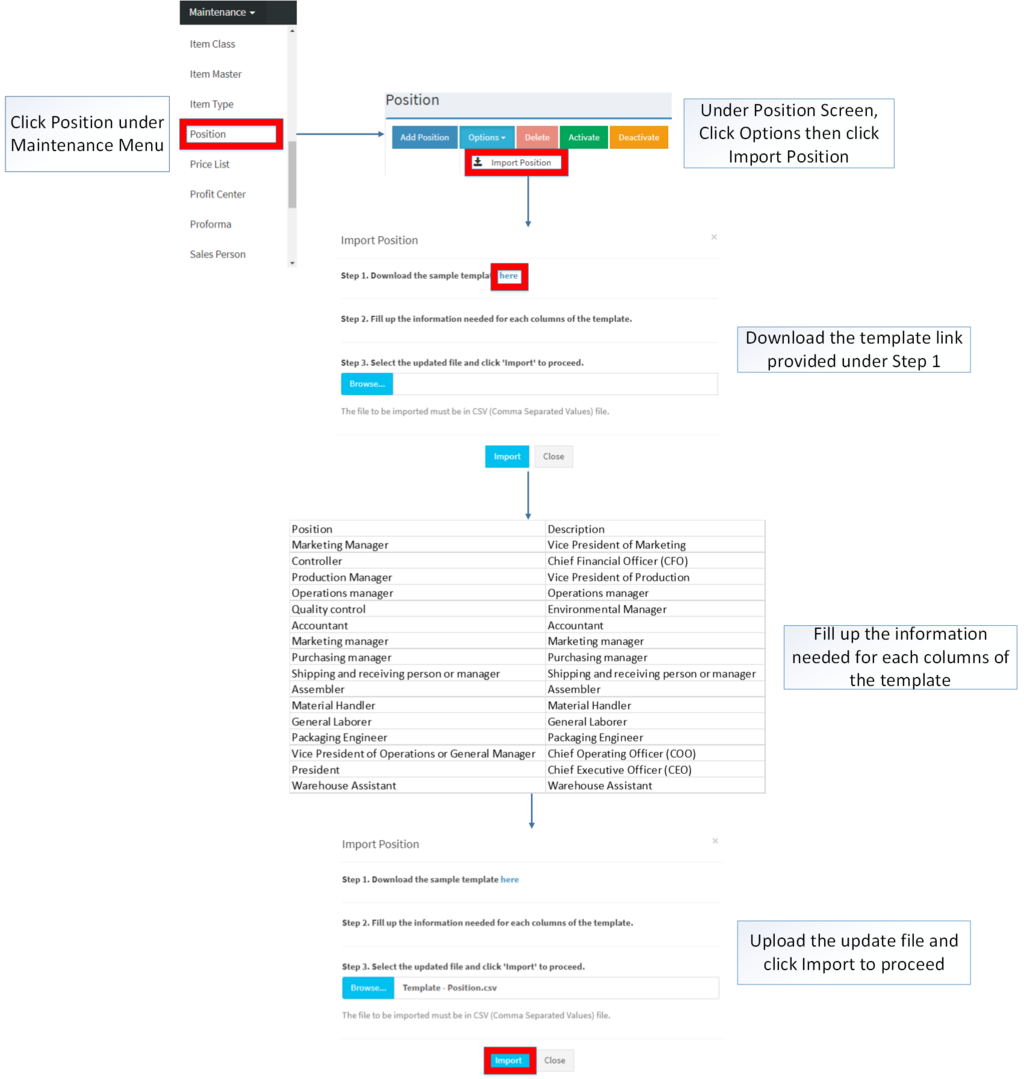
Importing Position
- Click Position under Maintenance Menu
- Under Position Screen, click Options then click Import Position
- Download the Template provided in Step 1.
- Fill up the information needed for each column of the template.
- Upload the updated file then click Import to proceed
Users
Users maintenance screen allows the user to configure and add Users that can use their system.
Adding Users
- Click Users under Maintenance Module
- Under Users Screen, Click Add Users
- Fill out the necessary fields then click Save. Note: Fields with * are require fields
Importing Users
- Click Users under Maintenance Menu
- Under Users Menu, click Options then click Import Users
- Download the Template provided in Step 1.
- Fill up the information needed for each column of the template.
- Upload the updated file then click Import to proceed
Chart of Accounts
The Chart of Account maintenance lists all the financial accounts included in the financial statements of a company. This maintenance module categorizes financial transactions that are conducted by the company during a specific accounting period.
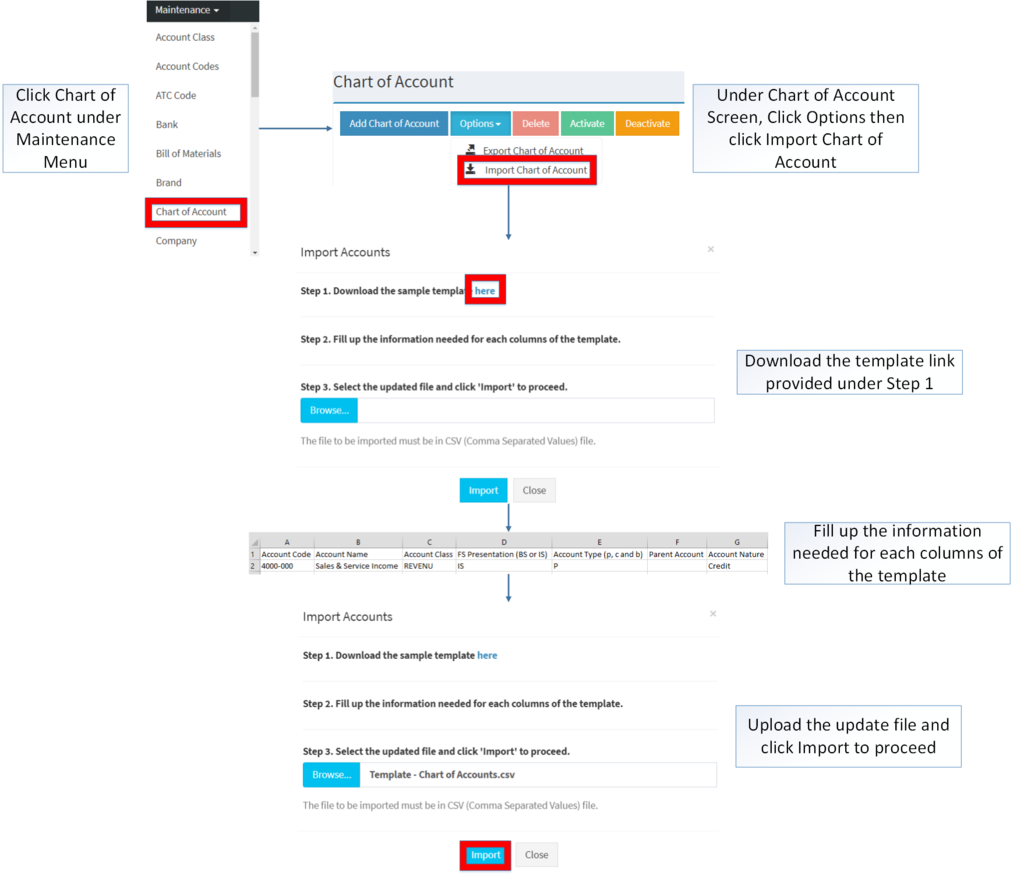
Creating Chart of Accounts
- Click Chart of Account under Maintenance Menu
- Under Chart of Account Menu Screen, Click Add Chart of Account
- Fill up the required fields then click Save. Note: Fields with * are required to be filled up
Importing Chart of Accounts
- Click Chart of Account under Maintenance Menu
- Under Chart of Account Menu, Click Options then click Import Chart of Account
- Download the Template provided in Step 1.
- Fill up the information needed for each column of the template. Note: There should be an existing Parent Account record in the system before importing Child Accounts.
- Upload the updated file then click Import to Proceed
Account Codes
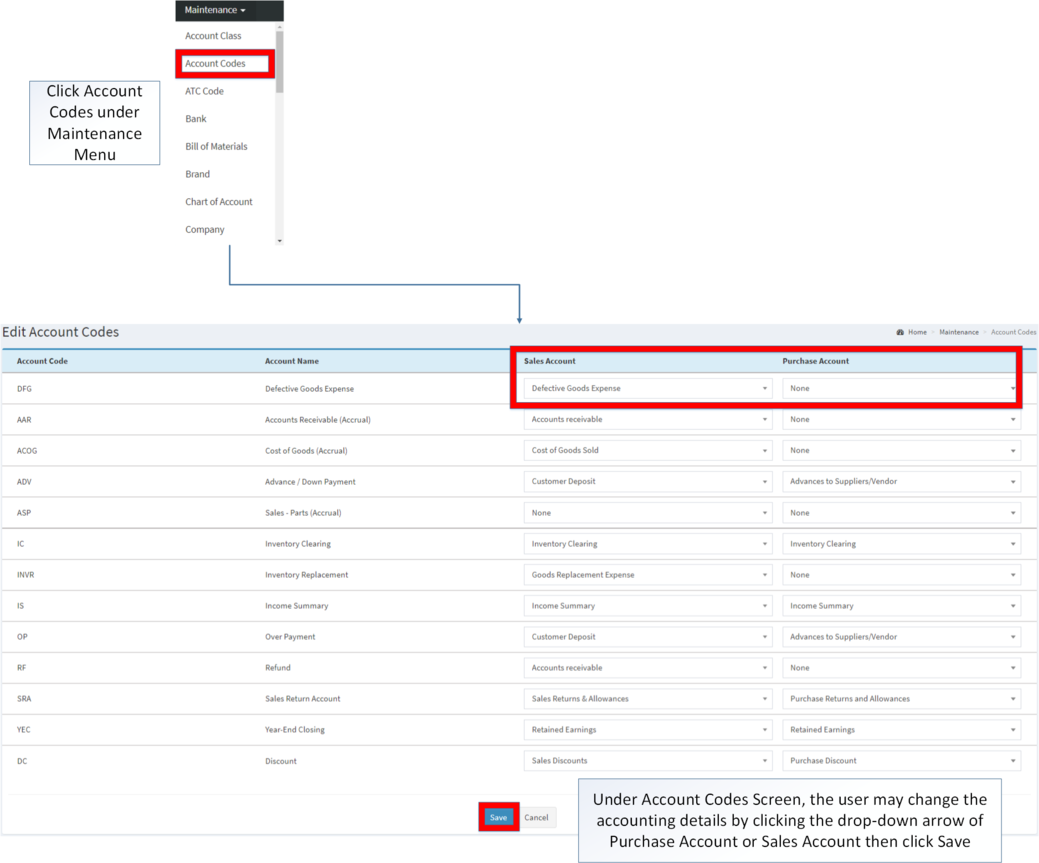
The Account Codes Maintenance screen allows users to configure accounting entry preferences for transactions. Note: Chart of Accounts must be setup in order to edit the Account Codes
Setting up Account Codes
- Click Account Codes under Maintenance Menu
- Under Account Codes. The user can edit the Sales Account and Purchase Account of a specific Account code by clicking the drop-down arrow of Purchase Account or Sales Account then click Save
ATC Code
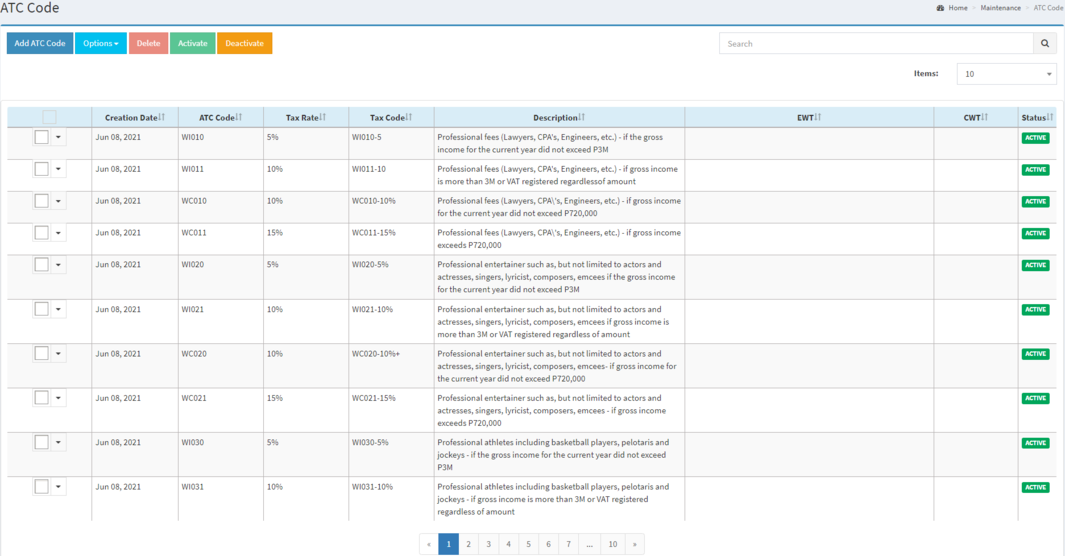
Alphanumeric Tax Codes or ATC Codes or ATCs are codes used to identify the type of tax that has to be paid. Note: Chart of Accounts must be set up in order to create and import ATC Codes.
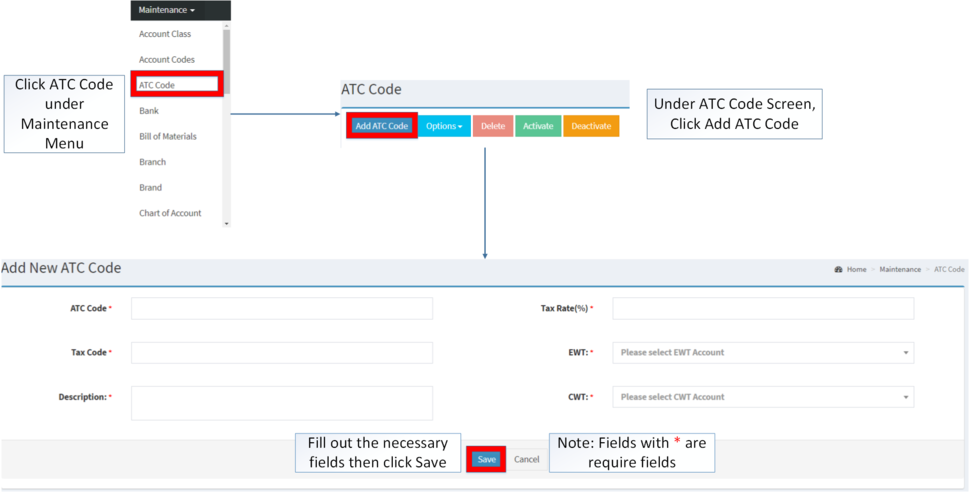
Creating ATC Records
- Click ATC Code under Maintenance Menu
- Under ATC Code Screen, Click Add ATC Code
- Fill up the required fields then Click Save. Note: Fields with * are required to be filled up.
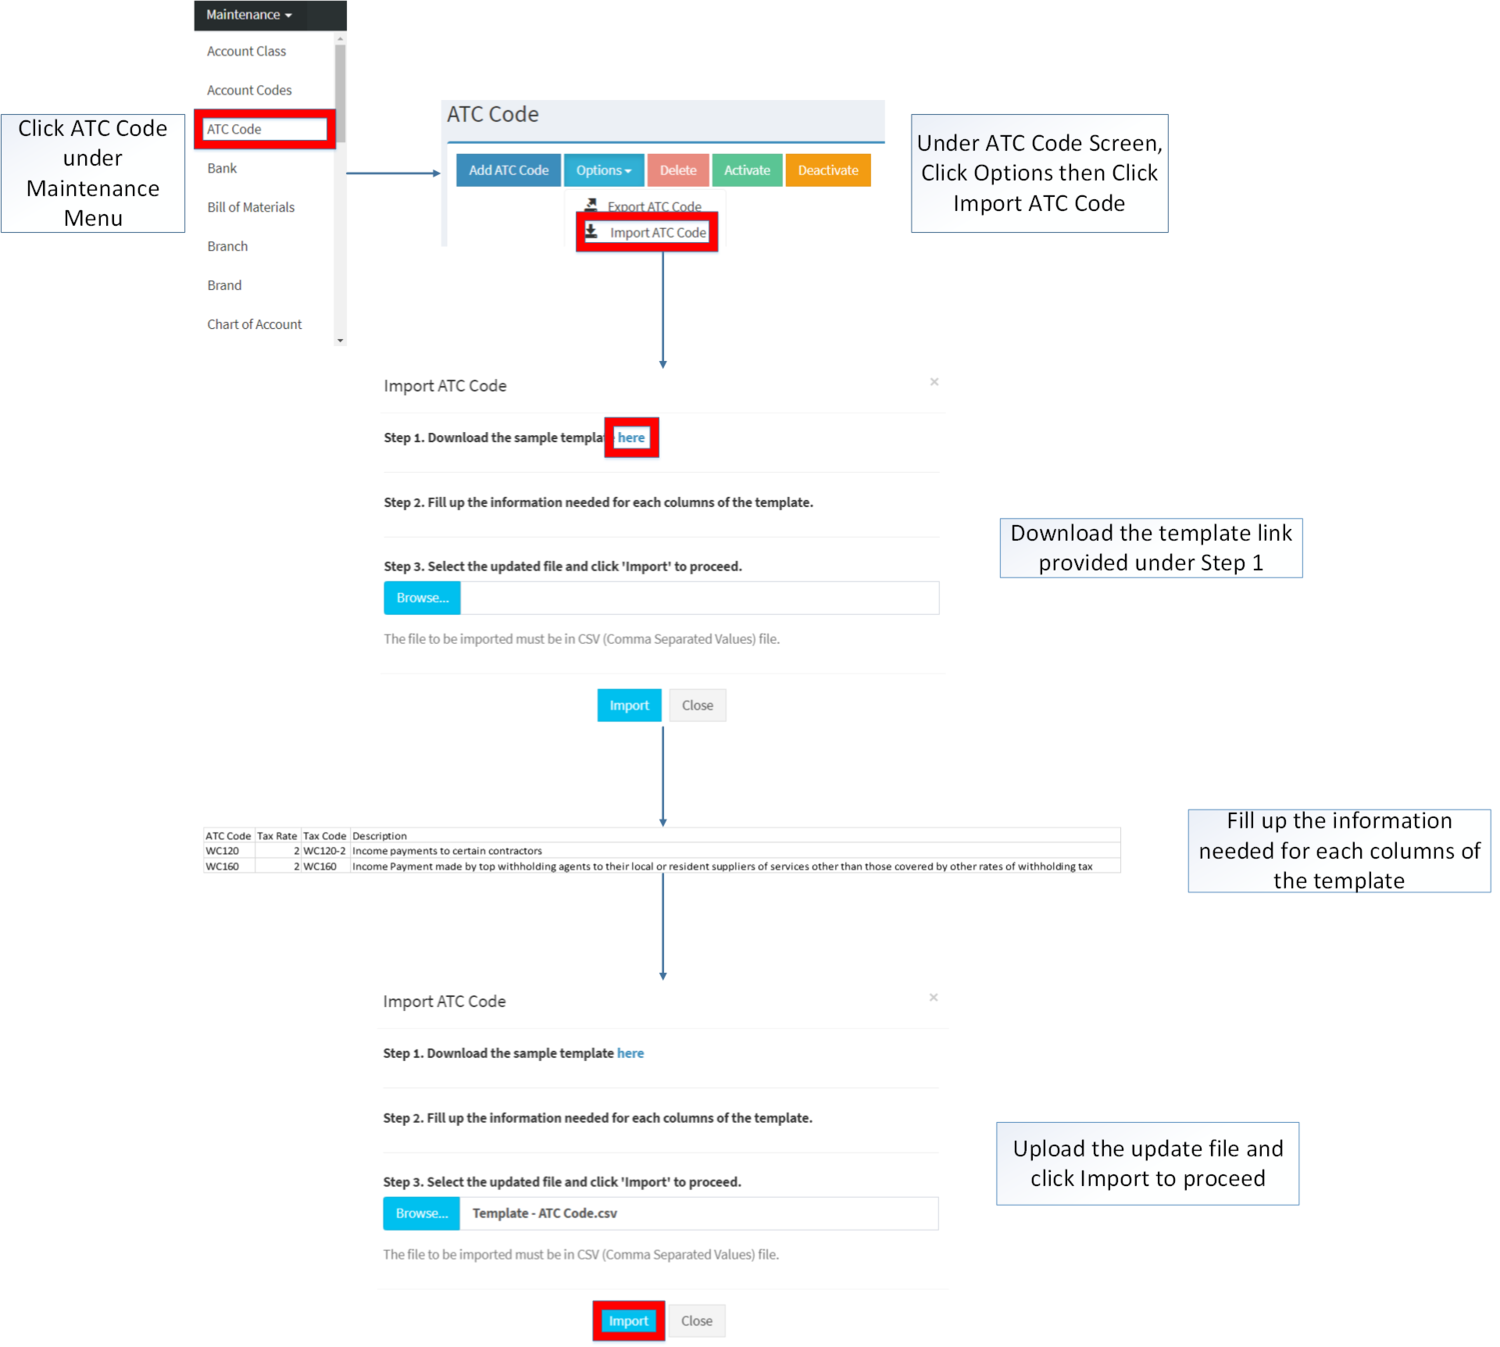
Importing ATC Records
- Click ATC Code under Maintenance Menu
- Under ATC Code Screen, Click Options then click Import ATC Code
- Download the Template link provided in Step 1.
- Fill up the information needed for each column of the template.
- Upload the updated template then click Import to Proceed
Tax
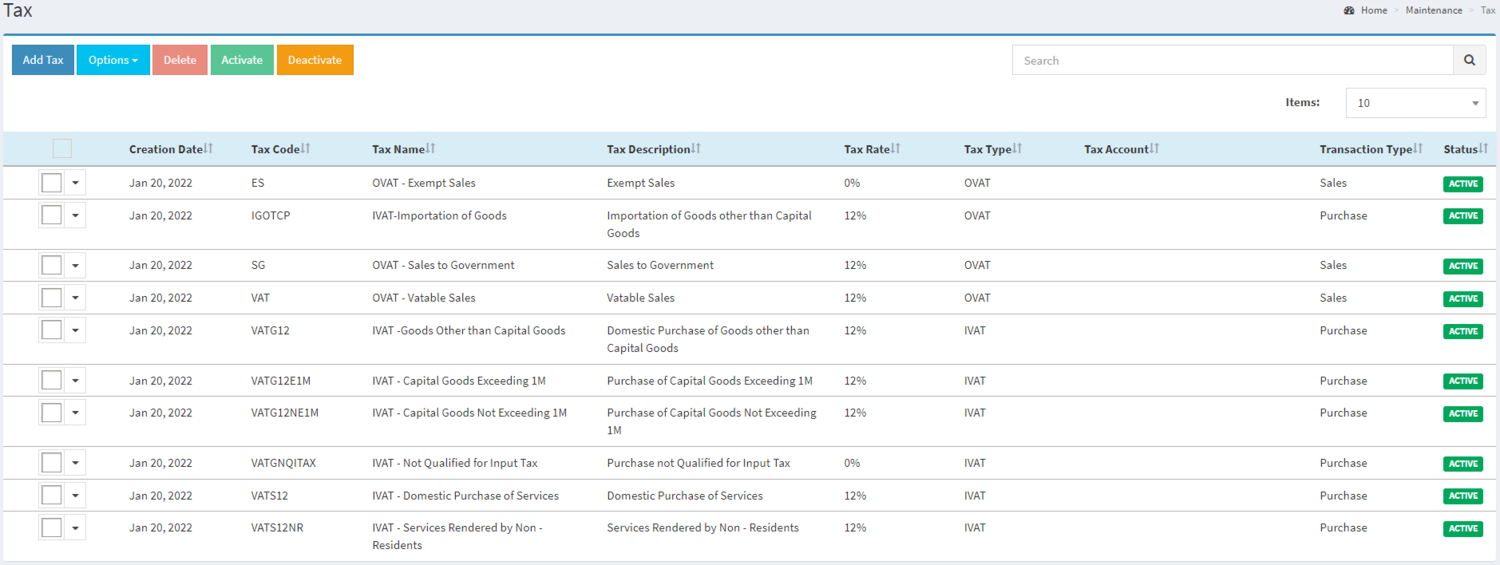
Tax Maintenance screen allows the user to configure and add tax types to be used on their transactions. Note: Chart of Accounts should be setup before creating or importing Tax Records
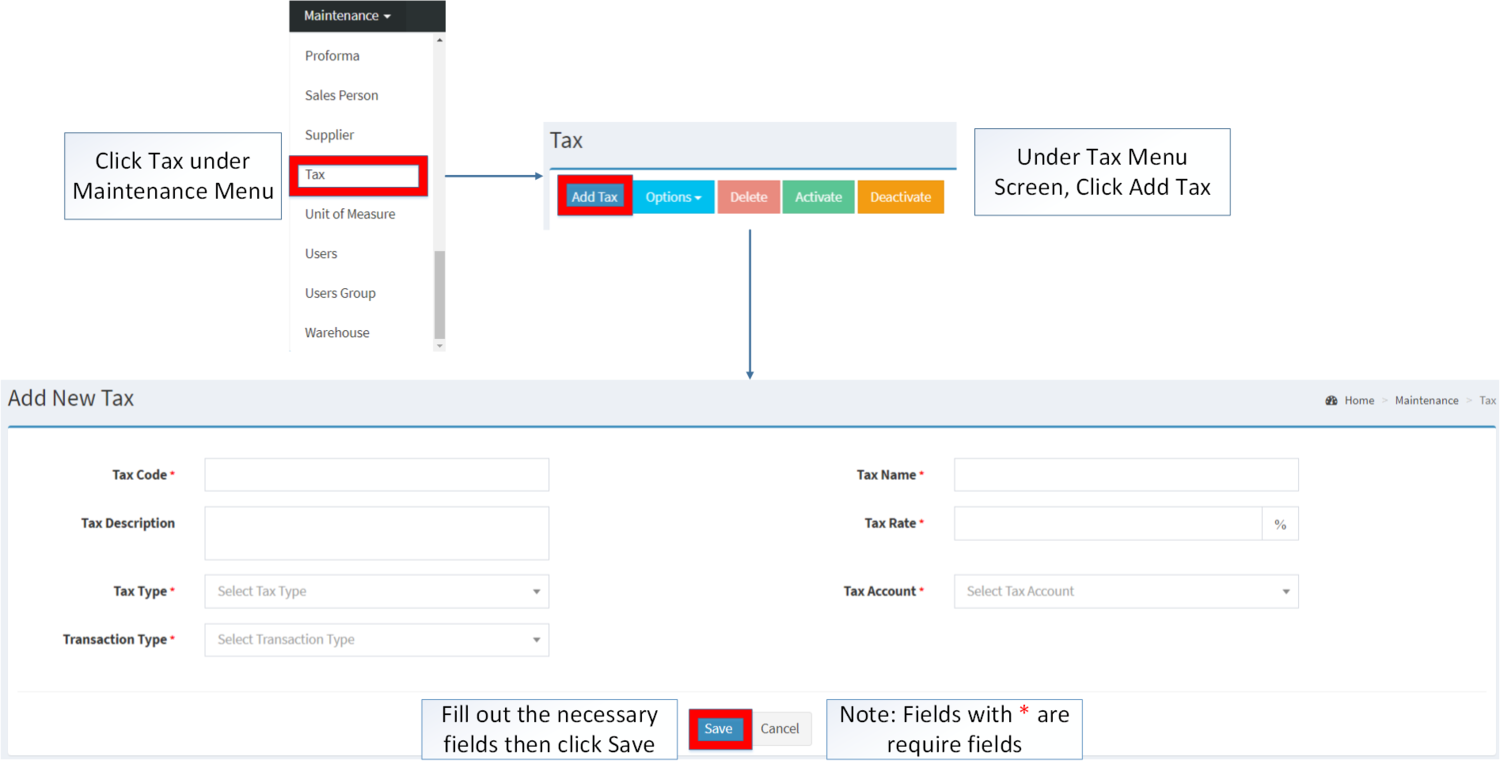
Creating Tax
- Click Tax under Maintenance Menu
- Under Tax Menu Screen, click Add Tax
- Fill up the required fields then click Save. Note: Fields with * are required to be filled up.
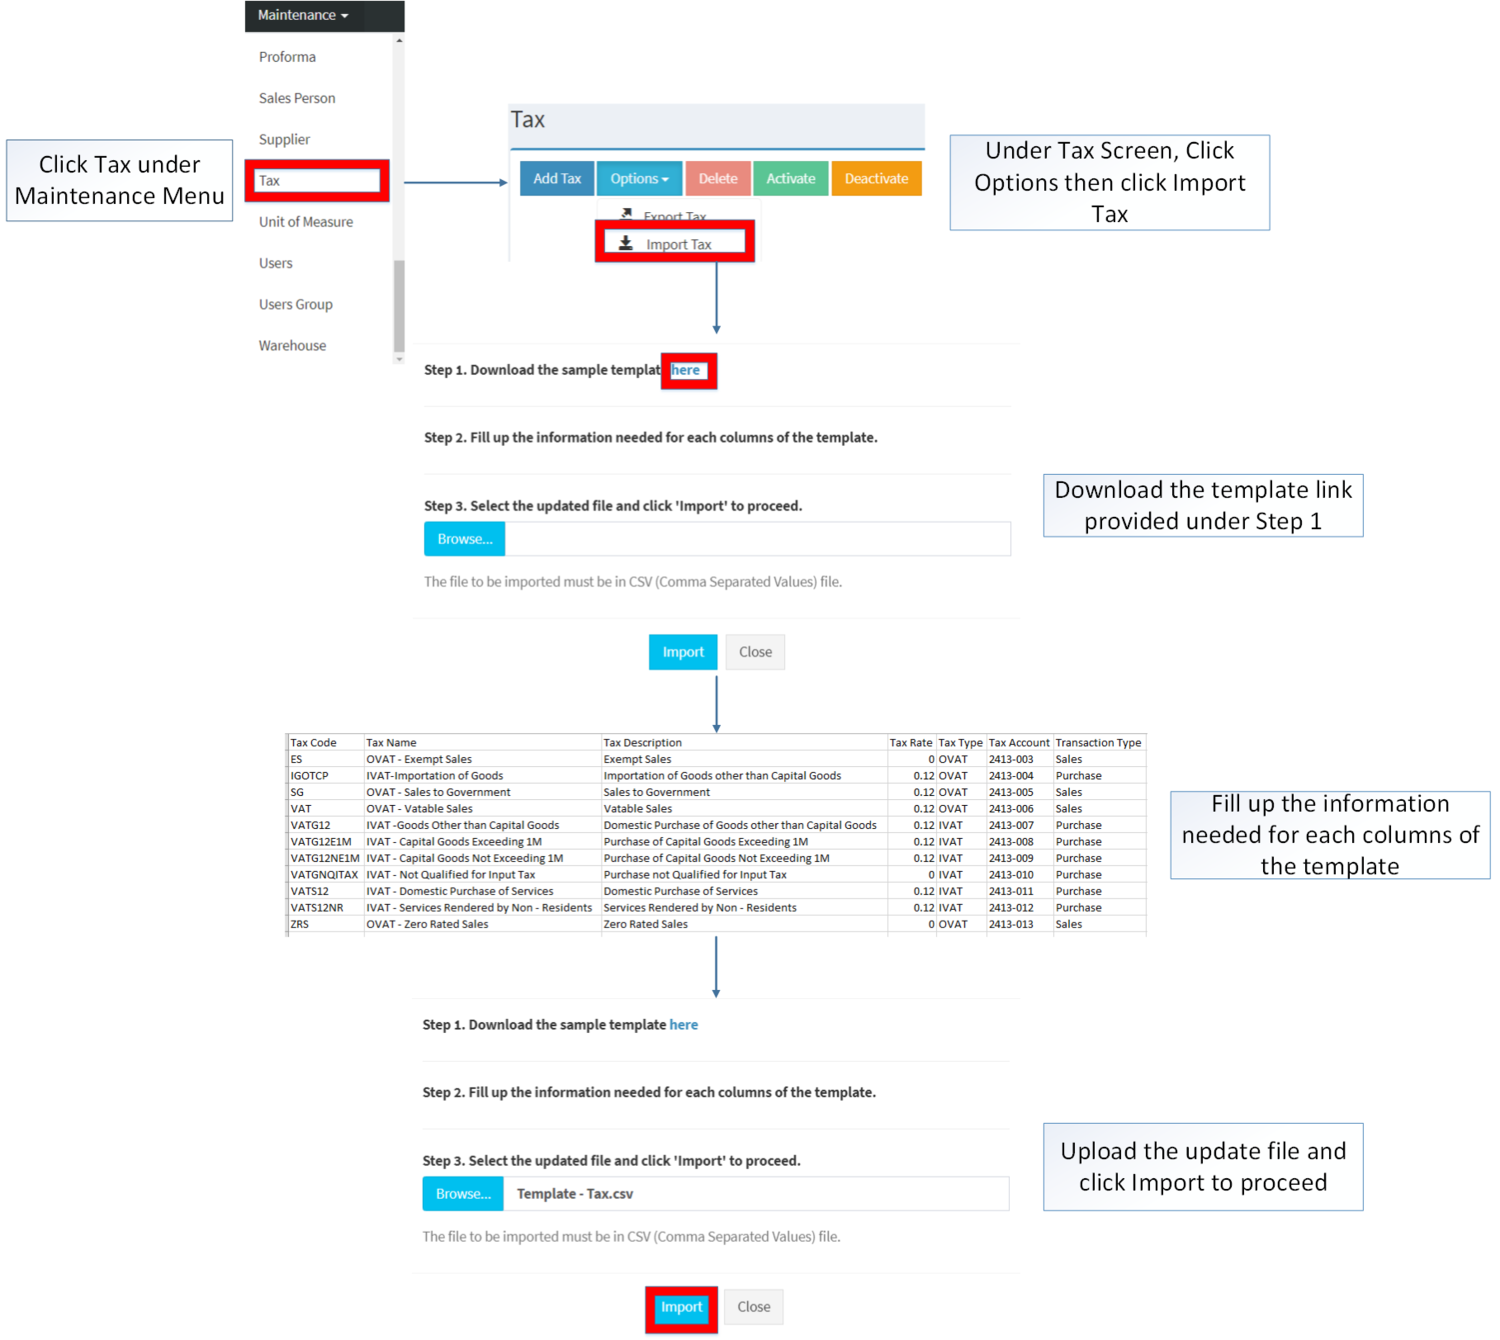
Importing Tax
- Click Tax under Maintenance Menu
- Under Tax Menu, click options then click Import Tax
- Download the Template provided under Step 1.
- Fill up the information needed for each column of the template.
- Upload the updated template then click Import to Proceed
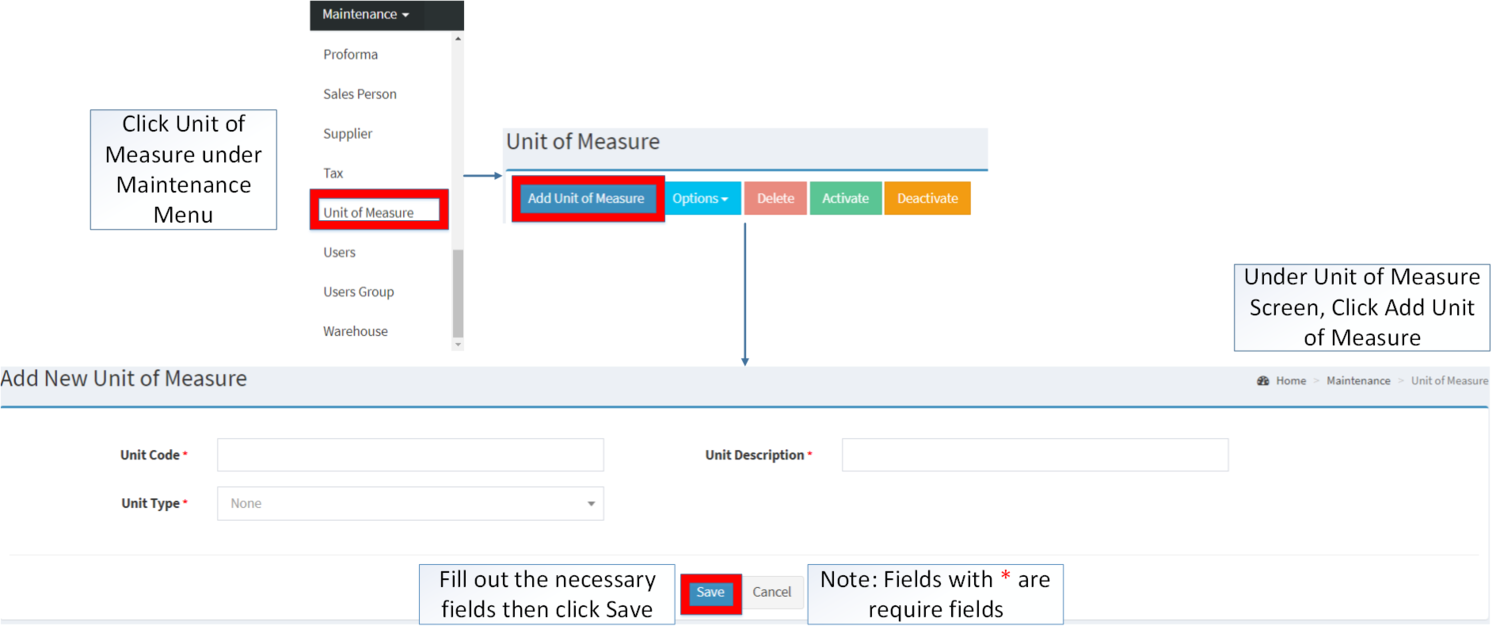
Unit of Measure
Unit of Measure maintenance allows the user to configure and add Unit of Measure on the items.
Creating Unit of Measure
- Click Unit of Measure under Maintenance Menu
- Under Unit of Measure Screen, click Add Unit of Measure
- Fill up the required fields then click Save. Note: Fields with * are required to be filled up.
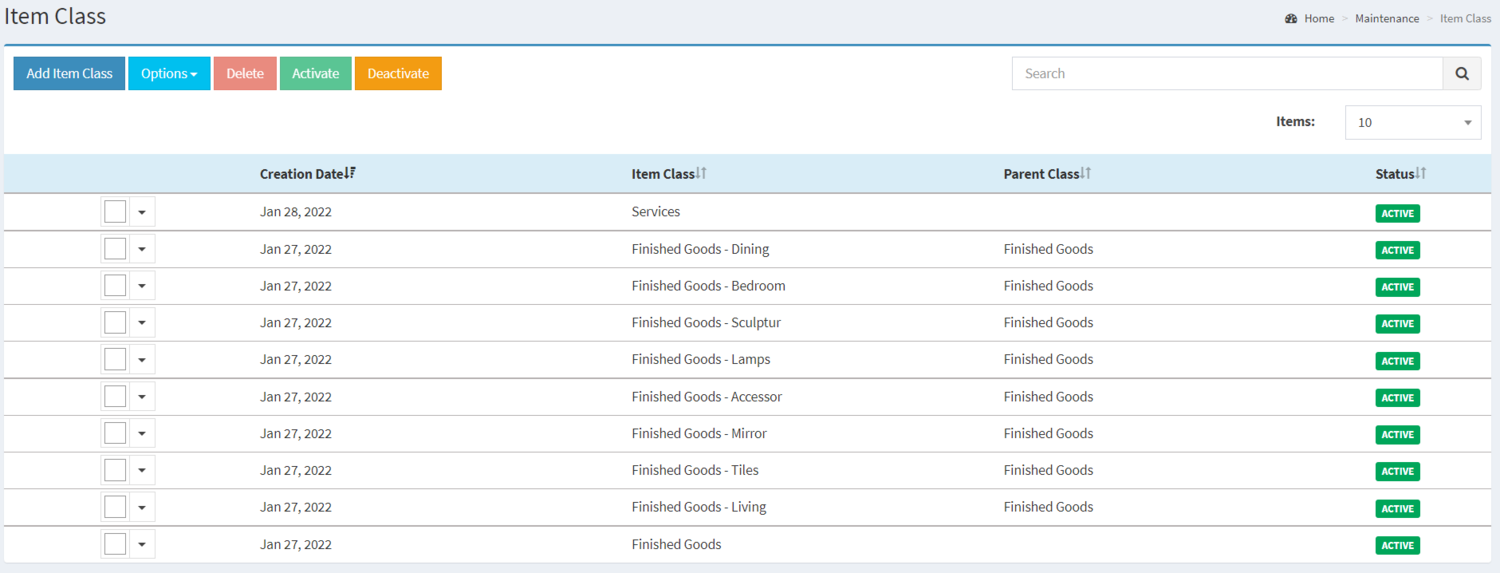
Item Class
The Item Class Maintenance screen allows the users to configure the item class to be used on categorizing their items.
Note: Chart of Accounts should be set up in order to add and import Item Class.
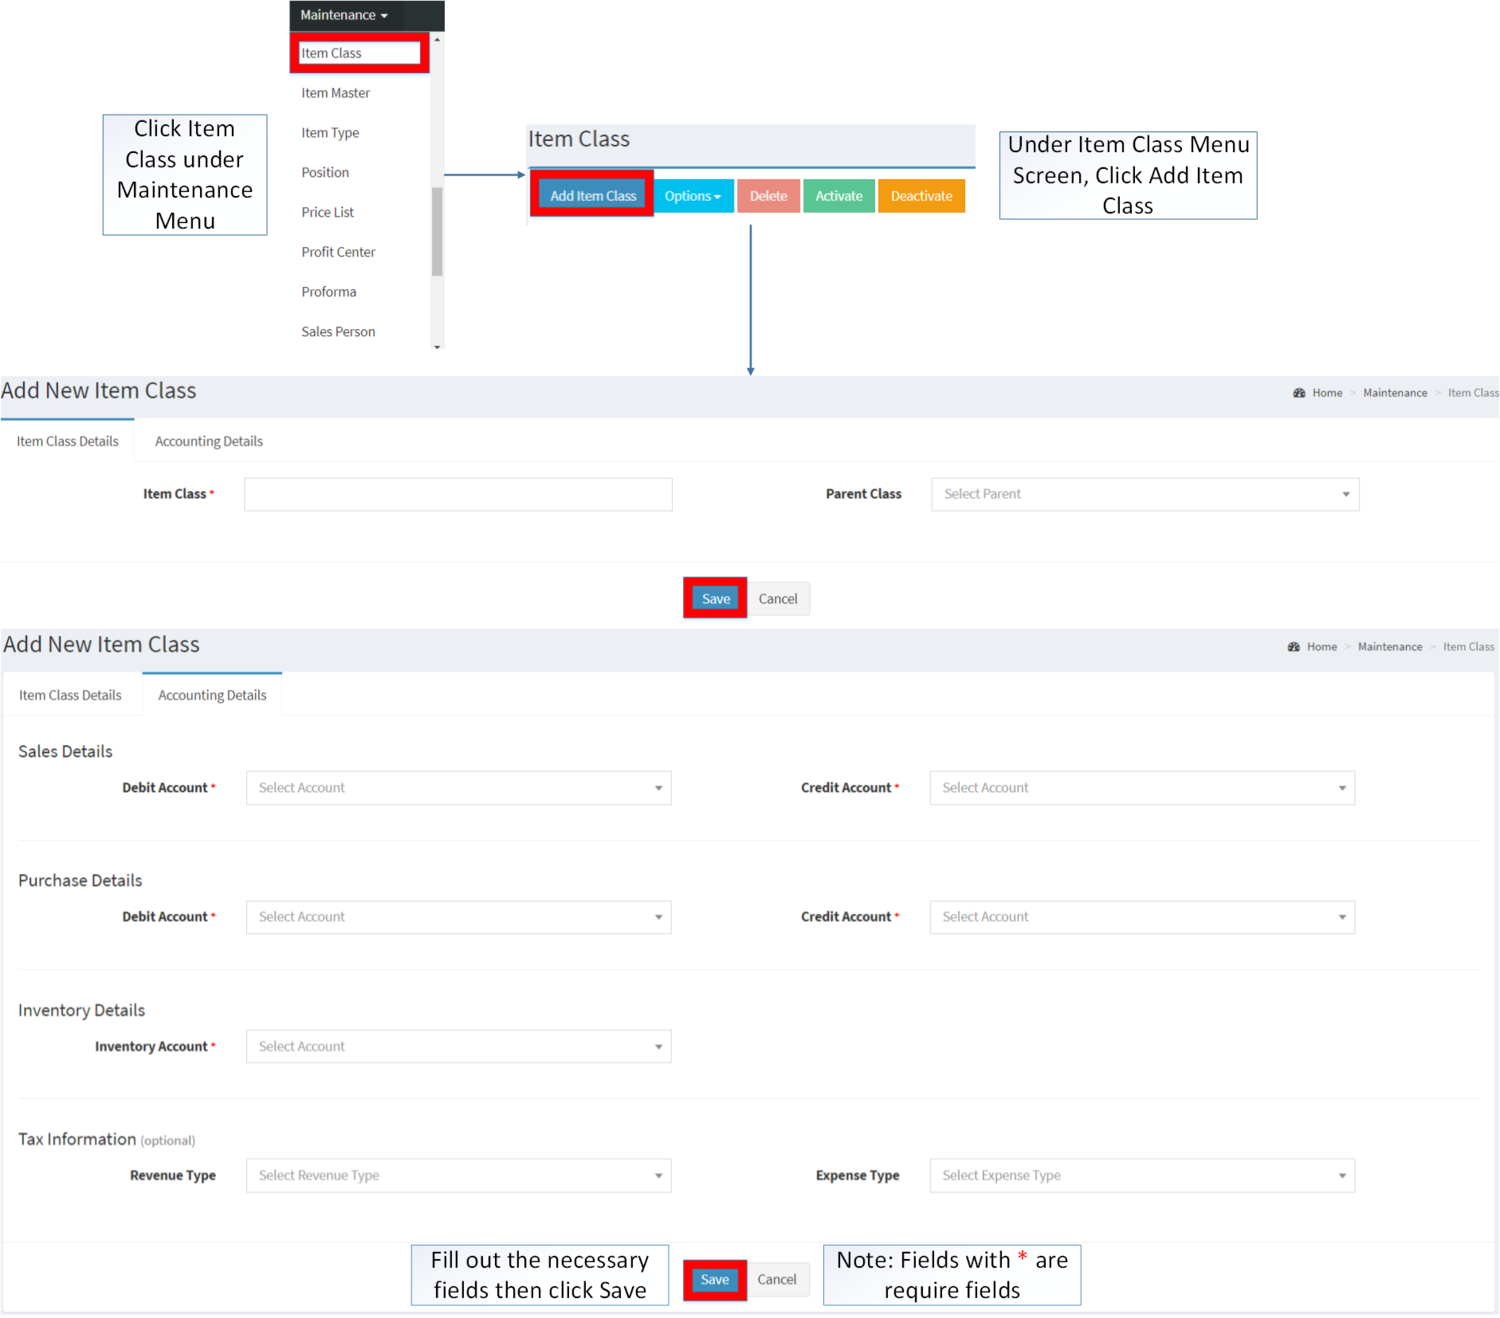
Creating Item Class
- Click Item Class under Maintenance Menu
- Under Item Class Menu, click Add Item Class
- Fill up the required fields then Click Save. Note: Fields with * are required to be filled up.
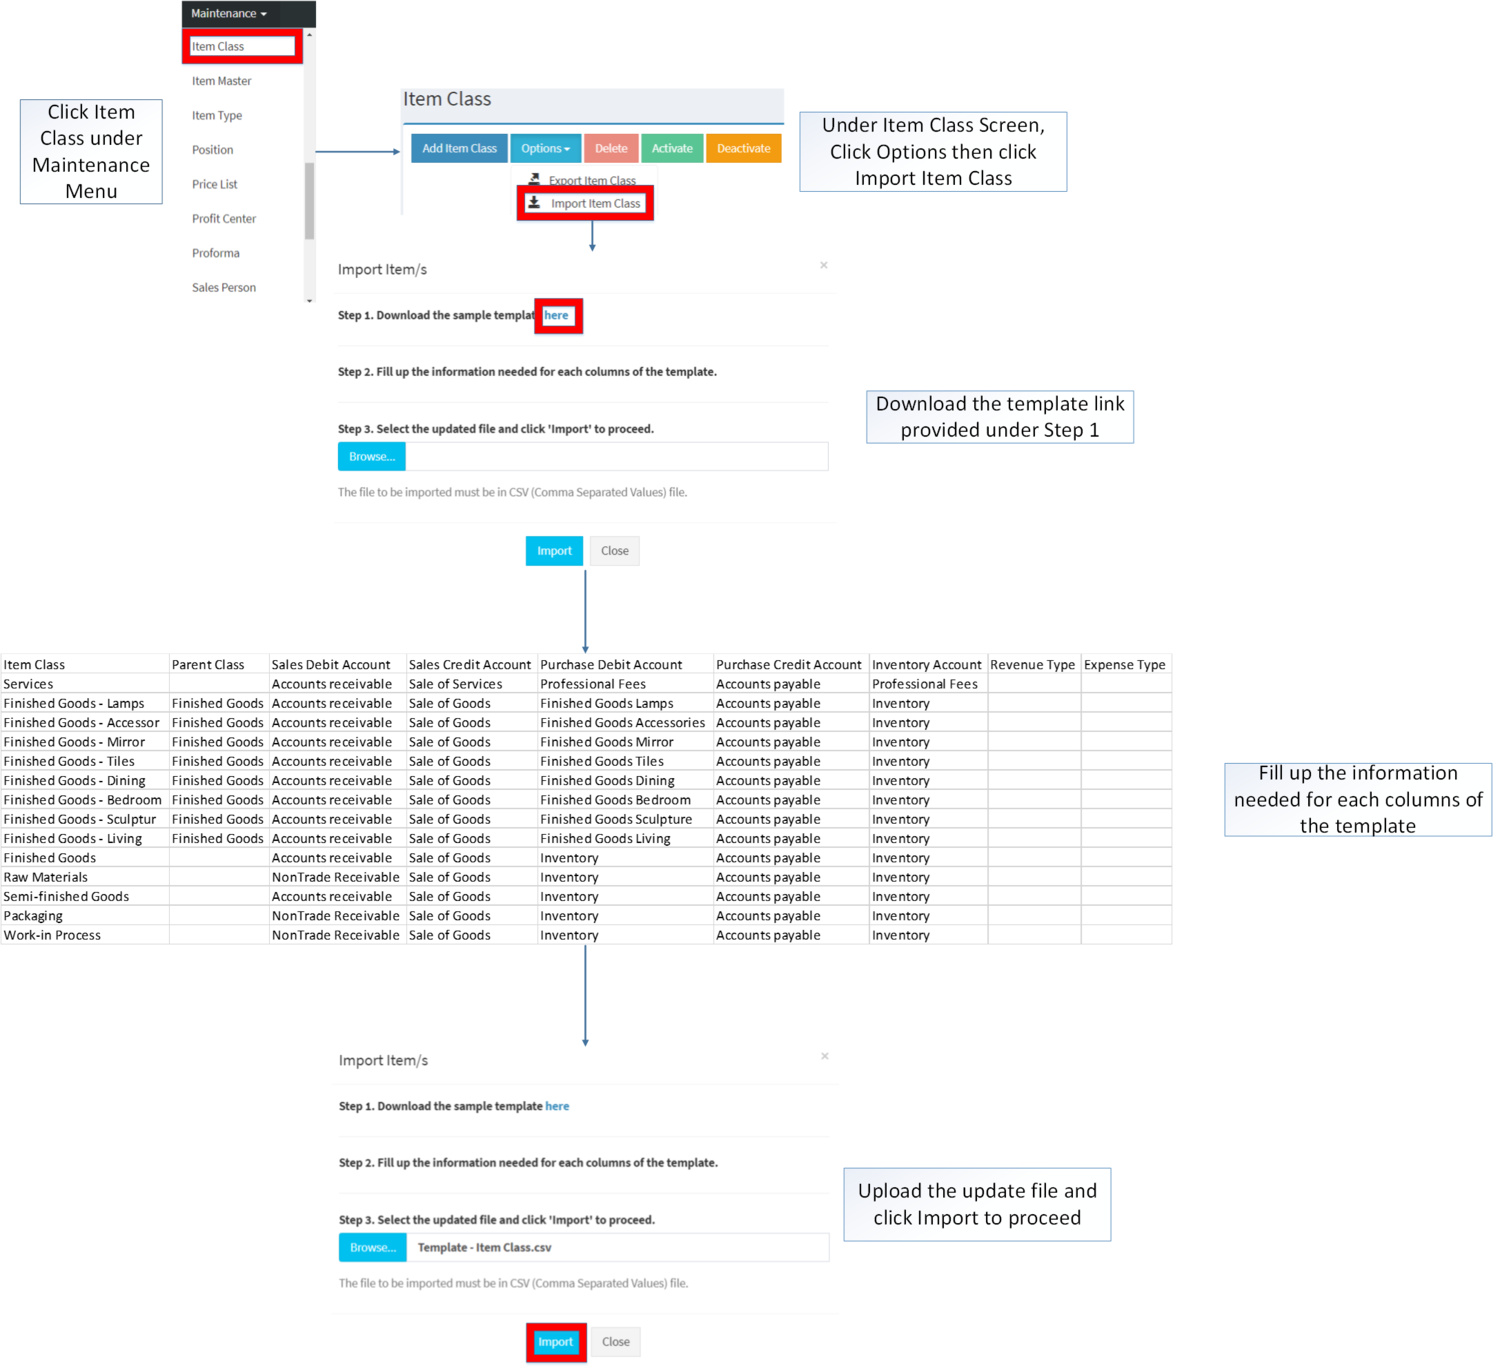
Importing Item Class
- Click Item Class under Maintenance Menu
- Under Item Class Screen, click options then click Import Item Class
- Download the Template link provided in Step 1.
- Fill up the information needed for each column of the template.
- Upload the updated file then click Import to Proceed
Item Type
Item Type Maintenance screen allows the users to configure and add item type on their items.
Creating Item Type
- Click Item Type under Maintenance Menu
- Under Item Type Menu, click Add Item Type
- Fill up the required fields then click Save. Note: Fields with * are required to be filled up.
Importing Item Type
- Click Item Type under Maintenance Menu
- Under Item Type Screen, click options then click Import Item Type
- Download the Template link provided in Step 1.
- Fill up the information needed for each column of the template.
- Upload the updated template then click Import to Proceed
Brand
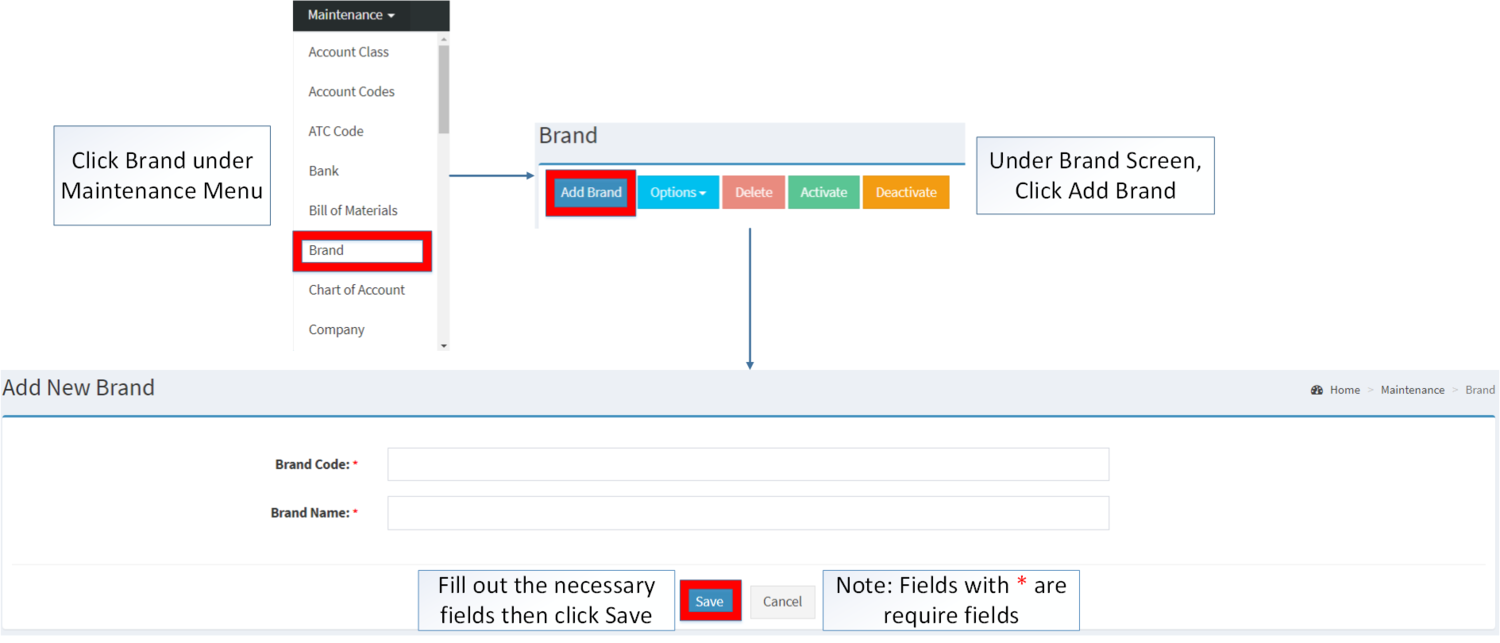
Brand maintenance screen allows users to add and configure Brand for their items.
Creating Brand
- Click Brand under Maintenance Menu
- Under Brand Screen, click Add Brand
- Fill up the required fields then click Save. Note: Fields with * are required to be filled up.
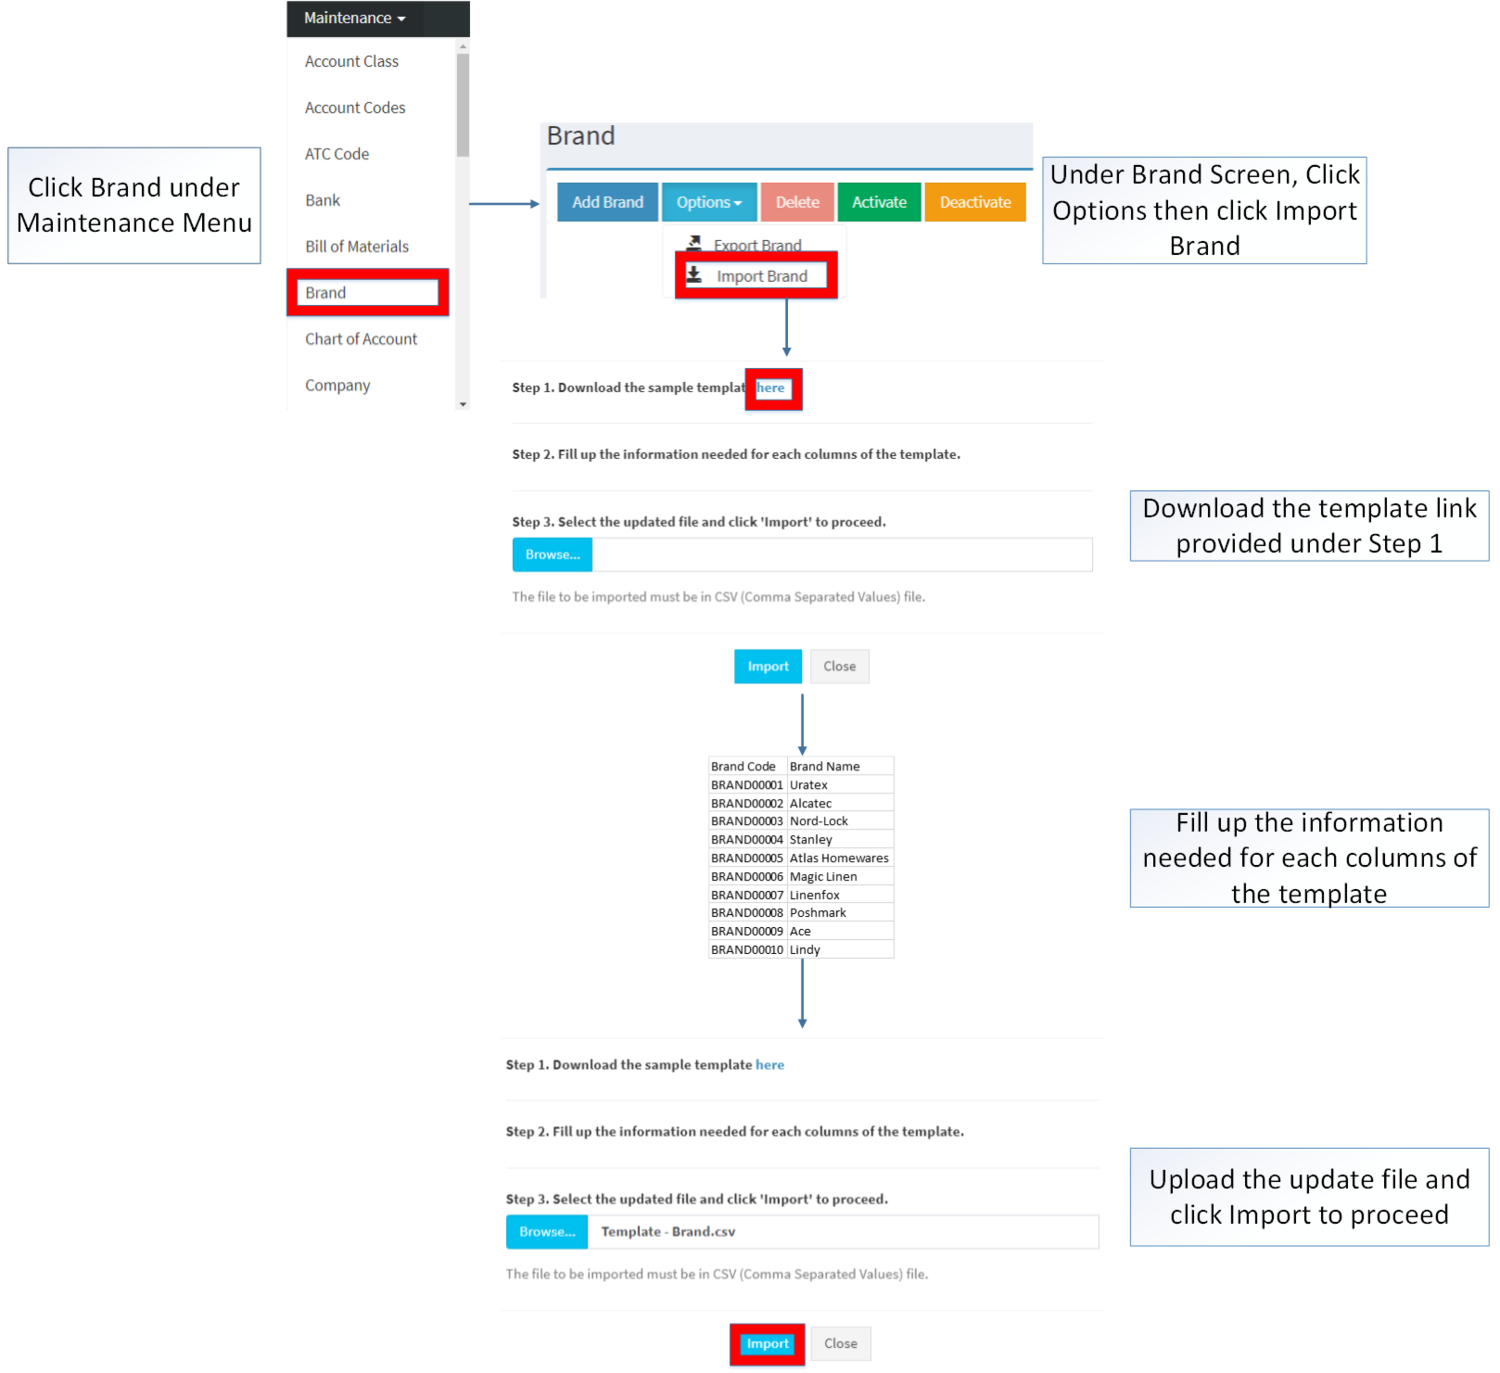
Importing Brand
- Click Brand under Maintenance Menu
- Under Brand Menu, click options then click Import Brand
- Download the Template link provided in Step 1.
- Fill up the information needed for each columns of the template.
- Upload the updated file then click Import to proceed
Item Master
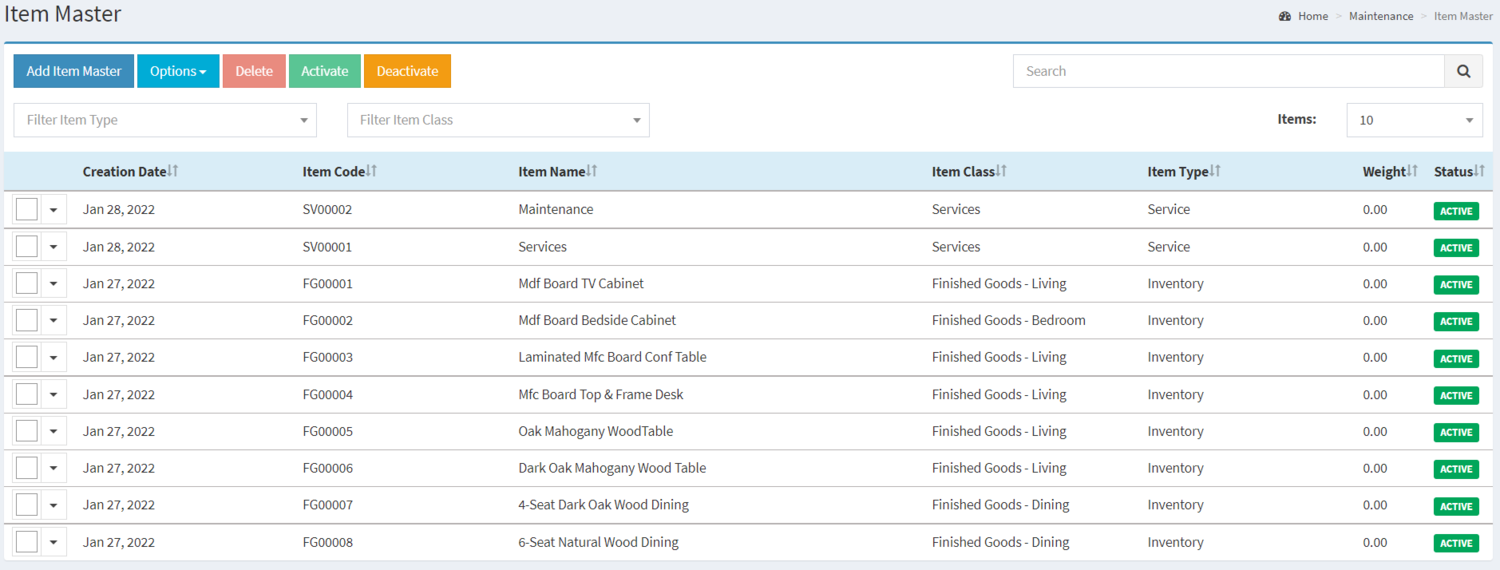
Item Master Maintenance screen allows the users to configure and add items to be used on their transaction.
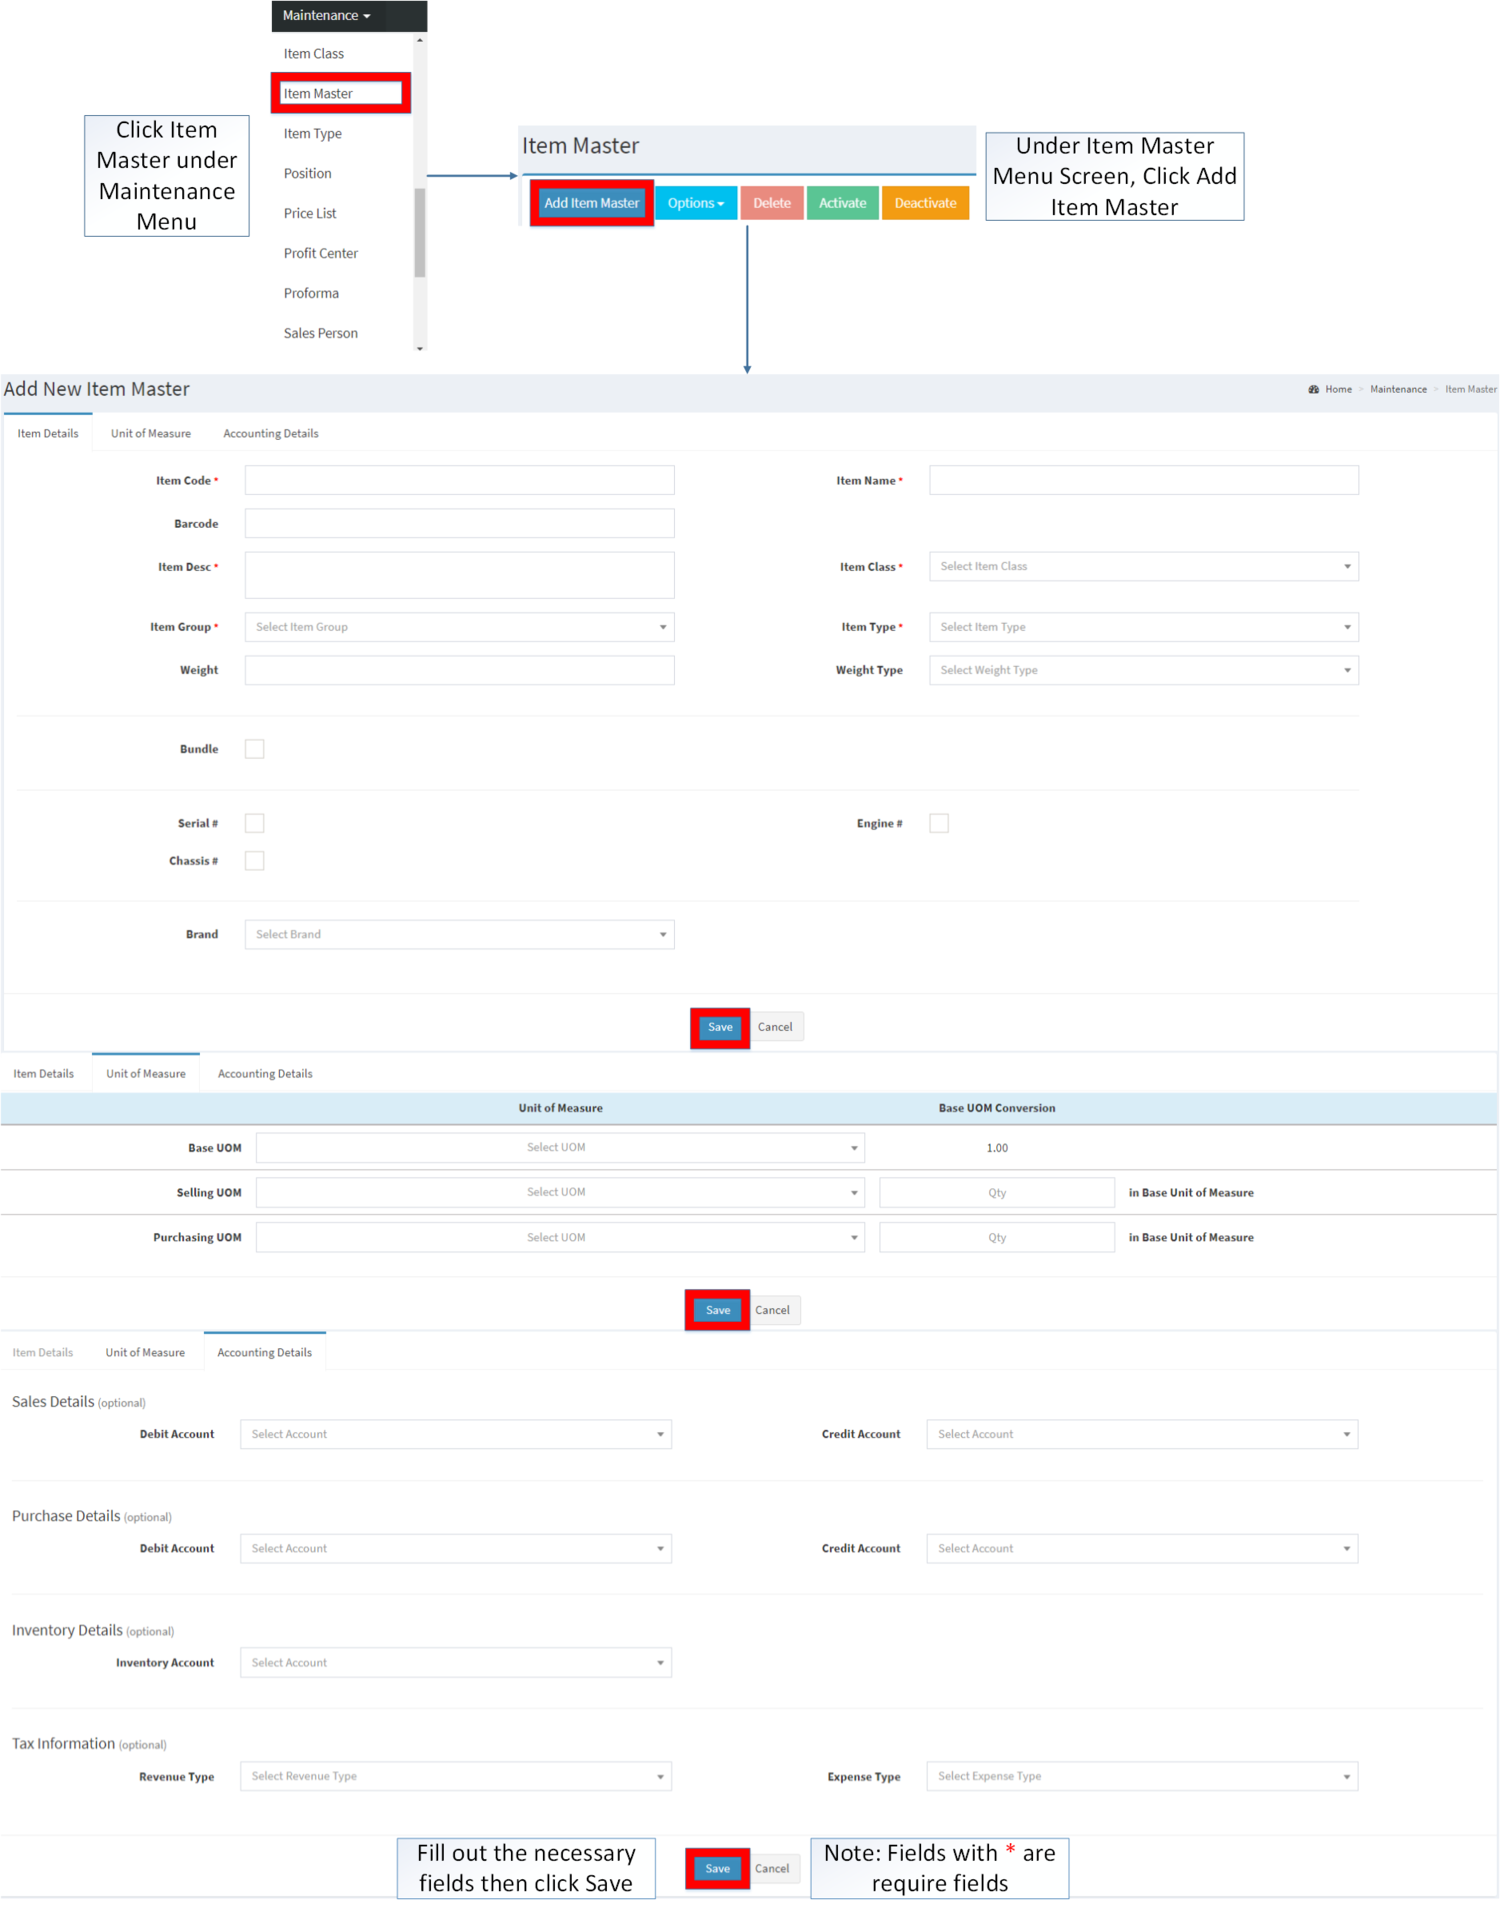
Creating Item Master
- Click Item Master under Maintenance Menu
- Under Item Master Menu, click Add Item Master
- Fill up the required fields then click Save. Note: Fields with * are required to be filled up.
Notes
- When accounting entries are automatically created, it creates entries based on the defaulted accounting details for the Item. If no accounting detail is maintained in Item Master, it automatically uses the accounting details maintained for its Item Class.
Importing Item Master
- Click Item Master under Maintenance Menu
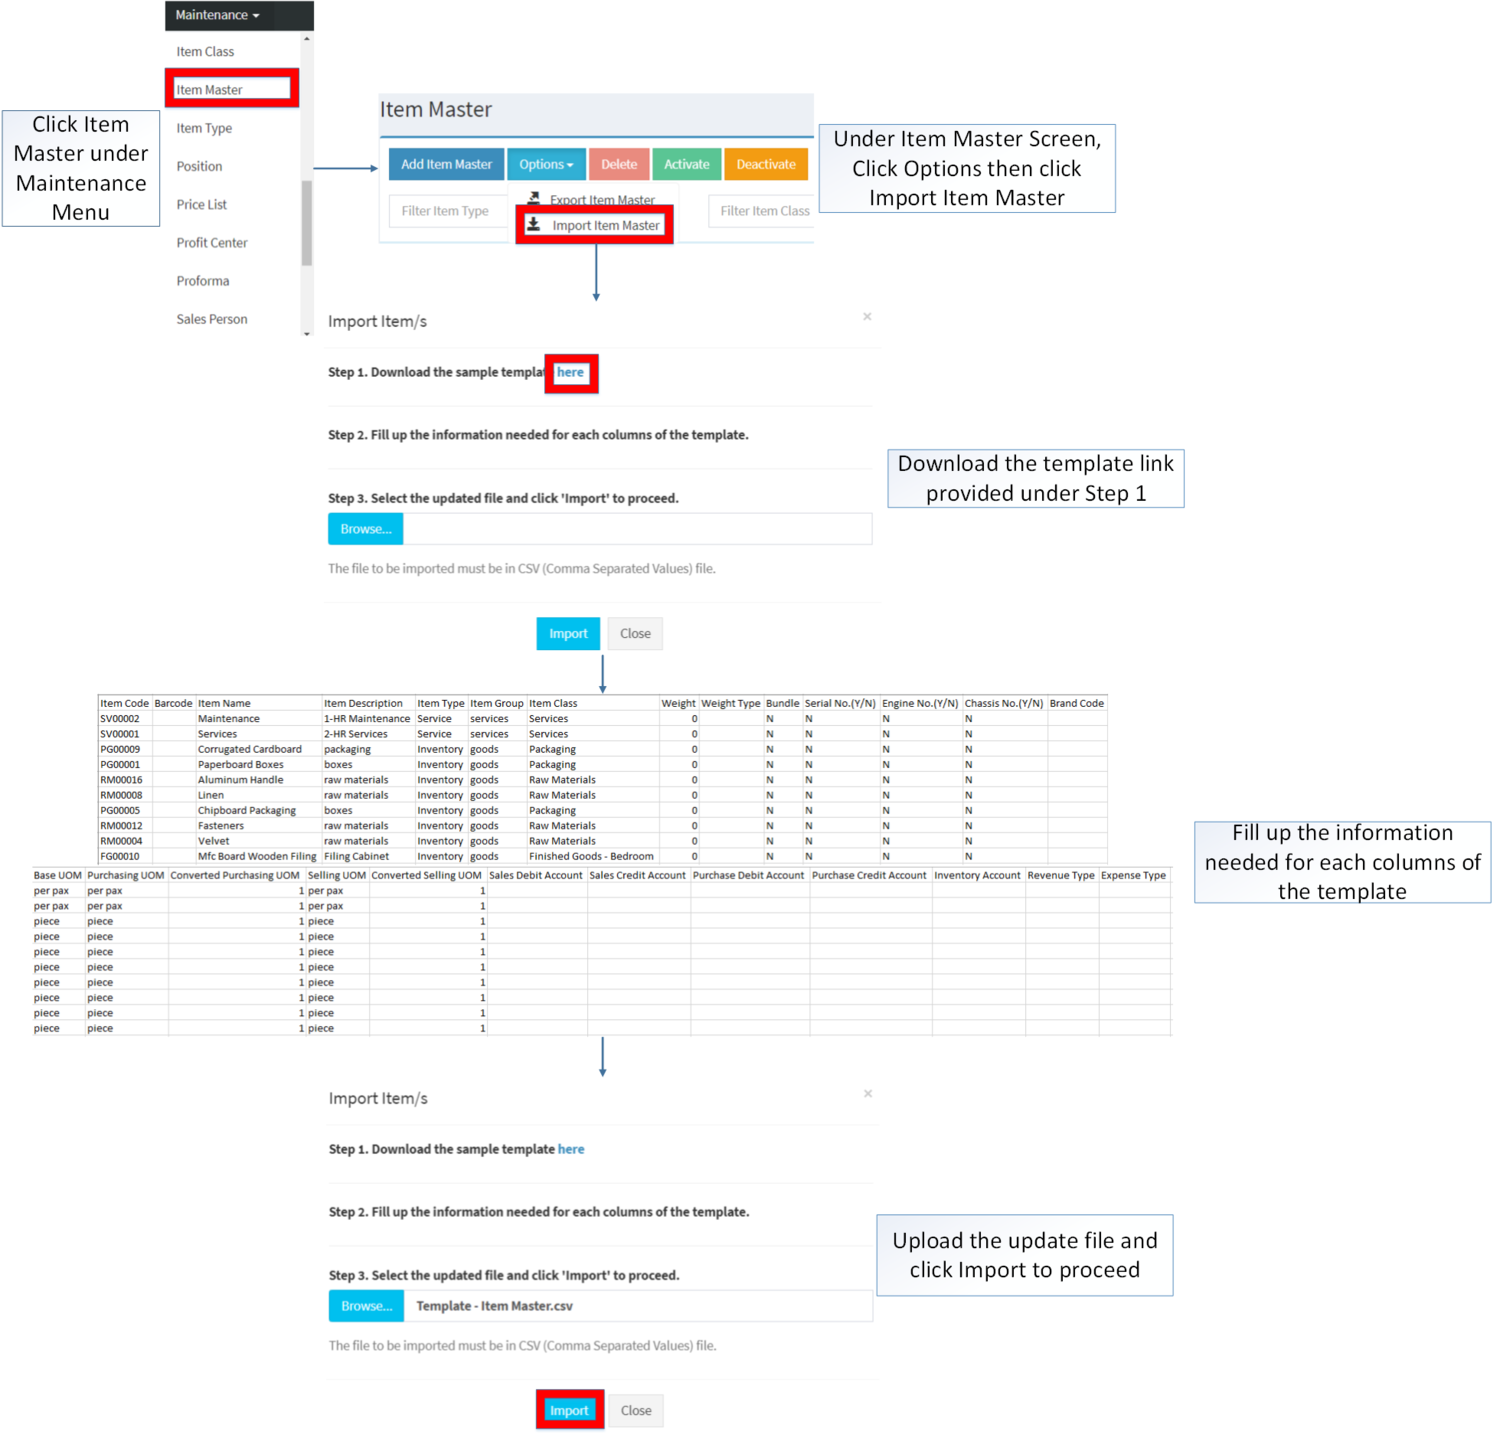
- Under Item Master Menu, click options then click Import Item Master
- Download the Template provided in Step 1.
- Fill up the information needed for each column of the template.
- Upload the updated template then click Import to proceed
Warehouse
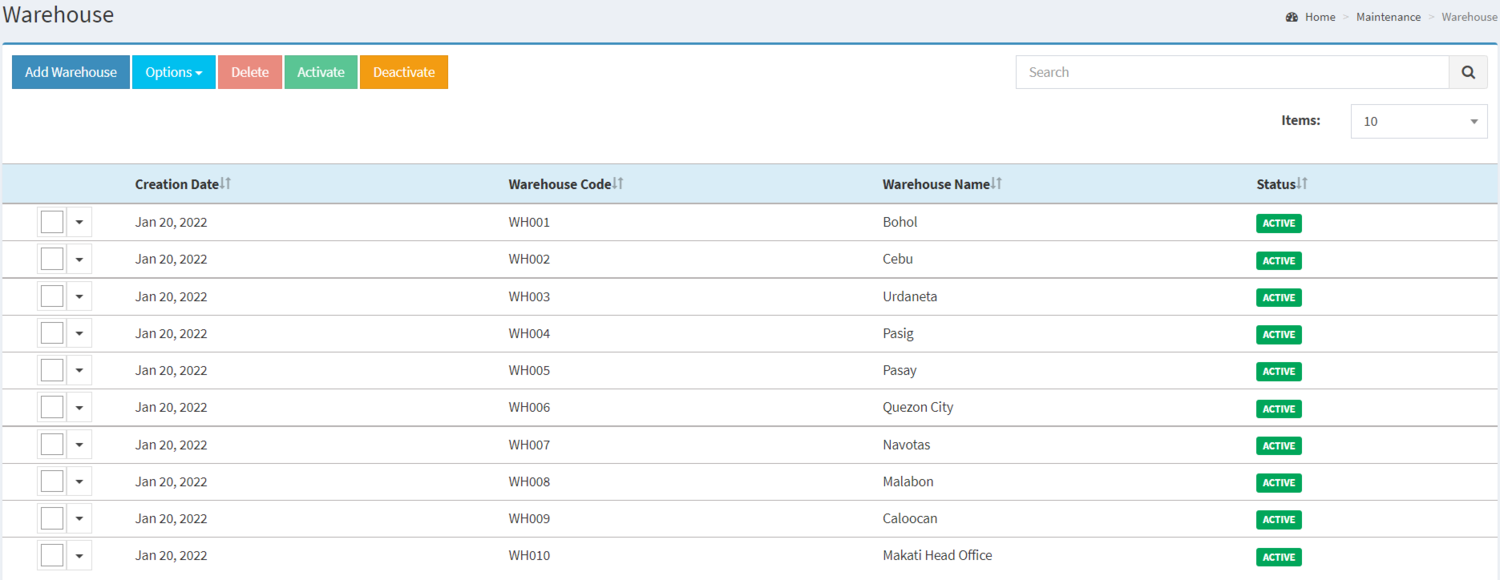
Warehouse maintenance screen allows the user to configure and add Warehouse to be used when adjusting, transferring stocks to be used on their transactions.
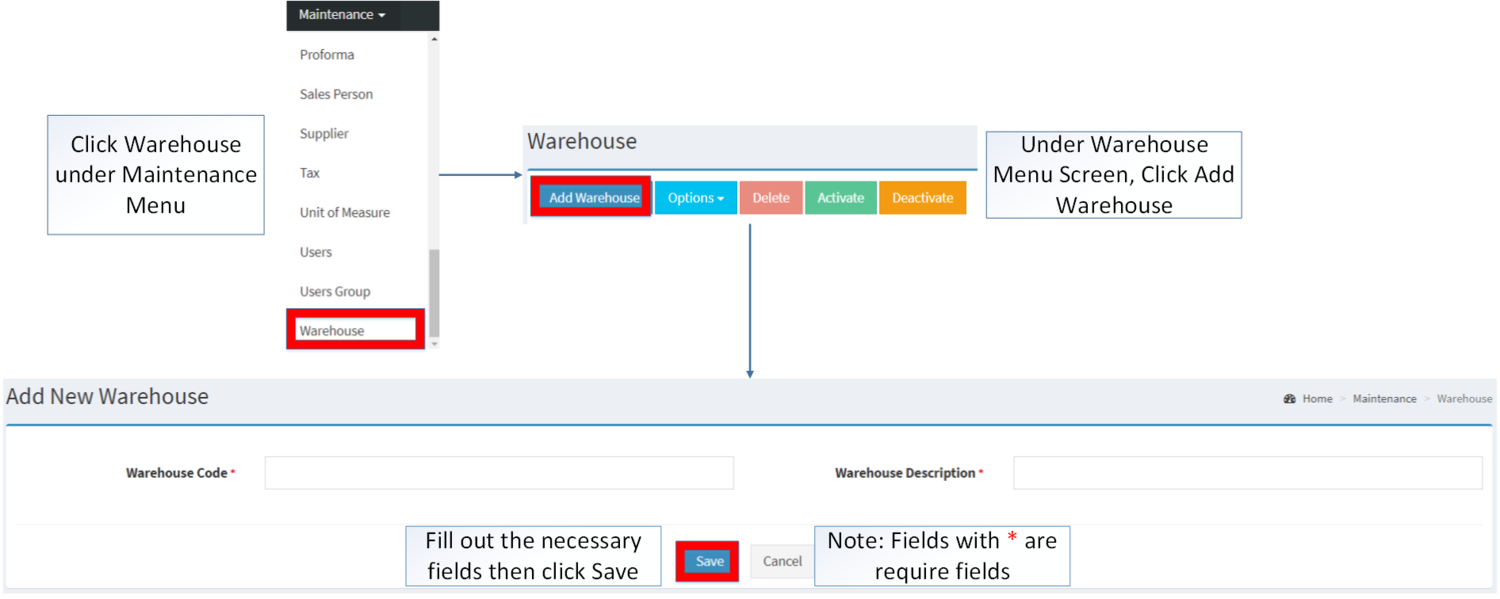
Creating Warehouse
- Click Warehouse under Maintenance Menu
- Under Warehouse Menu, click Add Warehouse
- Fill up the required fields then click Save. Note: Fields with * are required to be filled up.
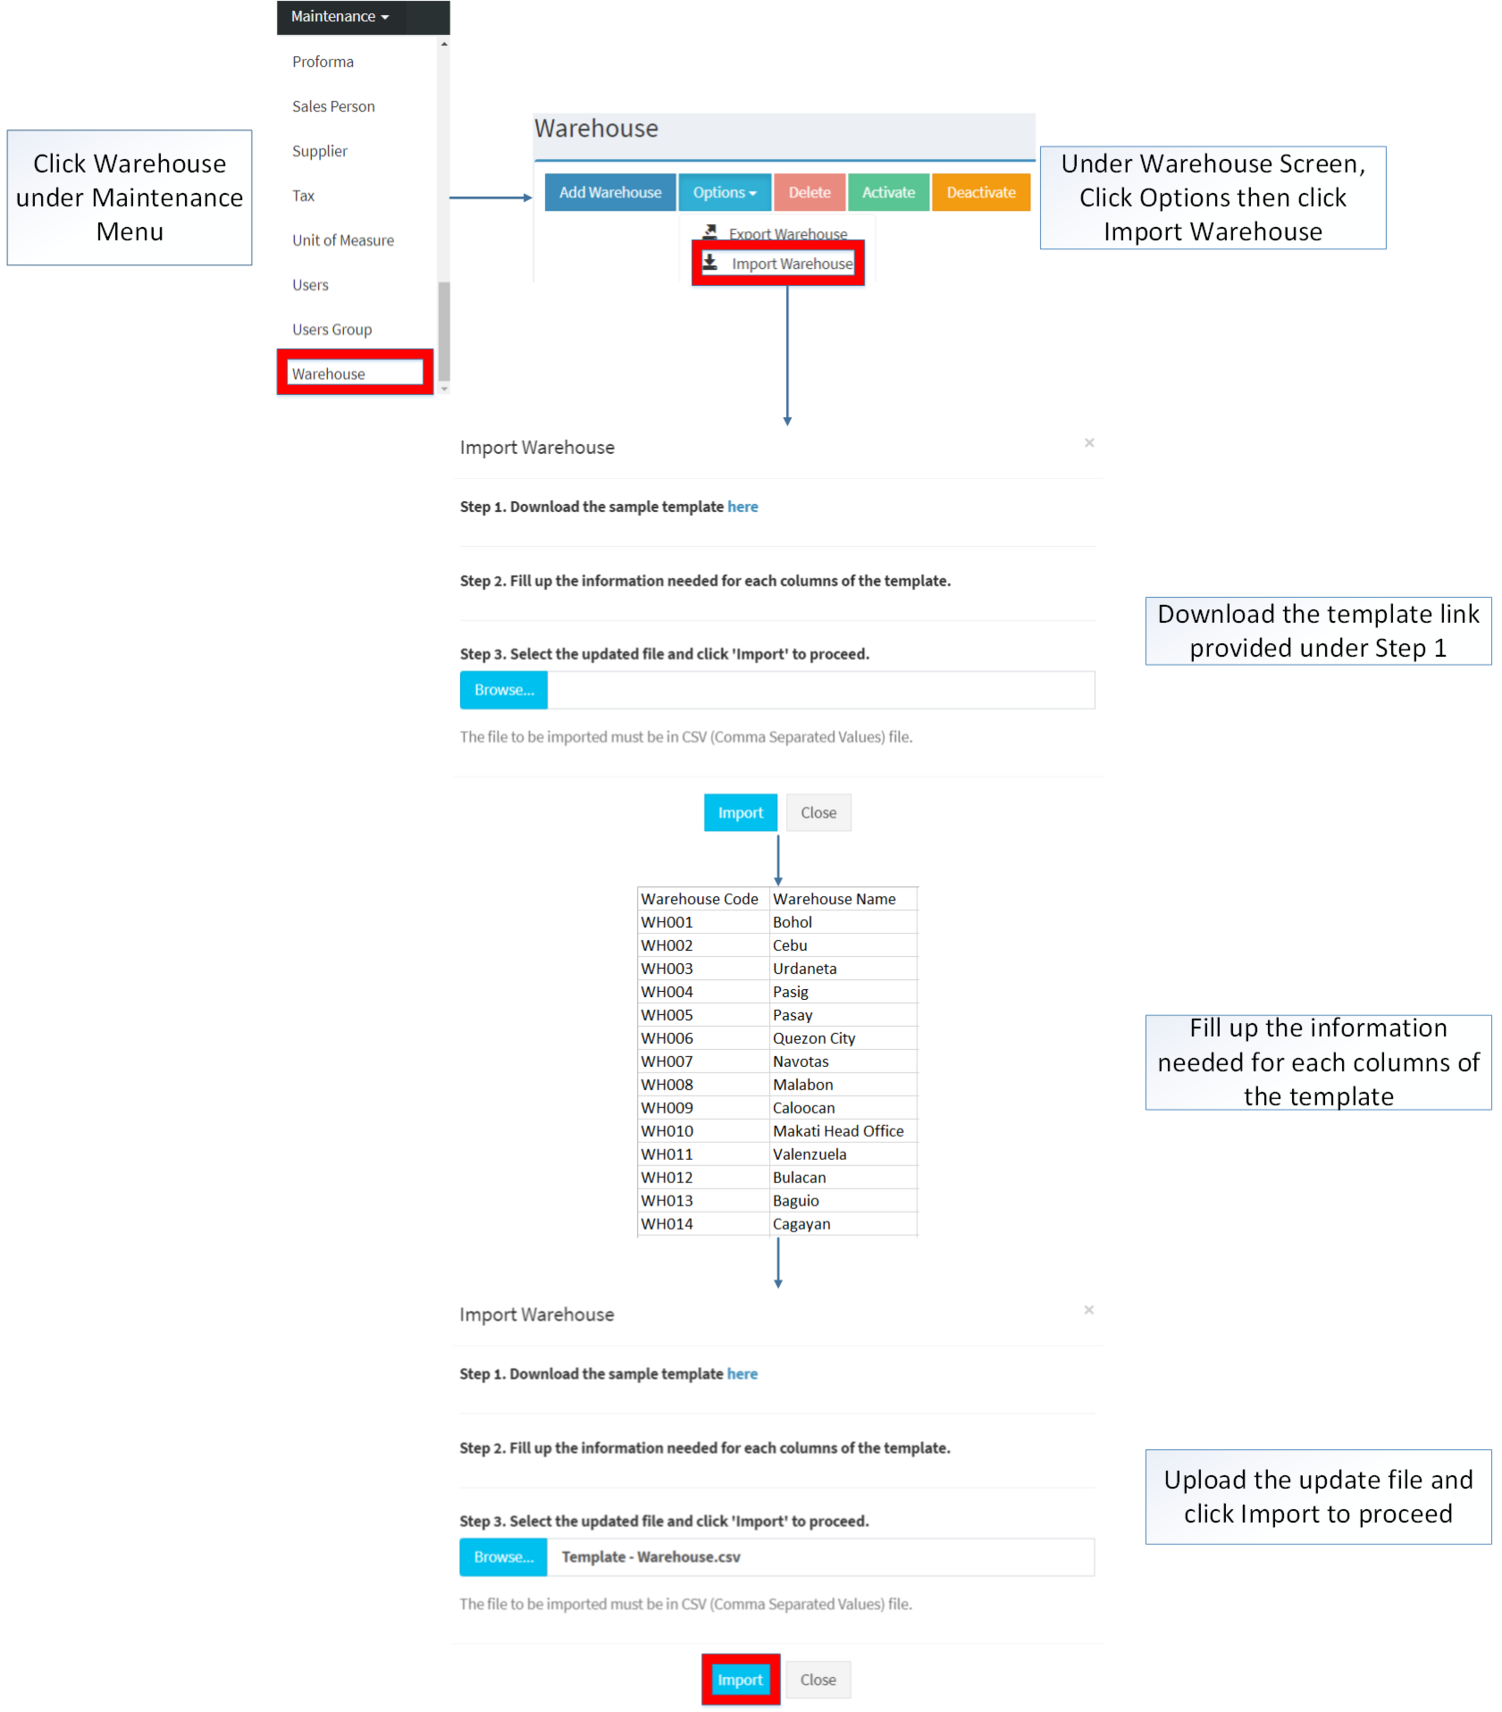
Importing Warehouse
- Click Warehouse under Maintenance Menu
- Under Warehouse Menu, click Options then click Import Warehouse
- Download the Template link provided in Step 1.
- Fill up the information needed for each column of the template.
- Upload the updated file then click Import to proceed.
Customer
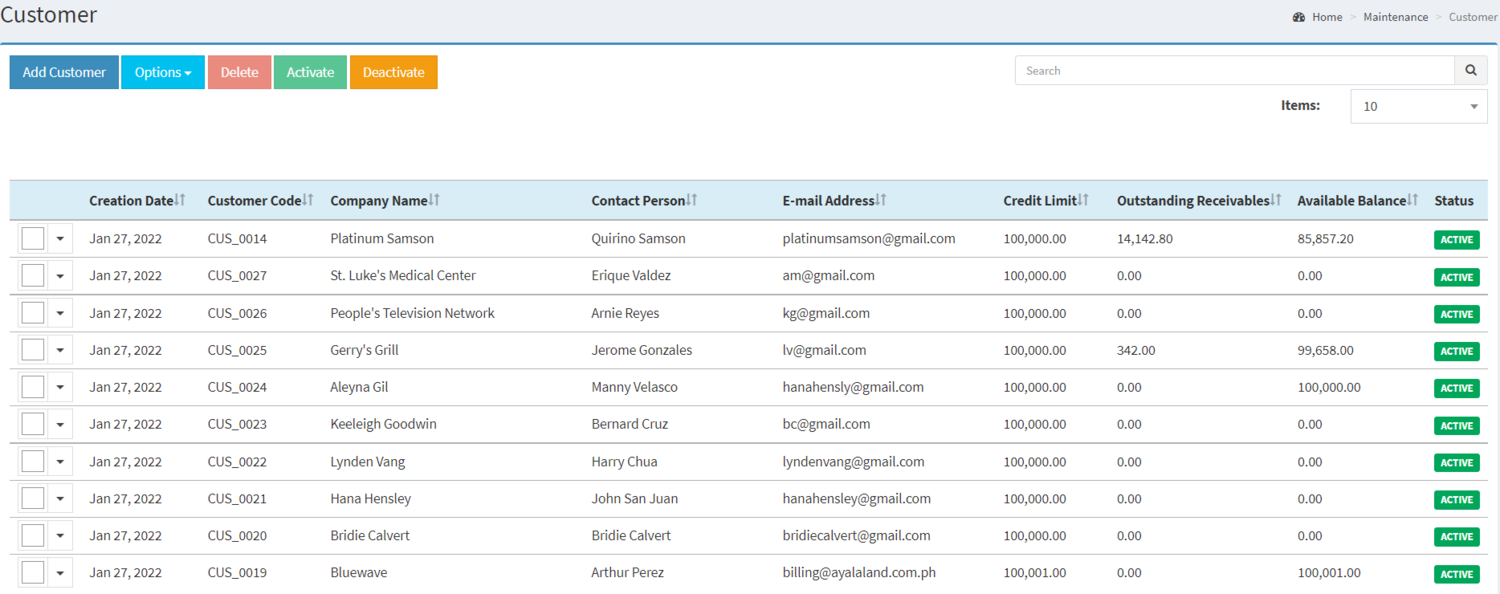
Customer maintenance screen allows users to configure and add customers that will be used on their transactions.
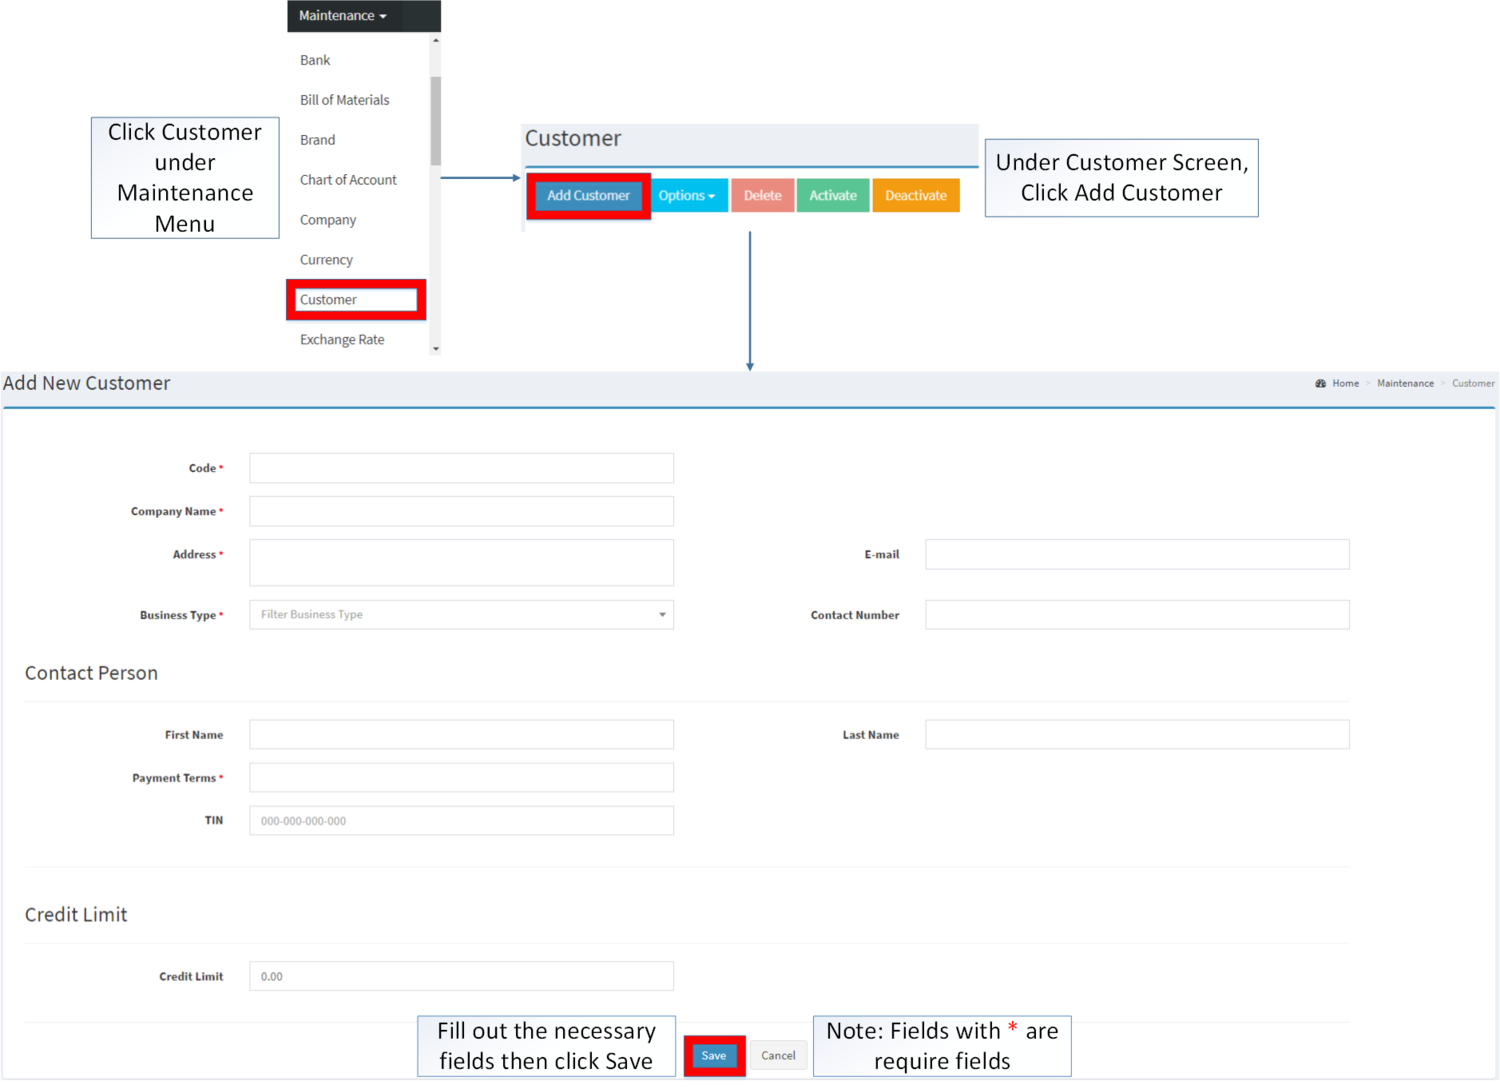
Creating Customer
- Click Customer under Maintenance Menu
- Under Customer Screen, click Add Customer
- Fill up the required fields then Click Save. Notes: Fields with * are required to be filled up.
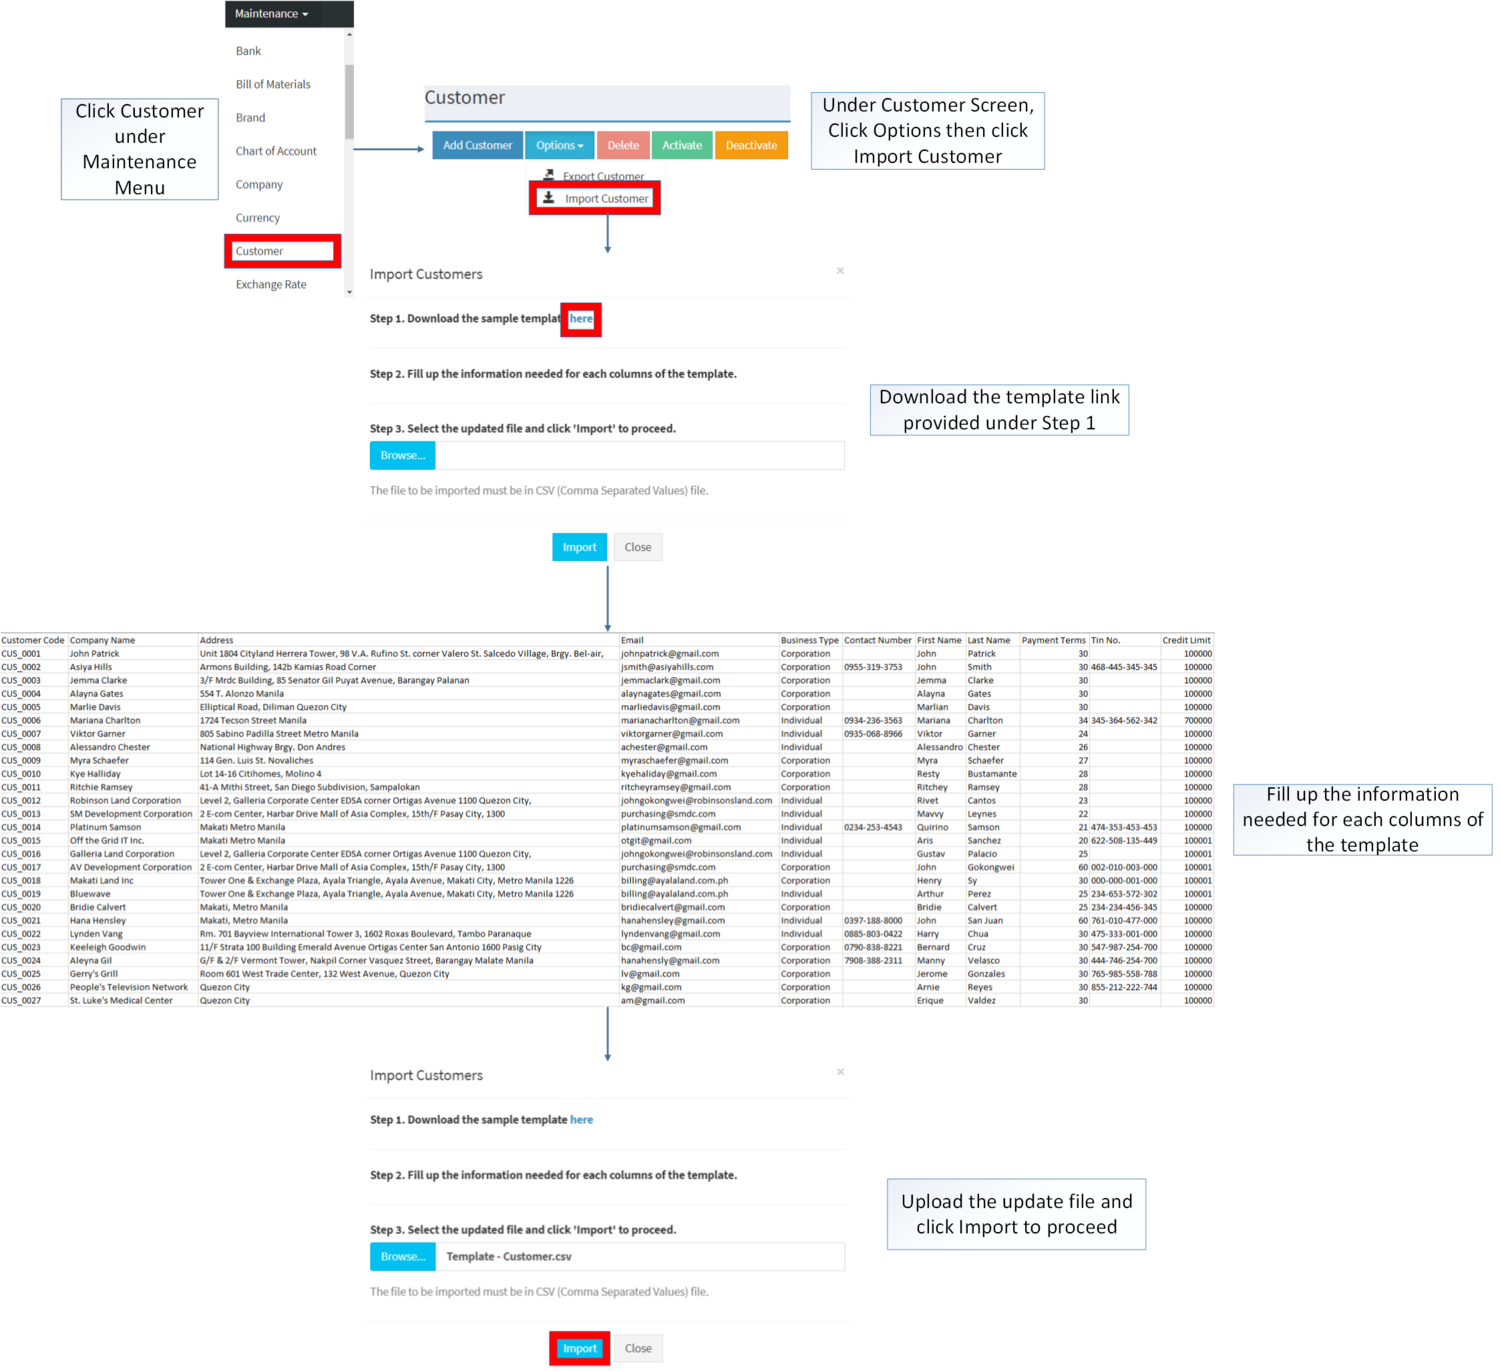
Importing Customer
- Click Maintenance then click Customer
- Under Customer Screen, click Options then click Import Customer
- Download the Template provided in Step 1.
- Fill up the information needed for each column of the template.
- Upload the updated file then click Import to proceed
Supplier
Supplier maintenance screen allows the user to configure and add Supplier to be assigned when creating purchasing transactions
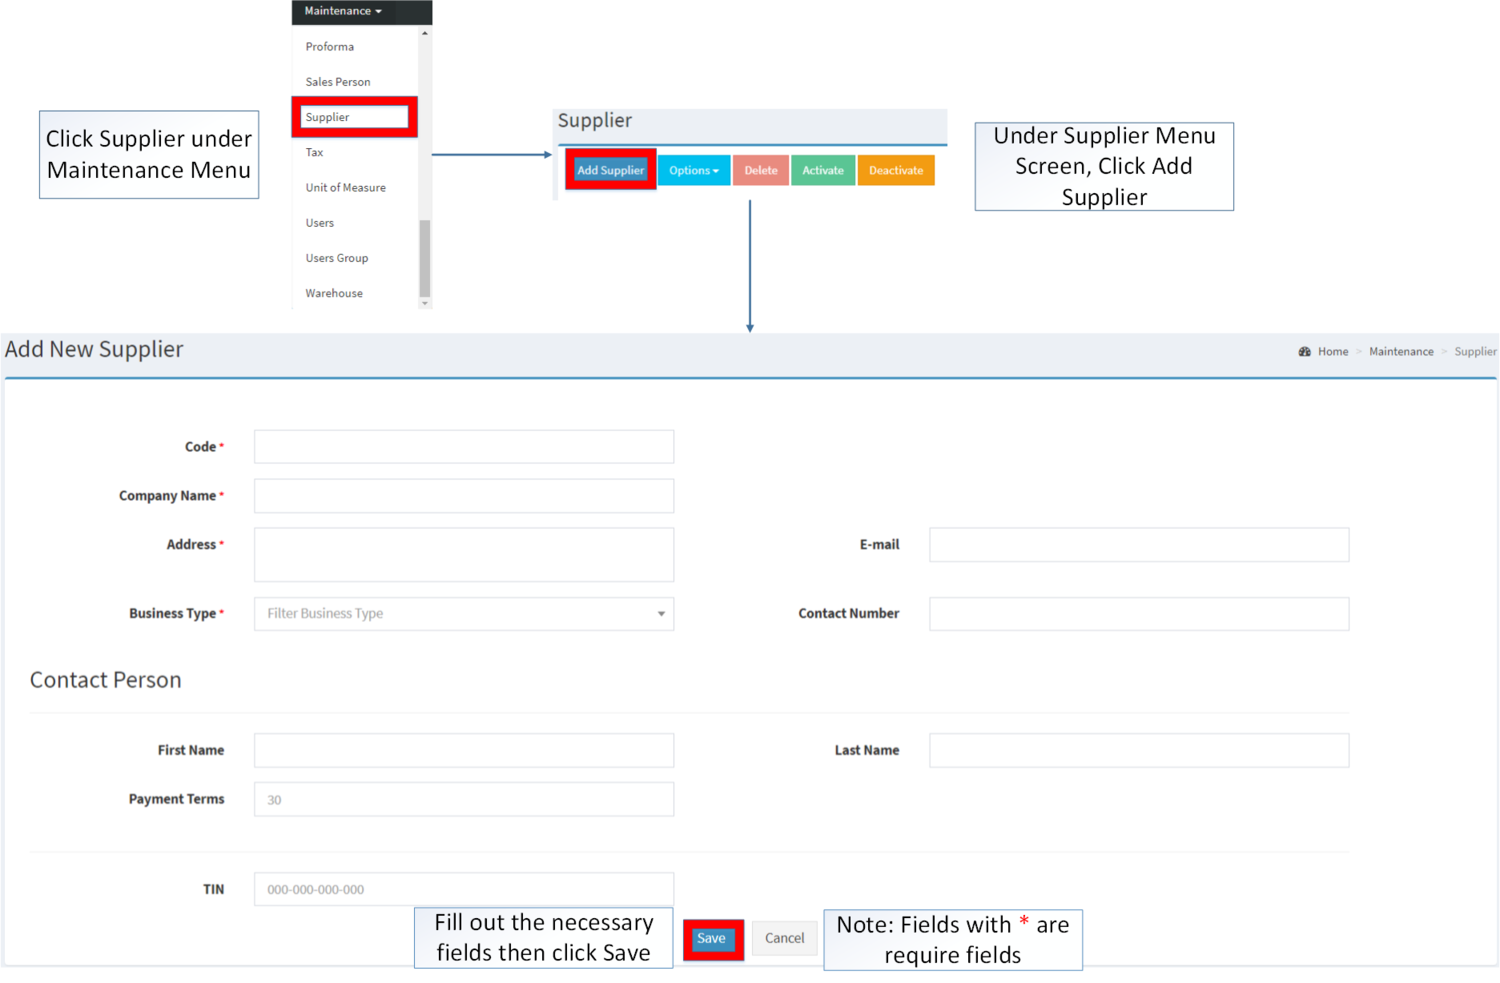
Creating Supplier
- Click Supplier under Maintenance Menu
- Under Supplier Menu Screen, click Add Supplier
- Fill up the required fields then Click Save. Notes: Fields with * are required to be filled up.
Importing Supplier
- Click Supplier under Maintenance Menu
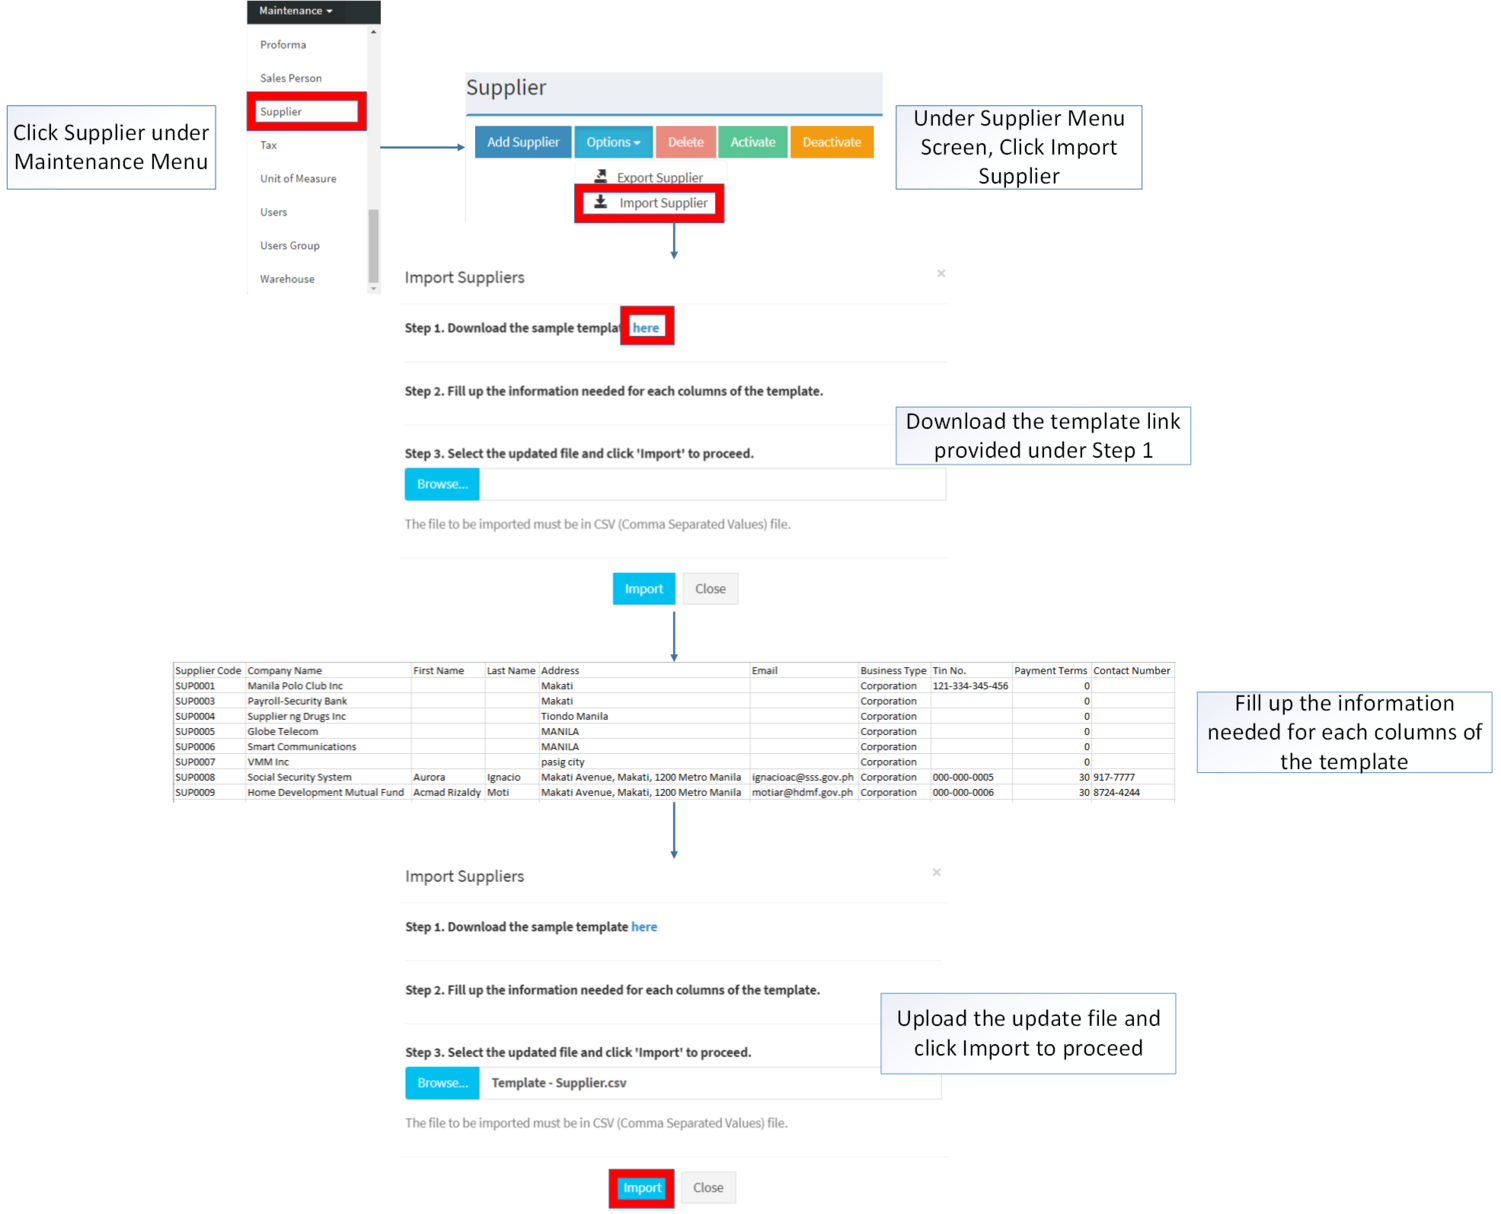
- Under Supplier Menu, click Options then click Import Supplier
- Download the Template provided in Step 1.
- Fill up the information needed for each column of the template.
- Upload the updated template then click Import to proceed
Price List
Price List maintenance screen allows the users to configure the prices of the items to be used in their transaction
Creating Price List
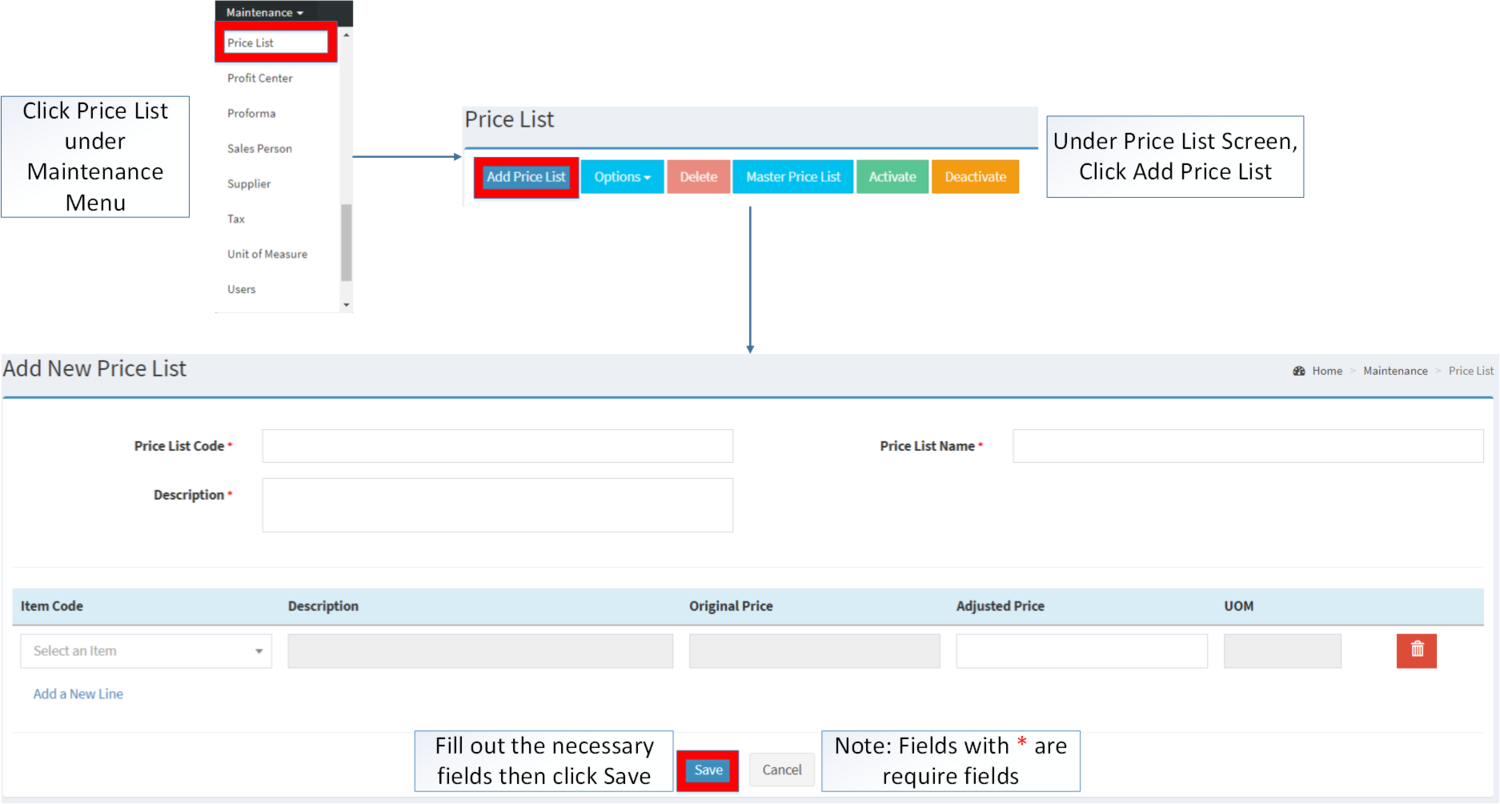
- Click Price List under Maintenance Menu
- Under Price List Screen, click Add Price List
- Fill up the required fields then Click Save. Notes: Fields with * are required to be filled up.
Importing Price List
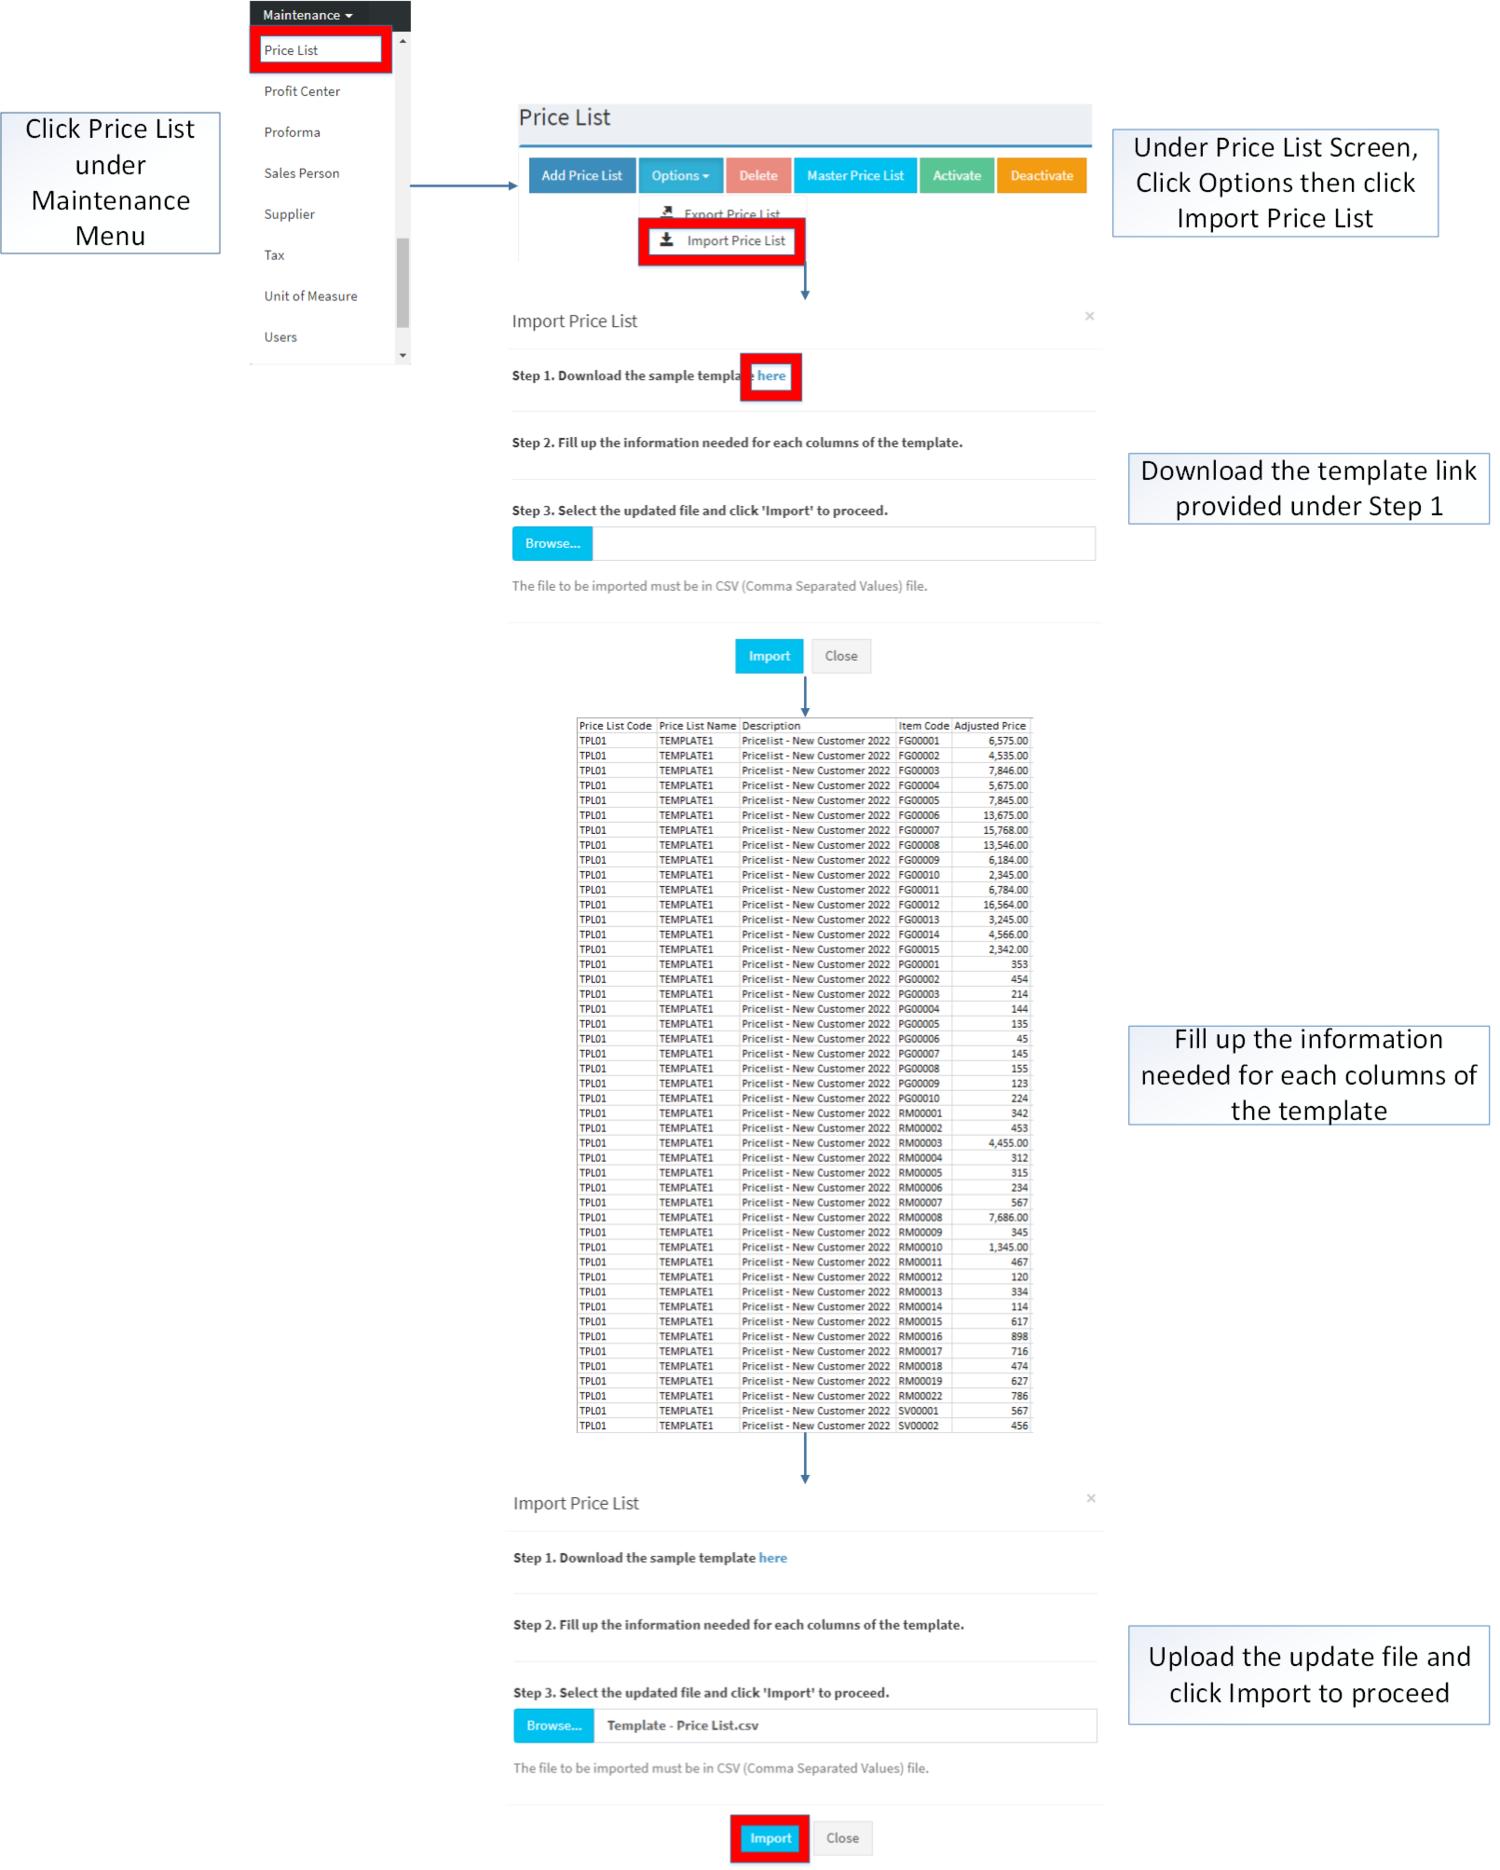
- Click Price List under Maintenance Menu
- Under Price List Menu, click Options then click Import Price List
- Download the Template provided in Step 1.
- Fill up the information needed for each column of the template.
- Upload the updated template then click Import to proceed
Adjusting Master Price List
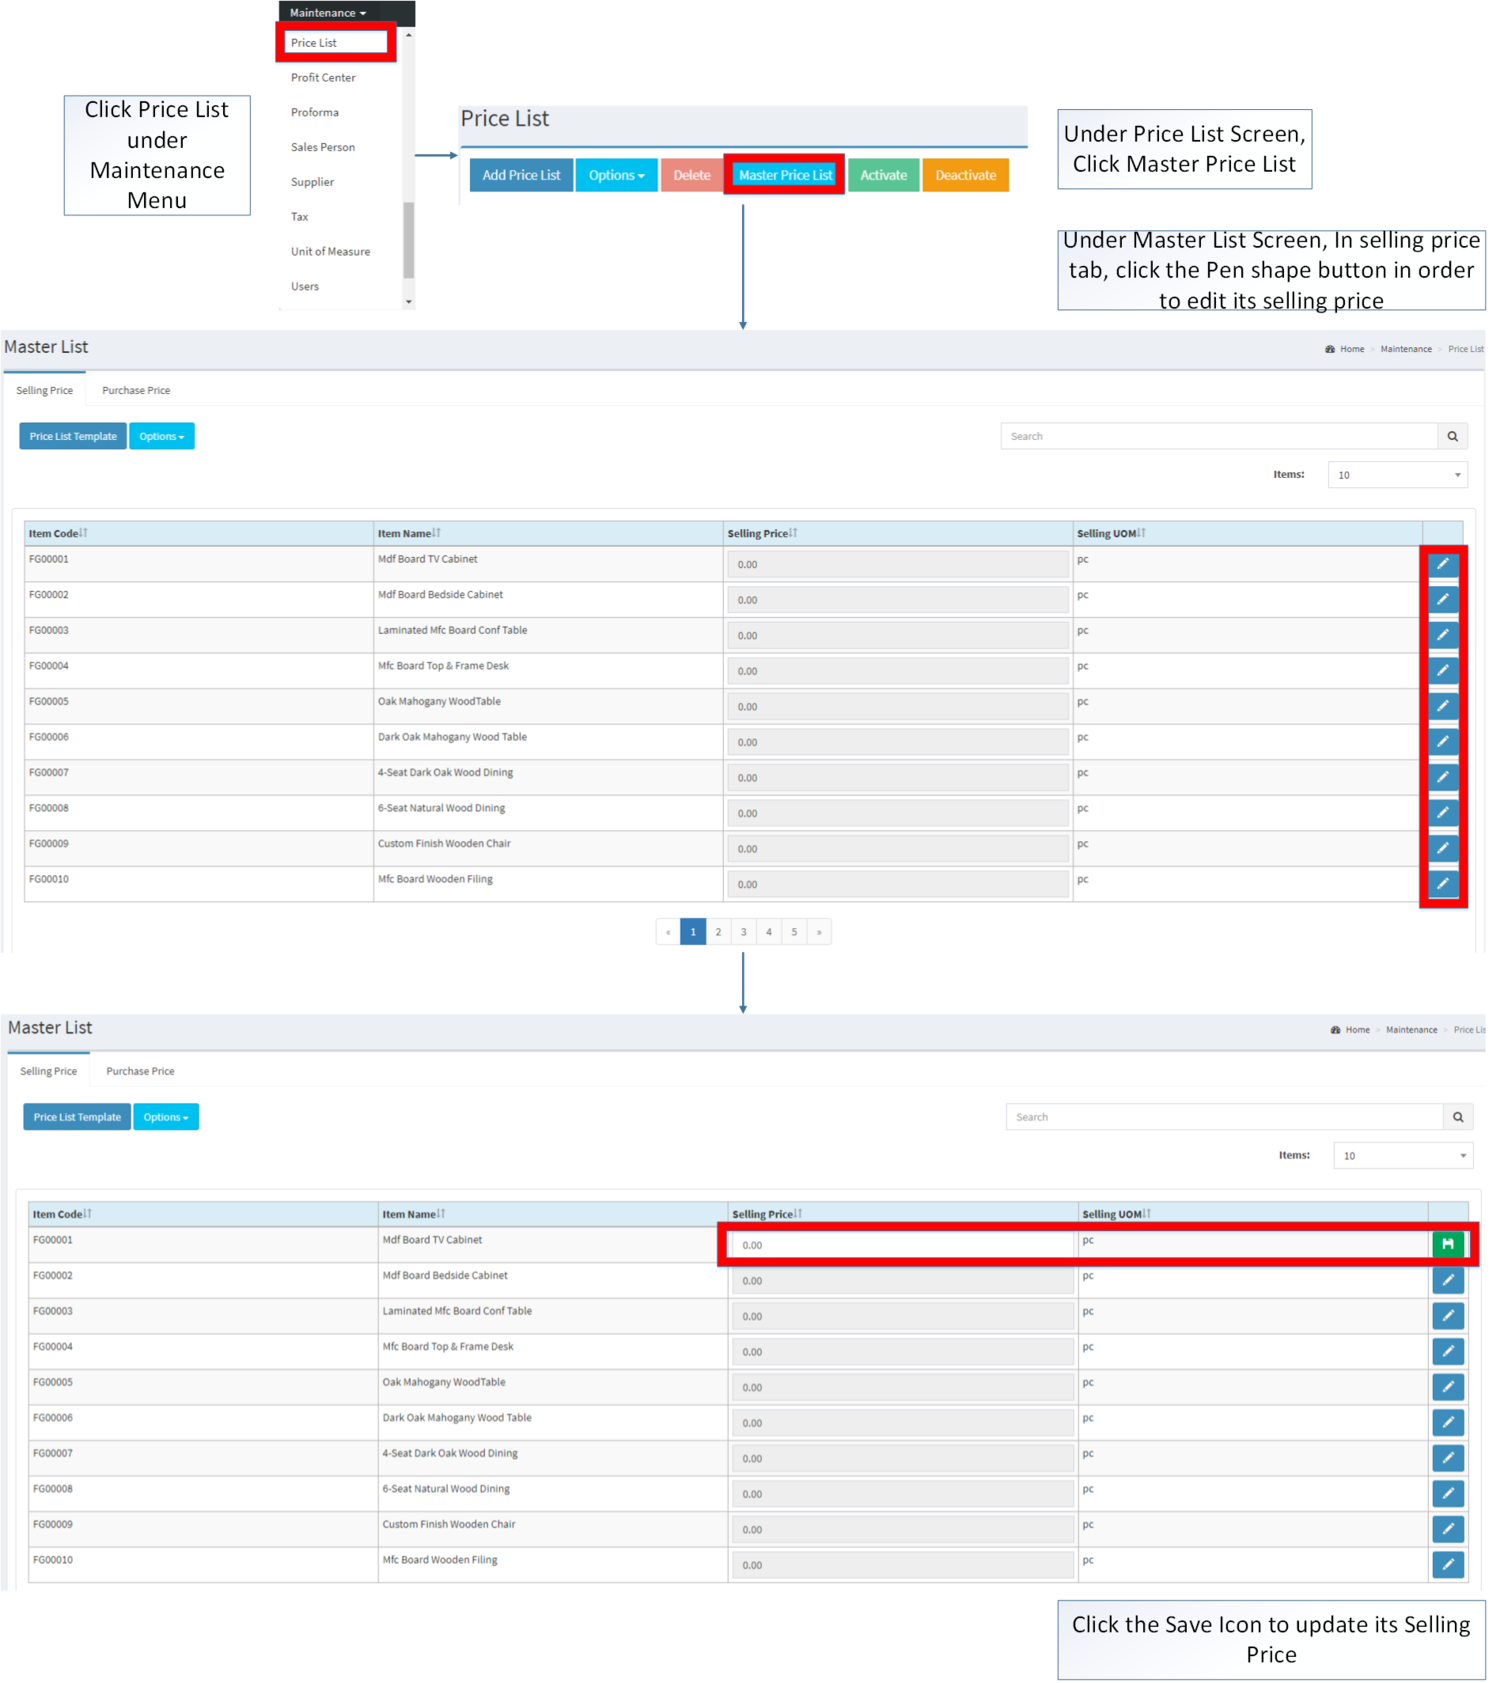
- Click Price List under Maintenance Menu
- Under Price List Menu, Click Master Price List
- Under Master List Menu, In selling price tab, Click the Pen shape button in order to edit its selling price
- Click the Save Icon to Update the Prices
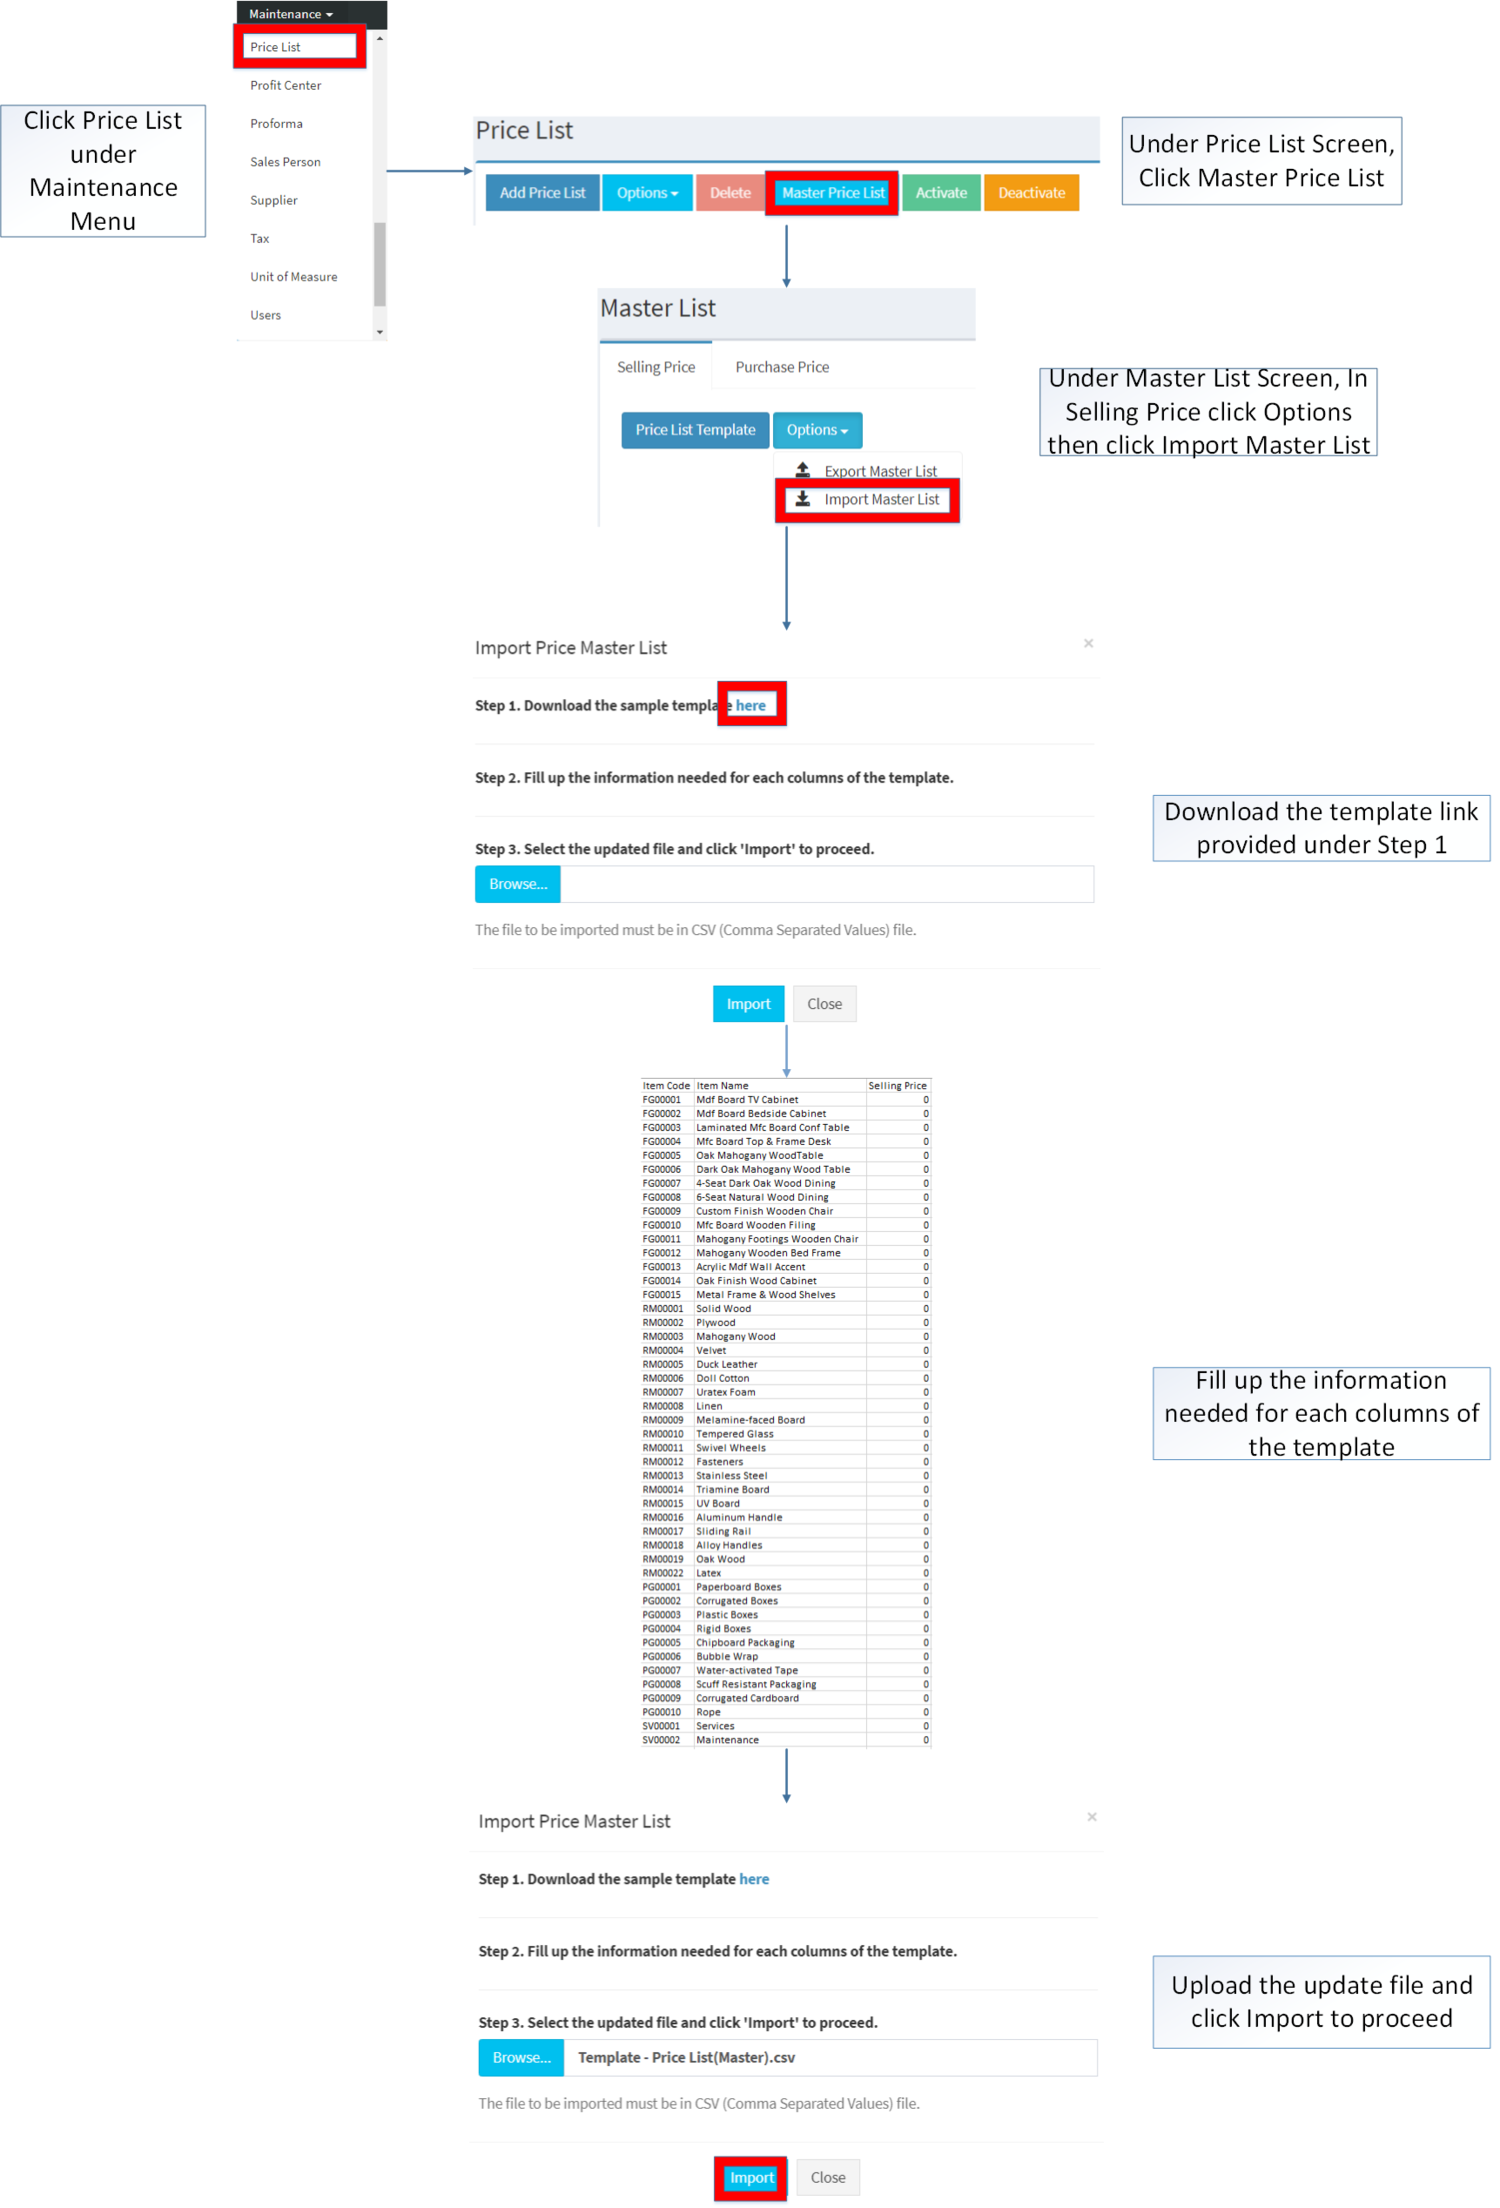
Importing Master Price List
- Click Price List under Maintenance Menu
- Under Price List Screen, click Master Price List
- Under Master List Menu, click Options then click Import Master List
- Download the Template provided in Step 1.
- Fill up the information needed for each column of the template.
- Upload the updated file then click Import to proceed
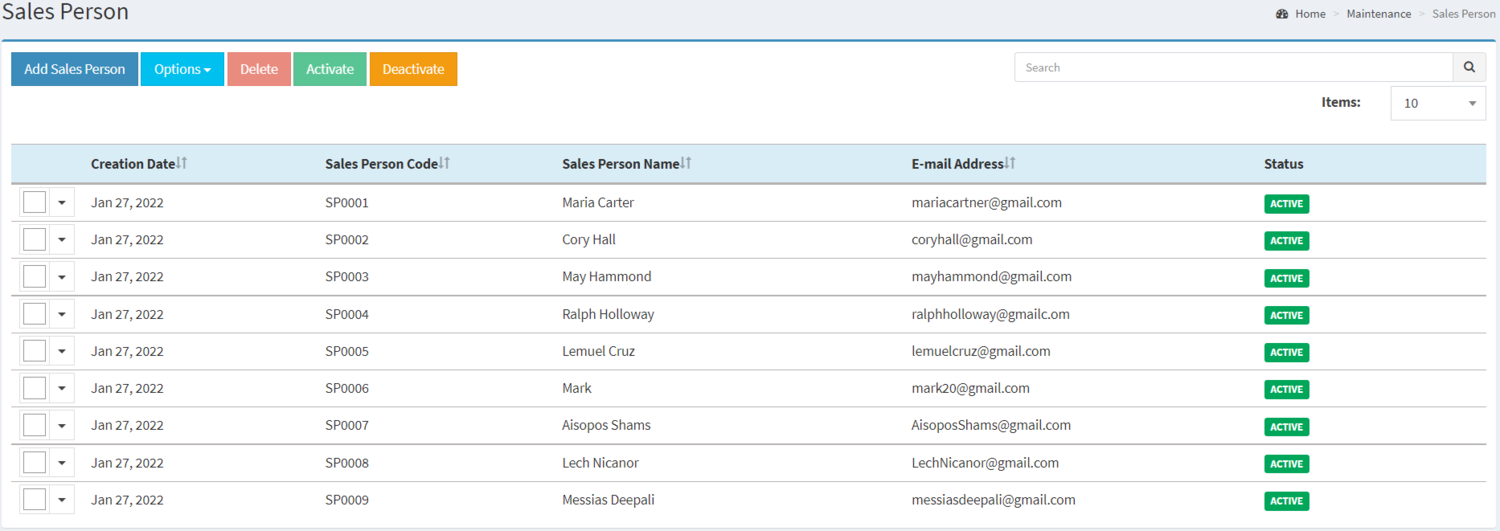
Sales Person
Sales Person maintenance screen allows the user to configure and add Sales Person to be assigned on the transactions.
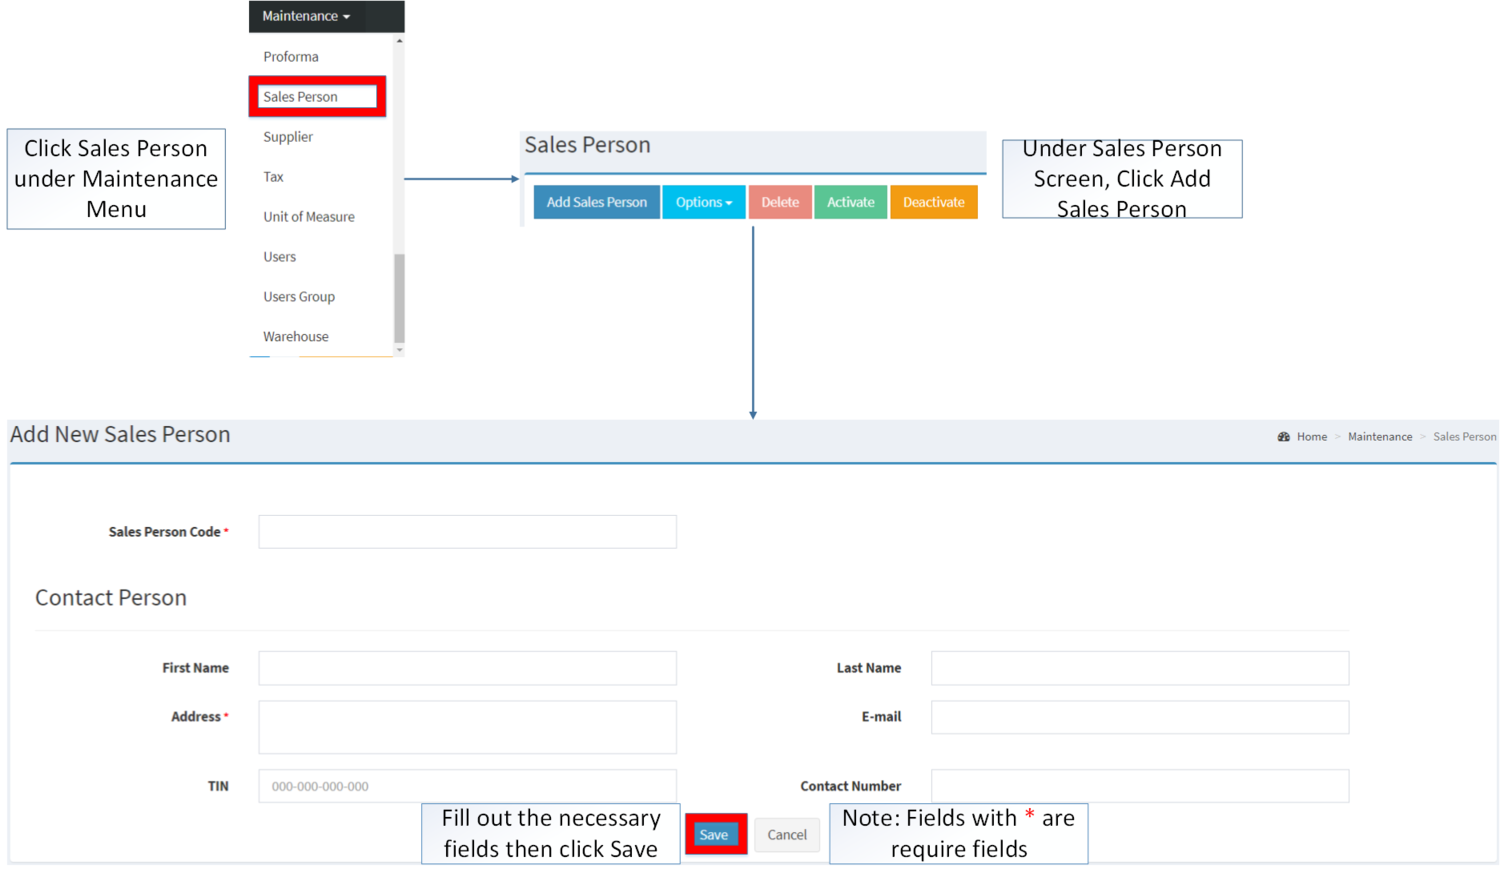
Creating Sales Person
- Click Sales Person under Maintenance Menu
- Under Sales Person Screen, click Add Sales Person
- Fill up the required fields then Click Save. Notes: Fields with * are required to be filled up.
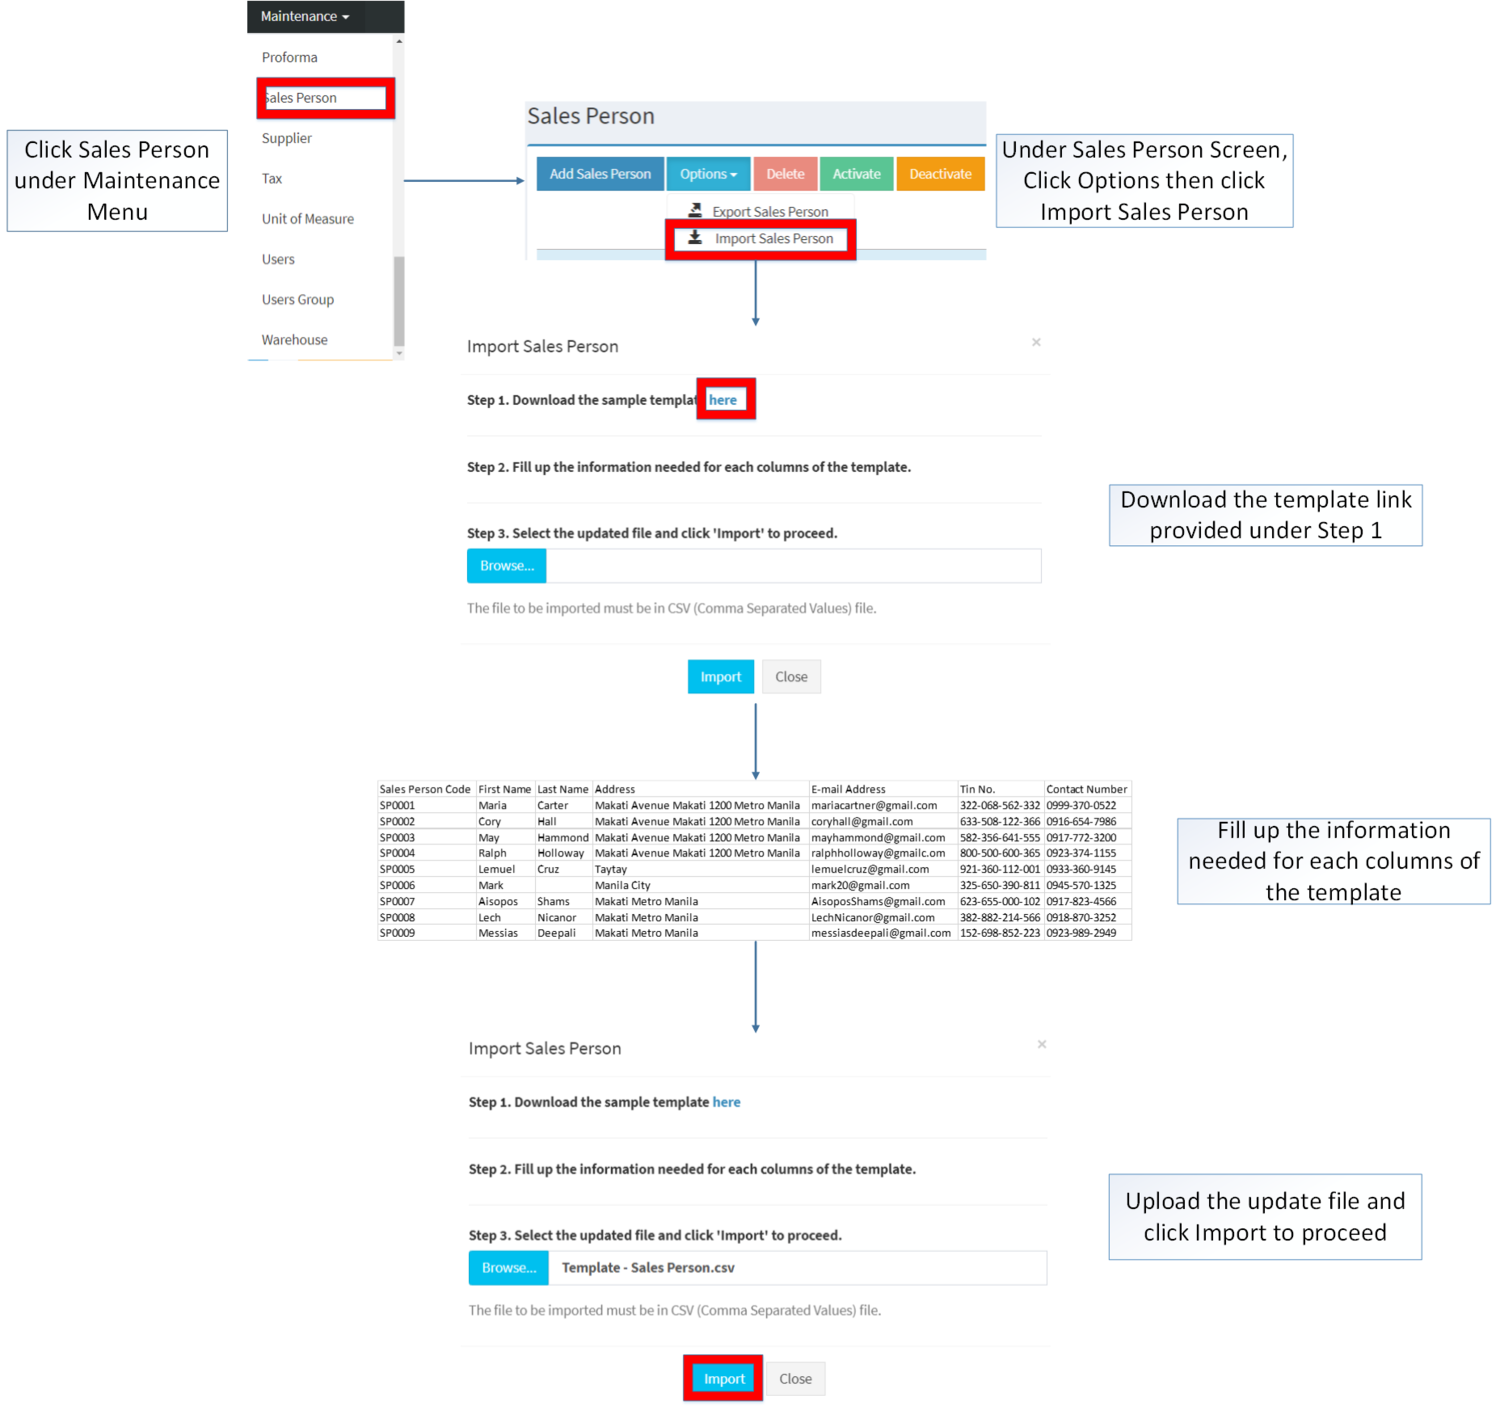
Importing Sales Person
- Click Sales Person under Maintenance Menu
- Under Sales Person Screen, click Options then choose Import Sales Person
- Download the Template provided in Step 1.
- Fill up the information needed for each column of the template.
- Upload the updated file then click Import to proceed
Currency
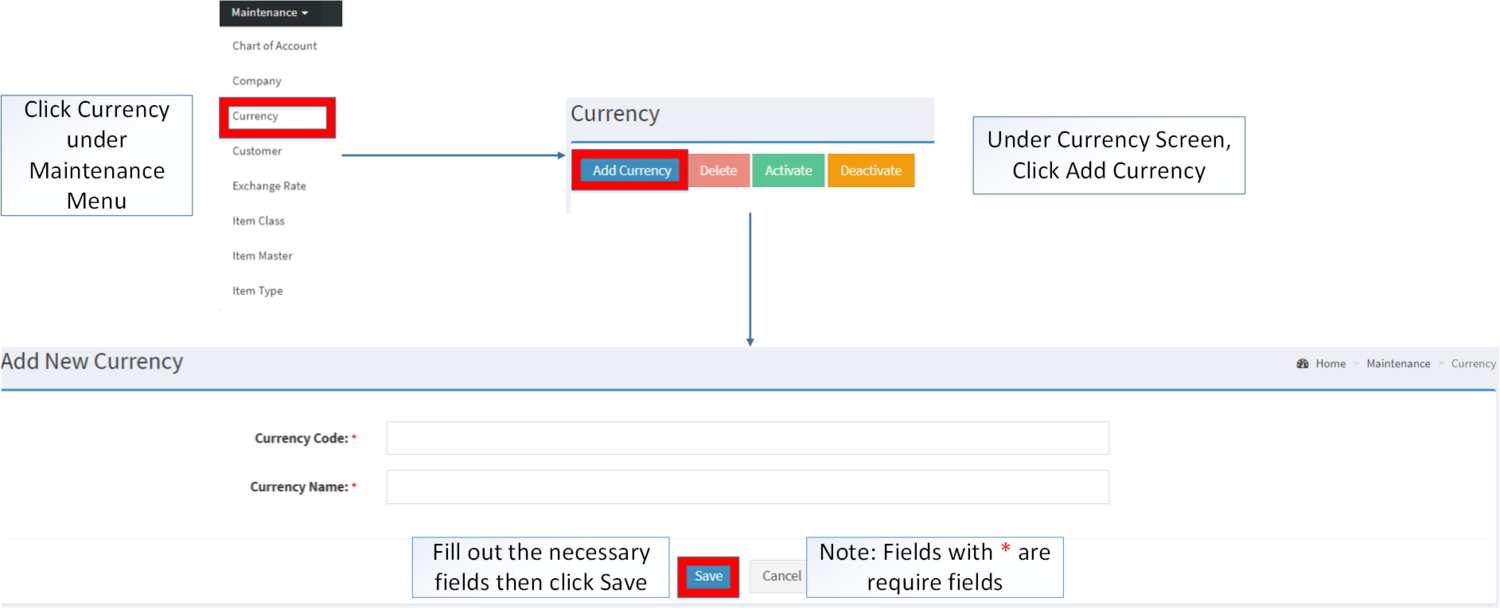
The Currency Maintenance screen allows users to configure and add the currencies that will be used on their transaction.
Creating Currency
- Click Currency under Maintenance Menu
- Under Currency Screen, click Add Currency
- Fill up the required fields then Click Save. Notes: Fields with * are required to be filled up.
Exchange Rate
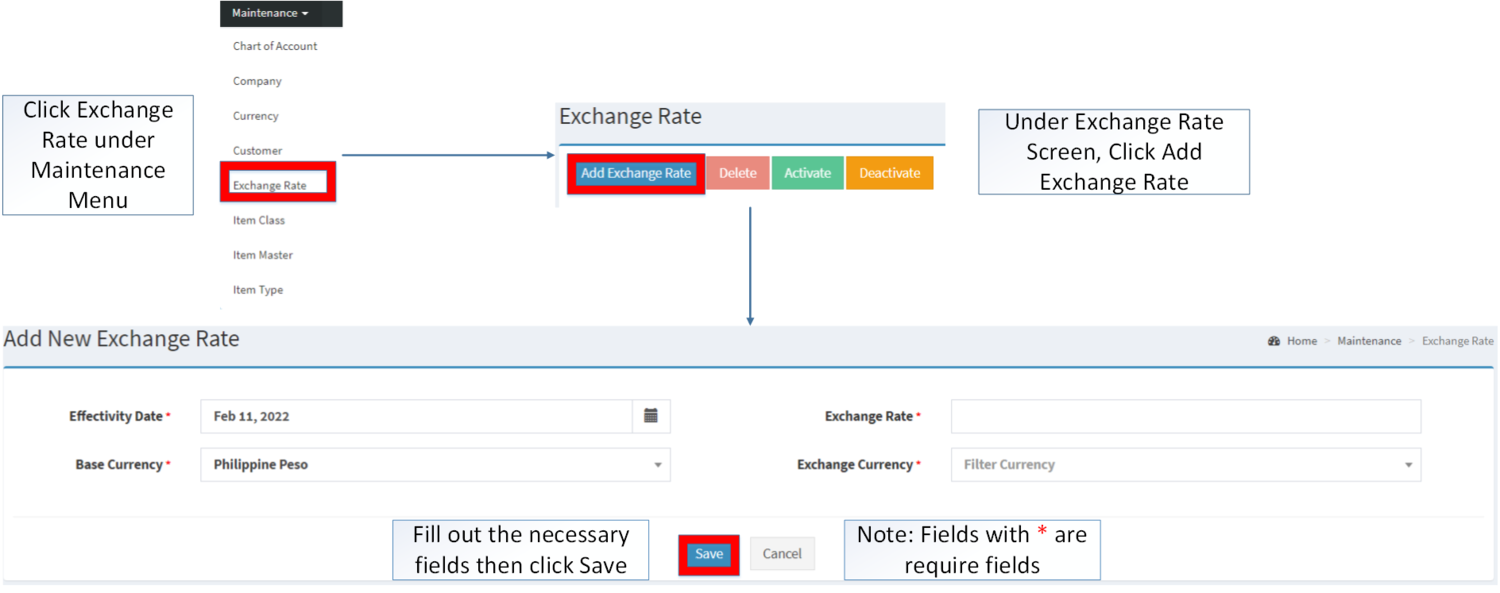
The Exchange Rate maintenance screen allows the users to configure the exchange rate from the base currency to a foreign currency.
Creating Exchange Rate
- Click Exchange Rate under Maintenance Menu
- Under Exchange Rate Screen, click Add Exchange Rate
- Fill up the required fields then Click Save. Notes: Fields with * are required to be filled up.
Proforma
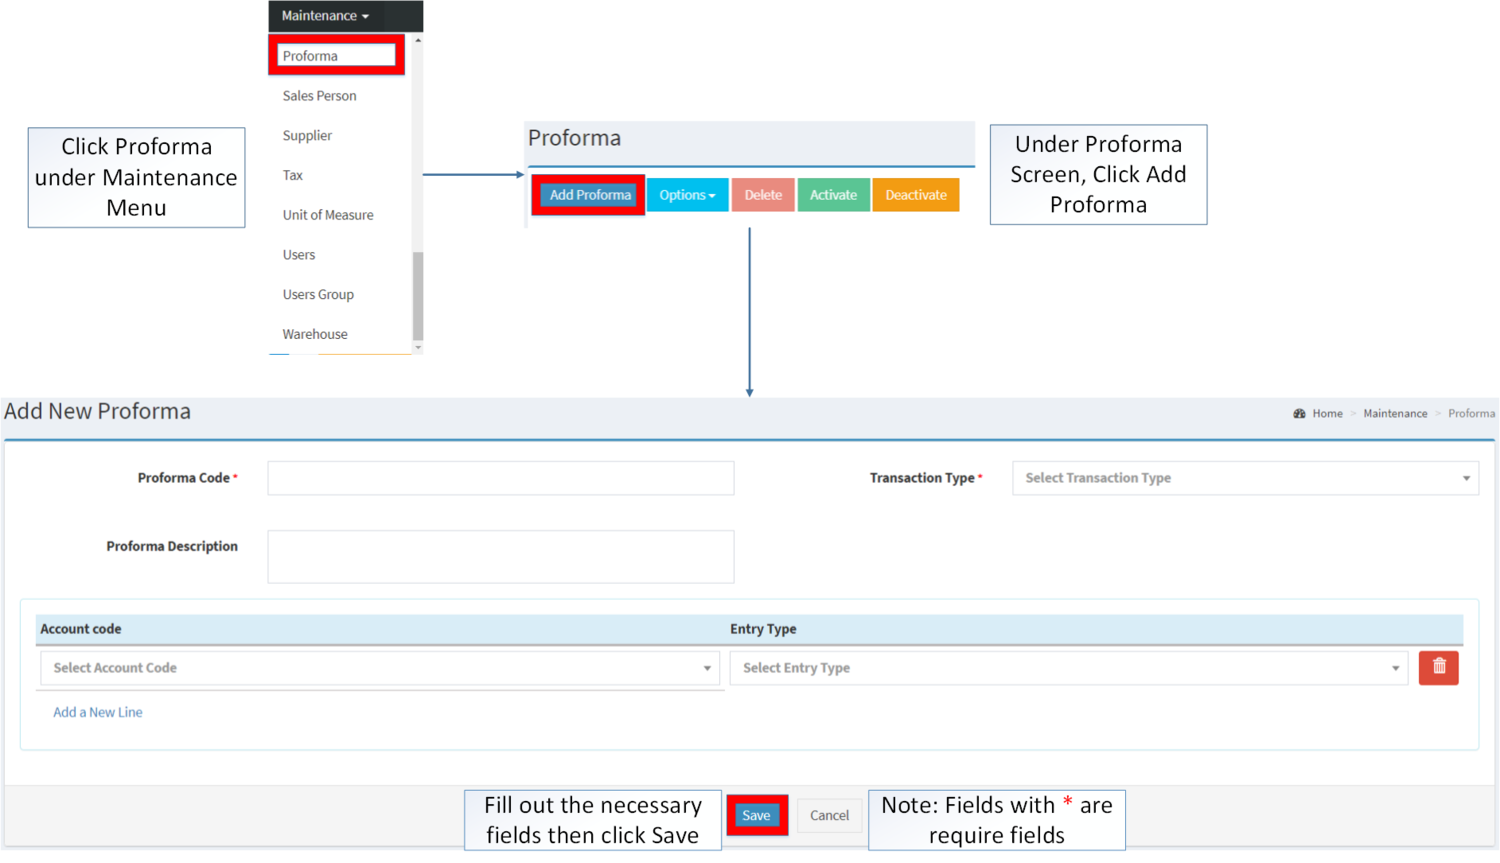
The Proforma maintenance screen allows the user to configure proforma entries that can be used in transactions such as Accounts Payable, Accounts Receivable, etc.
Creating Proforma
- Click Proforma under Maintenance Menu
- Under Proforma Screen, click Add Proforma
- Fill up the required fields then Click Save. Notes: Fields with * are required to be filled up.
Bank
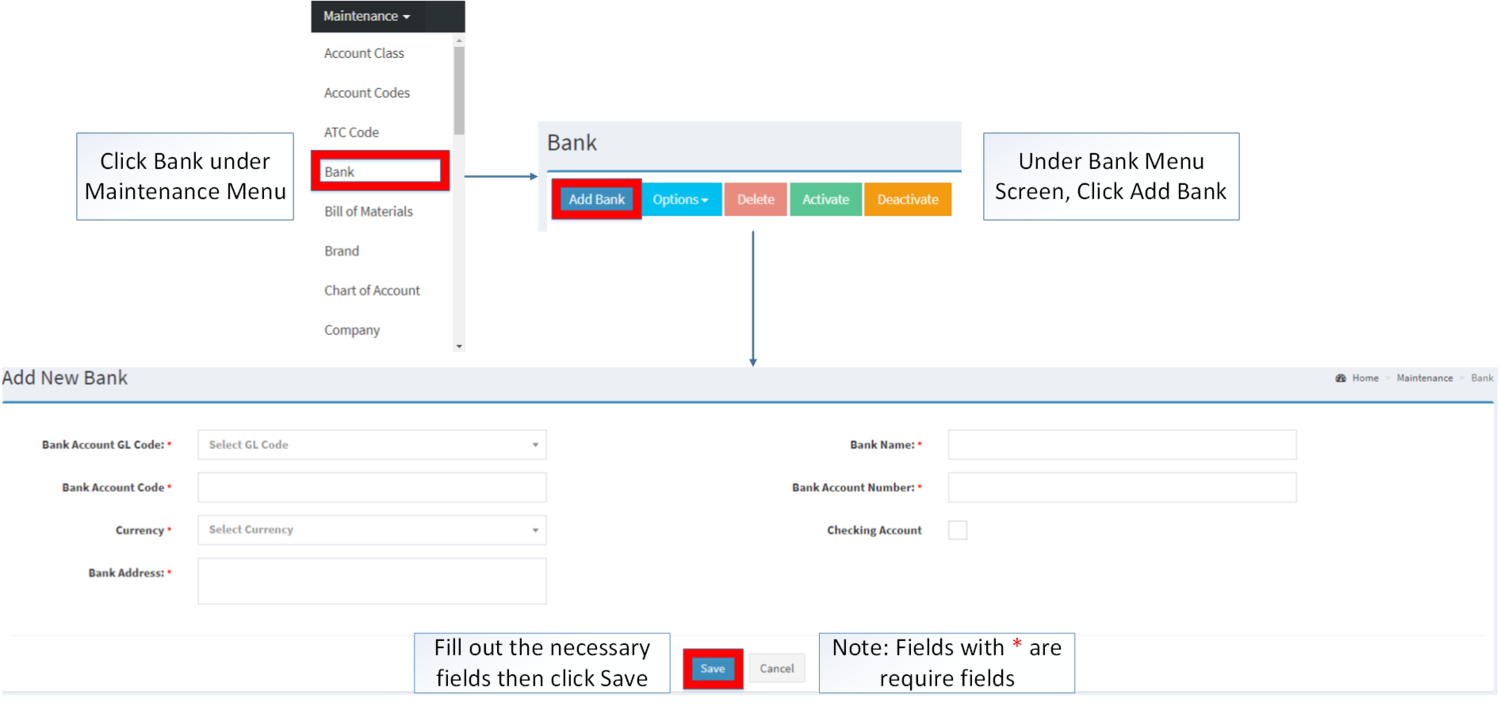
The Bank maintenance screen allows users to configure and add the Bank that they will use in a transaction.
Creating Bank
- Click Bank under Maintenance Menu
- Under Bank Menu Screen, click Add Bank
- Fill up the required fields then Click Save. Notes: Fields with * are required to be filled up.
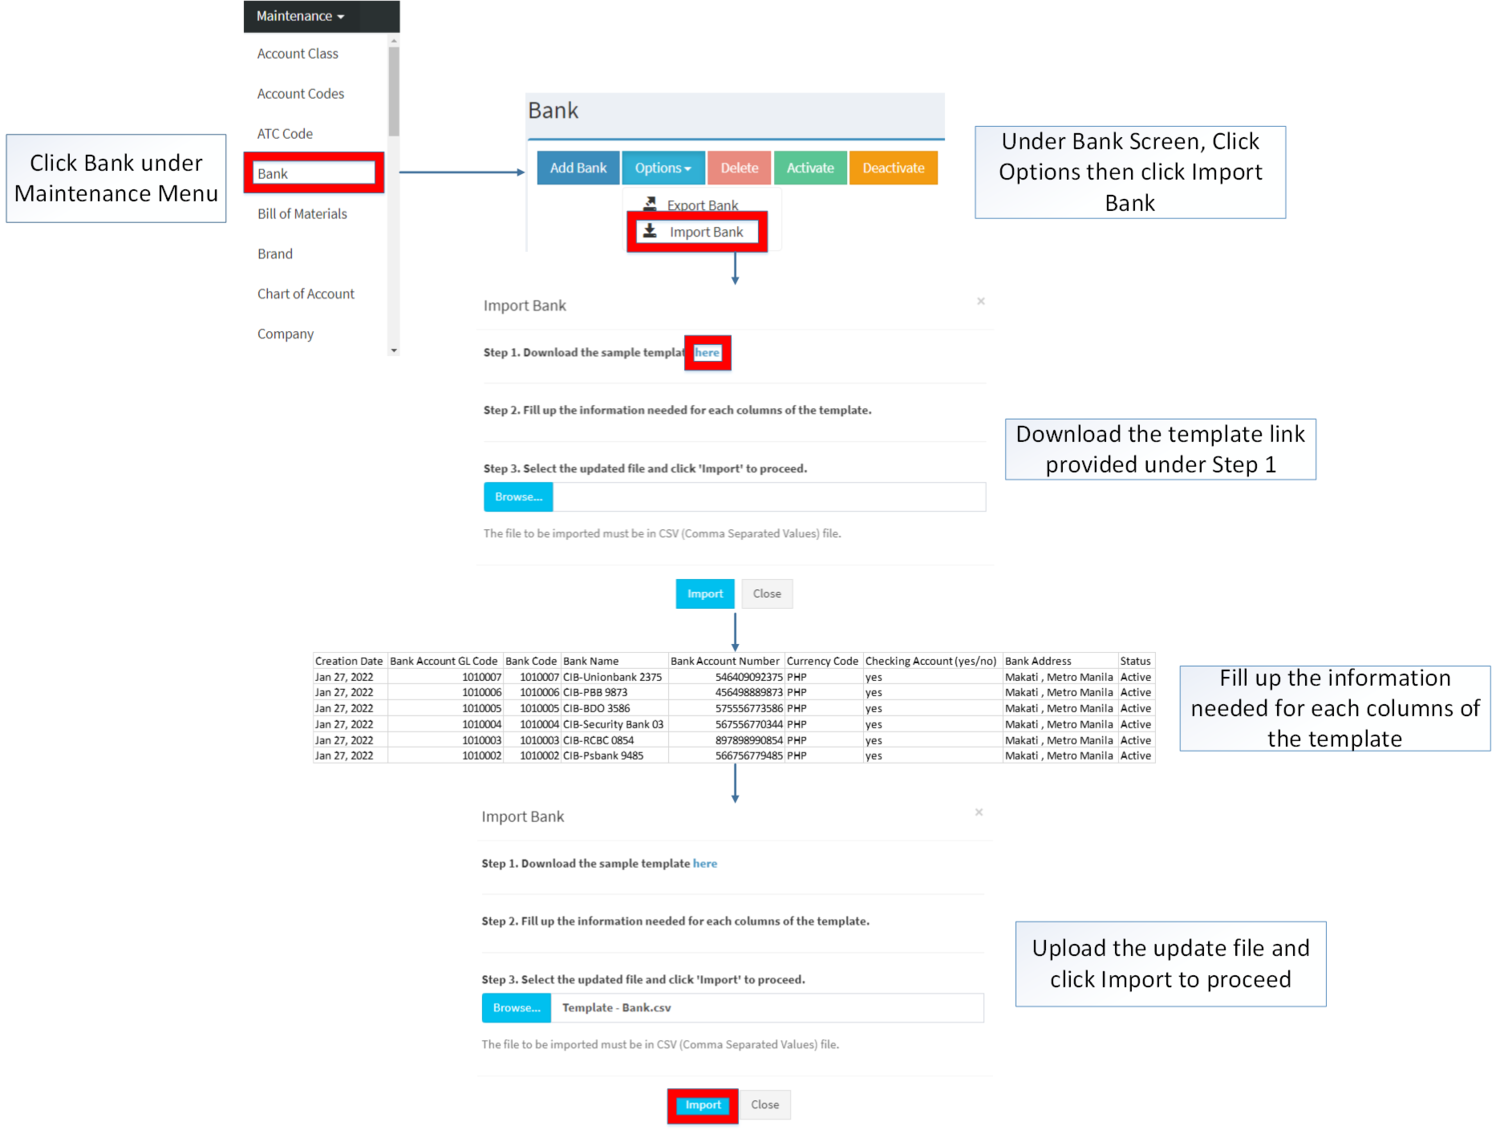
Importing Bank
- Click Bank under Maintenance Menu
- Under Bank Menu, click Options then click Import Bank
- Download the Template link provided in Step 1.
- Fill up the information needed for each column of the template.
- Upload the updated template then click Import to proceed
Beginning Balance Setup
Requirements
The user should set up the following modules in order to Import Beginning Balances.
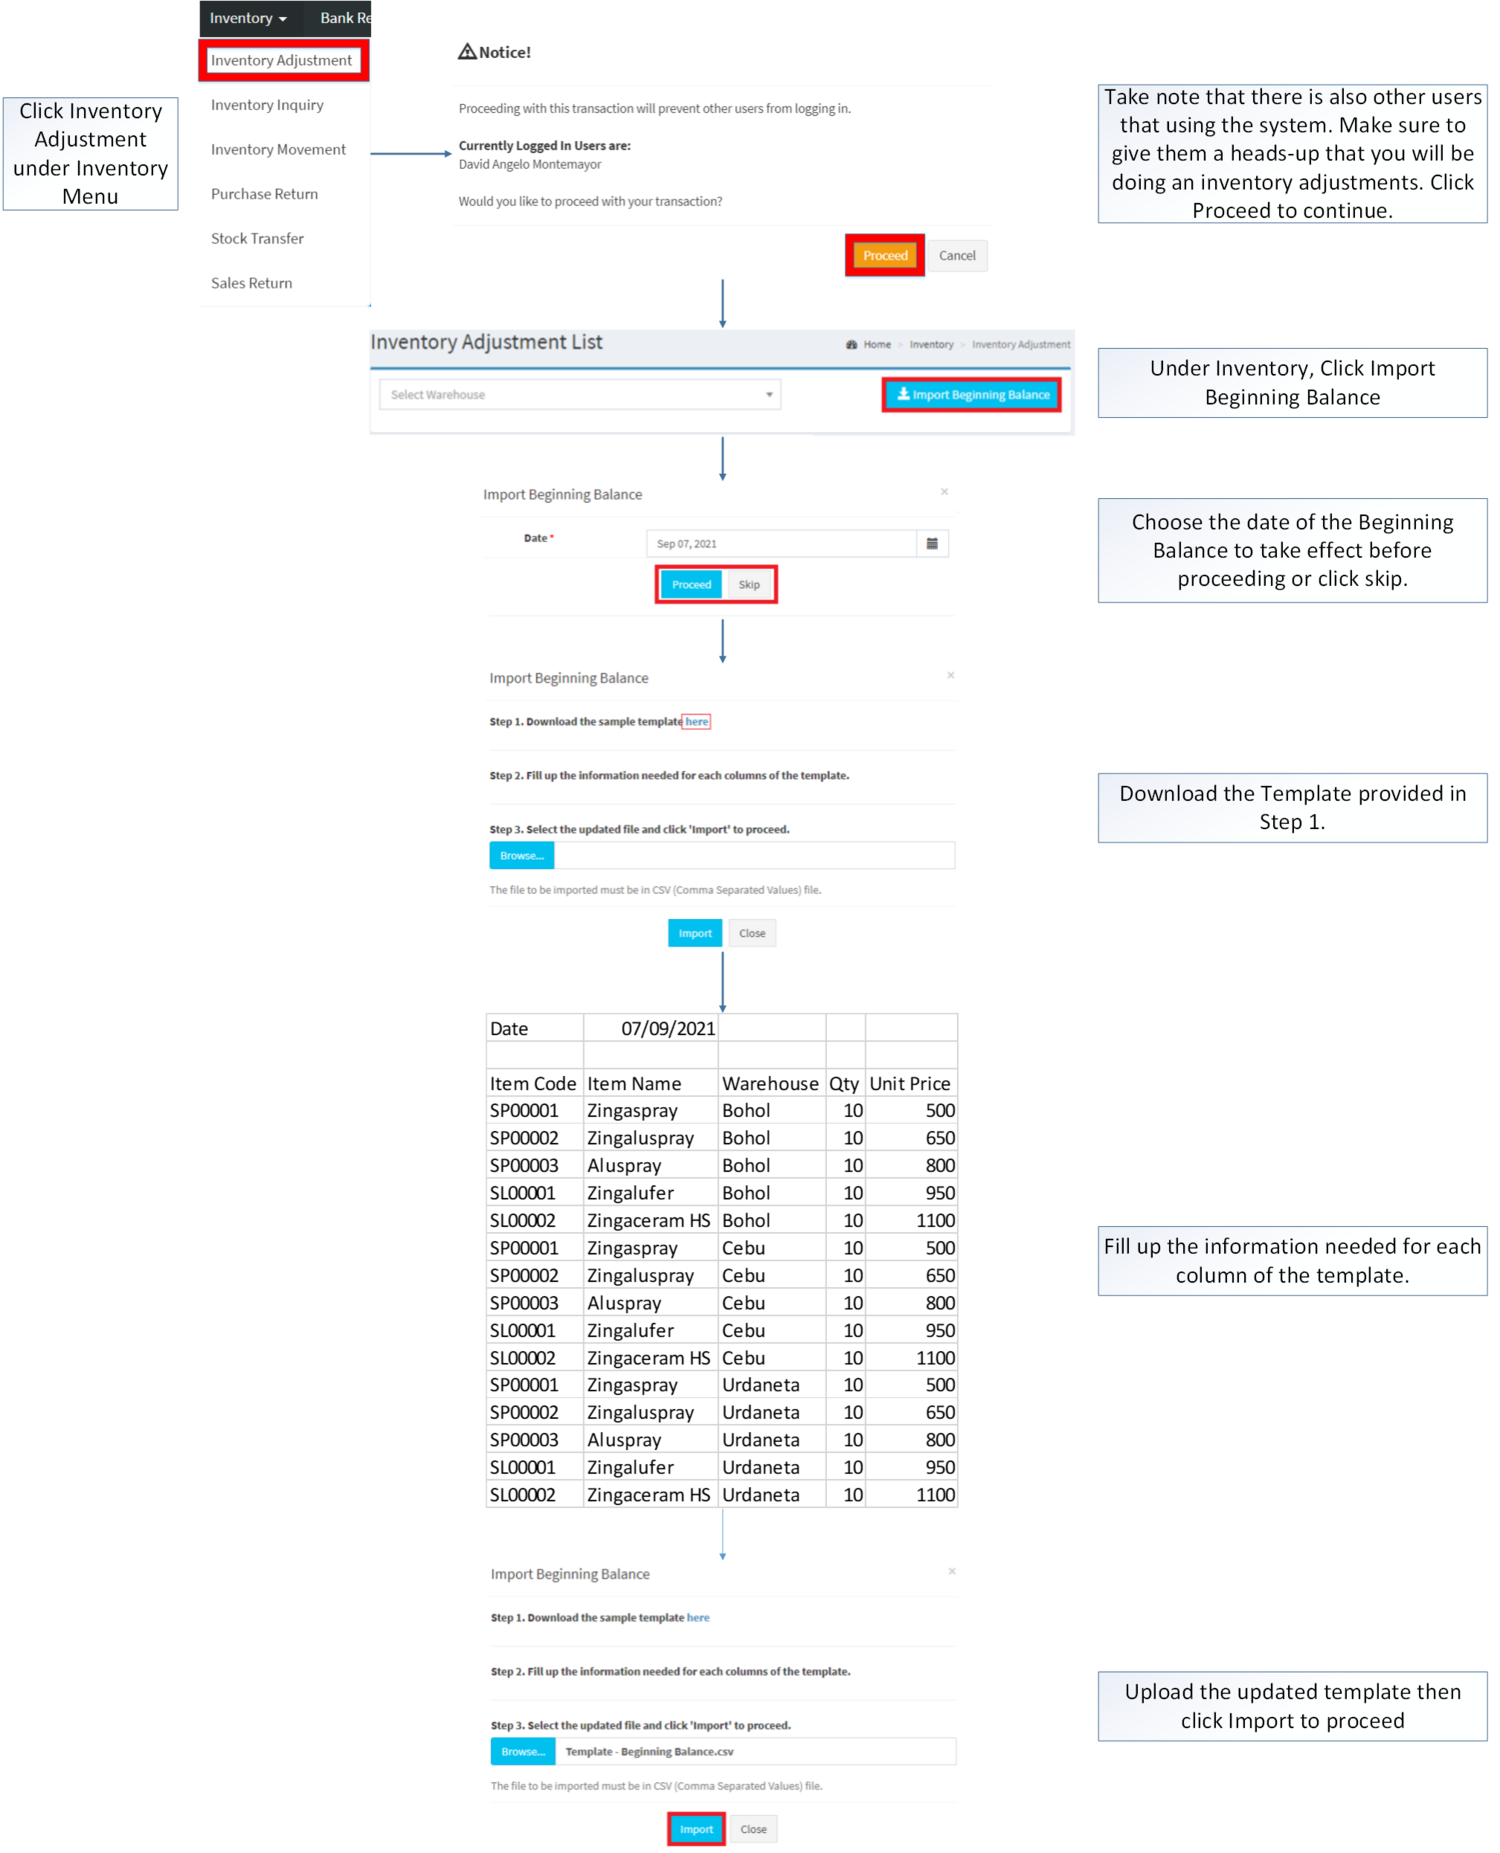
Import Beginning Balance
- Click Inventory Adjustment under Inventory Menu
- Take note that there is also other users that using the system. Make sure to give them a heads-up that you will be doing an inventory adjustments. Click Proceed to continue.
- Under Inventory, Click Import Beginning Balance
- Choose the date of the Beginning Balance to take effect before proceeding or click skip.
- Download the Template provided in Step 1.
- Fill up the information needed for each column of the template.
- Upload the updated template then click Import to proceed
Notes:
- Import Beginning Balance will only be available if there are no transaction records done by the user.
| Modules | |
|---|---|
| Maintenance | Maintenance | Users Group | Position | Users | Chart of Account | Account Codes | ATC Code | Tax | Unit of Measure | Item Class | Item Type | Brand | Item Master | Warehouse | Customer | Supplier | Price List | Sales Person | Currency | Exchange Rate | Proforma | Bank |
| Inventory | Inventory Adjustment |

