You are viewing an old version of this page. Return to the latest version.
Difference between revisions of "Sales Order"
(Tag: Visual edit) |
(Tag: Visual edit) |
||
| Line 3: | Line 3: | ||
</div> | </div> | ||
==Sales Order== | ==Sales Order== | ||
| − | This module allows the user to create a Sales Order that the | + | This module allows the user to create a Sales Order that the [[Customer]] wants to buy. This includes the Quantity, [[Item Master|Item]], Price and the status of the order if it is Pending, Partial, Completed or Cancelled. |
=====Requirements before using Sales Order===== | =====Requirements before using Sales Order===== | ||
| Line 38: | Line 38: | ||
=====<span class="mw-headline" id="Steps_on_how_to_Add_a_Quotation" style="box-sizing: inherit;">Creating a Sales Order</span>===== | =====<span class="mw-headline" id="Steps_on_how_to_Add_a_Quotation" style="box-sizing: inherit;">Creating a Sales Order</span>===== | ||
| − | #Under Sales Order | + | #Click [[Sales Order]] under Sales Menu |
| − | #Fill | + | #Under Sales Order Screen, Click Add Sales Order. |
| − | + | #Fill out the necessary fields then click Save. Note: Fields with * are required fields | |
[[File:Sales - Sales Order - Add.png|border|center|1500x1500px]] | [[File:Sales - Sales Order - Add.png|border|center|1500x1500px]] | ||
| Line 139: | Line 139: | ||
**This can be seen in [[Warehouse]] Maintenance Module. | **This can be seen in [[Warehouse]] Maintenance Module. | ||
| − | ===== <span class="mw-headline" id="Editing_Sales_Order" style="box-sizing: inherit;">Viewing Sales Order</span> ===== | + | =====<span class="mw-headline" id="Editing_Sales_Order" style="box-sizing: inherit;">Viewing Sales Order</span>===== |
| − | # Click Sales Order under Sales Menu | + | #Click [[Sales Order]] under Sales Menu |
| − | # Under Sales Order Screen, Select a record that needs to view its details. Click the drop-down arrow then click View. | + | #Under Sales Order Screen, Select a record that needs to view its details. Click the drop-down arrow then click View. |
| − | # The user has an option to Edit the Sales Order upon viewing it | + | #The user has an option to Edit the Sales Order upon viewing it |
[[File:Sales - Sales Order - View.png|border|center|1500x1500px]] | [[File:Sales - Sales Order - View.png|border|center|1500x1500px]] | ||
| Line 149: | Line 149: | ||
=====Editing Sales Order===== | =====Editing Sales Order===== | ||
| − | #Click Sales Order under Sales Menu | + | #Click [[Sales Order]] under Sales Menu |
| − | # | + | #Select a Sales Order that needs to update its details. Click the drop-down arrow then Click Edit |
#Update the necessary fields then Click Save | #Update the necessary fields then Click Save | ||
| − | |||
[[File:Sales - Sales Order - Edit.png|border|center|1500x1500px]] | [[File:Sales - Sales Order - Edit.png|border|center|1500x1500px]] | ||
<br /> | <br /> | ||
| Line 250: | Line 249: | ||
*Tax should on '''ACTIVE''' status when using it upon creating or editing a transaction. | *Tax should on '''ACTIVE''' status when using it upon creating or editing a transaction. | ||
**This can be seen in [[Tax]] Maintenance Module | **This can be seen in [[Tax]] Maintenance Module | ||
| − | **Past Transactions with '''INACTIVE''' Tax prior to its deactivation can still be used. | + | **Past Transactions with '''INACTIVE''' Tax prior to its deactivation can still be used. |
*use should be on '''ACTIVE''' status when using it upon creating or editing a transaction. | *use should be on '''ACTIVE''' status when using it upon creating or editing a transaction. | ||
**This can be seen in [[Warehouse]] Maintenance Module. | **This can be seen in [[Warehouse]] Maintenance Module. | ||
| Line 257: | Line 256: | ||
=====<span class="mw-headline" id="Printing_Sales_Quotation_Record" style="box-sizing: inherit;">Printing Sales Order Record</span>===== | =====<span class="mw-headline" id="Printing_Sales_Quotation_Record" style="box-sizing: inherit;">Printing Sales Order Record</span>===== | ||
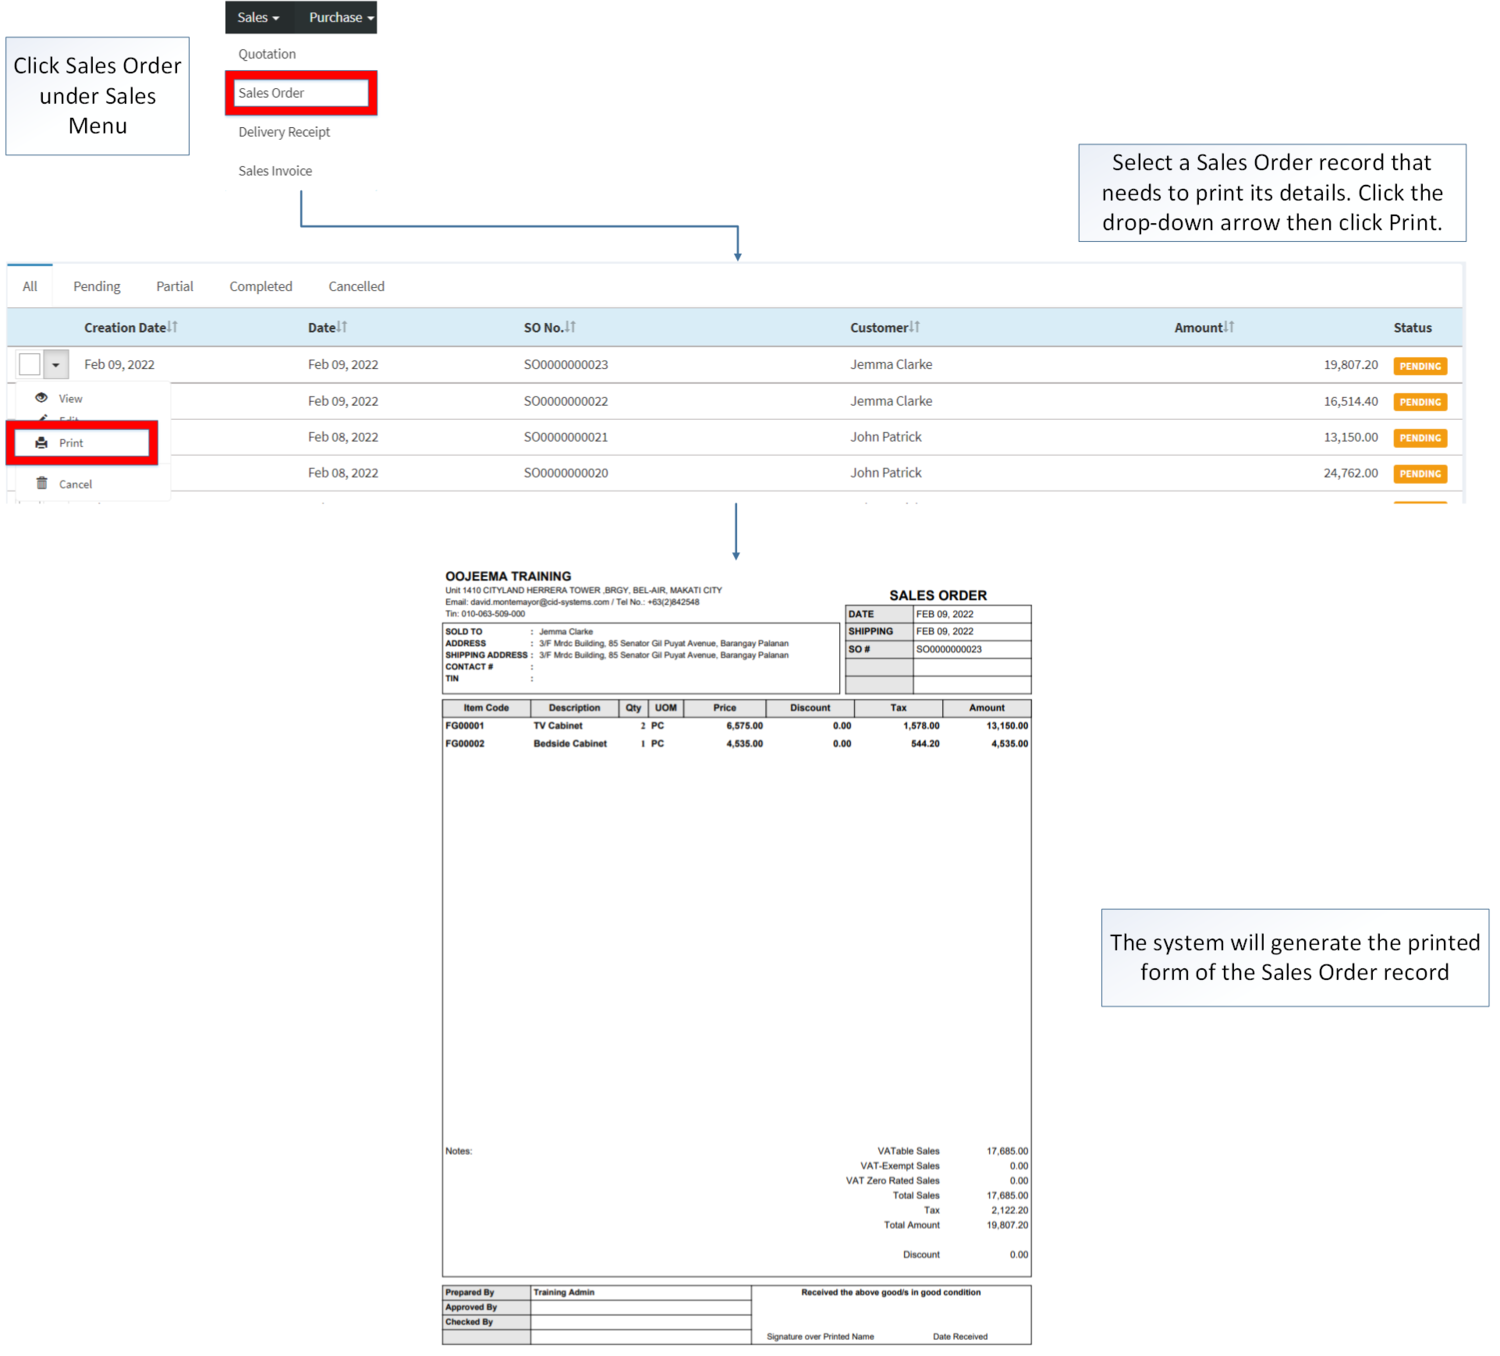
| − | #Click Sales Order under Sales Menu | + | #Click [[Sales Order]] under Sales Menu |
| − | # | + | #Select a Sales Order record that needs to print its details. Click the drop-down arrow then click Print. |
| + | #The system will generate the printed form of the Sales Order record. | ||
[[File:Sales - Sales Order - Print.png|border|center|1500x1500px]] | [[File:Sales - Sales Order - Print.png|border|center|1500x1500px]] | ||
=====<span class="mw-headline" id="Importing_and_Exporting_Sales_Quotation_Record" style="box-sizing: inherit;">Exporting Sales Order Record</span>===== | =====<span class="mw-headline" id="Importing_and_Exporting_Sales_Quotation_Record" style="box-sizing: inherit;">Exporting Sales Order Record</span>===== | ||
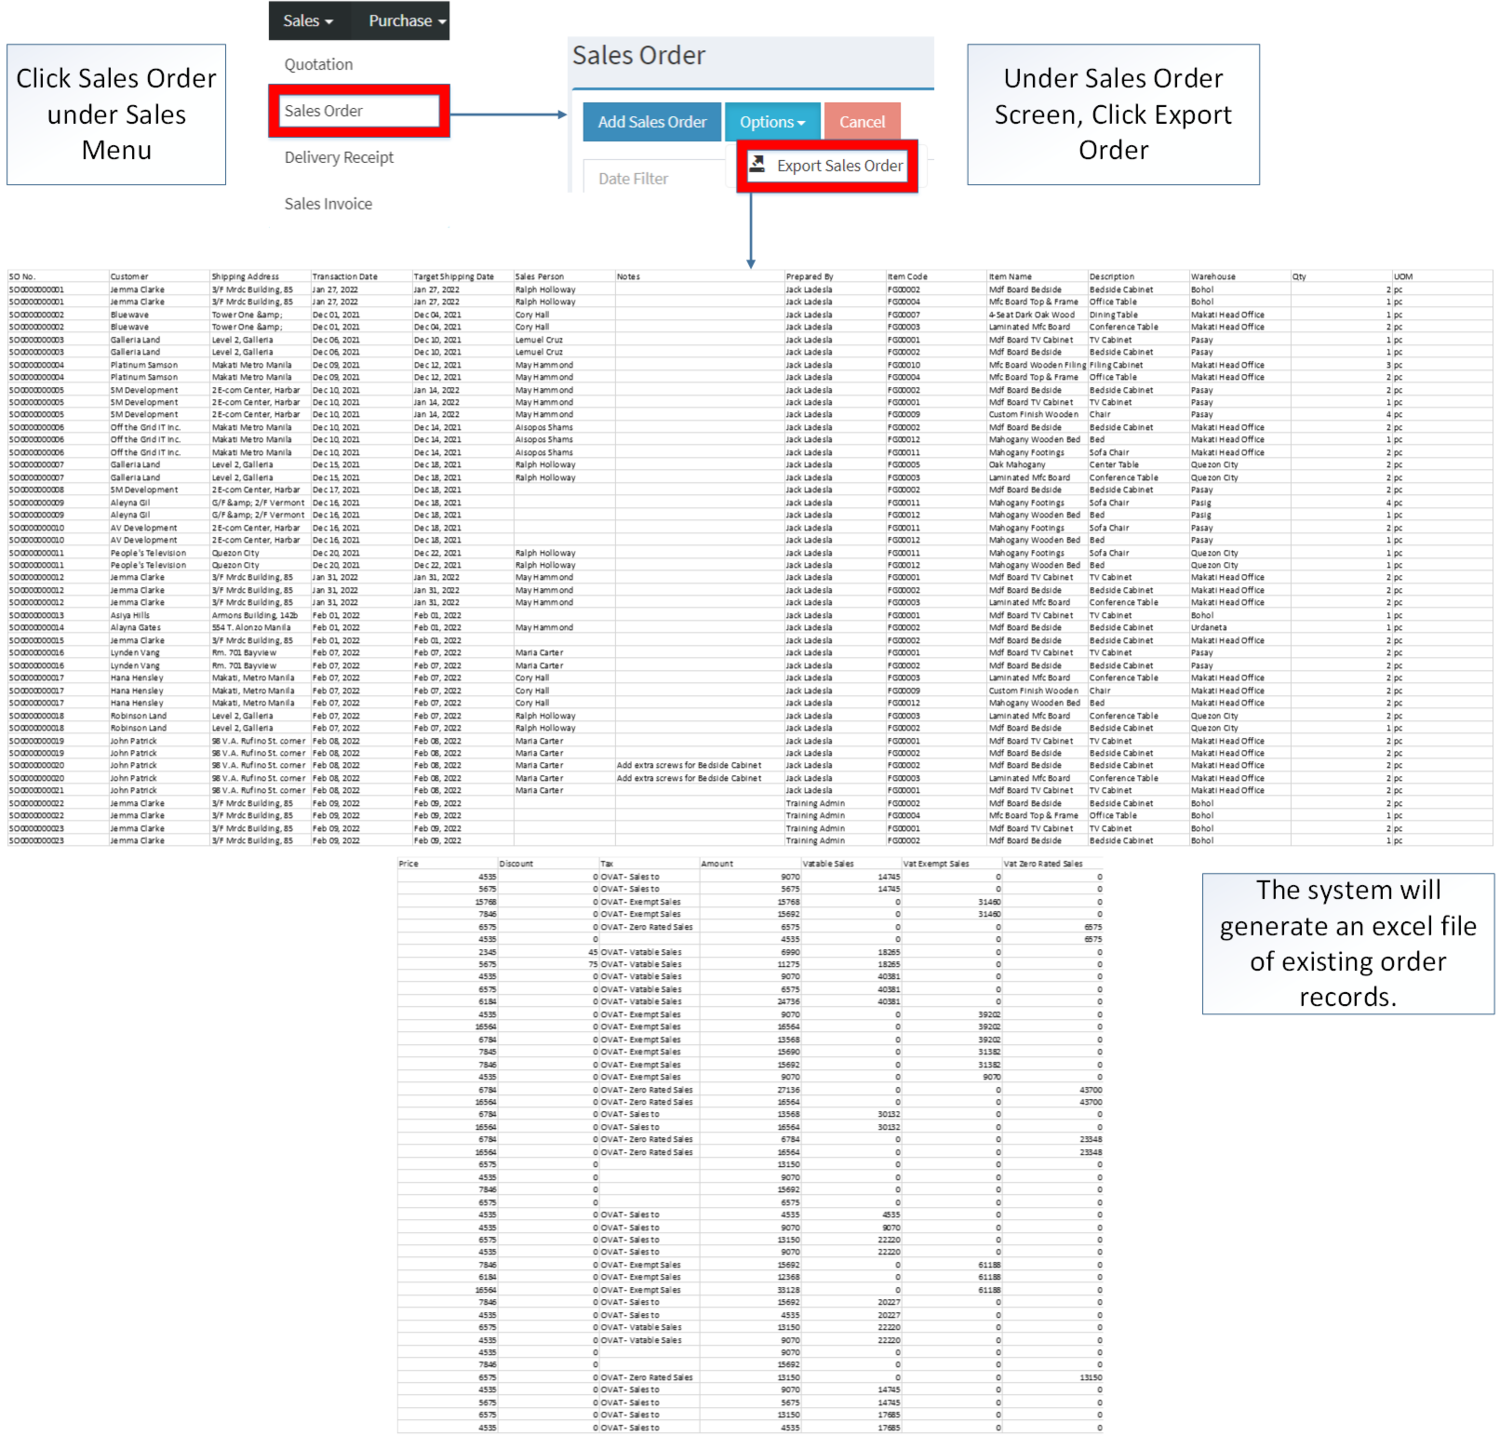
| − | 1. | + | 1. Click [[Sales Order]] under Sales Menu |
| − | 2. Under Options, The user may Export the record | + | 2. Under Sales Order Screen, Click Options |
| + | |||
| + | 3. Under Options, The user may Export the record | ||
*When Exporting the records, the user may also use the filter options such as Date Filter, Search Bar and Customer filter for precise searching and exporting of records. | *When Exporting the records, the user may also use the filter options such as Date Filter, Search Bar and Customer filter for precise searching and exporting of records. | ||
| Line 273: | Line 275: | ||
=====Tagging As Complete a Sales Order Record===== | =====Tagging As Complete a Sales Order Record===== | ||
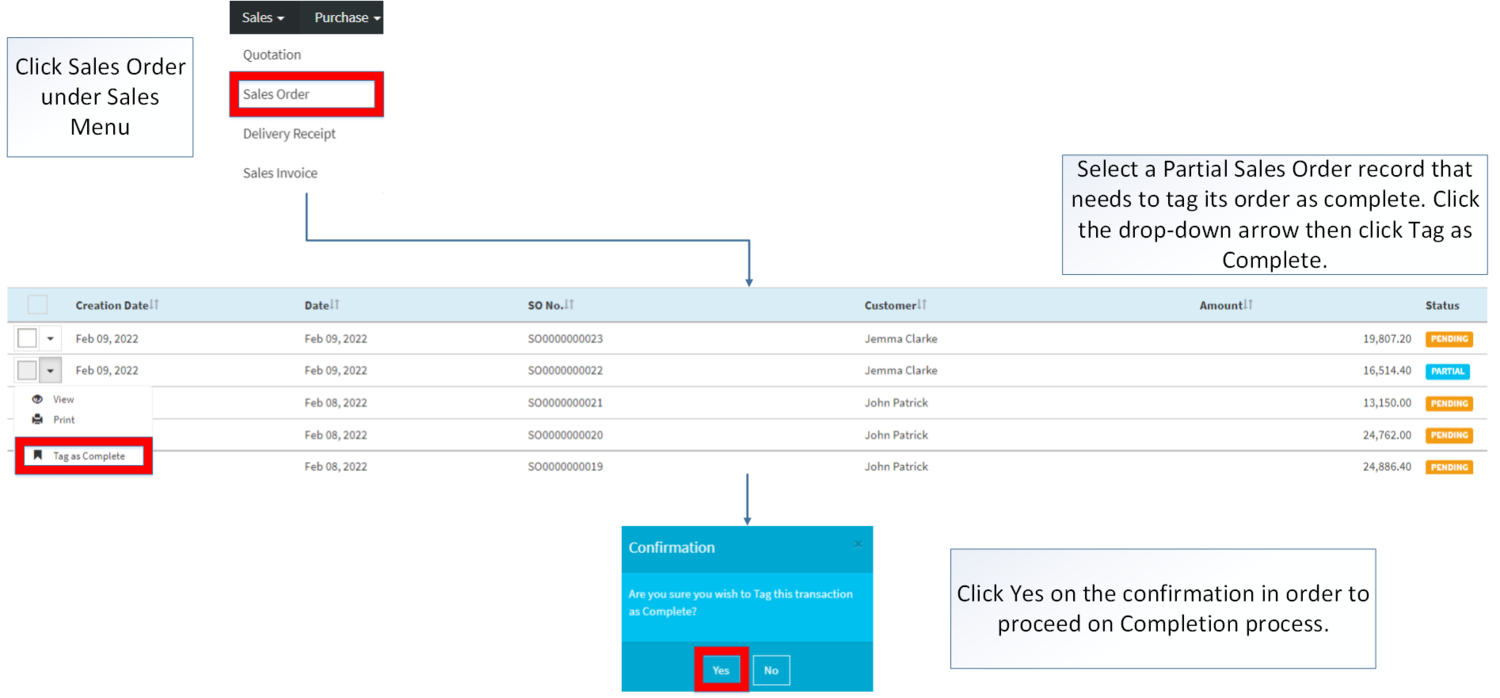
| − | #Click Sales Order under Sales Menu | + | #Click [[Sales Order]] under Sales Menu |
| − | #Select a Partial Sales Order that needs to tag its order as complete, click the drop-down arrow then click Tag as Complete | + | #Select a Partial Sales Order record that needs to tag its order as complete, click the drop-down arrow then click Tag as Complete |
| − | #Click Yes on the Confirmation to proceed | + | #Click Yes on the Confirmation to proceed on completion process. |
[[File:Sales - Sales Order - Tag as Complete.png|border|center|1500x1500px]] | [[File:Sales - Sales Order - Tag as Complete.png|border|center|1500x1500px]] | ||
| Line 286: | Line 288: | ||
[[File:Sales - Sales Order - Cancel1.png|border|center|1500x1500px]] | [[File:Sales - Sales Order - Cancel1.png|border|center|1500x1500px]] | ||
| − | |||
*Using Cancel Button for cancelling multiple records | *Using Cancel Button for cancelling multiple records | ||
Revision as of 11:51, 25 March 2022
Contents
- 1 Sales Order
- 1.1 Requirements before using Sales Order
- 1.2 Sales Order Record List
- 1.3 Creating a Sales Order
- 1.4 Viewing Sales Order
- 1.5 Editing Sales Order
- 1.6 Printing Sales Order Record
- 1.7 Exporting Sales Order Record
- 1.8 Tagging As Complete a Sales Order Record
- 1.9 Cancelling Sales Order Record
- 1.10 Sales Order Record Options
- 1.11 Exporting Sales Order Record
Sales Order
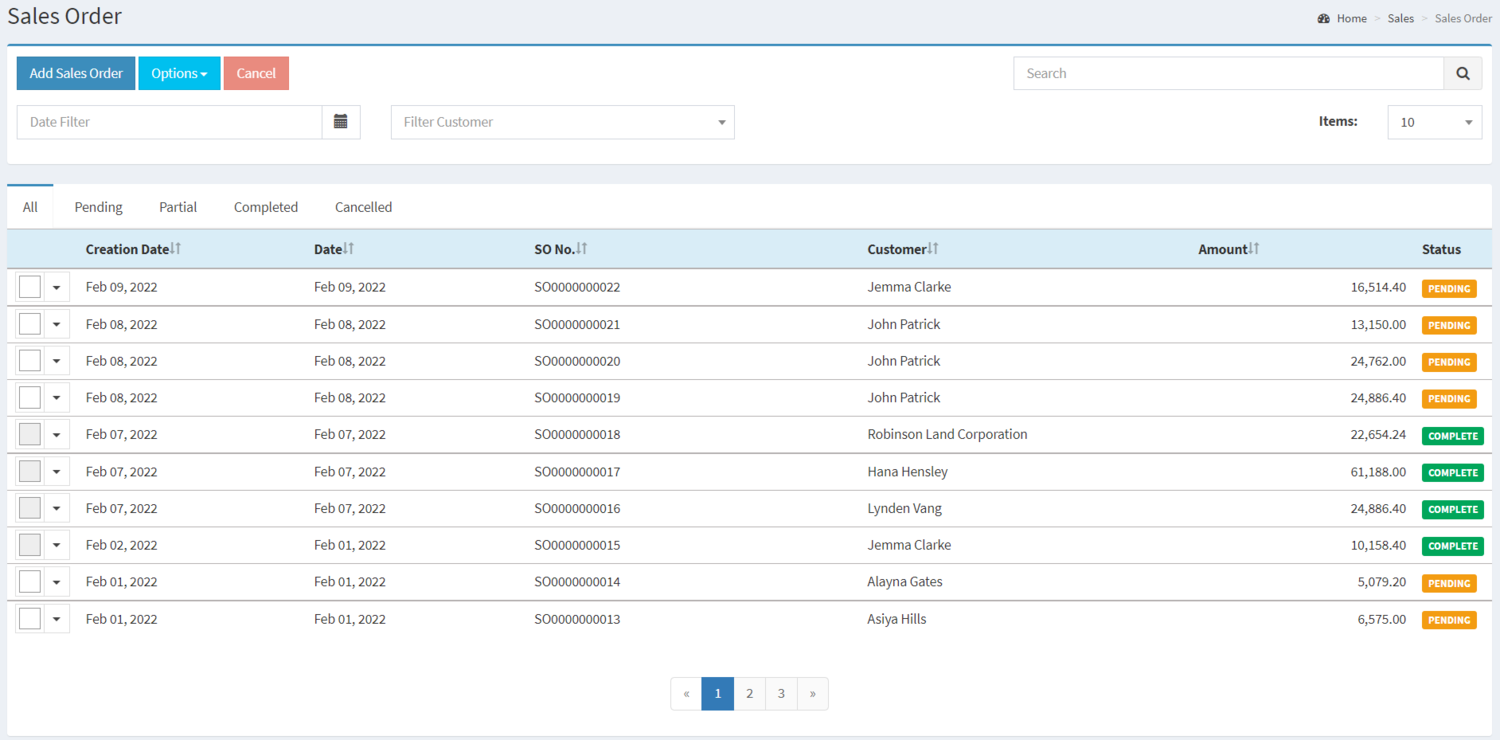
This module allows the user to create a Sales Order that the Customer wants to buy. This includes the Quantity, Item, Price and the status of the order if it is Pending, Partial, Completed or Cancelled.
Requirements before using Sales Order
- The user should setup the following Maintenance Module in order to proceed on using the Sales Order
Sales Order Record List
| Status | Description |
|---|---|
| PENDING | If the Sales Order has not been delivered. |
| PARTIAL | If the Sales Order is delivered partially. |
| COMPLETED | If the Sales Order items has been all delivered. |
| CANCELLED | If the Sales Order is cancelled. |
Creating a Sales Order
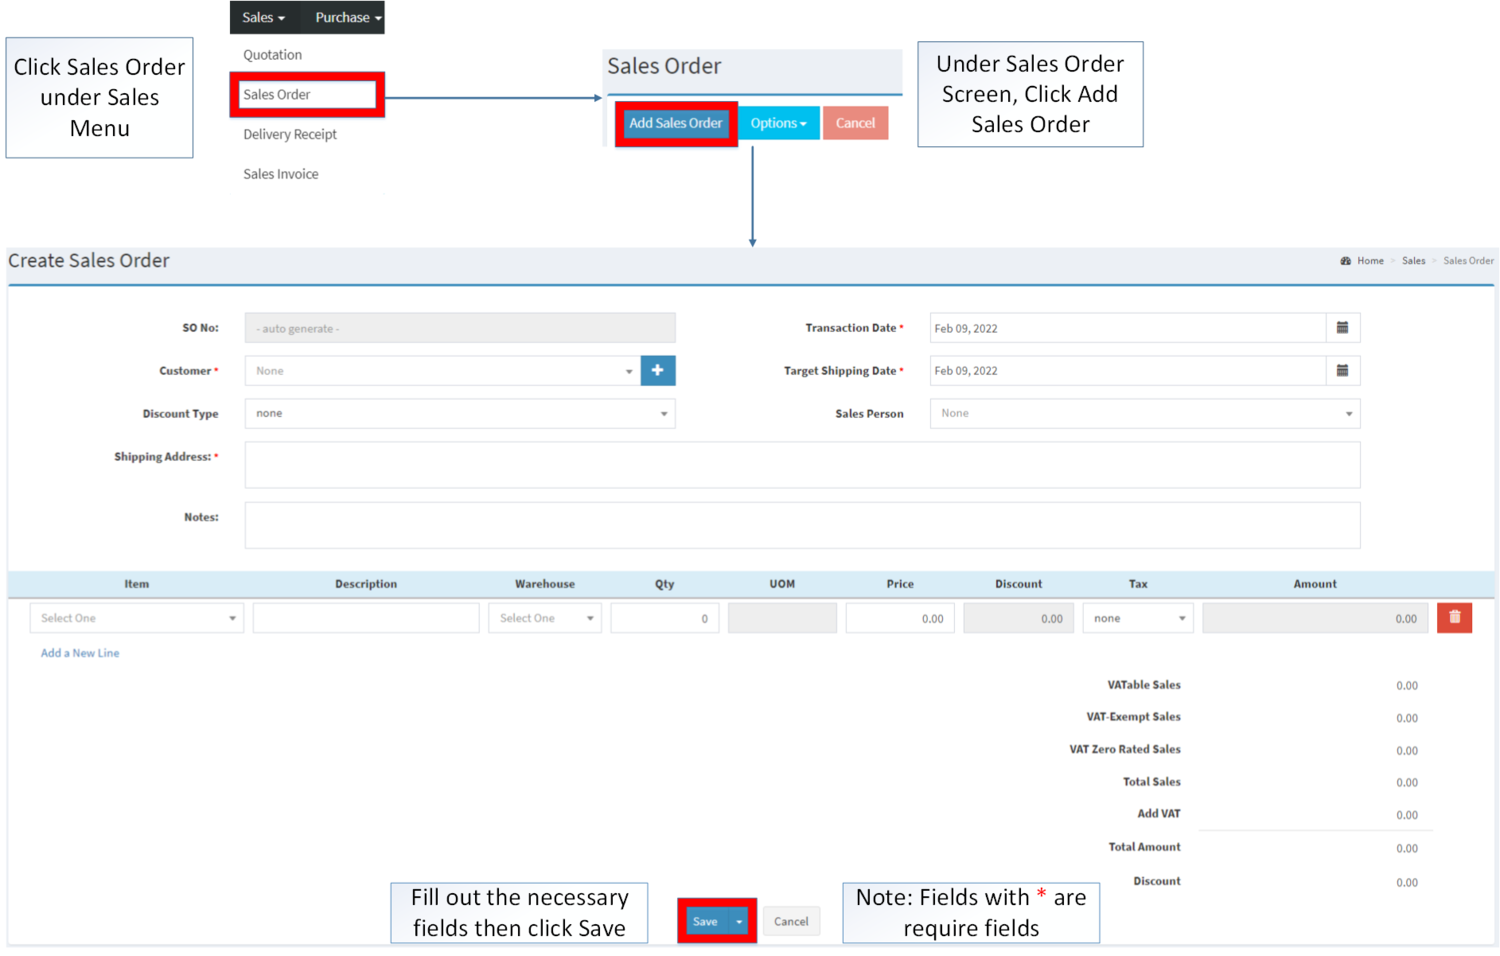
- Click Sales Order under Sales Menu
- Under Sales Order Screen, Click Add Sales Order.
- Fill out the necessary fields then click Save. Note: Fields with * are required fields
| Field | Description | Expected Values |
|---|---|---|
| 1.Sales Quotation Number | •Sales Quotation Reference Number | •Auto-Generated after creation |
| 2.Customer | •Name of Customer | •Text/Set of Customer List provided in Customer Maintenance Module |
| 3.Discount Type | •Type of Discount Prices for the Customer | •Type of Discount (Percentage/Amount) |
| 4.Transaction Date | •Date of Transaction | •Date |
| 5.Target Shipping Date | •Estimated date of the items to be shipped | •Date |
| 6.Sales Person | •Sales Representative for the transaction. | •Sales Person List provided in Sales Person Maintenance Module |
| 7.Shipping Address | •Address where the items to be shipped. | •Alphanumeric |
| 8.Notes | •Other remarks for the transaction | •Alphanumeric |
| 9.Item | •List of Items to be quoted | •Item List provided in the Item Master Maintenance Module |
| 10. Description | •Description of the Item | •Alphanumeric |
| 11.Warehouse | •Warehouse where the item should be ordered | •List of Warehouse provided in the Warehouse Maintenance Module |
| 12.Quantity(Qty) | •Quantity of items to be ordered | •Quantity(Number) |
| 13. UOM (Unit of Measure) | •Unit of Measure of the Item | •Unit of Measure assigned in the Item under Item Master Maintenance Module |
| 14. Price | •Initial price per unit of an item | •Numeric
•Auto-Generated based from Pricelist assigned to a specific Customer under Price List Maintenance Module |
| 15. Discount | •Discount Amount to be applied on the item depending on the Discount type chosen. | •Numeric |
| 16.Tax | •List of Tax to be applied on the item | •Tax list provided in the Tax Maintenance Module |
| 17. Amount | •Total Amount of the Item | •Numeric(Auto-generated) |
3. Click Save to complete the creation process
Notes:
- The Sales Order will be automatically set to PARTIAL when:
- When tagging it to Delivery Receipt where in the quantity available in the Warehouse is less than to the intended order
- Item should be on ACTIVE status when using it upon creating or editing a transaction.
- This can be seen in Item Master Maintenance Module.
- Customer should be on ACTIVE status when using it upon creating or editing a transaction.
- This can be seen in Customer Maintenance Module.
- Sales Person should be on ACTIVE status when using it upon creating or editing a transaction.
- This can be seen in Sales Person Maintenance Module.
- Tax should on ACTIVE status when using it upon creating or editing a transaction.
- This can be seen in Tax Maintenance Module.
- Warehouse should be on ACTIVE status when using it upon creating or editing a transaction.
- This can be seen in Warehouse Maintenance Module.
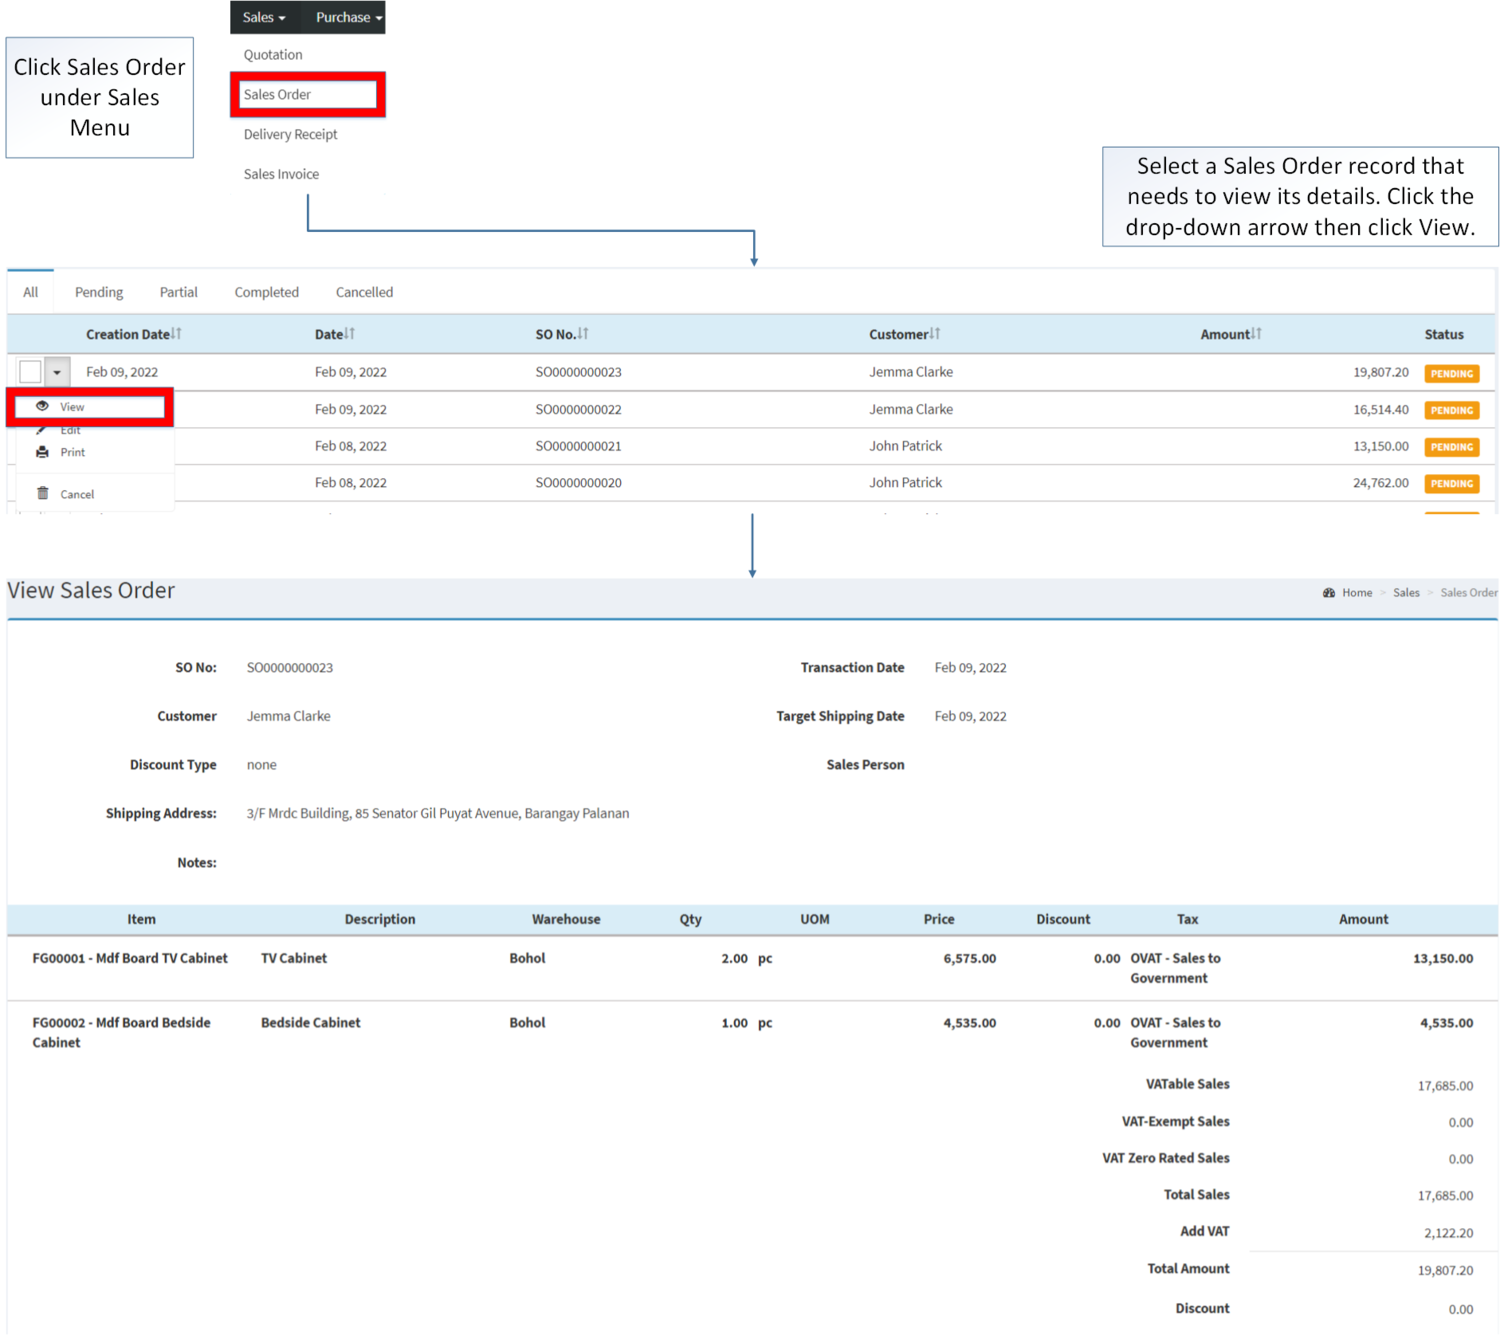
Viewing Sales Order
- Click Sales Order under Sales Menu
- Under Sales Order Screen, Select a record that needs to view its details. Click the drop-down arrow then click View.
- The user has an option to Edit the Sales Order upon viewing it
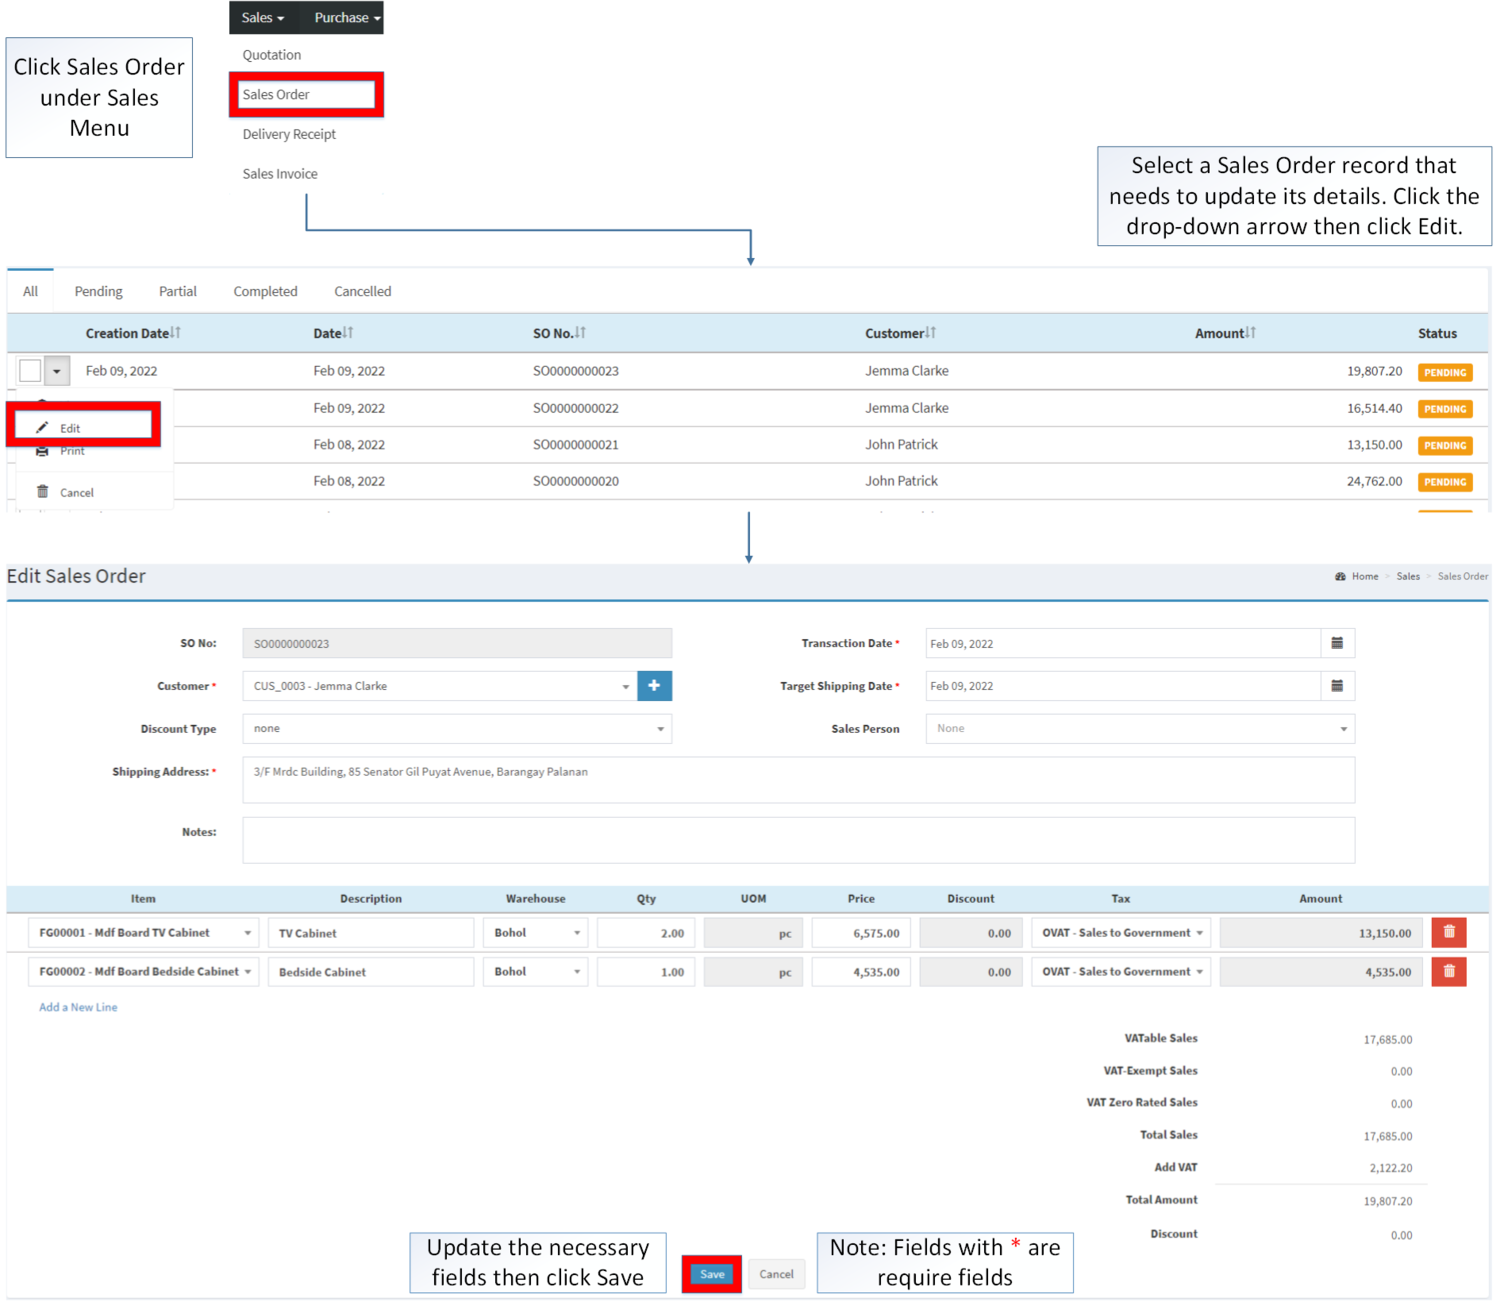
Editing Sales Order
- Click Sales Order under Sales Menu
- Select a Sales Order that needs to update its details. Click the drop-down arrow then Click Edit
- Update the necessary fields then Click Save
| Field | Description | Expected Values |
|---|---|---|
| 1.Sales Quotation Number | •Sales Quotation Reference Number | •Auto-Generated after creation |
| 2.Customer | •Name of Customer | •Text/Set of Customer List provided in Customer Maintenance Module |
| 3.Discount Type | •Type of Discount Prices for the Customer | •Type of Discount (Percentage/Amount) |
| 4.Transaction Date | •Date of Transaction | •Date |
| 5.Target Shipping Date | •Estimated date of the items to be shipped | •Date |
| 6.Sales Person | •Sales Representative for the transaction. | •Sales Person List provided in Sales Person Maintenance Module |
| 7.Shipping Address | •Address where the items to be shipped. | •Alphanumeric |
| 8.Notes | •Other remarks for the transaction | •Alphanumeric |
| 9.Item | •List of Items to be quoted | •Item List provided in the Item Master Maintenance Module |
| 10. Description | •Description of the Item | •Alphanumeric |
| 11.Warehouse | •Warehouse where the item should be ordered | •List of Warehouse provided in the Warehouse Maintenance Module |
| 12.Quantity(Qty) | •Quantity of items to be ordered | •Quantity(Number) |
| 13. UOM (Unit of Measure) | •Unit of Measure of the Item | •Unit of Measure assigned in the Item under Item Master Maintenance Module |
| 14. Price | •Initial price per unit of an item | •Numeric
•Auto-Generated based from Pricelist assigned to a specific Customer under Price List Maintenance Module |
| 15. Discount | •Discount Amount to be applied on the item depending on the Discount type chosen. | •Numeric |
| 16.Tax | •List of Tax to be applied on the item | •Tax list provided in the Tax Maintenance Module |
| 17. Amount | •Total Amount of the Item | •Numeric(Auto-generated) |
Notes:
The user can only edit the Sales Order record if it is on PENDING status.
- The Sales Order will be automatically set to PARTIAL when:
- When tagging it to Delivery Receipt where in the quantity available in the warehouse is less than to the intended order
- Item should be on ACTIVE status when using it upon creating or editing a transaction.
- This can be seen in Item Master Maintenance Module.
- Past Transactions with INACTIVE item prior to its deactivation can still be used.
- Customer should be on ACTIVE status when using it upon creating or editing a transaction.
- This can be seen in Customer Maintenance Module
- Past Transactions with INACTIVE customer prior to its deactivation can still be used.
- Sales Person should be on ACTIVE status when using it upon creating or editing a transaction.
- This can be seen in Sales Person Maintenance Module.
- Tax should on ACTIVE status when using it upon creating or editing a transaction.
- This can be seen in Tax Maintenance Module
- Past Transactions with INACTIVE Tax prior to its deactivation can still be used.
- use should be on ACTIVE status when using it upon creating or editing a transaction.
- This can be seen in Warehouse Maintenance Module.
- Past Transactions with INACTIVE Warehouse prior to its deactivation can still be used.
Printing Sales Order Record
- Click Sales Order under Sales Menu
- Select a Sales Order record that needs to print its details. Click the drop-down arrow then click Print.
- The system will generate the printed form of the Sales Order record.
Exporting Sales Order Record
1. Click Sales Order under Sales Menu
2. Under Sales Order Screen, Click Options
3. Under Options, The user may Export the record
- When Exporting the records, the user may also use the filter options such as Date Filter, Search Bar and Customer filter for precise searching and exporting of records.
Tagging As Complete a Sales Order Record
- Click Sales Order under Sales Menu
- Select a Partial Sales Order record that needs to tag its order as complete, click the drop-down arrow then click Tag as Complete
- Click Yes on the Confirmation to proceed on completion process.
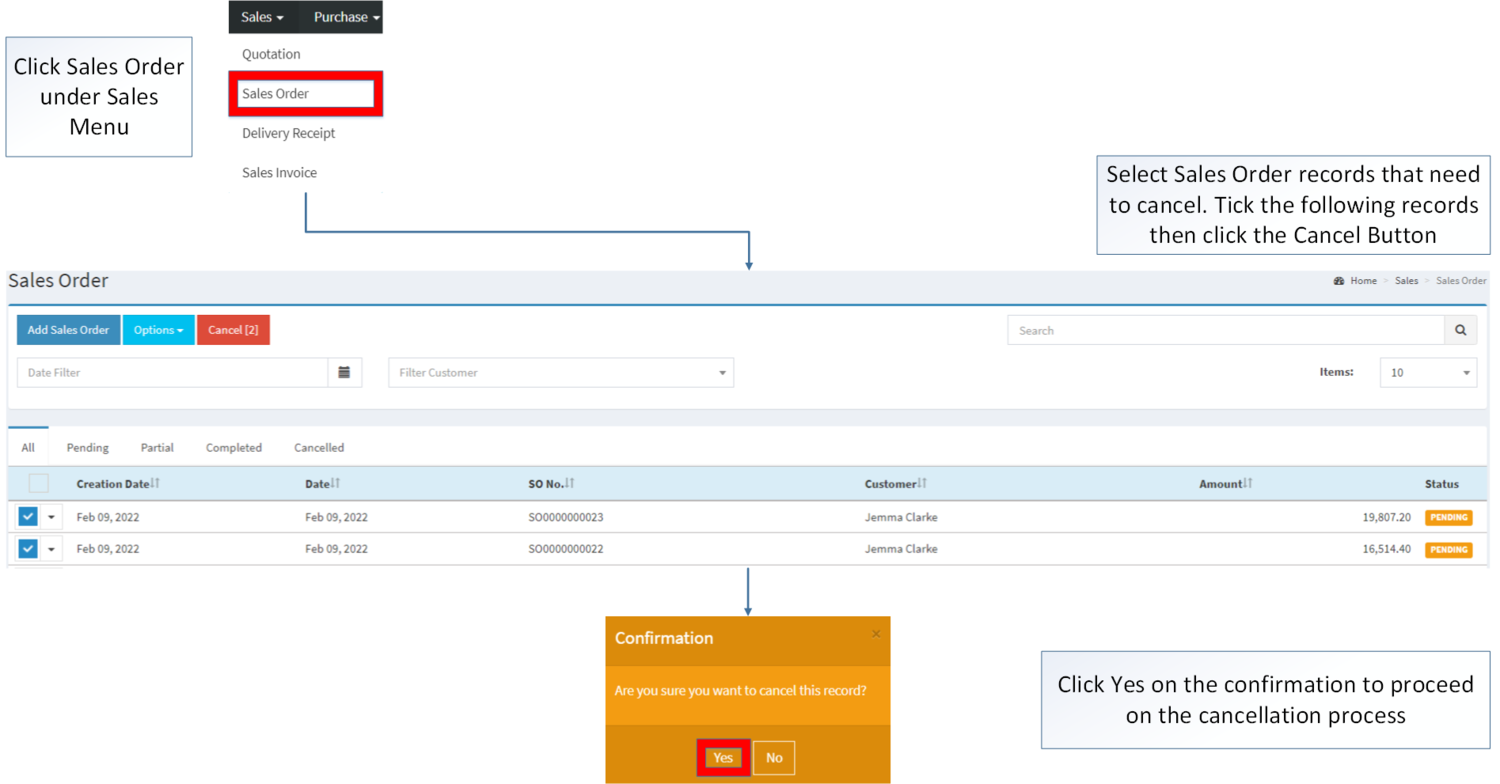
Cancelling Sales Order Record
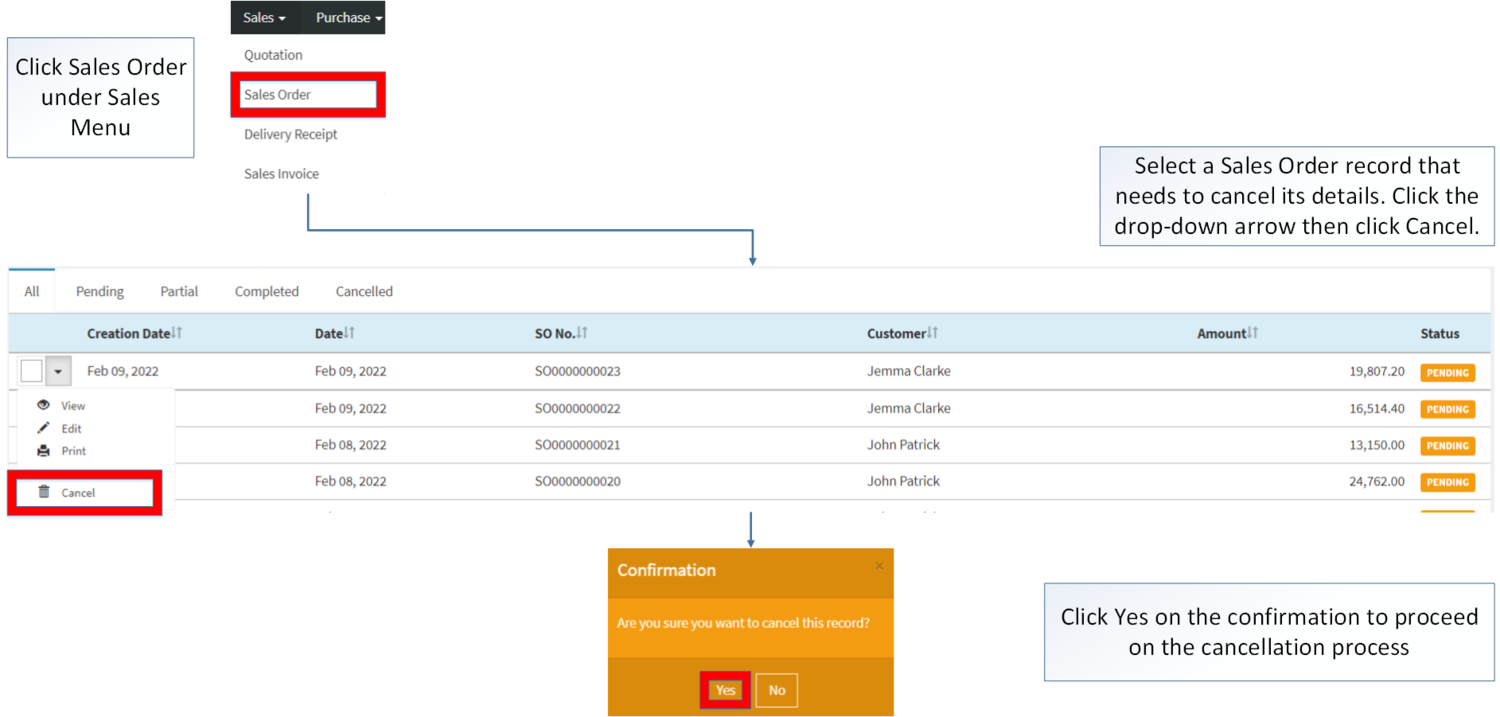
Sales Order can be cancelled in two ways:
- Using drop-down arrow of a record can be used in single record cancellation
- Using Cancel Button for cancelling multiple records
Sales Order Record Options
| Status | View | Edit | Tag as Complete | Cancel | |
|---|---|---|---|---|---|
| PENDING | ☑ | ☑ | ☑ | ☑ | |
| PARTIAL | ☑ | ☑ | ☑ | ||
| COMPLETED | ☑ | ☑ | |||
| CANCELLED | ☑ | ☑ |
Notes:
- The user has an option to edit the details of the record under View Option
- The user can only edit the details of the record if it is still on PENDING status
- Tagging the Sales Sales Order as Complete will change the status of Sales Quotation and its Sales Order to COMPLETED
- The user can only cancel the Sales Order record if it is still on PENDING status
Exporting Sales Order Record
| Modules | |
|---|---|
| Sales | Sales Quotation | Sales Order | Delivery Receipt | Sales Invoice |
| Maintenance | Customer | Item Master | Price List | Tax | Unit of Measure | Warehouse |
