You are viewing an old version of this page. Return to the latest version.
Difference between revisions of "Purchase Receipt"
(Tag: Visual edit) |
(Tag: Visual edit) |
||
| Line 9: | Line 9: | ||
*#[[Supplier]] | *#[[Supplier]] | ||
*#[[Warehouse]] | *#[[Warehouse]] | ||
| − | |||
| − | |||
| − | |||
=====Purchase Receipt Record List===== | =====Purchase Receipt Record List===== | ||
| + | [[File:Purchase - Purchase Receipt - Record List.png|center|1500x1500px]] | ||
| + | <br /> | ||
=====Adding Purchase Receipt===== | =====Adding Purchase Receipt===== | ||
| − | # Click Purchase then click [[Purchase Receipt]] | + | #Click Purchase then click [[Purchase Receipt]] |
| − | # Click '''Add Purchase Receipt''' | + | #Click '''Add Purchase Receipt''' |
| − | # Fill up the Header of the Purchase Receipt | + | #Fill up the Header of the Purchase Receipt |
| − | #* Please do note to Tag the [[Import Purchase Order]]/ [[Purchase Order]] in order for the system to fill up the Item Section below the Header of the Purchase Receipt. | + | #*Please do note to Tag the [[Import Purchase Order]]/ [[Purchase Order]] in order for the system to fill up the Item Section below the Header of the Purchase Receipt. |
| − | # Tick the Checkbox of the Item/s that needs to be purchased. Enter its quantity then '''Click Save'''. | + | #Tick the Checkbox of the Item/s that needs to be purchased. Enter its quantity then '''Click Save'''. |
| − | # There will be an auto-generated [[Accounts Payable]] which is in '''UNPAID''' status after saving the [[Purchase Receipt]] | + | #There will be an auto-generated [[Accounts Payable]] which is in '''UNPAID''' status after saving the [[Purchase Receipt]] |
| + | [[File:Purchase - Purchase Receipt - Add.png|border|center|1500x1500px]] | ||
| + | <br /> | ||
{| class="wikitable" style="margin: auto;" | {| class="wikitable" style="margin: auto;" | ||
|+Adding Purchase Receipt Field Information | |+Adding Purchase Receipt Field Information | ||
| Line 53: | Line 54: | ||
|•Warehouse List provided from Warehouse Maintenance Module | |•Warehouse List provided from Warehouse Maintenance Module | ||
|- | |- | ||
| − | |7 | + | |7.Notes |
| − | |||
| − | |||
| − | |||
| − | |||
|•Other Remarks for the Transaction | |•Other Remarks for the Transaction | ||
|•Text | |•Text | ||
| Line 73: | Line 70: | ||
*<span style="color: rgb(51, 51, 51)">For detailed steps on how to create a Purchase Receipt, you can visit the Purchase Receipt Job Aids which can be found [[Purchase Receipt Aid|here]]</span> | *<span style="color: rgb(51, 51, 51)">For detailed steps on how to create a Purchase Receipt, you can visit the Purchase Receipt Job Aids which can be found [[Purchase Receipt Aid|here]]</span> | ||
| − | ===== Exporting Purchase Receipt ===== | + | ===== <span class="mw-headline" id="Printing_Purchase_Order_Record" style="box-sizing: inherit;"><span class="mw-headline" id="Printing_Purchase_Requisition_Record" style="box-sizing: inherit;"><span class="mw-headline" id="Printing_Sales_Quotation_Record" style="box-sizing: inherit;">Printing Purchase Receipt Record</span></span></span> ===== |
| + | |||
| + | # Click Purchase Receipt under Purchase Menu | ||
| + | # Under Purchase Receipt Screen, Select a record that needs to print its details. Click the drop-down arrow then click Print. | ||
| + | |||
| + | [[File:Purchase - Purchase Receipt - Print.png|border|center|1500x1500px]] | ||
| + | <br /> | ||
| + | =====Exporting Purchase Receipt===== | ||
| + | |||
| + | #Click Purchase then click [[Purchase Receipt]] | ||
| + | #Click Options then click '''Export Purchase Receipt'''. Take note that you can filter the date range and the supplier for precise exportation of Data. | ||
| + | |||
| + | [[File:Purchase - Purchase Receipt - Export.png|border|center|1500x1500px]] | ||
| − | |||
| − | |||
{| class="wikitable" style="margin: auto;" | {| class="wikitable" style="margin: auto;" | ||
| Line 90: | Line 97: | ||
|Maintenance | |Maintenance | ||
|[[Supplier]]<nowiki> | </nowiki>[[Warehouse]] | |[[Supplier]]<nowiki> | </nowiki>[[Warehouse]] | ||
| − | |||
| − | |||
| − | |||
| − | |||
| − | |||
|} | |} | ||
Revision as of 12:17, 11 February 2022
Contents
Purchase Receipt
This module allows the user to keep track the status of the Purchase Order that has been purchased from the supplier if it is already receive or not.
Requirements before using Purchase Receipt
- The user should setup the following Maintenance Module in order to proceed on using the Purchase Receipt
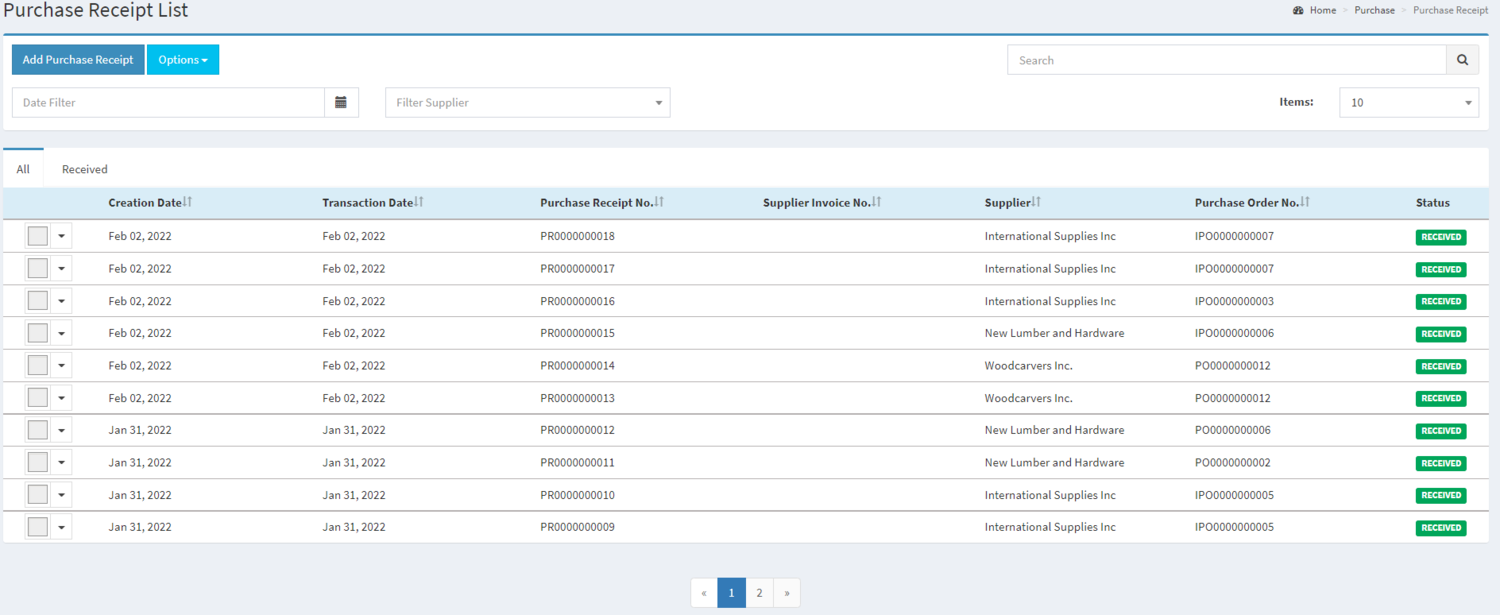
Purchase Receipt Record List
Adding Purchase Receipt
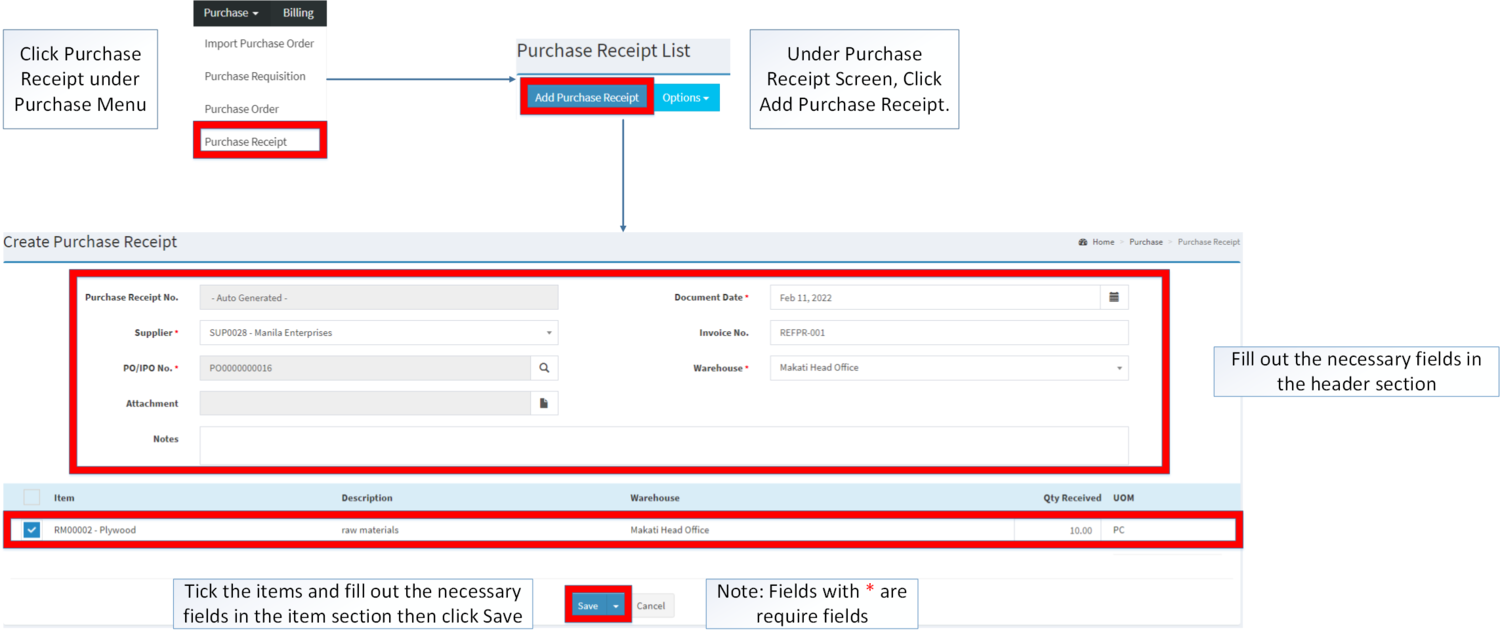
- Click Purchase then click Purchase Receipt
- Click Add Purchase Receipt
- Fill up the Header of the Purchase Receipt
- Please do note to Tag the Import Purchase Order/ Purchase Order in order for the system to fill up the Item Section below the Header of the Purchase Receipt.
- Tick the Checkbox of the Item/s that needs to be purchased. Enter its quantity then Click Save.
- There will be an auto-generated Accounts Payable which is in UNPAID status after saving the Purchase Receipt
| Field | Description | Expected Values |
|---|---|---|
| 1.Supplier | •Name of Supplier | •Supplier List provided in the Supplier Maintenance Module |
| 2.IPO / PONumber | •Purchase Order or Import Purchase order Reference Number for the Transaction | •Alphanumeric |
| 3.Attachment | •Attachment as a proof of payment or other information regarding the transaction | •PNG/PDF or JPG file type |
| 4.Document Date | •Date when the document is created | •Date |
| 5.Invoice No | •Invoice Reference No | •Alphanumeric |
| 6.Warehouse | •Warehouse where the items should be delivered | •Warehouse List provided from Warehouse Maintenance Module |
| 7.Notes | •Other Remarks for the Transaction | •Text |
Notes:
- The user can create multiple transactions with the same Import Purchase Order and Purchase Order as long as the IPO/PO status is PARTIAL
- Purchase Receipt cannot be edited once created.
- Import Purchase Order and Purchase Order record should be on "PENDING" or "PARTIAL" status in order for it to be tagged on Purchase Receipt.
- Warehouse should be on ACTIVE status when using it upon creating or editing a transaction.
- This can be seen in Warehouse Maintenance Module
- Supplier should be on ACTIVE status when using it upon creating or editing a transaction.
- This can be seen in Supplier Maintenance Module
- For detailed steps on how to create a Purchase Receipt, you can visit the Purchase Receipt Job Aids which can be found here
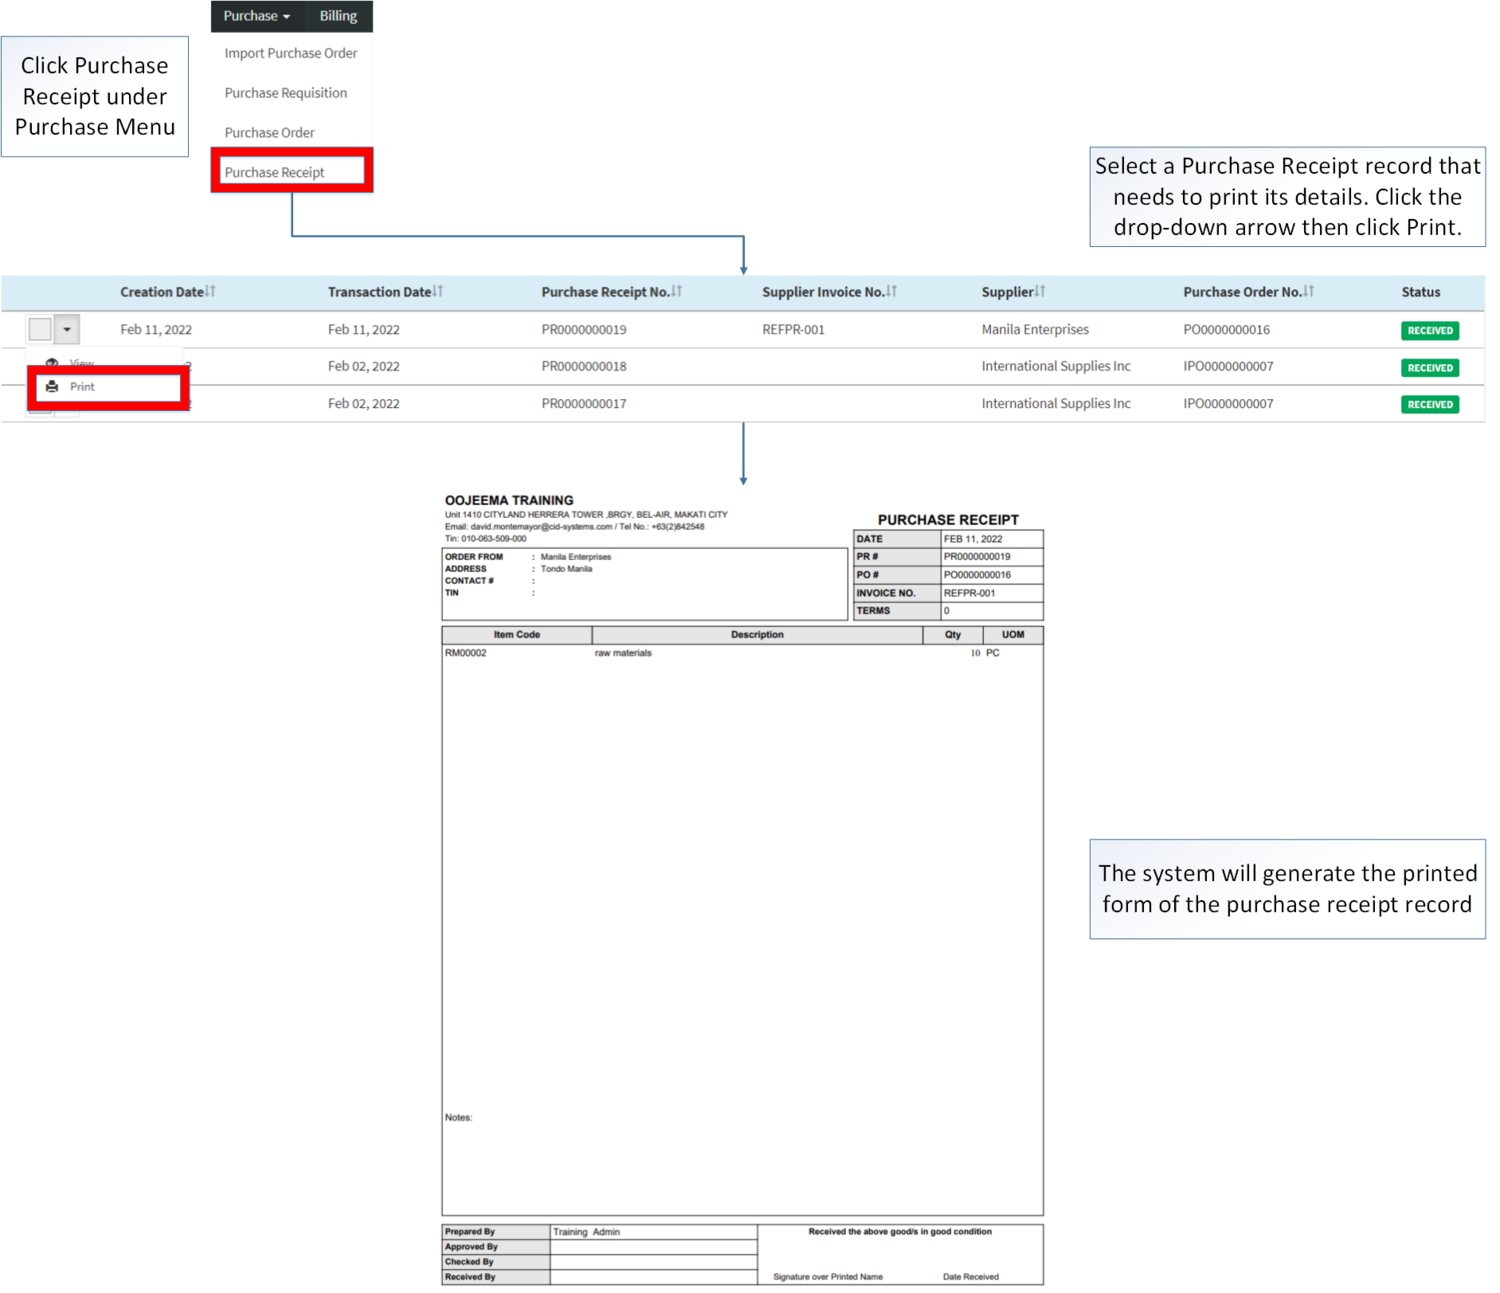
Printing Purchase Receipt Record
- Click Purchase Receipt under Purchase Menu
- Under Purchase Receipt Screen, Select a record that needs to print its details. Click the drop-down arrow then click Print.
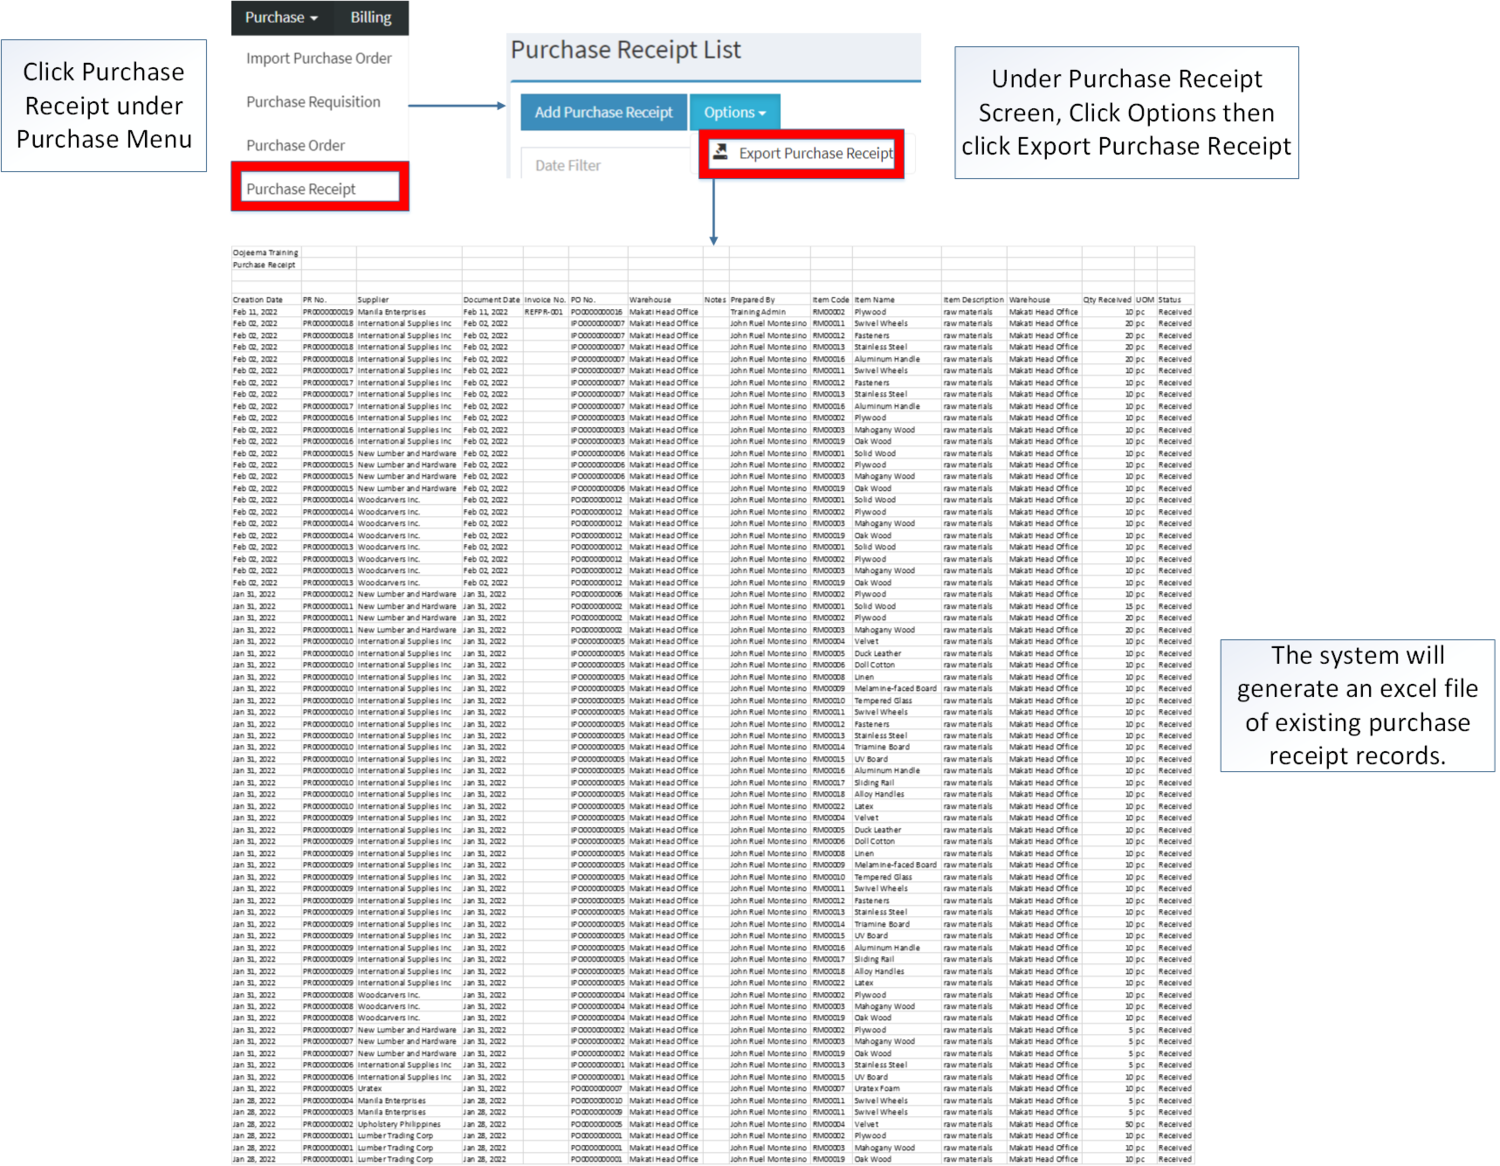
Exporting Purchase Receipt
- Click Purchase then click Purchase Receipt
- Click Options then click Export Purchase Receipt. Take note that you can filter the date range and the supplier for precise exportation of Data.
| Modules | |
|---|---|
| Purchase | Purchase | Import Purchase Order | Purchase Order | Purchase Receipt |
| Financials | Accounts Payable |
| Maintenance | Supplier | Warehouse |


