You are viewing an old version of this page. Return to the latest version.
Difference between revisions of "Chart of Account"
(Tag: Visual edit) |
(Tag: Visual edit) |
||
| Line 1: | Line 1: | ||
<div style="text-align: center;"> | <div style="text-align: center;"> | ||
| − | [[Maintenance]] | [[Account Class]] | [[Account Codes]] | + | [[Maintenance]] | [[Account Class]] | [[Account Codes]] | [[ATC Code]] | [[Tax]] |
</div> | </div> | ||
==Chart of Account== | ==Chart of Account== | ||
| Line 9: | Line 9: | ||
<br /> | <br /> | ||
=====Adding Chart of Account===== | =====Adding Chart of Account===== | ||
| − | |||
| − | + | # Click '''[[Chart of Account]]''' under Maintenance Module | |
| + | # Under '''Chart of Account''' Menu Screen, Click '''Add Chart of Account''' | ||
| + | # Fill out the necessary fields then click Save. Note: Fields with * are require fields | ||
| − | |||
[[File:Maintenance - Chart of Account - Add.png|border|center|1500x1500px]] | [[File:Maintenance - Chart of Account - Add.png|border|center|1500x1500px]] | ||
<br /> | <br /> | ||
{| class="wikitable" style="margin: auto;" | {| class="wikitable" style="margin: auto;" | ||
| − | !Field | + | !'''Field''' |
| − | !Description | + | !'''Description''' |
| − | !Expected Values | + | !'''Expected Values''' |
|- | |- | ||
|1.Account Code | |1.Account Code | ||
| Line 54: | Line 54: | ||
=====Viewing Chart of Account===== | =====Viewing Chart of Account===== | ||
| − | |||
| − | + | # Click '''[[Chart of Account]]''' under Maintenance Module | |
| + | # Select a Chart of Account that needs to view its details. Click the drop-down arrow then click View. | ||
| + | # The user has an option to Edit the Chart of Account upon viewing it. | ||
| − | |||
[[File:Maintenance - Chart of Account - View.png|border|center|1500x1500px]] | [[File:Maintenance - Chart of Account - View.png|border|center|1500x1500px]] | ||
<br /> | <br /> | ||
=====Editing Chart of Account===== | =====Editing Chart of Account===== | ||
| − | |||
| − | + | # Click '''[[Chart of Account]]''' under Maintenance Module | |
| + | # Select a '''[[Chart of Account]]''' that needs to update its details. Click the drop-down arrow then click Edit. | ||
| + | # Update the necessary fields then click Save. | ||
| − | |||
[[File:Maintenance - Chart of Account - Edit.png|border|center|1501x1501px]] | [[File:Maintenance - Chart of Account - Edit.png|border|center|1501x1501px]] | ||
<br /> | <br /> | ||
| Line 113: | Line 113: | ||
*When Importing the records, the user should follow the following steps provided in the Importing Chart of Account Screen such as | *When Importing the records, the user should follow the following steps provided in the Importing Chart of Account Screen such as | ||
| − | |||
| − | |||
| − | |||
[[File:Maintenance - Chart of Account - Import.png|border|center|1500x1500px]] | [[File:Maintenance - Chart of Account - Import.png|border|center|1500x1500px]] | ||
| Line 269: | Line 266: | ||
|- | |- | ||
|Maintenance | |Maintenance | ||
| − | |[[Maintenance]]<nowiki> | </nowiki>[[ | + | |[[Maintenance]]<nowiki> | </nowiki>[[Account Class]]<nowiki> | </nowiki>[[Account Codes]]<nowiki> | </nowiki>[[ATC Code]]<nowiki> | </nowiki>[[Item Class]]<nowiki> | </nowiki>[[Item Master]]<nowiki> | </nowiki>[[Proforma]]<nowiki> | </nowiki>[[Tax]] |
|- | |- | ||
|Financials | |Financials | ||
Revision as of 11:18, 24 March 2022
Maintenance | Account Class | Account Codes | ATC Code | Tax
Contents
- 1 Chart of Account
- 1.1 Chart of Account Record List
- 1.2 Adding Chart of Account
- 1.3 Viewing Chart of Account
- 1.4 Editing Chart of Account
- 1.5 Importing and Exporting Chart of Accounts
- 1.6 Activating Chart of Account Record
- 1.7 Deactivating Chart of Account Record
- 1.8 Deleting Chart of Account Record
- 1.9 Chart of Account Record Option
Chart of Account
A chart of accounts is a list of the categories used by an organization to classify and distinguish financial assets, liabilities, and transactions
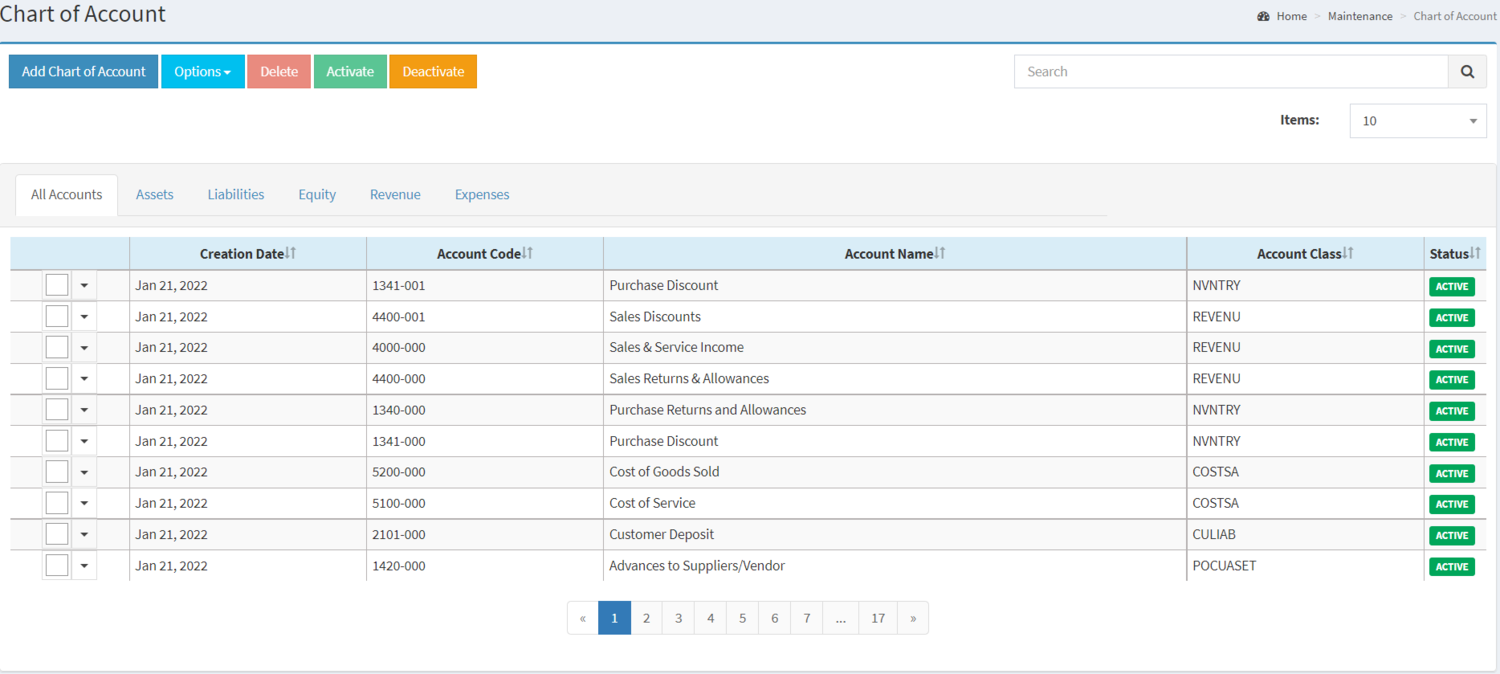
Chart of Account Record List
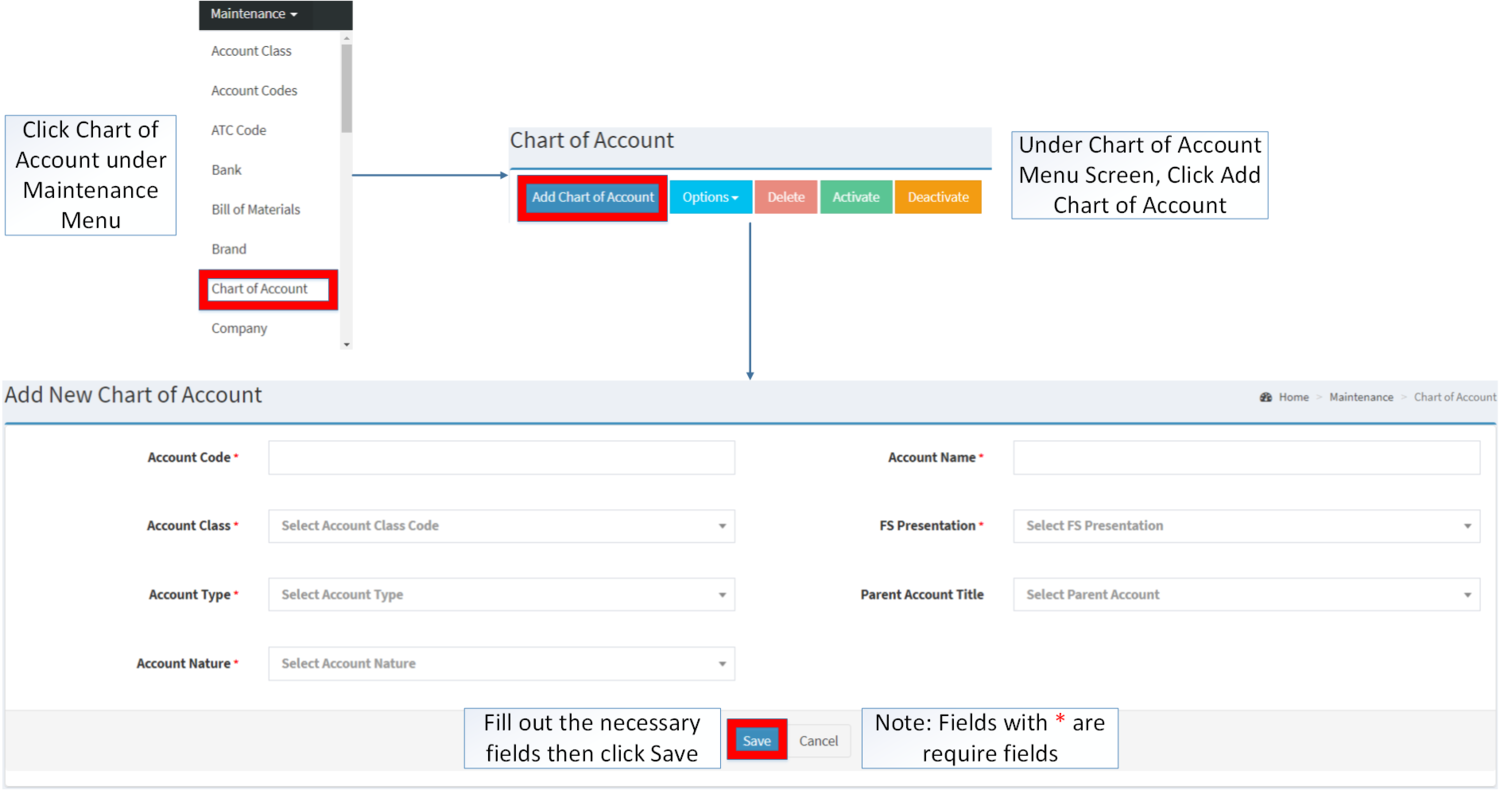
Adding Chart of Account
- Click Chart of Account under Maintenance Module
- Under Chart of Account Menu Screen, Click Add Chart of Account
- Fill out the necessary fields then click Save. Note: Fields with * are require fields
| Field | Description | Expected Values |
|---|---|---|
| 1.Account Code | •Reference Code for the Account | •Alphanumeric |
| 2.Account Name | •Name of the Account | •Alphanumeric |
| 3.Account Class | •Class of the Account | •Account Class List provided in Account Class Maintenance Module |
| 4.FS Presentation | •Presentation of Financial Statements | •Balance Sheet/Income Statement |
| 5.Account Type | •Type of Account | •Child/Parent/Both |
| 6.Parent Account Title | •Parent Account related on the Account | •Parent Account Title List |
| 7.Account Nature | •Nature of Account if it is Debit or Credit | •Debit/Credit |
Notes:
- When creating a Chart of Accounts, account class field is required, make sure to check the Account Class module first when creating a Chart of Accounts
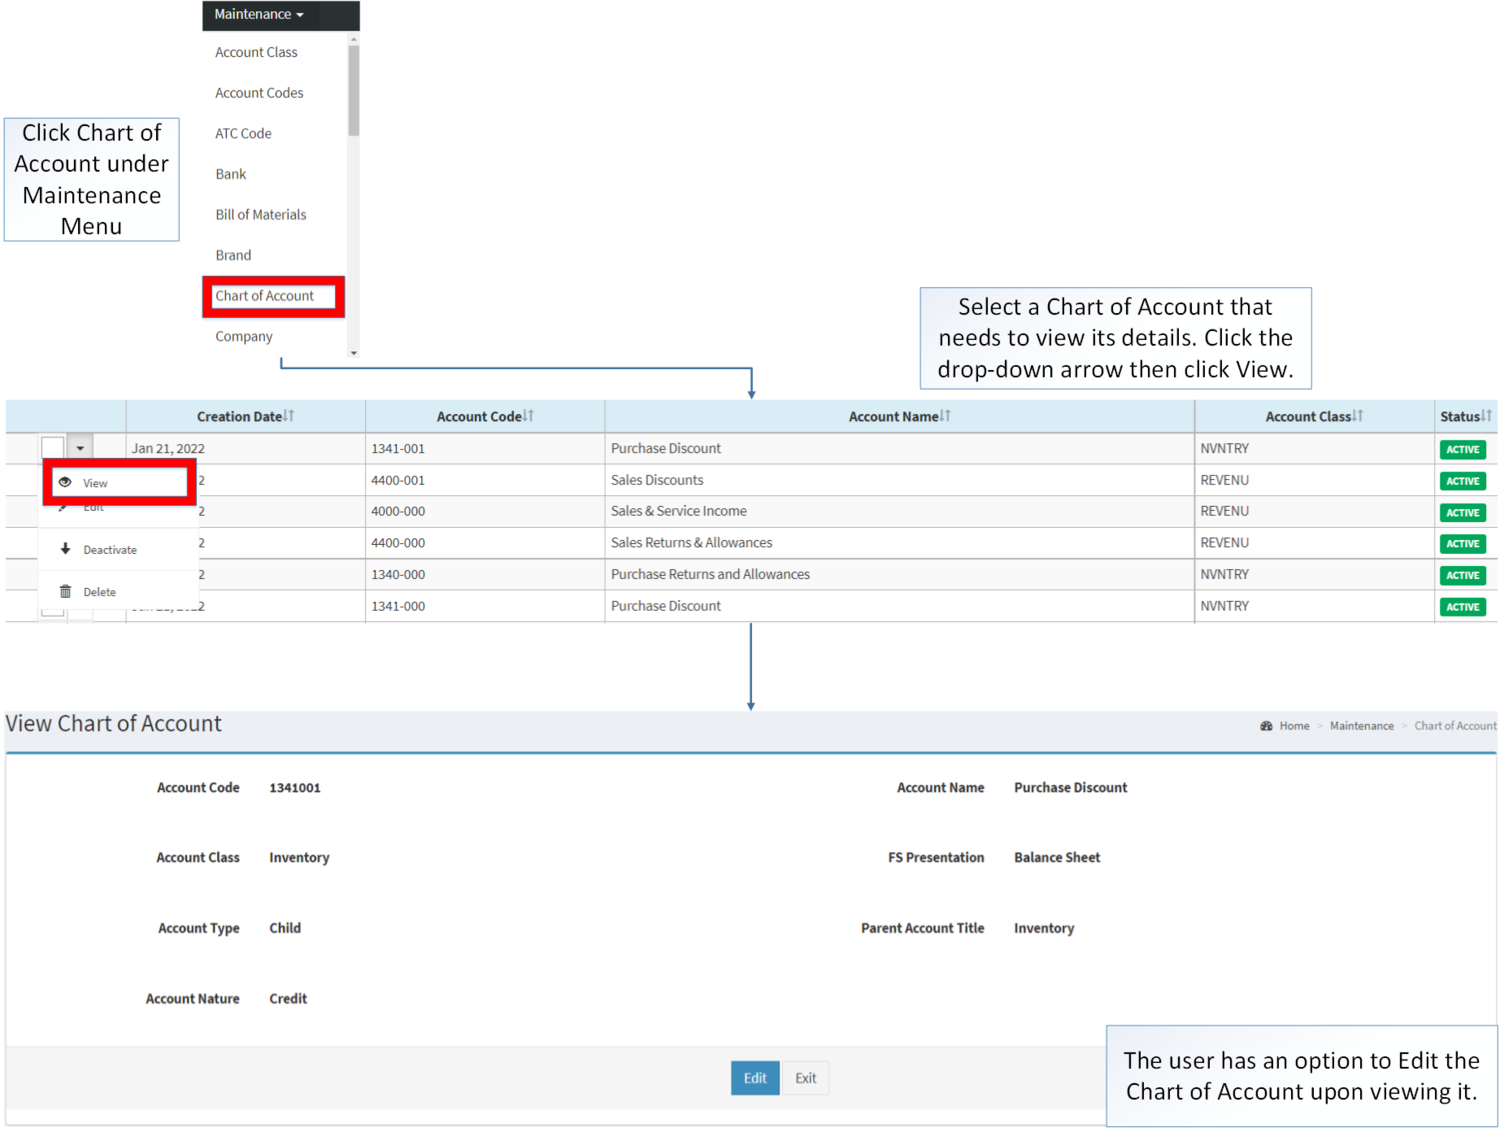
Viewing Chart of Account
- Click Chart of Account under Maintenance Module
- Select a Chart of Account that needs to view its details. Click the drop-down arrow then click View.
- The user has an option to Edit the Chart of Account upon viewing it.
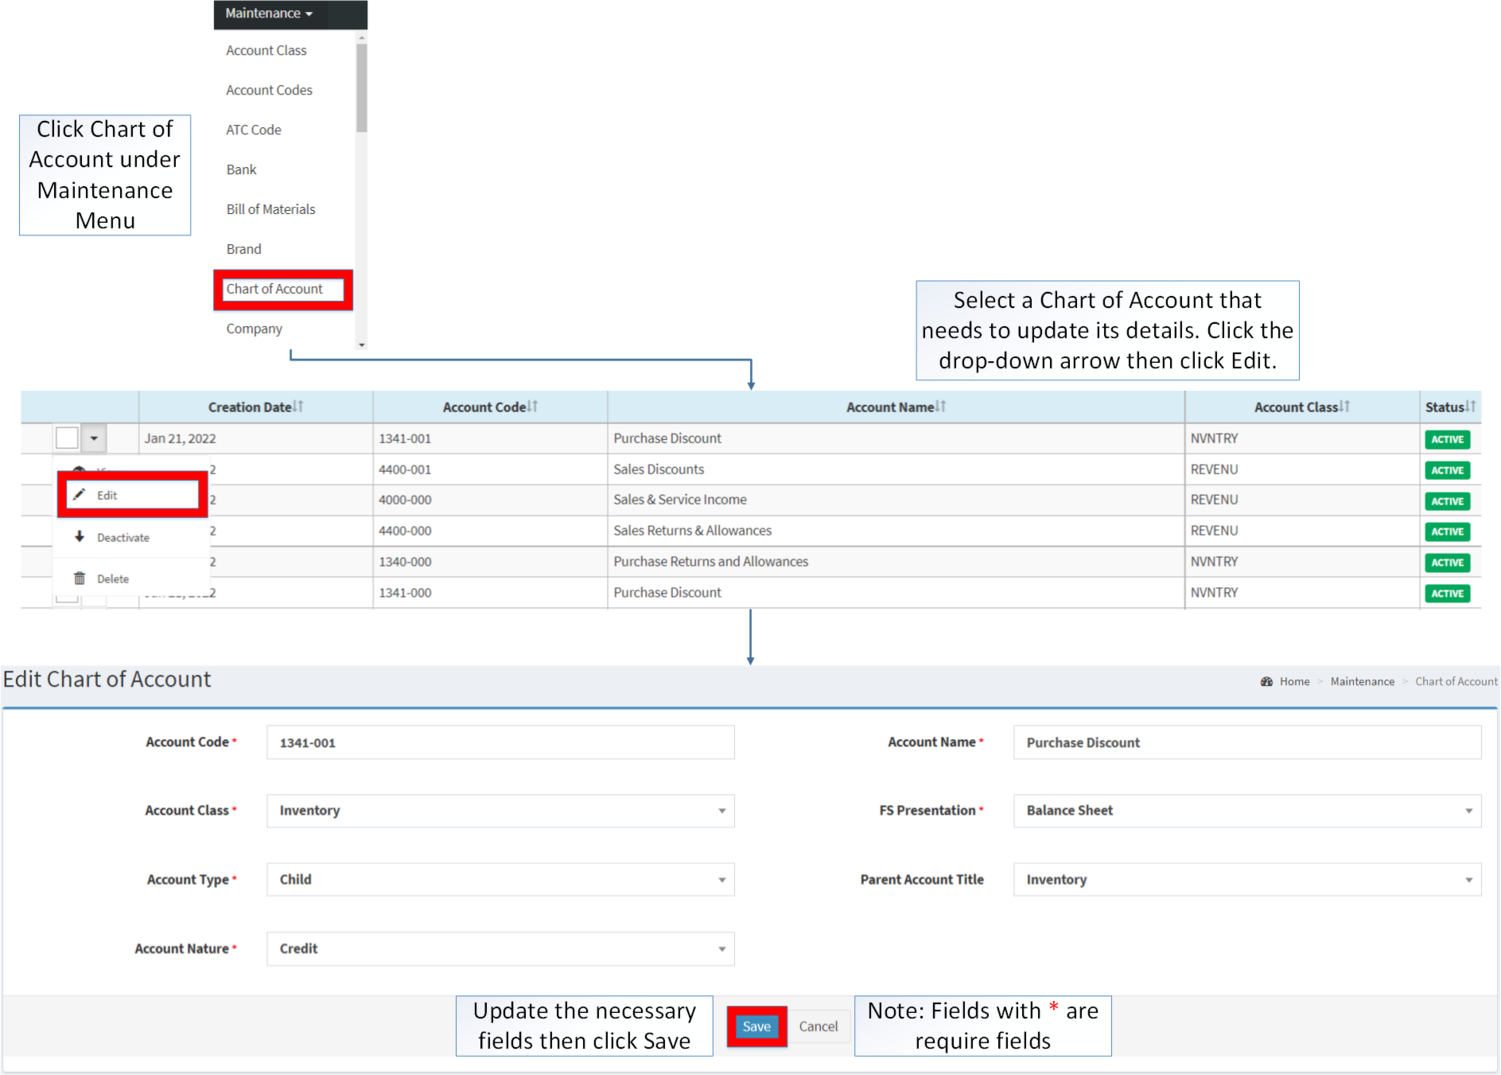
Editing Chart of Account
- Click Chart of Account under Maintenance Module
- Select a Chart of Account that needs to update its details. Click the drop-down arrow then click Edit.
- Update the necessary fields then click Save.
| Field | Description | Expected Values |
|---|---|---|
| 1.Account Code | •Reference Code for the Account | •Alphanumeric |
| 2.Account Name | •Name of the Account | •Alphanumeric |
| 3.Account Class | •Class of the Account | •Account Class List provided in Account Class Maintenance Module |
| 4.FS Presentation | •Presentation of Financial Statements | •Balance Sheet/Income Statement |
| 5.Account Type | •Type of Account | •Child/Parent/Both |
| 6.Parent Account Title | •Parent Account related on the Account | •Parent Account Title List |
| 7.Account Nature | •Nature of Account if it is Debit or Credit | •Debit/Credit |
Importing and Exporting Chart of Accounts
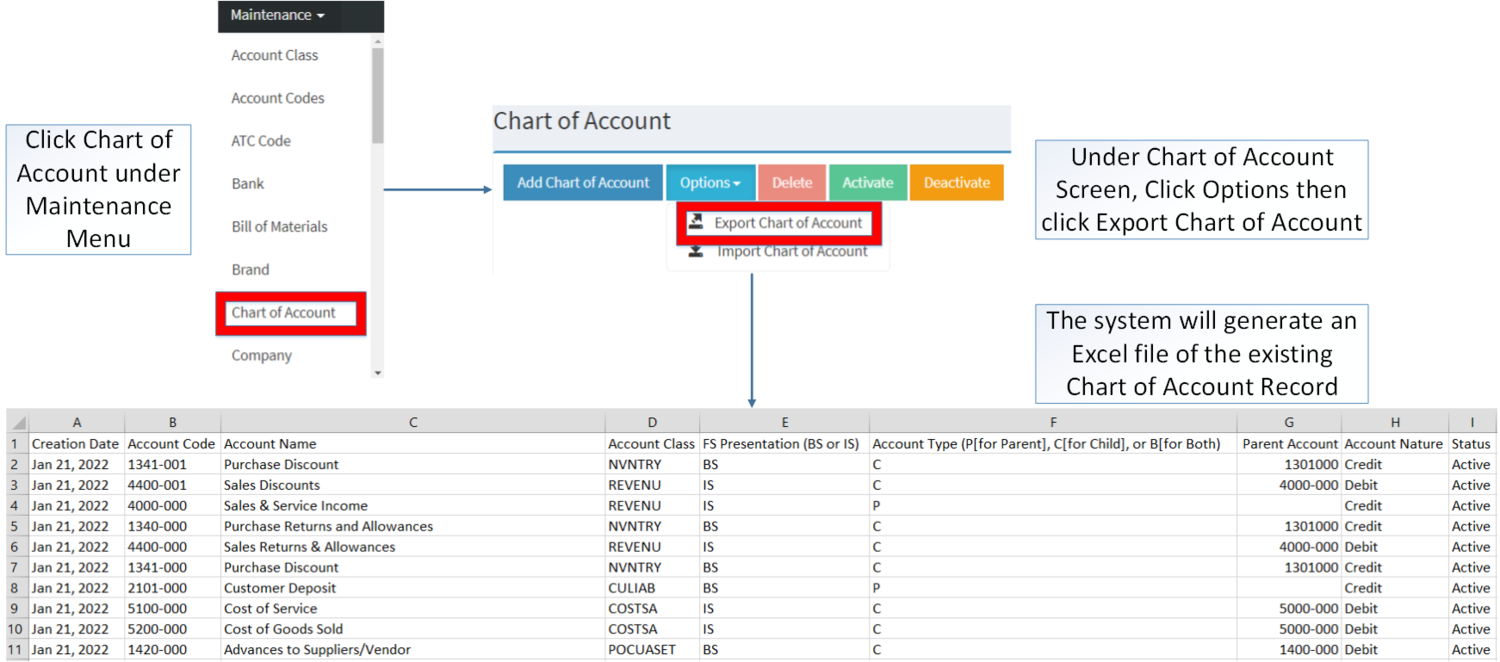
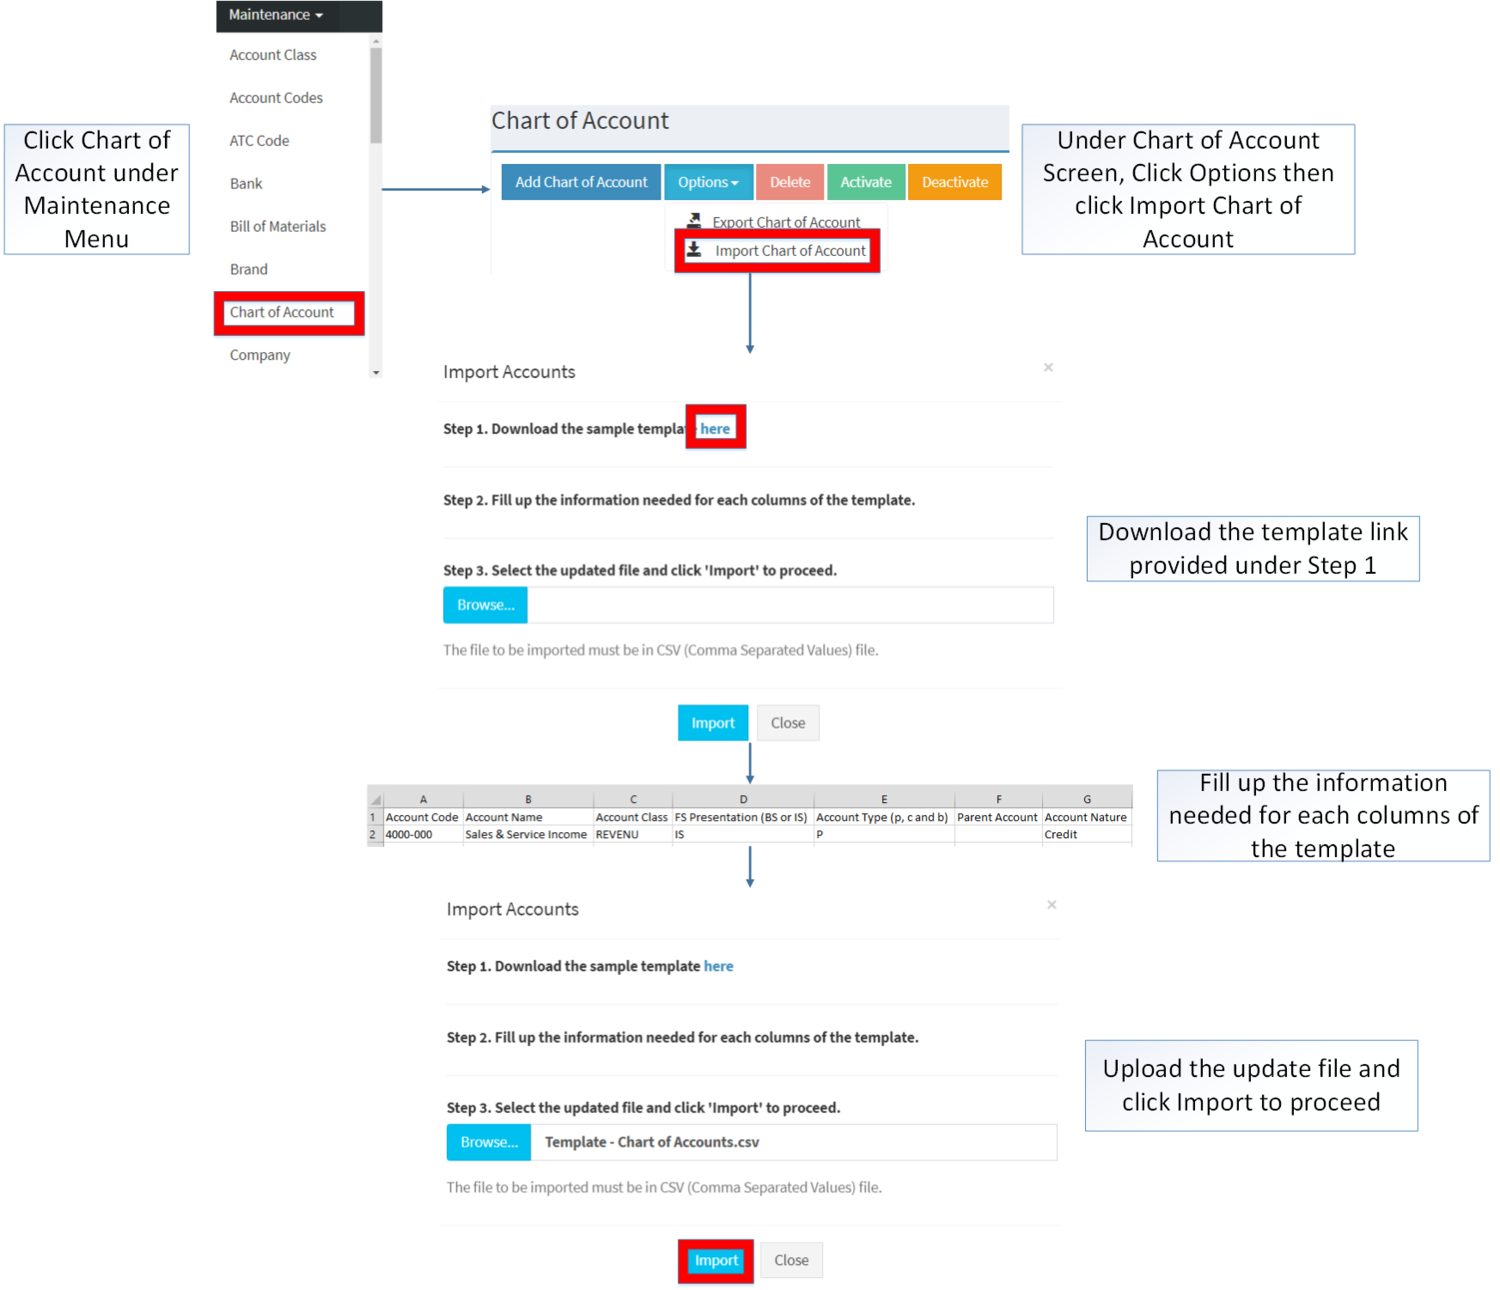
1. Under Chart of Account Screen, Click Options
2. Under Options, The user may Export or Import The Record
- When Exporting the records, the user may also use the filter options through tabs for precise searching and exporting of records.
- When Importing the records, the user should follow the following steps provided in the Importing Chart of Account Screen such as
| Field | Description | Allowed Inputs | Input Restrictions | Required Field? |
|---|---|---|---|---|
| 1.Account Code | Reference Code for the Account | *Alphanumeric
*Dash "-" *Underscore "_" |
*Up to 15 characters
*Other Special Characters *Space" |
Yes |
| 2.Account Name | Name of the Account | *Alphanumeric
*Special Characters |
*Up to 200 characters | Yes |
| 3.Account Class | Class of the Account | *Account Class List provided in Account Class Maintenance Module | *Any inputs not mentioned in the allowed inputs | Yes |
| 4.FS Presentation | Presentation of Financial Statements | *Balance Sheet
*Income Statement |
*Any inputs not mentioned in the allowed inputs | Yes |
| 5.Account Type | Type of Account | *Child
*Parent *Both |
*Any inputs not mentioned in the allowed inputs | Yes |
| 6.Parent Account | Parent Account related on the Account | *Existing Chart of Account Record whose Account Type is "Parent" or "Both"
*Account Code of the Parent Class provided in the Chart of Account Maintenance Module |
*Any inputs not mentioned in the allowed inputs | No |
| 7.Account Nature | Nature of Account if it is Debit or Credit | *Debit
*Credit |
*Any inputs not mentioned in the allowed inputs | Yes |
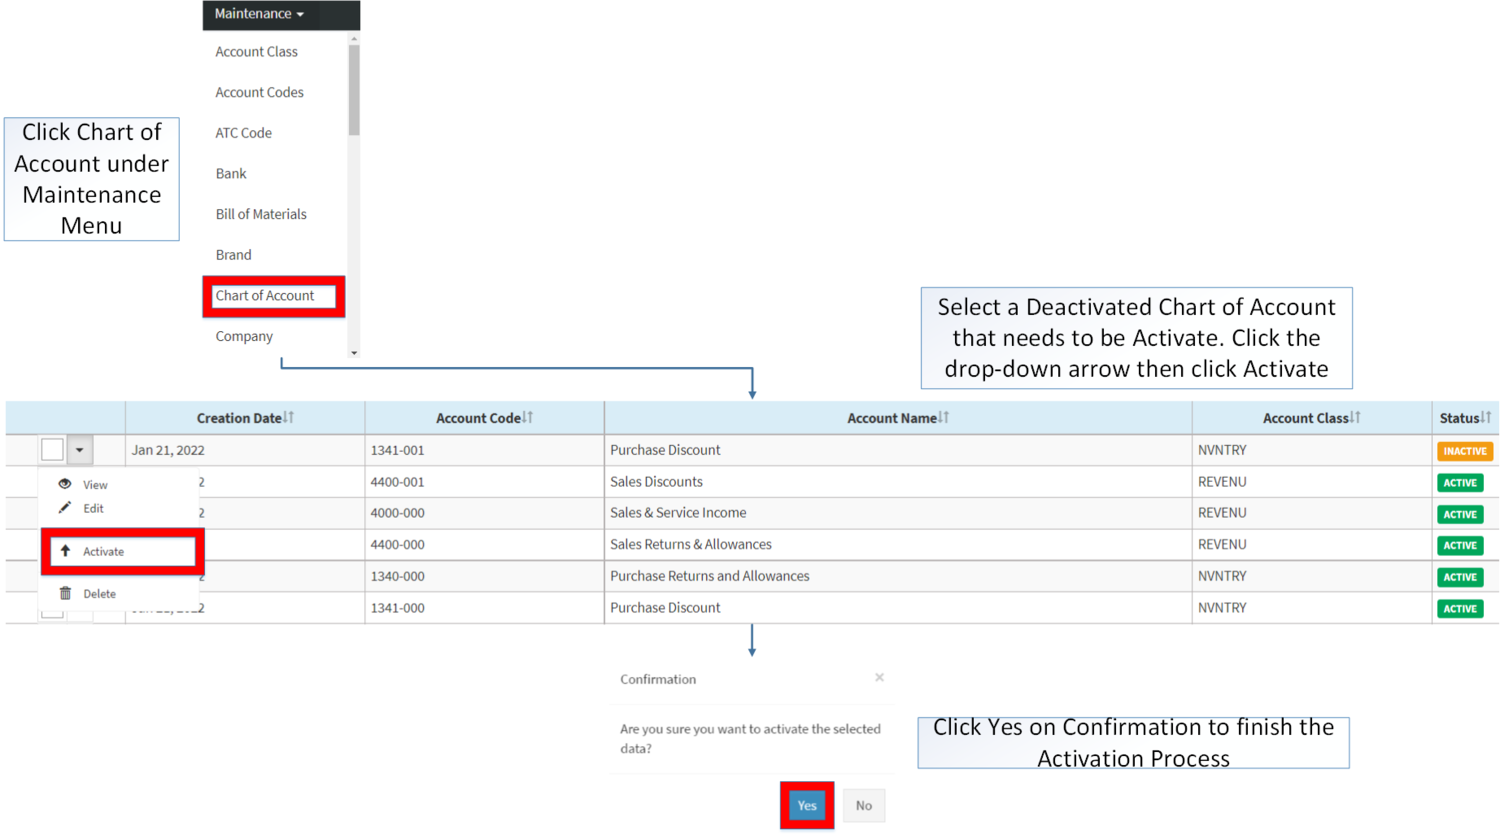
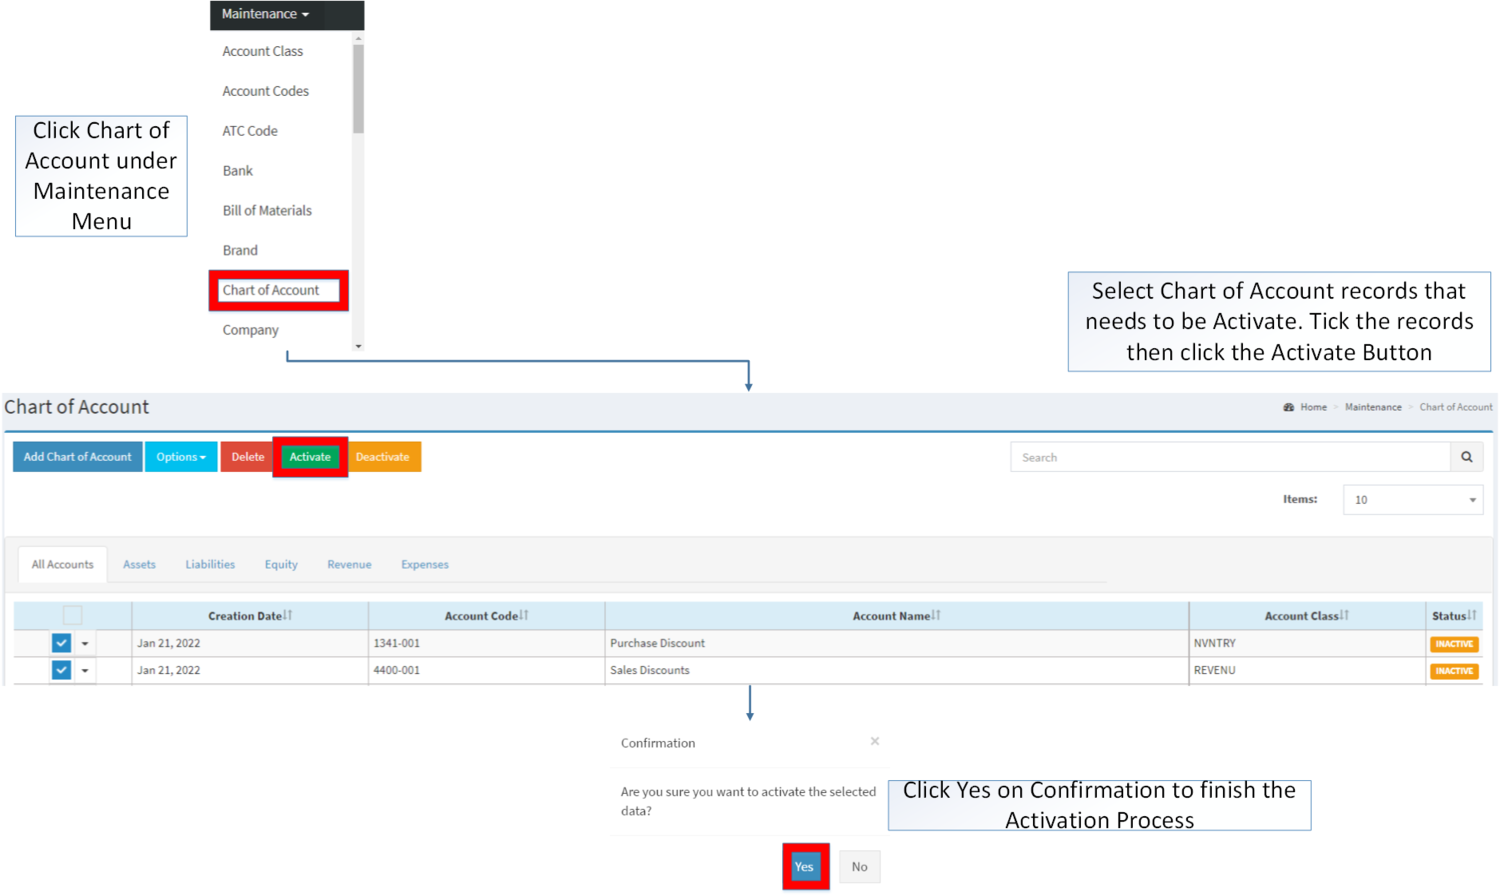
Activating Chart of Account Record
Chart of Account can be Activated in two ways:
- Using drop-down arrow of a record can be used in single record Activation
- Using Activate Button for activating multiple record
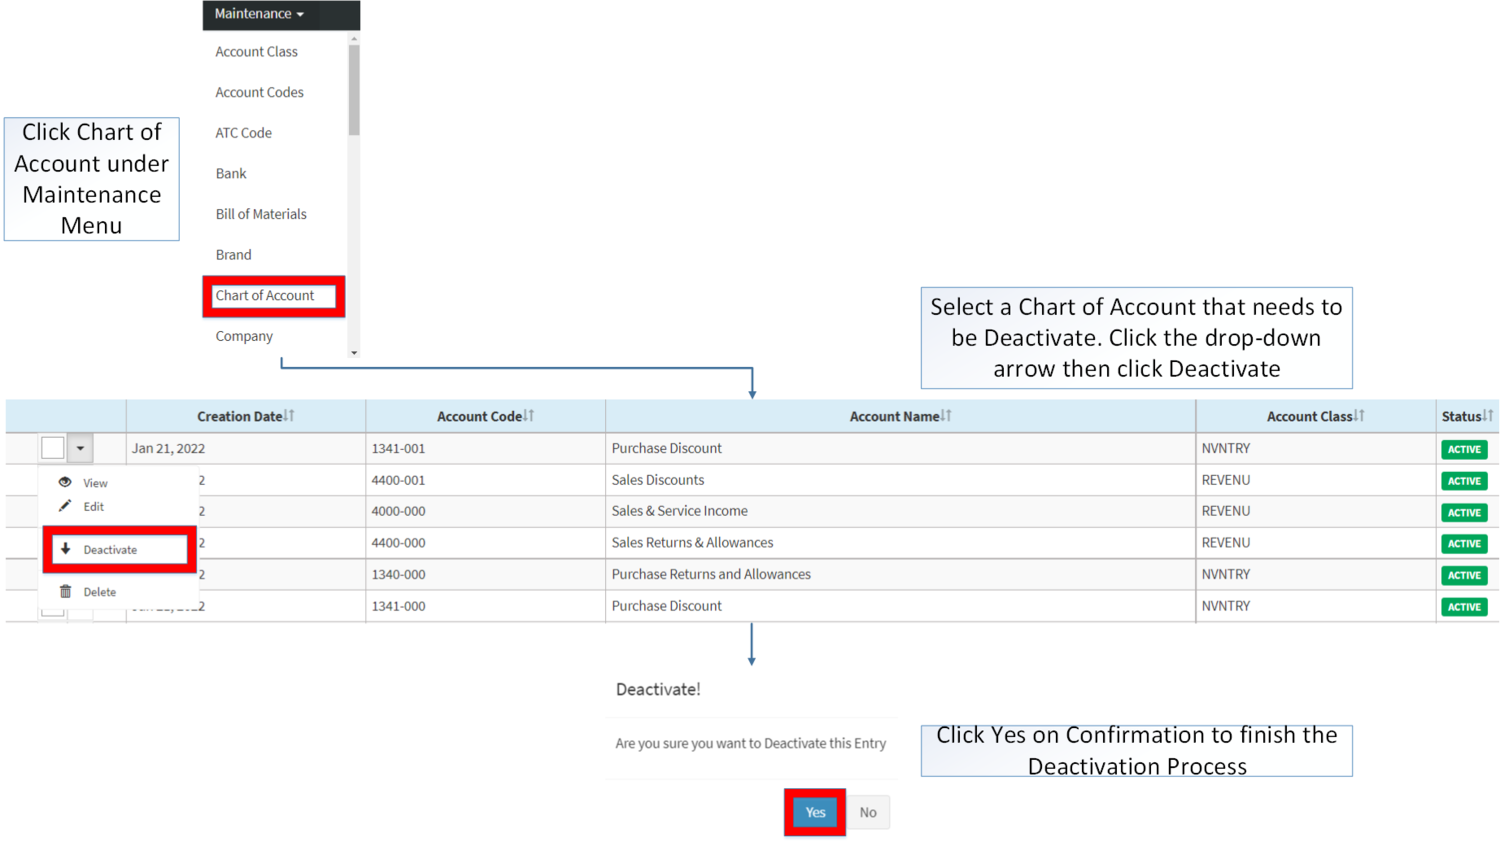
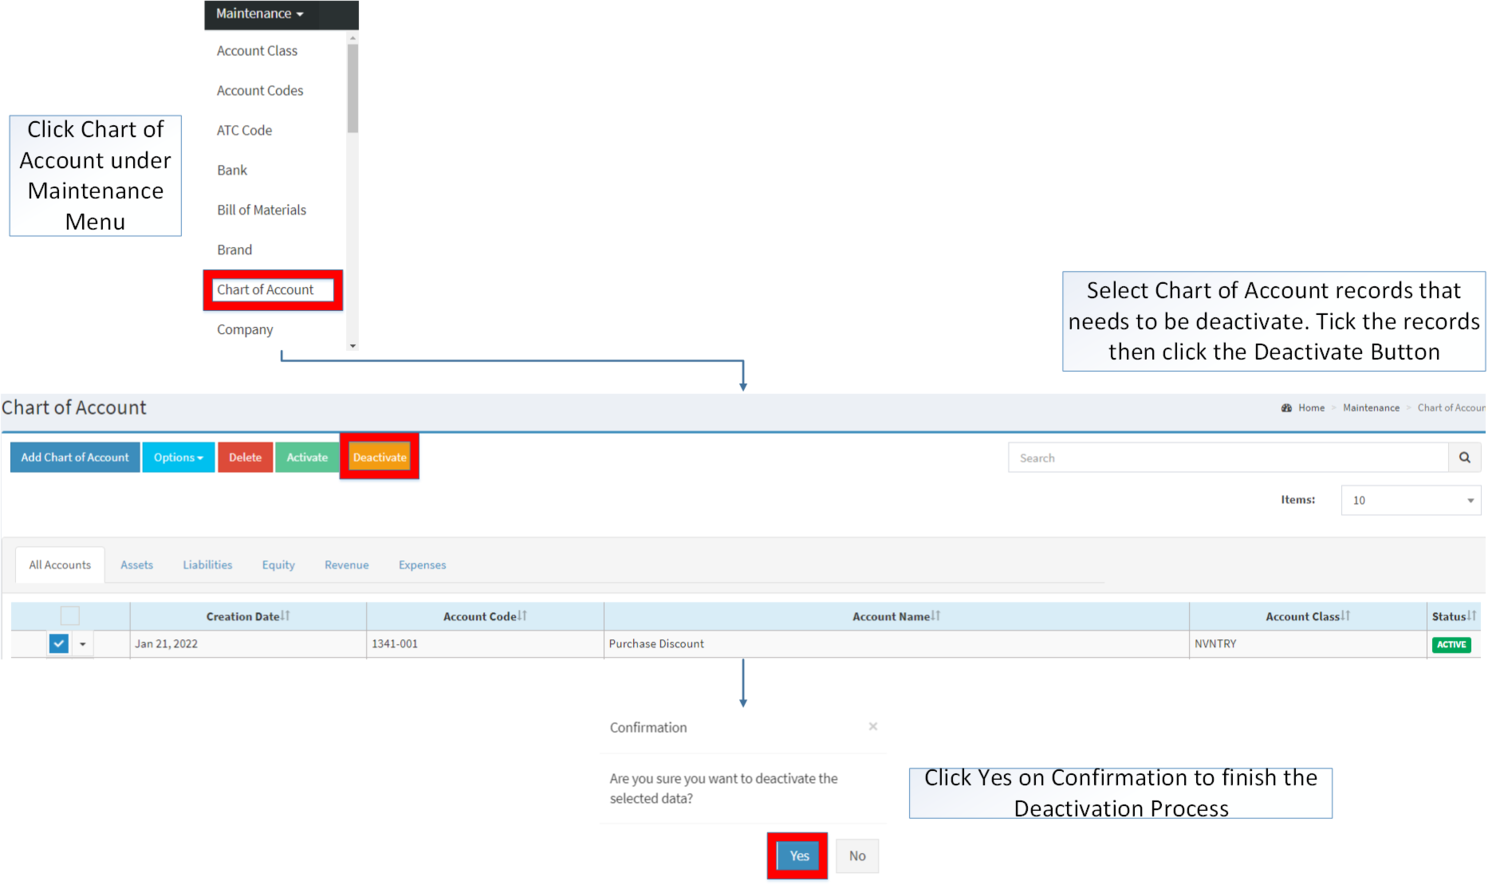
Deactivating Chart of Account Record
Chart of Account can be deactivated in two ways:
- Using drop-down arrow of a record can be used in single record deactivation
- Using Deactivate Button for deactivating multiple record
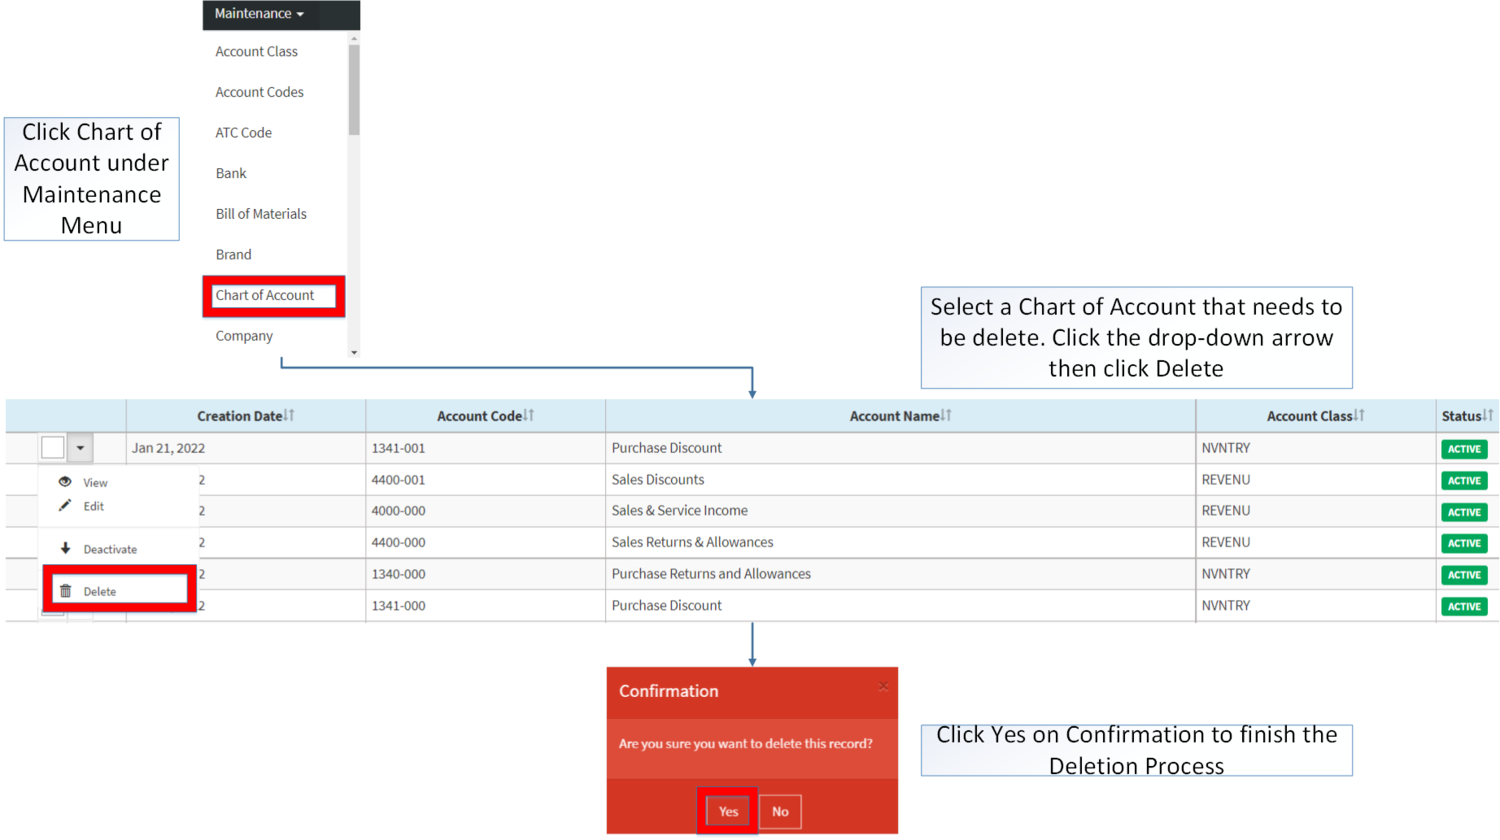
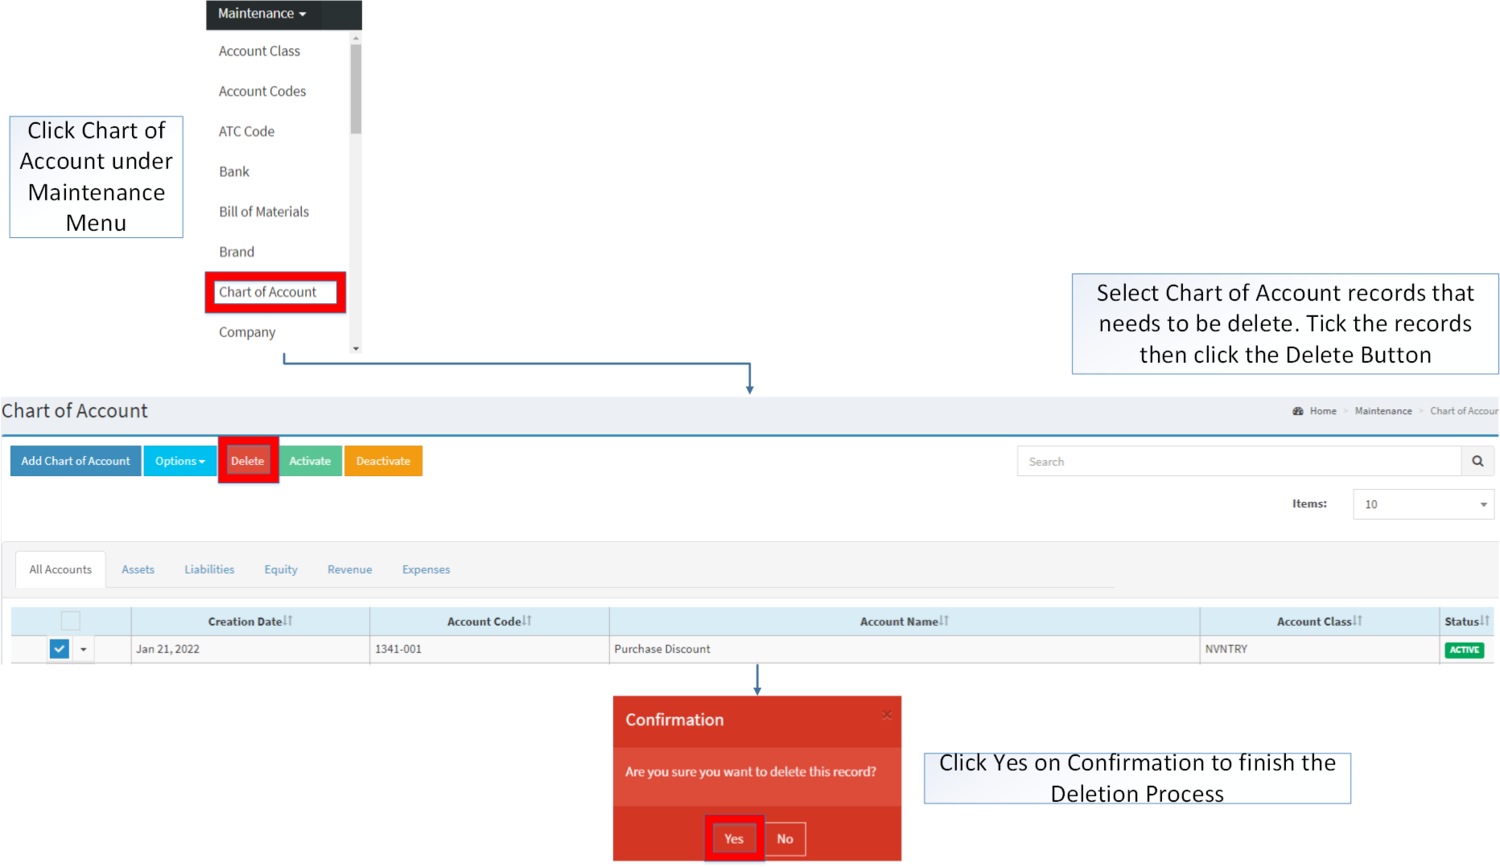
Deleting Chart of Account Record
Chart of Account can be deleted in two ways:
- Using drop-down arrow of a record can be used in single record deletion
- Using Delete Button for deleting multiple record
Chart of Account Record Option
| Status | View | Edit | Deactivate | Activate | Delete |
|---|---|---|---|---|---|
| ACTIVE | ☑ | ☑ | ☑ | ☑ | |
| INACTIVE | ☑ | ☑ | ☑ | ☑ |
Notes:
- Charts of accounts are important when creating or editing the following Module since it needs accounting details to proceed with the transaction
- The list of accounts can be used as long as its status is ACTIVE
- The user has an option to Edit the details when viewing the record.
- INACTIVE accounts cannot be used in the transaction but the INACTIVE accounts on the past transactions can still use it.
- Activating/Deactivating and Deleting of Records can be done in two ways.
- For single records, the user may use the drop down arrow then the action that need to perform.
- For multiple records, the user may tick the records then click the action button that need to perform
- Click the Yes in the confirmation to proceed on the action taken.
| Modules | |
|---|---|
| Maintenance | Maintenance | Account Class | Account Codes | ATC Code | Item Class | Item Master | Proforma | Tax |
| Financials | Accounts Payable | Accounts Receivable | Disbursement Voucher | Journal Voucher | Petty Cash | Payment Voucher | Receipt Voucher |
| Reports | |
| Financial Statements | Balance Sheet | Income Statement |
