You are viewing an old version of this page. Return to the latest version.
Difference between revisions of "Item Type"
(Tag: Visual edit) |
(Tag: Visual edit) |
||
| Line 14: | Line 14: | ||
=====Adding Item Type===== | =====Adding Item Type===== | ||
| − | # | + | #Click [[Item Type]] under Maintenance Menu |
| − | #Under Item Type Screen, click '''Add Item Type''' | + | #Under Item Type Screen, click '''Add Item Type''' |
| − | #Fill | + | #Fill out the necessary fields then click Save. Note: Fields with * are require fields |
[[File:Maintenance - Item Type - Add.png|border|center|1500x1500px]] | [[File:Maintenance - Item Type - Add.png|border|center|1500x1500px]] | ||
| Line 31: | Line 31: | ||
=====Viewing Item Type===== | =====Viewing Item Type===== | ||
| − | # | + | #Click [[Item Type]] under Maintenance Menu |
| − | #Select | + | #Select an Item Type that needs to view its details. Click the drop-down arrow then click View |
| − | # | + | #The user has an option to Edit the Item Type while viewing it. |
[[File:Maintenance - Item Type - View.png|border|center|1500x1500px]] | [[File:Maintenance - Item Type - View.png|border|center|1500x1500px]] | ||
| Line 40: | Line 40: | ||
#Go to Maintenance then click [[Item Type]] | #Go to Maintenance then click [[Item Type]] | ||
| − | #Select the Item Type that needs | + | #Select the Item Type that needs to update its details. Click the drop-down arrow then click '''Edit''' |
#Update the necessary Fields and Click '''Save''' | #Update the necessary Fields and Click '''Save''' | ||
| Line 172: | Line 172: | ||
|- | |- | ||
|Maintenance | |Maintenance | ||
| − | |[[Maintenance]]<nowiki> | </nowiki>[[Item Type]]<nowiki> | </nowiki>[[Item Class]]<nowiki> | </nowiki>[[Item Master | + | |[[Maintenance]]<nowiki> | </nowiki>[[Item Type]]<nowiki> | </nowiki>[[Item Class]]<nowiki> | </nowiki>[[Item Master]] |
| − | |||
| − | |||
| − | |||
| − | |||
| − | |||
|} | |} | ||
Revision as of 13:09, 24 March 2022
Contents
Item Type
This maintenance screen allows the users to configure and add item group and type on their items.
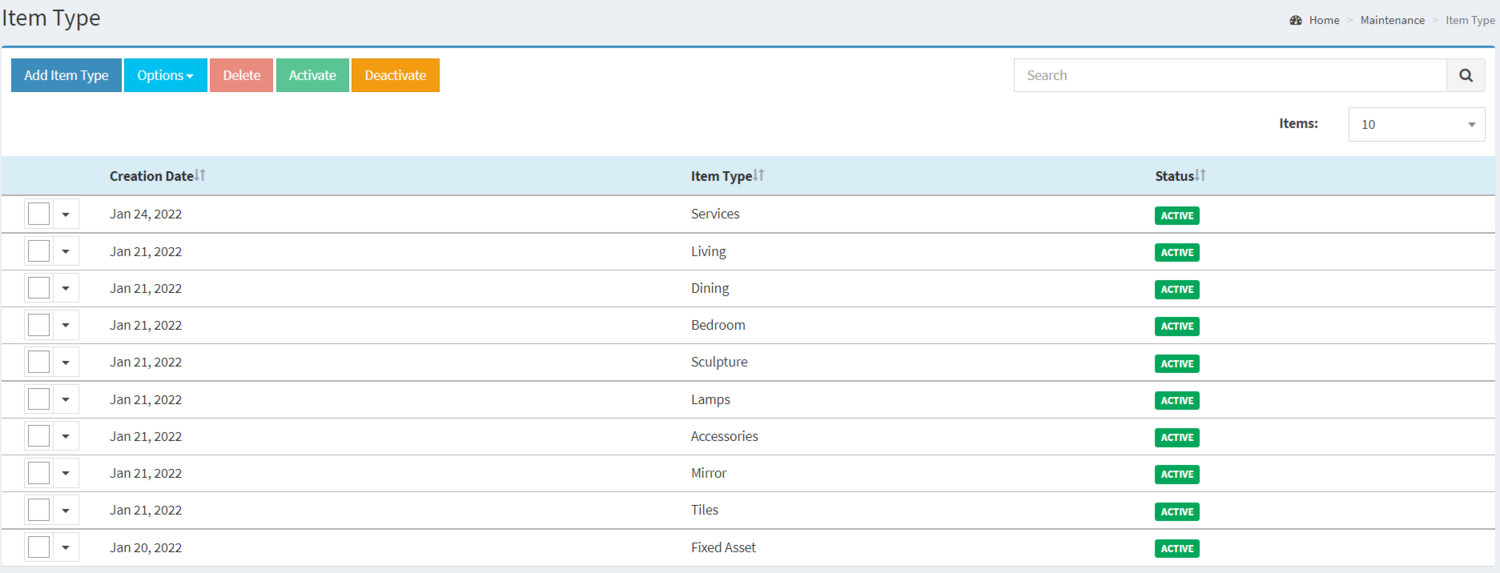
Item Type Record List
- Item Type is required when creating an Item Master Record.
- Item Type should be on ACTIVE status in order to use it on creating a Item Master record.
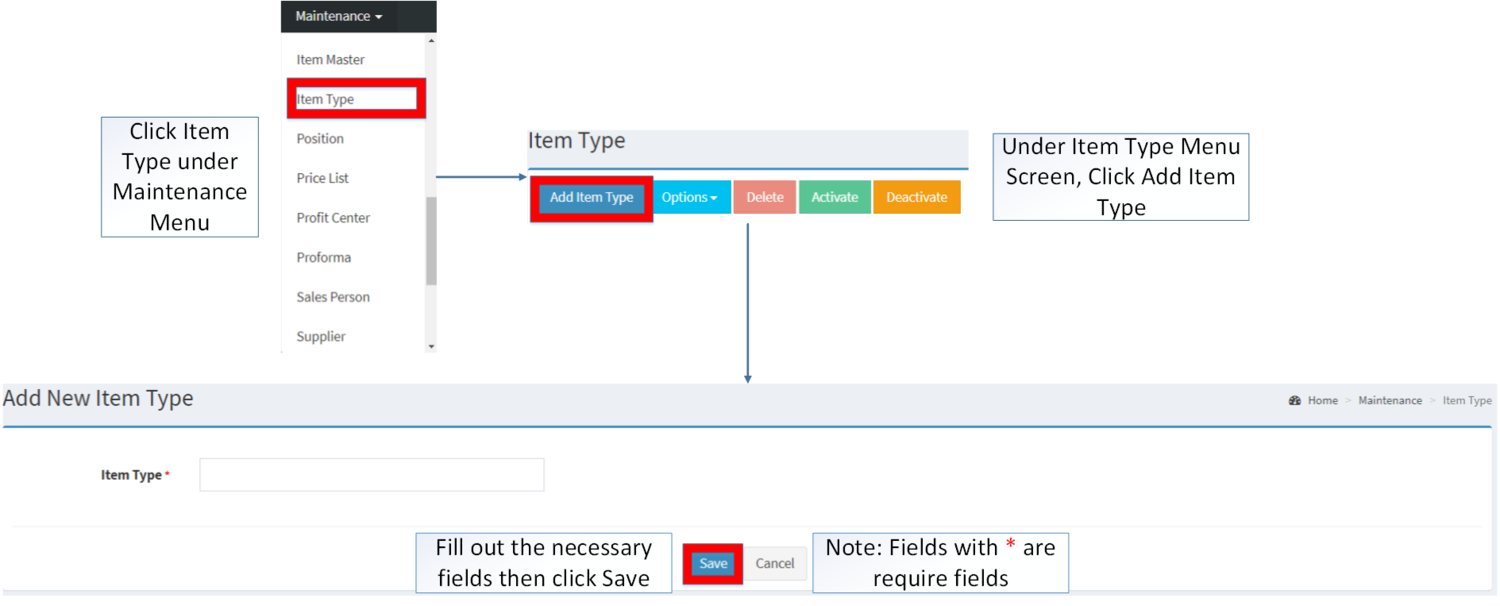
Adding Item Type
- Click Item Type under Maintenance Menu
- Under Item Type Screen, click Add Item Type
- Fill out the necessary fields then click Save. Note: Fields with * are require fields
| Field | Description | Expected Values |
|---|---|---|
| 1.Item Type | •Name of the Item Type | •Alphanumeric |
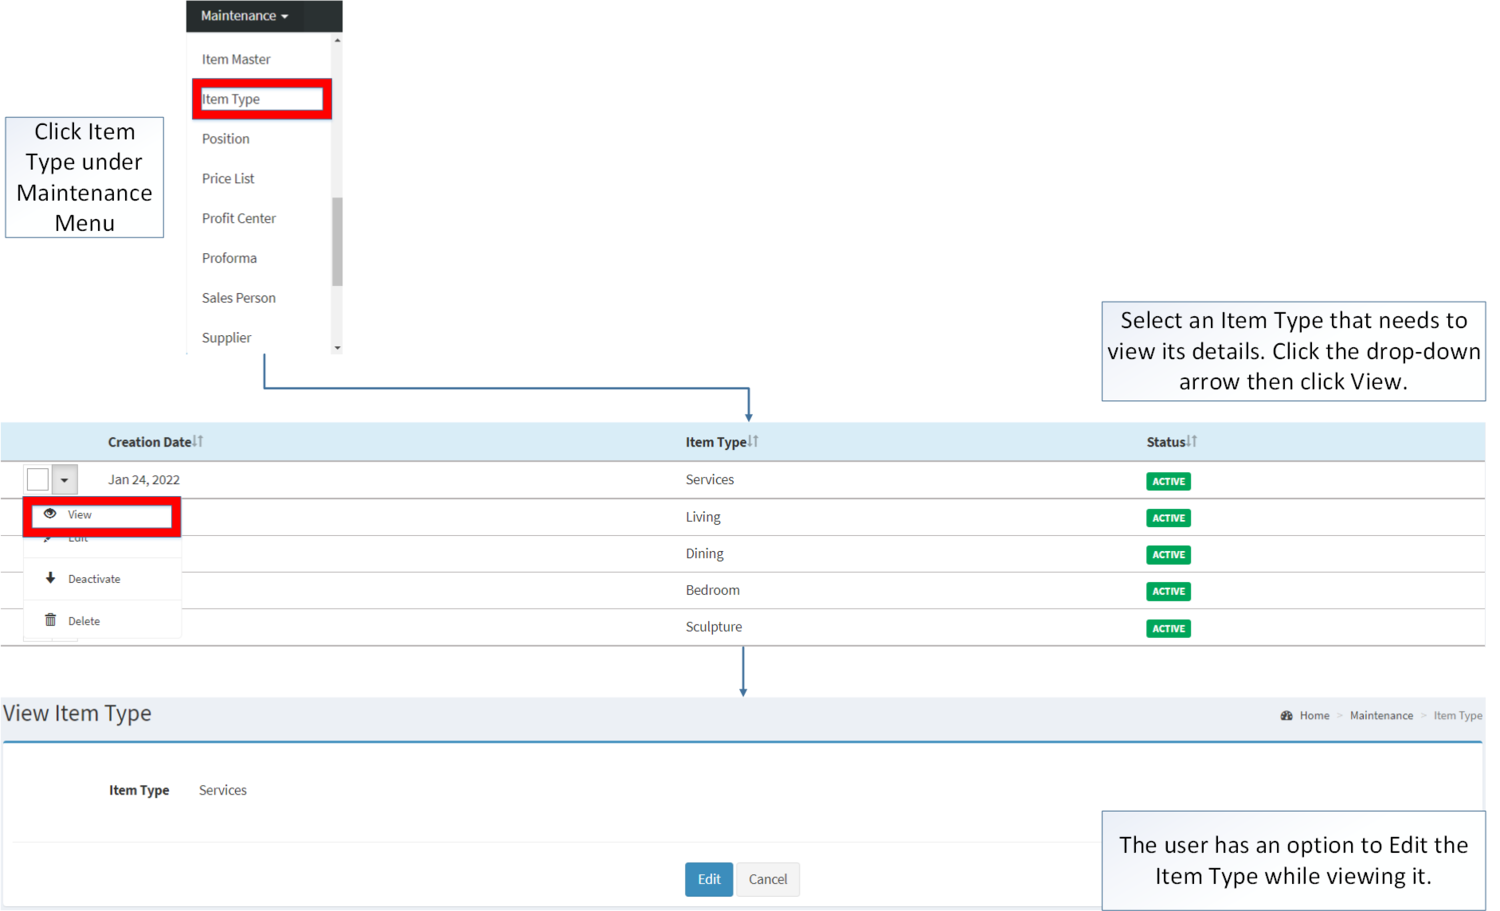
Viewing Item Type
- Click Item Type under Maintenance Menu
- Select an Item Type that needs to view its details. Click the drop-down arrow then click View
- The user has an option to Edit the Item Type while viewing it.
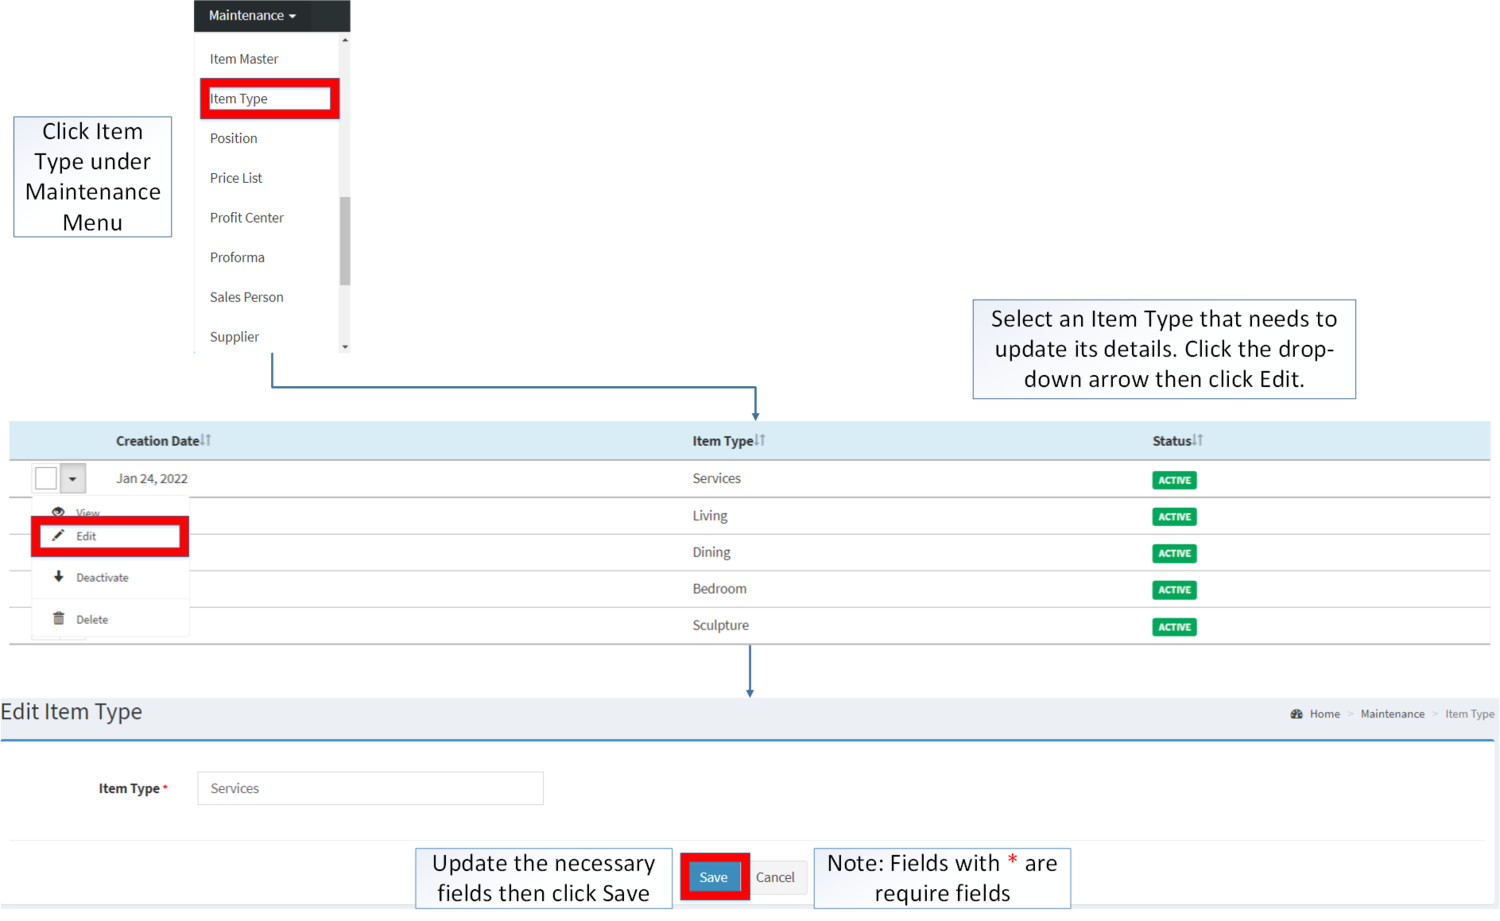
Editing Item Type
- Go to Maintenance then click Item Type
- Select the Item Type that needs to update its details. Click the drop-down arrow then click Edit
- Update the necessary Fields and Click Save
| Field | Description | Expected Values |
|---|---|---|
| 1.Item Type | •Name of the Item Type | •Alphanumeric |
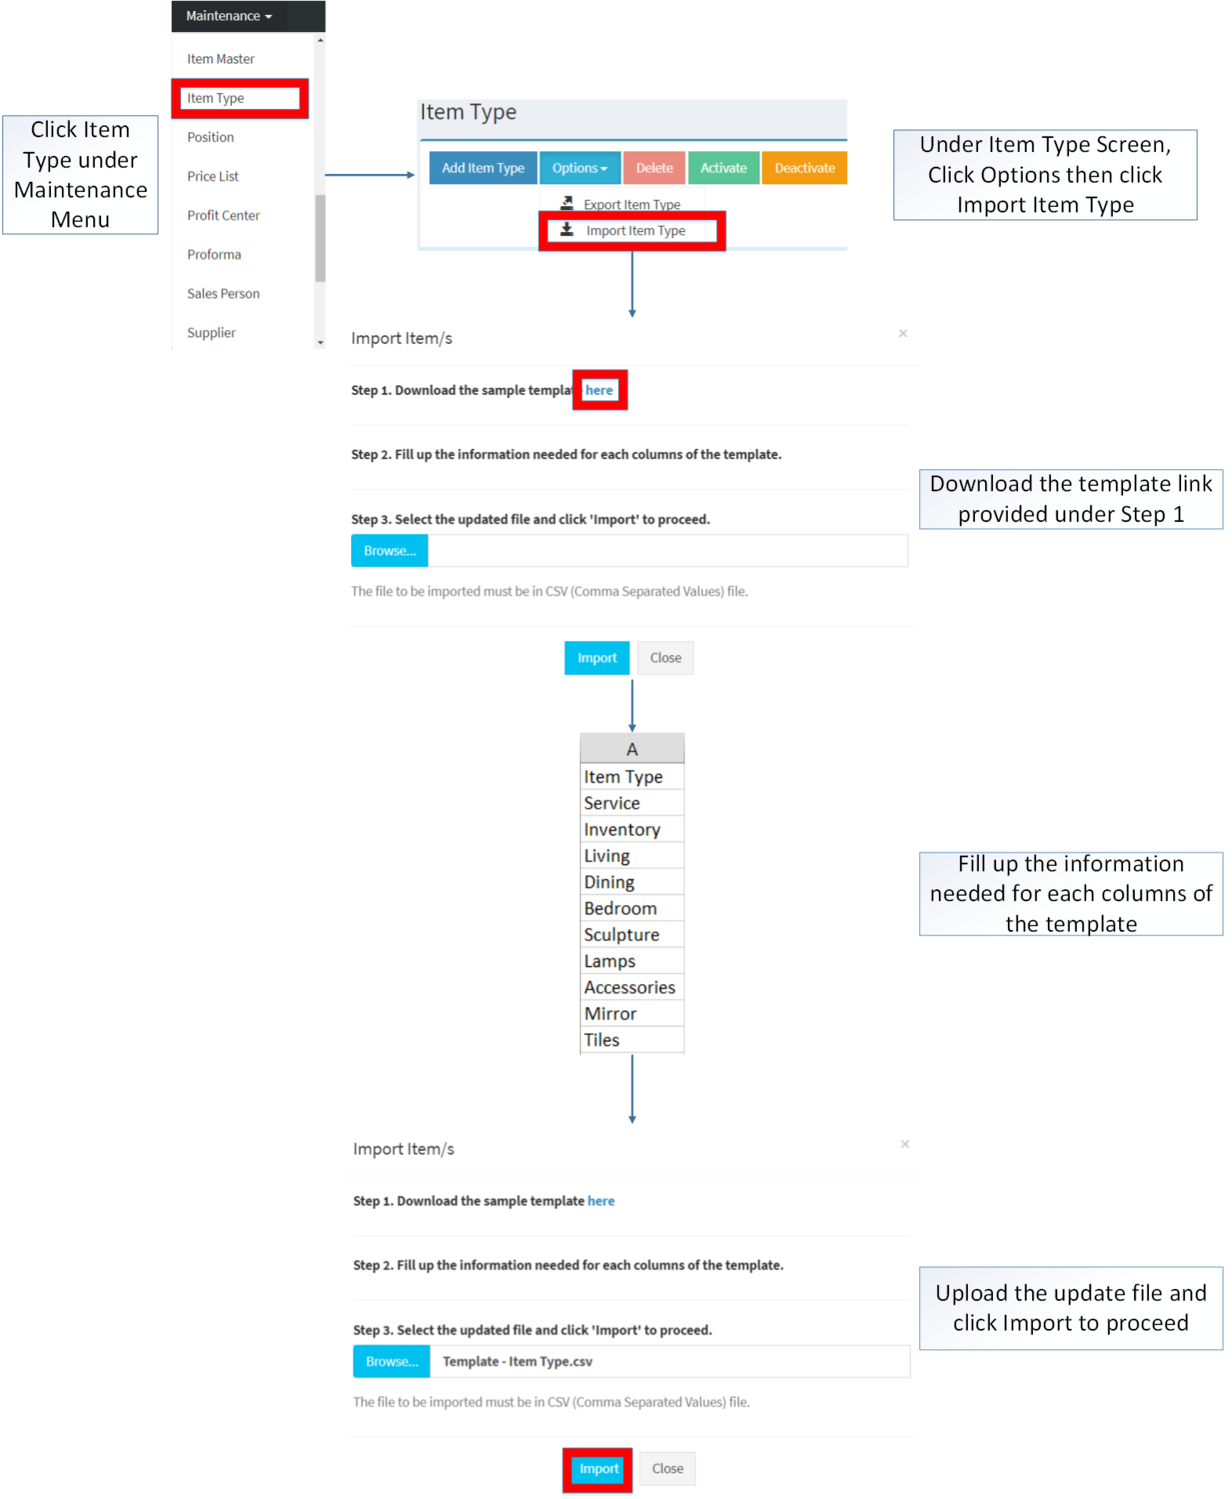
Importing and Exporting Item Type
1. Under Item Class, Click Options
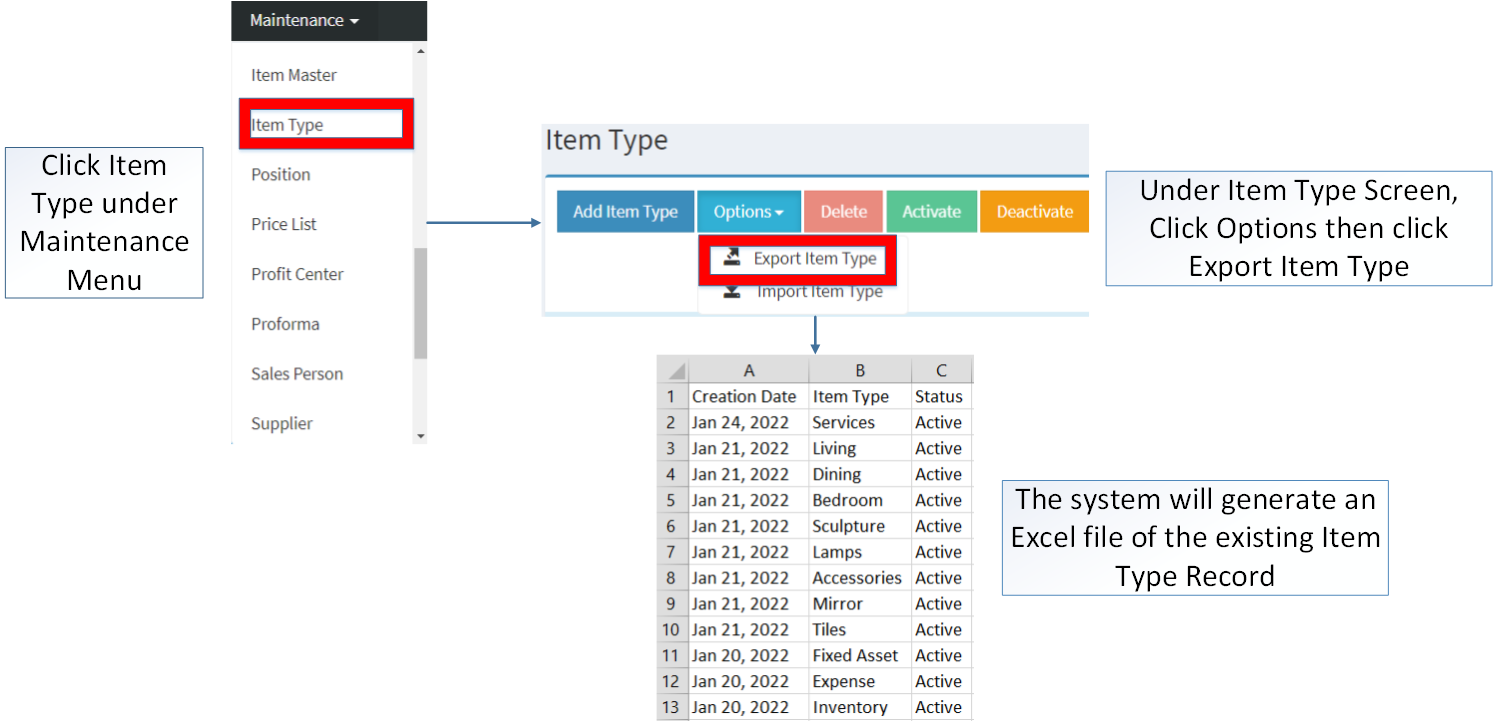
2. Under Options, The user may Export or Import The Record
- When Exporting the records, the user may also use the filter options through tabs for precise searching and exporting of records.
- When Importing the records, the user should follow the following steps provided in the Importing Item Type Screen such as
- Downloading the template link provided under Step 1.
- Filling up the information needed for each columns of the template
- Uploading the updated Template
| Item Class Details | ||||
|---|---|---|---|---|
| Field | Description | Allowed Inputs | Input Restrictions | Required Field? |
| 1. Item Type | Name of the Item Type | *Alphanumeric
*Dash "-" *Underscore "_" |
*Up to 25 characters
*Other Special Characters not mentioned |
Yes |
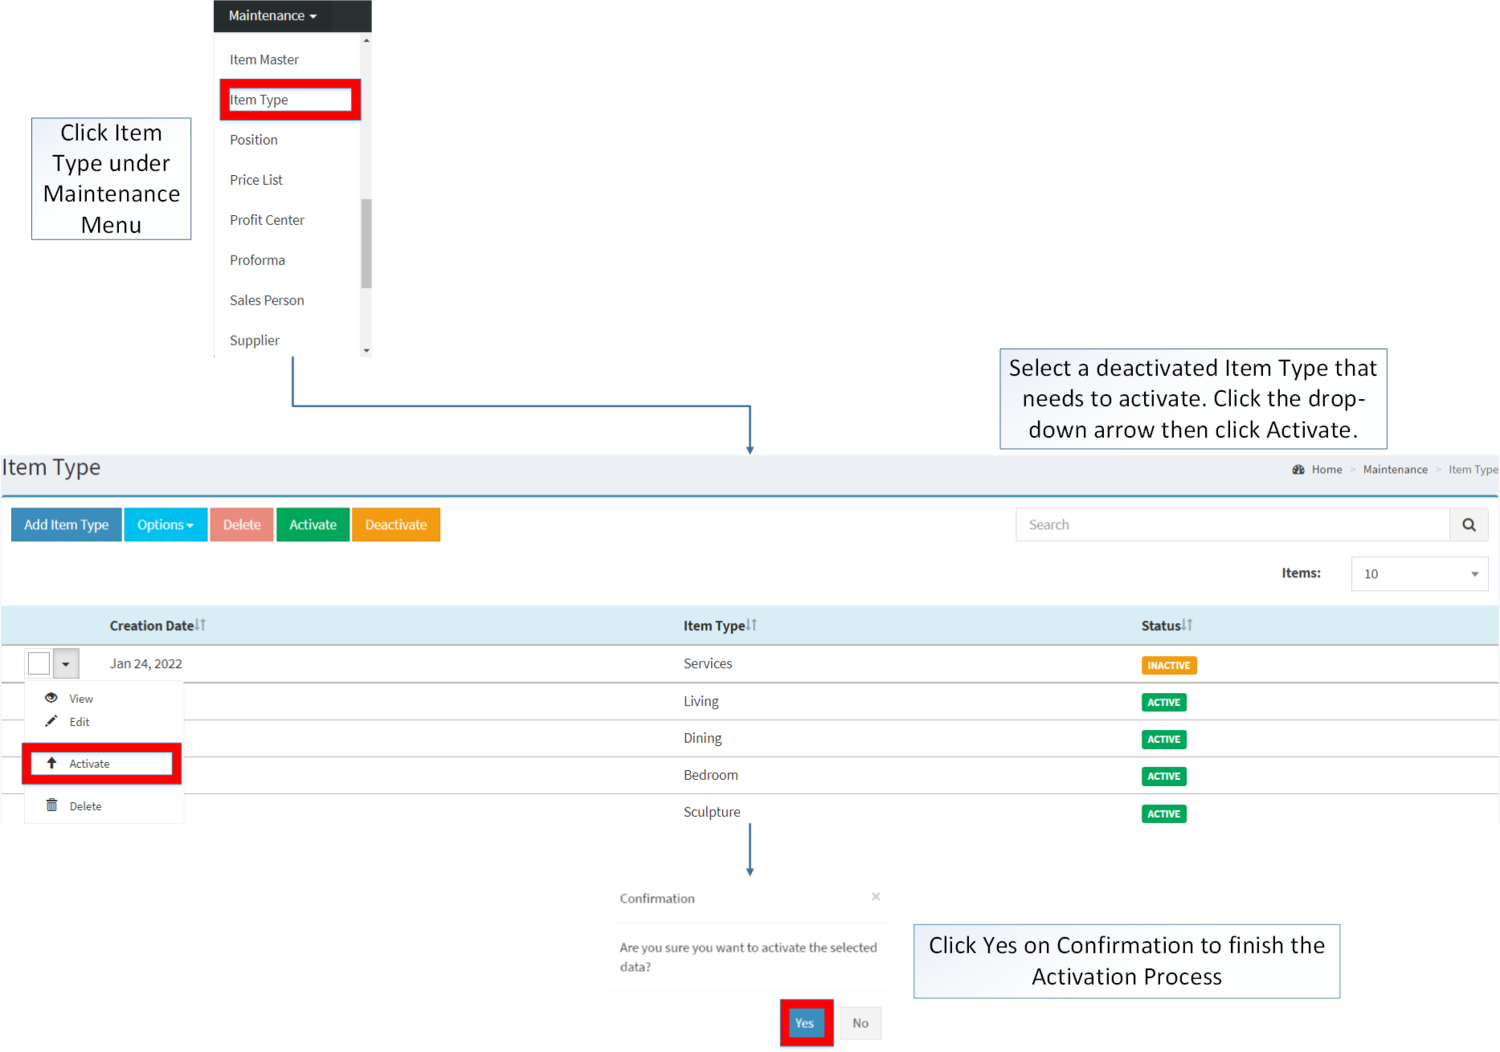
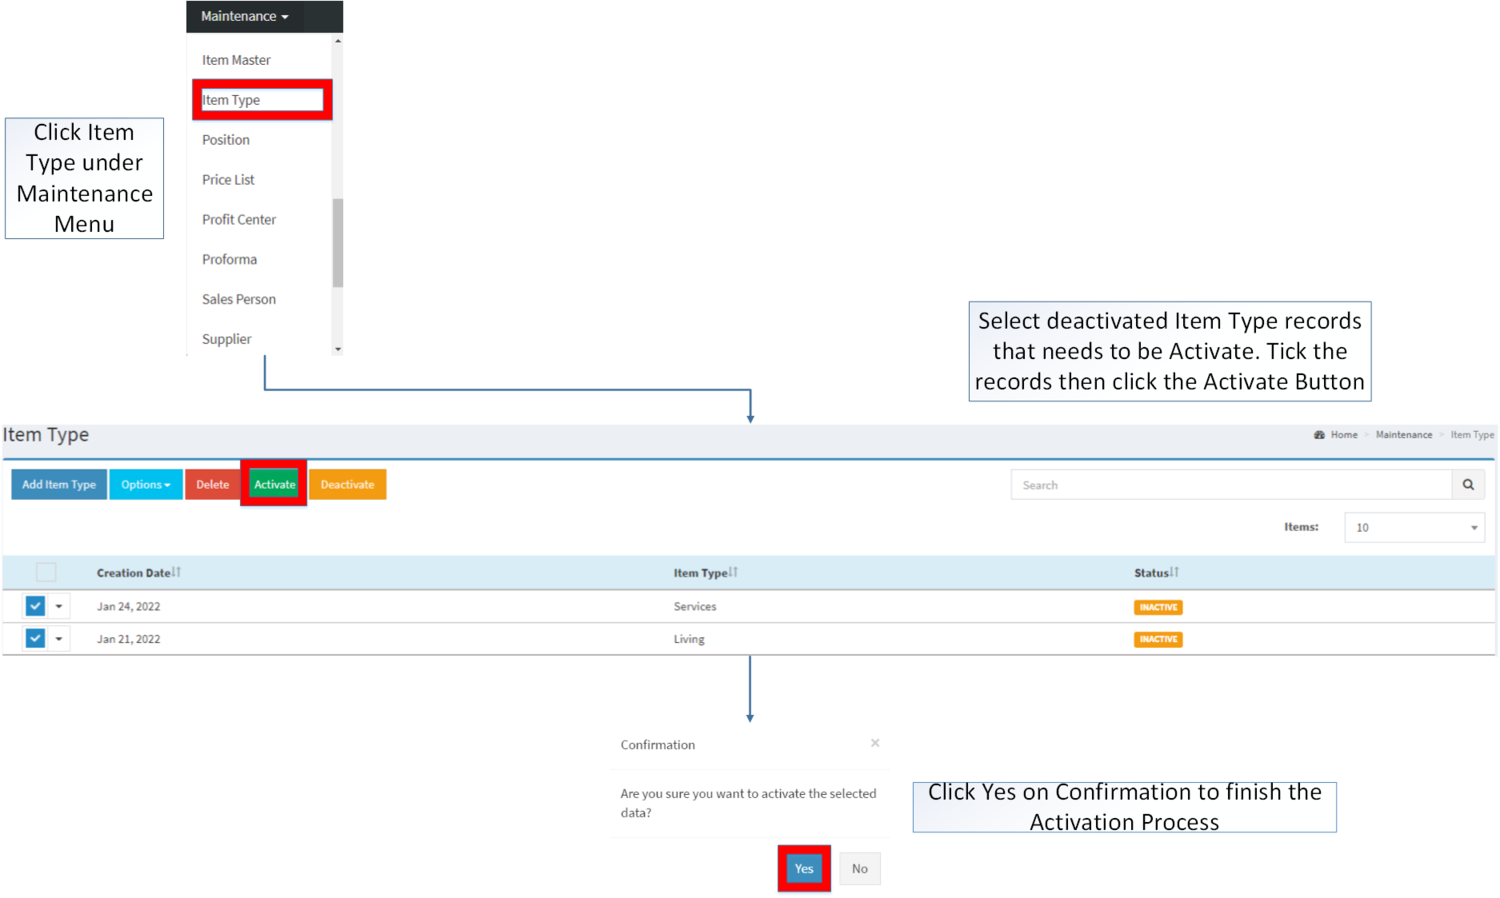
Activating Item Type Record
Item Type can be Activated in two ways:
- Using drop-down arrow of a record can be used in single record Activation
- Using Activate Button for activating multiple record
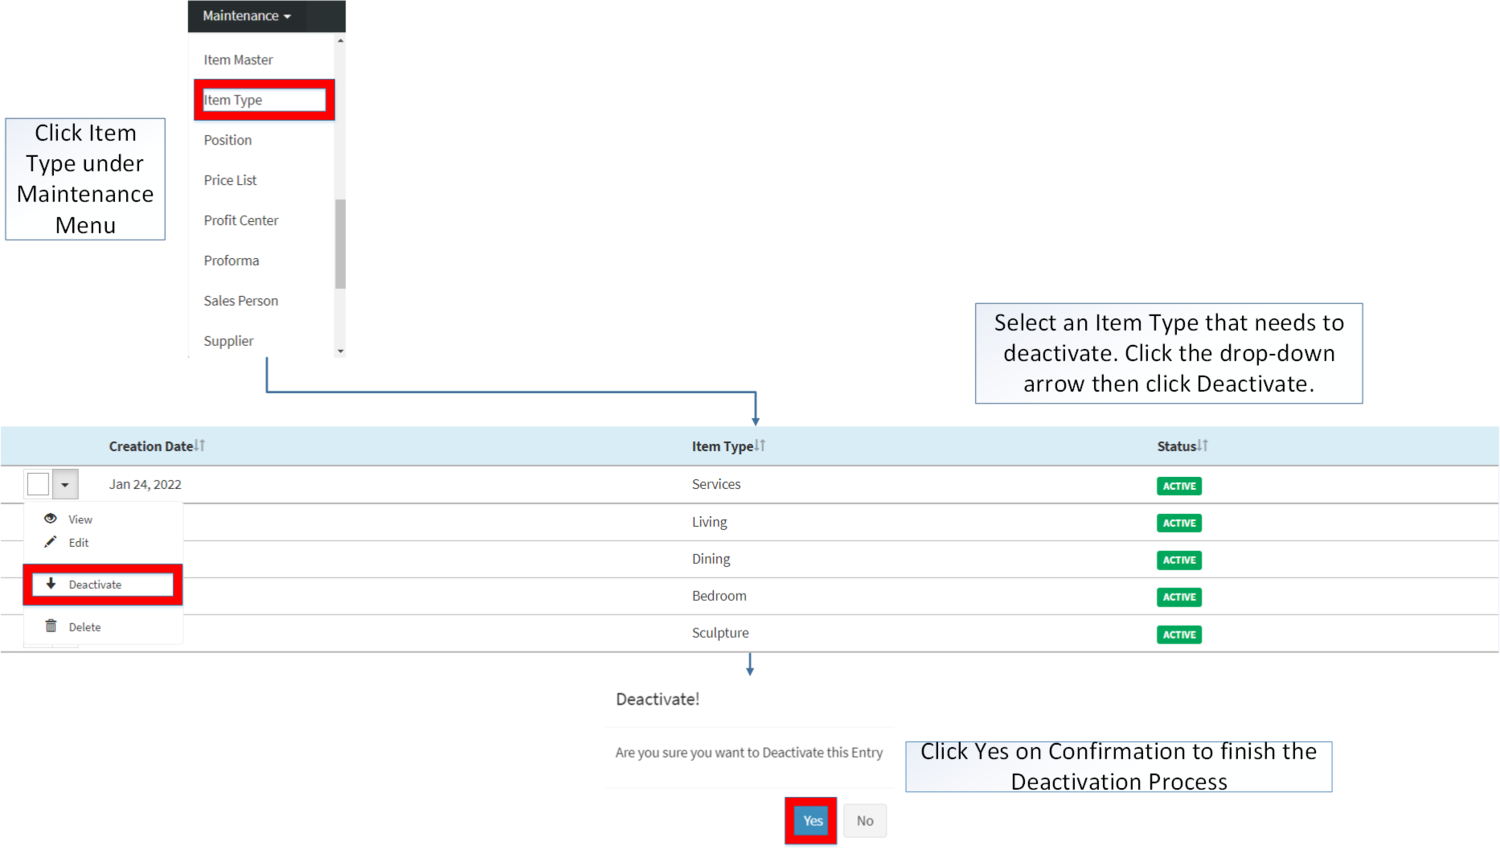
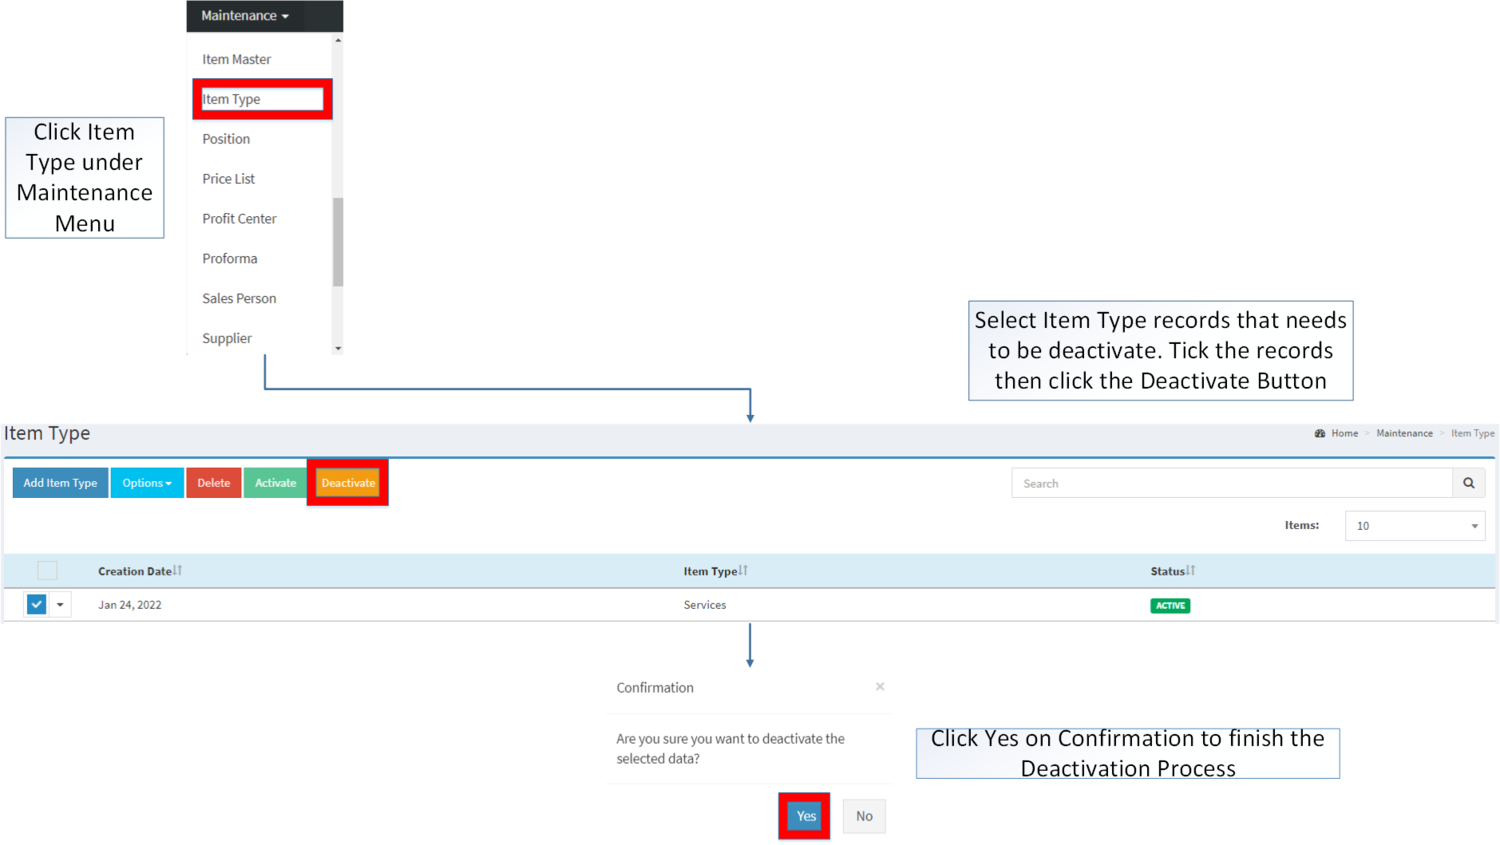
Deactivating Item Type Record
Item Type can be deactivated in two ways:
- Using drop-down arrow of a record can be used in single record deactivation
- Using Deactivate Button for deactivating multiple record
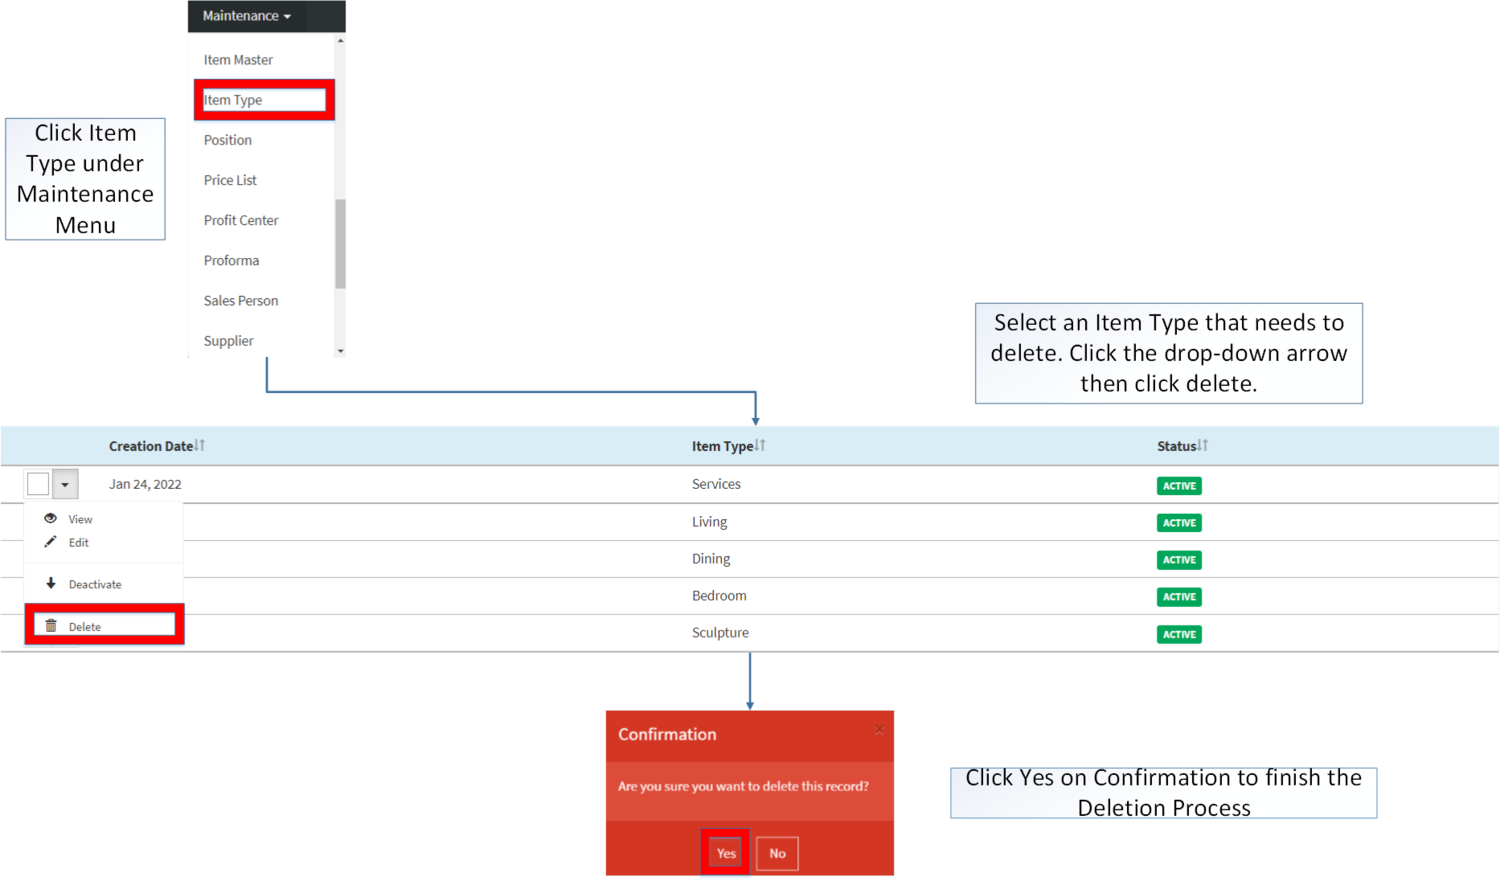
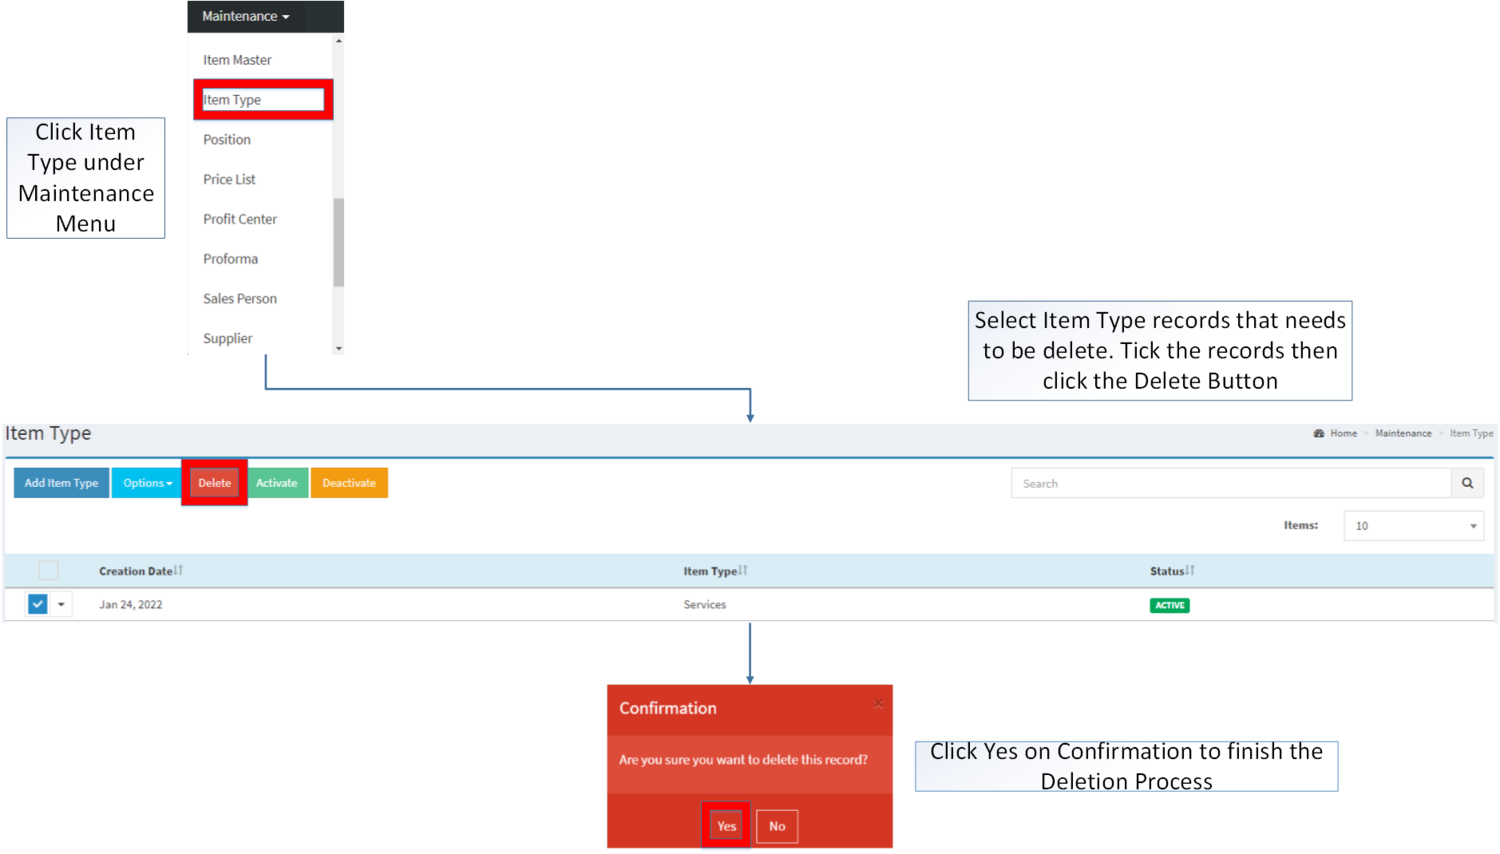
Deleting Item Type Record
Item Type can be deleted in two ways:
- Using drop-down arrow of a record can be used in single record deletion
- Using Delete Button for deleting multiple record
Item Type Record Option
| Status | View | Edit | Deactivate | Activate | Delete |
|---|---|---|---|---|---|
| ACTIVE | ☑ | ☑ | ☑ | ☑ | |
| INACTIVE | ☑ | ☑ | ☑ | ☑ |
Notes:
- The user can edit the details while viewing the record.
- Item Type is required field on Item Master Module. Item Type can be use as long as its status is ACTIVE
- INACTIVE Item Type can still be used as long as it is already tag on the past records prior to its deactivation
- Used Item Type record cannot be deleted.
- Activating/Deactivating and Deleting of Records can be done in two ways.
- For single records, the user may use the drop down arrow then the action that need to perform.
- For multiple records, the user may tick the records then click the action button that need to perform
- Click the Yes in the confirmation to proceed on the action taken.
| Modules | |
|---|---|
| Maintenance | Maintenance | Item Type | Item Class | Item Master |
