You are viewing an old version of this page. Return to the latest version.
Difference between revisions of "Payment Voucher"
(Tag: Visual edit) |
(Tag: Visual edit) |
||
| Line 33: | Line 33: | ||
=====Adding Payment Voucher===== | =====Adding Payment Voucher===== | ||
| − | # | + | #Click [[Payment Voucher]] under Financials Menu |
| − | #Click '''Add Payment Voucher''' | + | #Under Payment Voucher Screen, Click '''Add Payment Voucher''' |
| − | #Fill | + | #Fill out the necessary Fields in the Header Section |
| − | #Fill up the necessary Fields on the Accounting | + | #Fill up the necessary Fields on the Accounting Details then Click '''Save''' |
[[File:Financials - Payment Voucher - Add.png|border|center|1500x1500px]] | [[File:Financials - Payment Voucher - Add.png|border|center|1500x1500px]] | ||
| Line 132: | Line 132: | ||
=====Viewing Payment Voucher===== | =====Viewing Payment Voucher===== | ||
| − | # | + | #Click the [[Payment Voucher]] under Financials Menu |
| − | #Select | + | #Select Payment Voucher that needs to view its details. Click the drop-down arrow then click View'''.''' |
| − | # | + | #The user has an option to Edit the Payment Voucher upon Viewing it. |
[[File:Financials - Payment Voucher - View.png|border|center|1533x1533px]] | [[File:Financials - Payment Voucher - View.png|border|center|1533x1533px]] | ||
| Line 141: | Line 141: | ||
=====Editing Payment Voucher===== | =====Editing Payment Voucher===== | ||
| − | # | + | #Click [[Payment Voucher]] under Financials Menu. |
| − | #Select | + | #Select Payment Voucher record that needs to update its details. Click the drop-down arrow then click '''Edit.''' |
#Update the necessary fields then click '''Save.''' | #Update the necessary fields then click '''Save.''' | ||
| Line 239: | Line 239: | ||
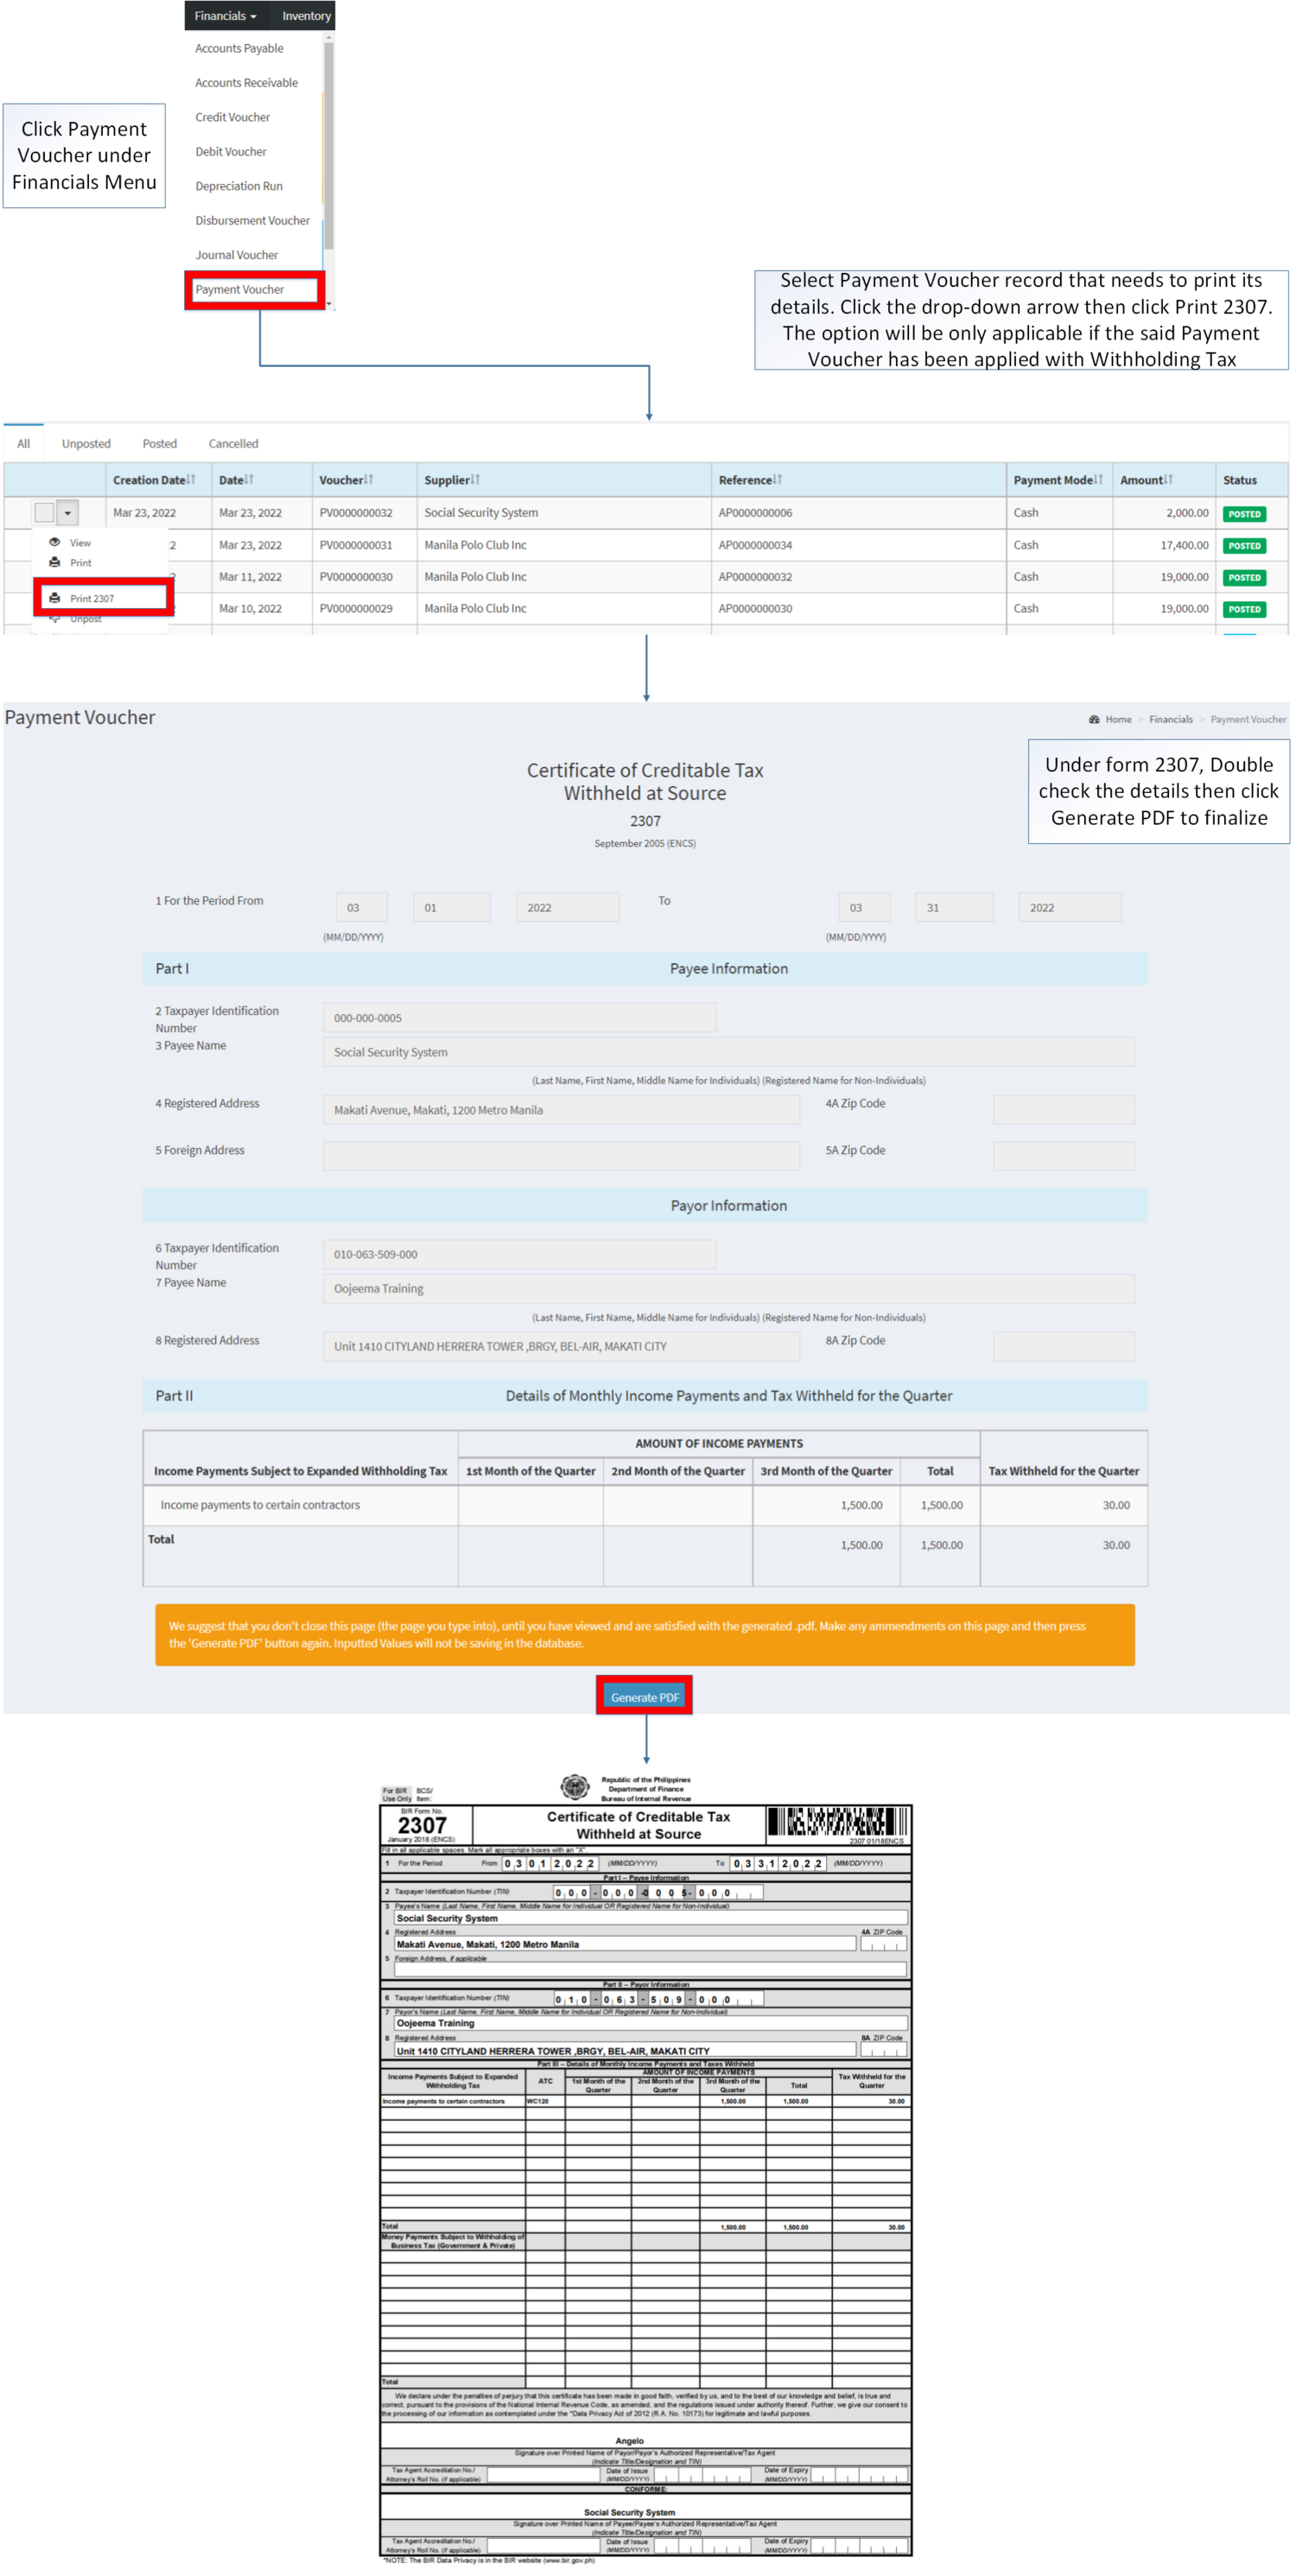
=====<span class="mw-headline ve-pasteProtect" id="Printing_Accounts_Receivable" style="box-sizing: inherit;" data-ve-attributes="{"style":"box-sizing: inherit;"}"><span class="mw-headline ve-pasteProtect" id="Editing_Import_Purchase_Order" data-ve-attributes="{"style":"box-sizing: inherit;"}" style="box-sizing: inherit;">Printing 2307 Payment Voucher</span></span>===== | =====<span class="mw-headline ve-pasteProtect" id="Printing_Accounts_Receivable" style="box-sizing: inherit;" data-ve-attributes="{"style":"box-sizing: inherit;"}"><span class="mw-headline ve-pasteProtect" id="Editing_Import_Purchase_Order" data-ve-attributes="{"style":"box-sizing: inherit;"}" style="box-sizing: inherit;">Printing 2307 Payment Voucher</span></span>===== | ||
| − | #Click Payment Voucher under Financials Menu | + | #Click [[Payment Voucher]] under Financials Menu |
#Select Payment Voucher record that needs to print its details. Click the drop-down arrow then click Print 2307. The option will be only applicable if the said Payment Voucher has been applied with Withholding Tax | #Select Payment Voucher record that needs to print its details. Click the drop-down arrow then click Print 2307. The option will be only applicable if the said Payment Voucher has been applied with Withholding Tax | ||
#Under form 2307, Double check the details then click Generate PDF to finalize | #Under form 2307, Double check the details then click Generate PDF to finalize | ||
| Line 248: | Line 248: | ||
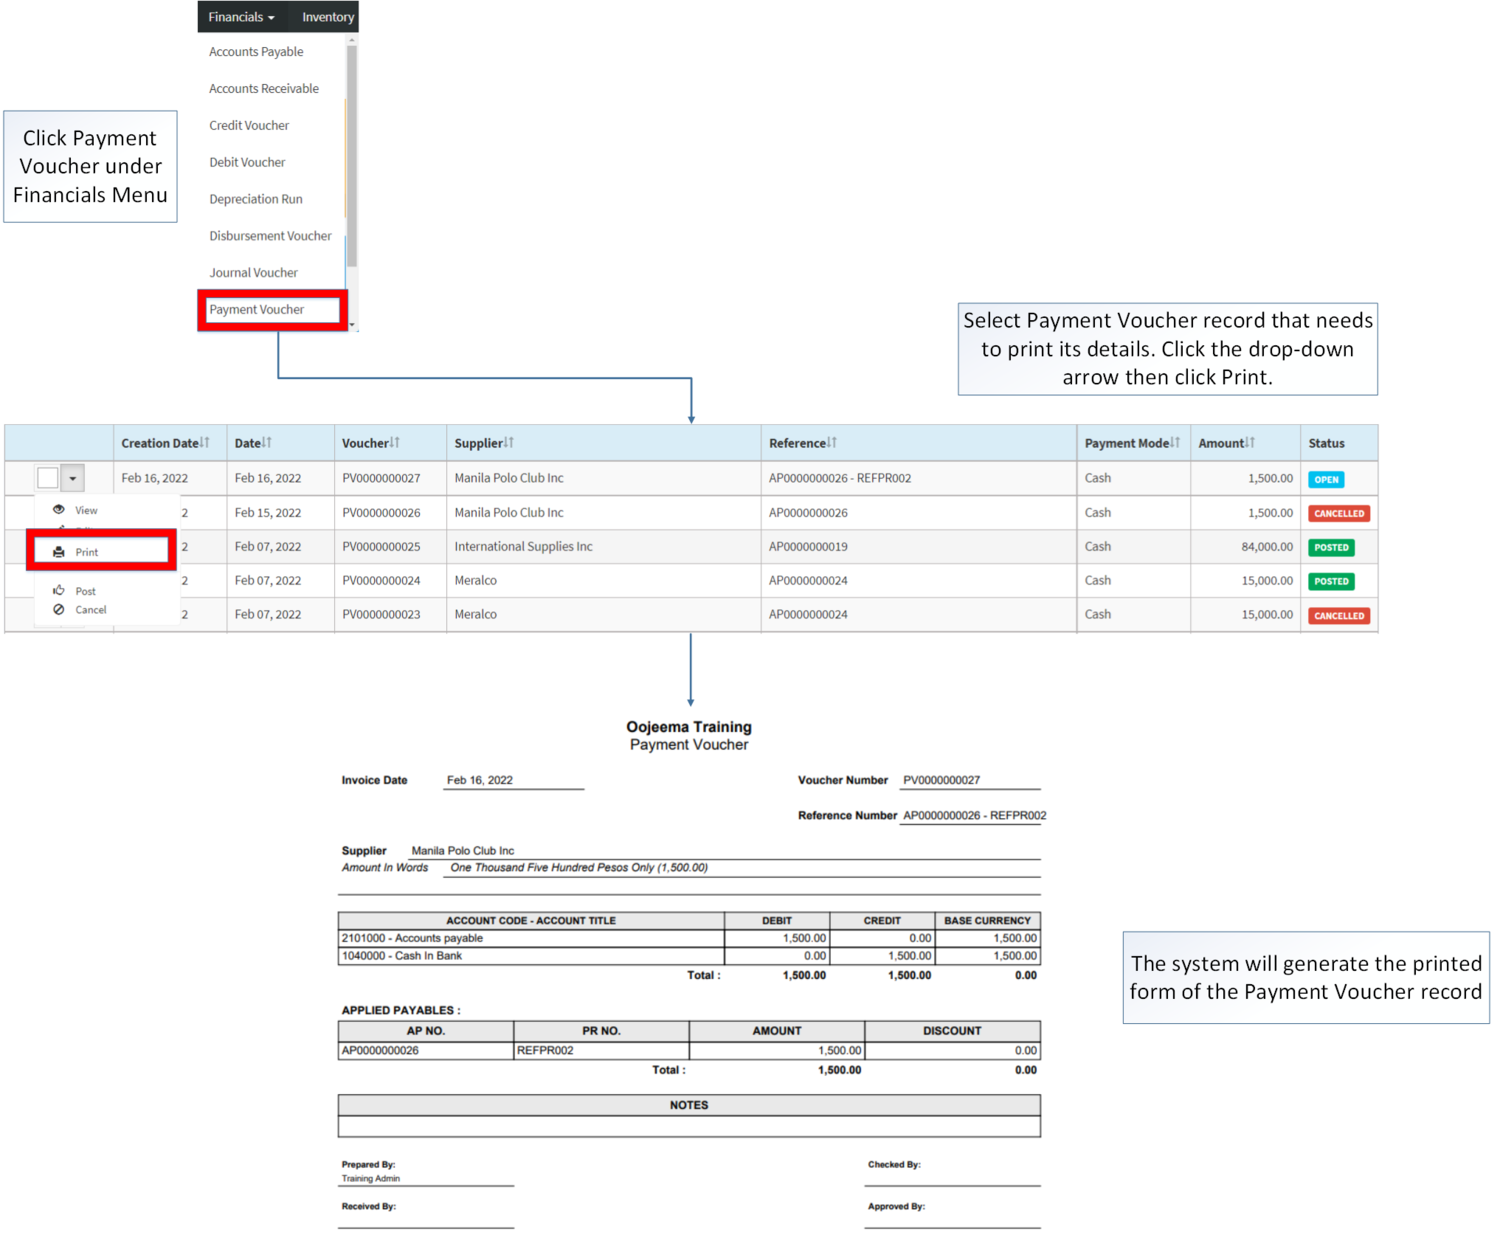
=====<span class="mw-headline" id="Printing_Accounts_Receivable" style="box-sizing: inherit;"><span class="mw-headline ve-pasteProtect" id="Editing_Import_Purchase_Order" data-ve-attributes="{"style":"box-sizing: inherit;"}" style="box-sizing: inherit;">Printing Payment Voucher</span></span>===== | =====<span class="mw-headline" id="Printing_Accounts_Receivable" style="box-sizing: inherit;"><span class="mw-headline ve-pasteProtect" id="Editing_Import_Purchase_Order" data-ve-attributes="{"style":"box-sizing: inherit;"}" style="box-sizing: inherit;">Printing Payment Voucher</span></span>===== | ||
| − | #Click | + | #Click [[Payment Voucher]] under Financials Menu |
#Select the Payment Voucher that needs to print its details. Click the Drop-down Arrow then press Print'''.''' | #Select the Payment Voucher that needs to print its details. Click the Drop-down Arrow then press Print'''.''' | ||
| Line 257: | Line 257: | ||
#Select Bank Account where the payable will be deposited | #Select Bank Account where the payable will be deposited | ||
| − | #Enter | + | #Enter its check details and its amount |
| − | # | + | #Double check the Accounting details |
| − | # | + | #Click Save |
{| class="wikitable" style="box-sizing: inherit; border-collapse: collapse; border-spacing: 0px; background-color: rgb(248, 249, 250); font-size: 14px; color: rgb(34, 34, 34); margin: auto; border: 1px solid rgb(162, 169, 177); font-family: "Open Sans", Roboto, arial, sans-serif; font-style: normal; font-variant-ligatures: normal; font-variant-caps: normal; font-weight: 400; letter-spacing: normal; orphans: 2; text-align: start; text-transform: none; white-space: normal; widows: 2; word-spacing: 0px; -webkit-text-stroke-width: 0px; text-decoration-thickness: initial; text-decoration-style: initial; text-decoration-color: initial;" | {| class="wikitable" style="box-sizing: inherit; border-collapse: collapse; border-spacing: 0px; background-color: rgb(248, 249, 250); font-size: 14px; color: rgb(34, 34, 34); margin: auto; border: 1px solid rgb(162, 169, 177); font-family: "Open Sans", Roboto, arial, sans-serif; font-style: normal; font-variant-ligatures: normal; font-variant-caps: normal; font-weight: 400; letter-spacing: normal; orphans: 2; text-align: start; text-transform: none; white-space: normal; widows: 2; word-spacing: 0px; -webkit-text-stroke-width: 0px; text-decoration-thickness: initial; text-decoration-style: initial; text-decoration-color: initial;" | ||
| Line 292: | Line 292: | ||
#*OPTIONAL: You may also enter account description for easy referencing e.g. Payment for PO#123456 | #*OPTIONAL: You may also enter account description for easy referencing e.g. Payment for PO#123456 | ||
#Enter received amount on Credit column | #Enter received amount on Credit column | ||
| + | #Click Save | ||
{| class="wikitable" style="box-sizing: inherit; border-collapse: collapse; border-spacing: 0px; background-color: rgb(248, 249, 250); font-size: 14px; color: rgb(34, 34, 34); margin: auto; border: 1px solid rgb(162, 169, 177); font-family: "Open Sans", Roboto, arial, sans-serif; font-style: normal; font-variant-ligatures: normal; font-variant-caps: normal; font-weight: 400; letter-spacing: normal; orphans: 2; text-align: start; text-transform: none; white-space: normal; widows: 2; word-spacing: 0px; -webkit-text-stroke-width: 0px; text-decoration-thickness: initial; text-decoration-style: initial; text-decoration-color: initial;" | {| class="wikitable" style="box-sizing: inherit; border-collapse: collapse; border-spacing: 0px; background-color: rgb(248, 249, 250); font-size: 14px; color: rgb(34, 34, 34); margin: auto; border: 1px solid rgb(162, 169, 177); font-family: "Open Sans", Roboto, arial, sans-serif; font-style: normal; font-variant-ligatures: normal; font-variant-caps: normal; font-weight: 400; letter-spacing: normal; orphans: 2; text-align: start; text-transform: none; white-space: normal; widows: 2; word-spacing: 0px; -webkit-text-stroke-width: 0px; text-decoration-thickness: initial; text-decoration-style: initial; text-decoration-color: initial;" | ||
| Line 339: | Line 340: | ||
=====<span class="mw-headline" id="Posting_Accounts_Receivable" style="box-sizing: inherit;"><span class="mw-headline ve-pasteProtect" id="Editing_Import_Purchase_Order" data-ve-attributes="{"style":"box-sizing: inherit;"}" style="box-sizing: inherit;">Posting Payment Voucher</span></span>===== | =====<span class="mw-headline" id="Posting_Accounts_Receivable" style="box-sizing: inherit;"><span class="mw-headline ve-pasteProtect" id="Editing_Import_Purchase_Order" data-ve-attributes="{"style":"box-sizing: inherit;"}" style="box-sizing: inherit;">Posting Payment Voucher</span></span>===== | ||
| − | #Click | + | #Click [[Payment Voucher]] under Financials Menu |
| − | #Select the Payment Voucher that needs to post | + | #Select the Payment Voucher record that needs to be post. Click the drop-down arrow then click Post |
| + | #Click Yes on the confirmation to proceed on the posting process. | ||
[[File:Financials - Payment Voucher - Post.png|border|center|1500x1500px]] | [[File:Financials - Payment Voucher - Post.png|border|center|1500x1500px]] | ||
| − | |||
| − | |||
=====<span class="mw-headline" id="Unposting_Accounts_Receivable" style="box-sizing: inherit;"><span class="mw-headline ve-pasteProtect" id="Editing_Import_Purchase_Order" data-ve-attributes="{"style":"box-sizing: inherit;"}" style="box-sizing: inherit;">Unposting Payment Voucher</span></span>===== | =====<span class="mw-headline" id="Unposting_Accounts_Receivable" style="box-sizing: inherit;"><span class="mw-headline ve-pasteProtect" id="Editing_Import_Purchase_Order" data-ve-attributes="{"style":"box-sizing: inherit;"}" style="box-sizing: inherit;">Unposting Payment Voucher</span></span>===== | ||
| − | #Click | + | #Click [[Payment Voucher]] under Financials Menu |
| − | #Select a Posted Payment Voucher that needs to | + | #Select a Posted Payment Voucher that needs to be unpost. Click the drop-down arrow then click Unpost |
| + | #Click Yes on the confirmation to proceed on the unposting process. | ||
[[File:Financials - Payment Voucher - Unpost.png|border|center|1500x1500px]] | [[File:Financials - Payment Voucher - Unpost.png|border|center|1500x1500px]] | ||
| − | |||
=====<span class="mw-headline" id="Exporting_Payment_Voucher" style="box-sizing: inherit;">Exporting Payment Voucher</span>===== | =====<span class="mw-headline" id="Exporting_Payment_Voucher" style="box-sizing: inherit;">Exporting Payment Voucher</span>===== | ||
| − | # | + | #Click [[Payment Voucher]] under Financials Menu |
| − | #Click Options then click | + | #Under Payment Voucher Screen, Click Options then click Export Payment Voucher |
[[File:Financials - Payment Voucher - Export.png|border|center|1500x1500px]] | [[File:Financials - Payment Voucher - Export.png|border|center|1500x1500px]] | ||
| − | |||
=====Payment Voucher Record Options===== | =====Payment Voucher Record Options===== | ||
{| class="wikitable" style="box-sizing: inherit; border-collapse: collapse; border-spacing: 0px; background-color: rgb(248, 249, 250); font-size: 14px; color: rgb(34, 34, 34); margin: auto; border: 1px solid rgb(162, 169, 177); font-family: "Open Sans", Roboto, arial, sans-serif; font-style: normal; font-variant-ligatures: normal; font-variant-caps: normal; font-weight: 400; letter-spacing: normal; orphans: 2; text-align: start; text-transform: none; white-space: normal; widows: 2; word-spacing: 0px; -webkit-text-stroke-width: 0px; text-decoration-thickness: initial; text-decoration-style: initial; text-decoration-color: initial;" | {| class="wikitable" style="box-sizing: inherit; border-collapse: collapse; border-spacing: 0px; background-color: rgb(248, 249, 250); font-size: 14px; color: rgb(34, 34, 34); margin: auto; border: 1px solid rgb(162, 169, 177); font-family: "Open Sans", Roboto, arial, sans-serif; font-style: normal; font-variant-ligatures: normal; font-variant-caps: normal; font-weight: 400; letter-spacing: normal; orphans: 2; text-align: start; text-transform: none; white-space: normal; widows: 2; word-spacing: 0px; -webkit-text-stroke-width: 0px; text-decoration-thickness: initial; text-decoration-style: initial; text-decoration-color: initial;" | ||
| Line 404: | Line 403: | ||
=====<span class="mw-headline" id="Creating_Debit_Voucher" style="box-sizing: inherit;">Creating Debit Voucher</span>===== | =====<span class="mw-headline" id="Creating_Debit_Voucher" style="box-sizing: inherit;">Creating Debit Voucher</span>===== | ||
| − | #Click Payment Voucher from Financial Module | + | #Click [[Payment Voucher]] from Financial Module |
| − | #Under Payment Voucher, Click Add Payment Voucher | + | #Under Payment Voucher Screen, Click Add Payment Voucher |
| − | #Select | + | #Select [[Supplier]], then tick the Down Payment, Account for Down Payment can be edited. |
| − | #Fill | + | #Fill out the necessary fields in the accounting details then Click Save. |
[[File:Financials - Payment Voucher - Create Debit Voucher.png|border|center|1500x1500px]] | [[File:Financials - Payment Voucher - Create Debit Voucher.png|border|center|1500x1500px]] | ||
<br /> | <br /> | ||
| − | |||
| − | #Under Create [[Payment Voucher]], Select a Supplier | + | ===== <span class="mw-headline" id="Applying_Debit_Voucher" style="box-sizing: inherit;"><span class="mw-headline" id="Applying_Debit_Voucher" style="box-sizing: inherit;"><span class="mw-headline" id="Applying_Credit_Voucher" style="box-sizing: inherit;">Applying Debit Voucher</span></span></span> ===== |
| − | # | + | |
| − | # | + | # Under Create [[Payment Voucher]], Select a Supplier then click the Debits field to tag a Debit Voucher |
| + | # Tick the following Debit Voucher then click Tag | ||
| + | # Fill out the necessary fields in the accounting details then click Save. | ||
| − | [[File:Financials - Payment Voucher - Apply Debit Voucher.png|center| | + | [[File:Financials - Payment Voucher - Apply Debit Voucher.png|center|1498x1498px|border]] |
<br /> | <br /> | ||
{| class="wikitable" style="box-sizing: inherit; border-collapse: collapse; border-spacing: 0px; background-color: rgb(248, 249, 250); font-size: 14px; color: rgb(34, 34, 34); margin: auto; border: 1px solid rgb(162, 169, 177); font-family: "Open Sans", Roboto, arial, sans-serif; font-style: normal; font-variant-ligatures: normal; font-variant-caps: normal; font-weight: 400; letter-spacing: normal; orphans: 2; text-align: start; text-transform: none; white-space: normal; widows: 2; word-spacing: 0px; -webkit-text-stroke-width: 0px; text-decoration-thickness: initial; text-decoration-style: initial; text-decoration-color: initial;" | {| class="wikitable" style="box-sizing: inherit; border-collapse: collapse; border-spacing: 0px; background-color: rgb(248, 249, 250); font-size: 14px; color: rgb(34, 34, 34); margin: auto; border: 1px solid rgb(162, 169, 177); font-family: "Open Sans", Roboto, arial, sans-serif; font-style: normal; font-variant-ligatures: normal; font-variant-caps: normal; font-weight: 400; letter-spacing: normal; orphans: 2; text-align: start; text-transform: none; white-space: normal; widows: 2; word-spacing: 0px; -webkit-text-stroke-width: 0px; text-decoration-thickness: initial; text-decoration-style: initial; text-decoration-color: initial;" | ||
Revision as of 12:19, 29 March 2022
Contents
- 1 Payment Voucher
- 1.1 Requirements before using Payment Voucher
- 1.2 Payment Voucher Status
- 1.3 Payment Voucher Record List
- 1.4 Adding Payment Voucher
- 1.5 Viewing Payment Voucher
- 1.6 Editing Payment Voucher
- 1.7 Printing 2307 Payment Voucher
- 1.8 Printing Payment Voucher
- 1.9 Selecting Payment Method
- 1.10 Cancelling Payment Voucher Record
- 1.11 Posting Payment Voucher
- 1.12 Unposting Payment Voucher
- 1.13 Exporting Payment Voucher
- 1.14 Payment Voucher Record Options
- 1.15 Creating Debit Voucher
- 1.16 Applying Debit Voucher
Payment Voucher
Allows the user to create a transaction from Accounts Payable for the amounts to be paid to the vendor.
Requirements before using Payment Voucher
- The user should have the following records in order to proceed on using the Payment Voucher
Payment Voucher Status
| Status | Description |
|---|---|
| UNPOSTED/OPEN | If the transaction is not yet posted regardless if it is paid or not. |
| WITH PARTIAL PAYMENT | If there are any partial payments posted. |
| CANCELLED | Payment Voucher is cancelled |
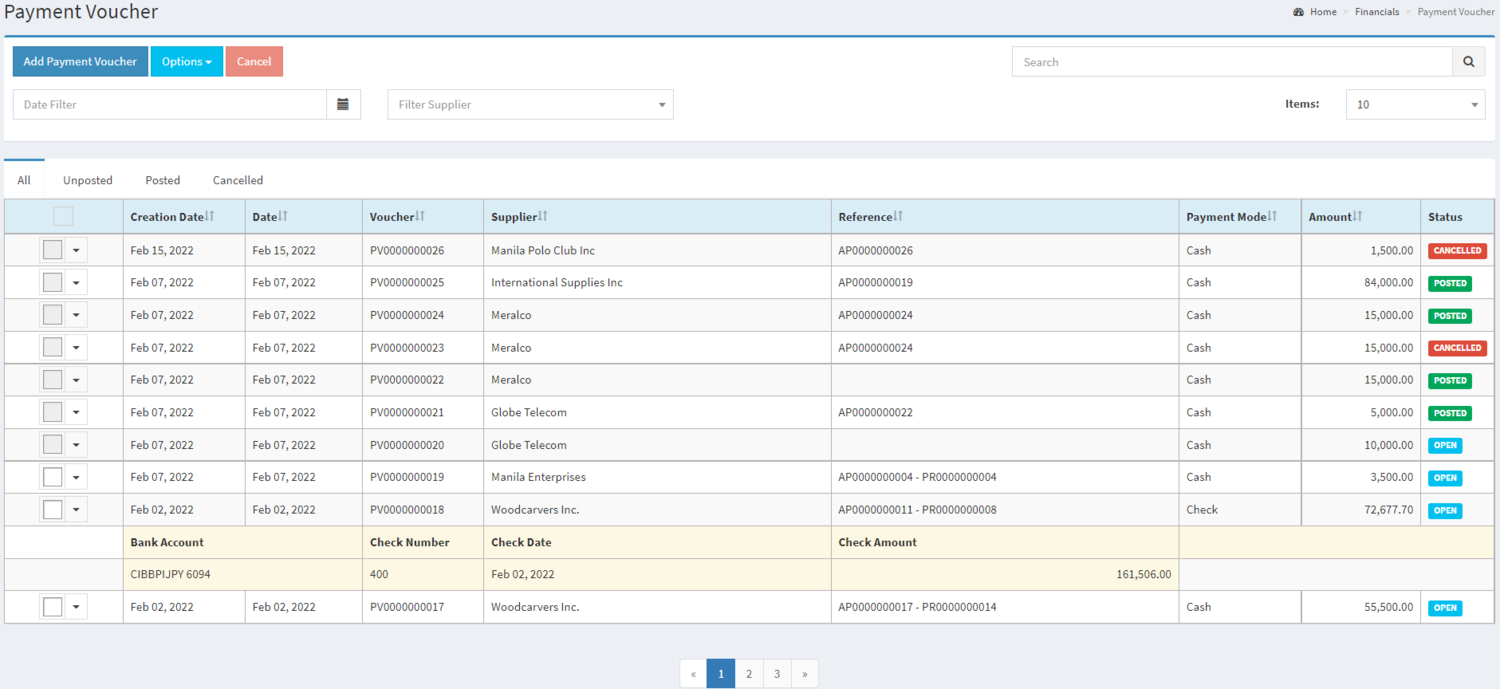
Payment Voucher Record List
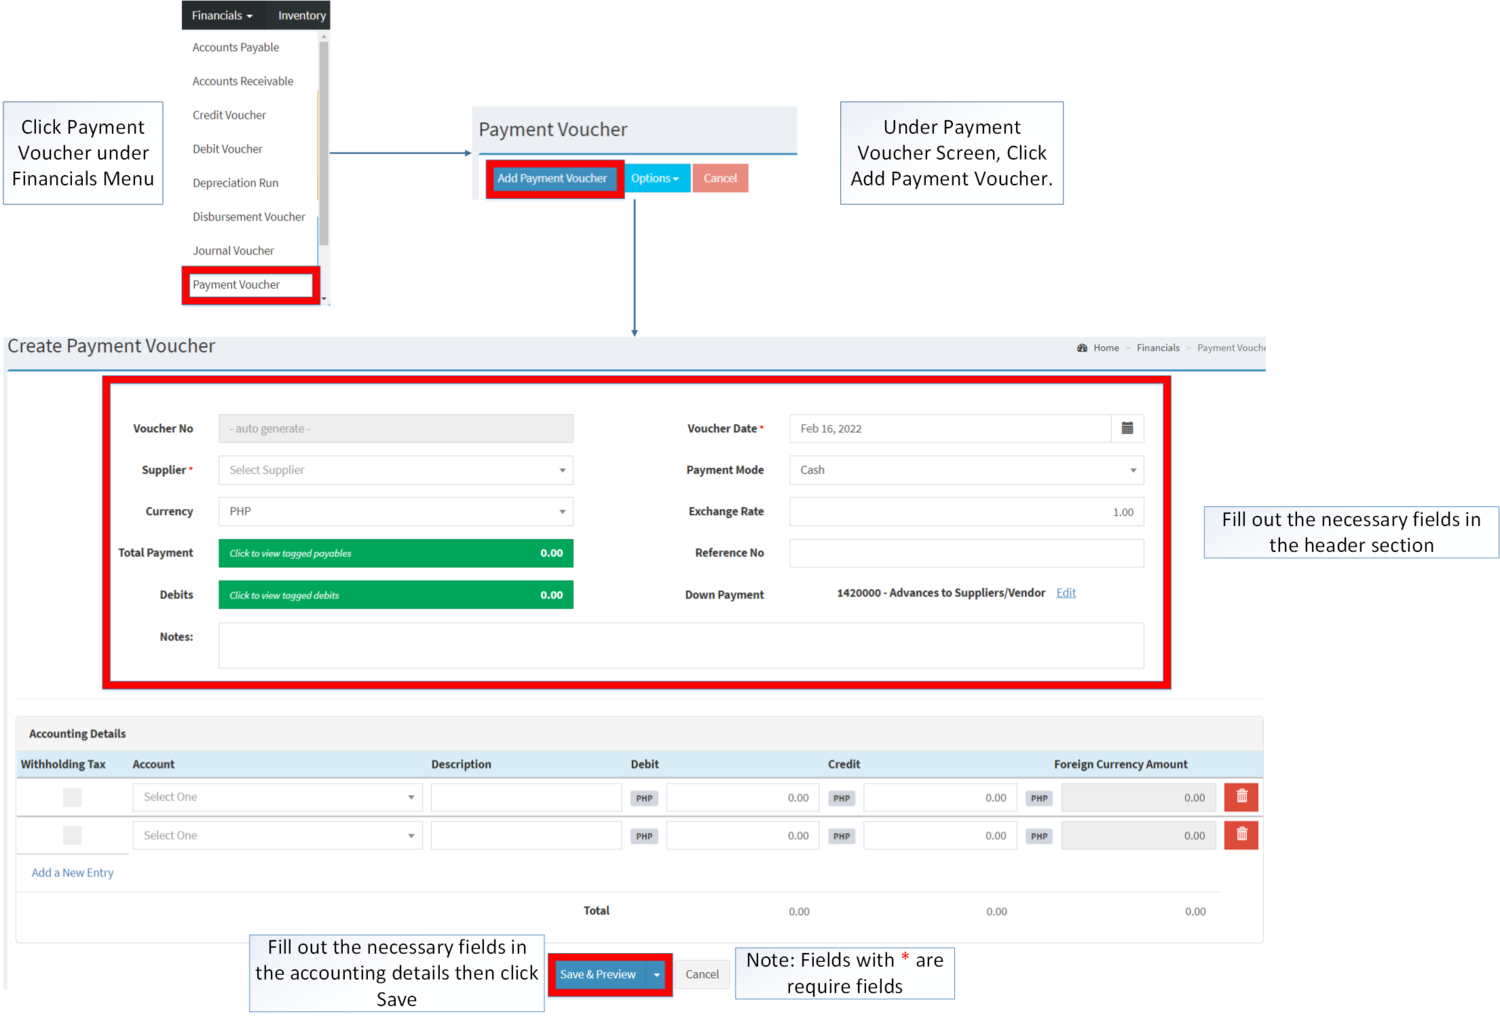
Adding Payment Voucher
- Click Payment Voucher under Financials Menu
- Under Payment Voucher Screen, Click Add Payment Voucher
- Fill out the necessary Fields in the Header Section
- Fill up the necessary Fields on the Accounting Details then Click Save
| Field | Description | Expected Values |
|---|---|---|
| 1.Voucher No | •The generated Voucher Number of the Transaction upon creation | •Alphanumeric(auto-generated) |
| 2.Supplier | •Name of Supplier | •Supplier List in the Supplier Maintenance Module |
| 3.Currency | •Date when the Transaction was Created | •Currency List in the Currency Maintenance Module |
| 4.Total Payment | •Payables to be tagged on the Transaction | •Accounts Payable List Provided in Accounts Payable Financial Module |
| 5.Debits | •Debit Vouchers to be tagged on the Transaction | •List of Debit Vouchers provided in the Debit Voucher Financial Module |
| 6.Voucher Date | •Date when the voucher was created | •Date |
| 7.Payment Mode | •Mode of Payment for the Transaction | •Cash/Check |
| 8.Exchange Rate | •Exchange Rate of the Currency | •Amount/Number |
| 9.Reference No. | •Reference Number of the Transaction | •Alphanumeric |
| 10.Down Payment | •Allows the user to create a debit voucher from the Transaction | •Tick/untick / Edit down payment Account |
| 11.Overpayment | •Allows the user to create a credit voucher from the transaction | •Tick/untick / Edit Overpayment Account |
| 12.Notes | •Adds additional remarks on the transaction | •Alphanumeric |
| 13.Withholding Tax | •Applies a Withholding Tax to a specific account | •Tick/Untick |
| 14.Account | •Account to be charged for credit and debit amount on the transaction | •Account list in the Chart of Accounts Maintenance Module |
| 15.Description | •Any remarks or description on the Account Line | •Alphanumeric |
| 16.Debit | •Debit Amount for the Transaction | •Number |
| 17.Credit | •Credit Amount for the Transaction | •Number |
| 18. Foreign Currency Amount | •The converted currency amount to be paid | •Number |
Notes:
- By ticking Down Payment, the user can create a Debit Voucher.
- Supplier should be on ACTIVE status when using it upon creating or editing a transaction.
- This can be seen in Supplier Maintenance Module
- INACTIVE supplier can still be used if it is used in a transaction prior to its deactivation
- Account should be on ACTIVE status when using it upon creating or editing a transaction.
- This can be seen in Chart of Account Maintenance Module.
- Currency should be on ACTIVE status when using it upon creating or editing a transaction.
- This can be seen in Currency Maintenance Module.
- INACTIVE currency can still be used if it is used in a transaction prior to its deactivation
- Only one user at a time can use the Payment Voucher.
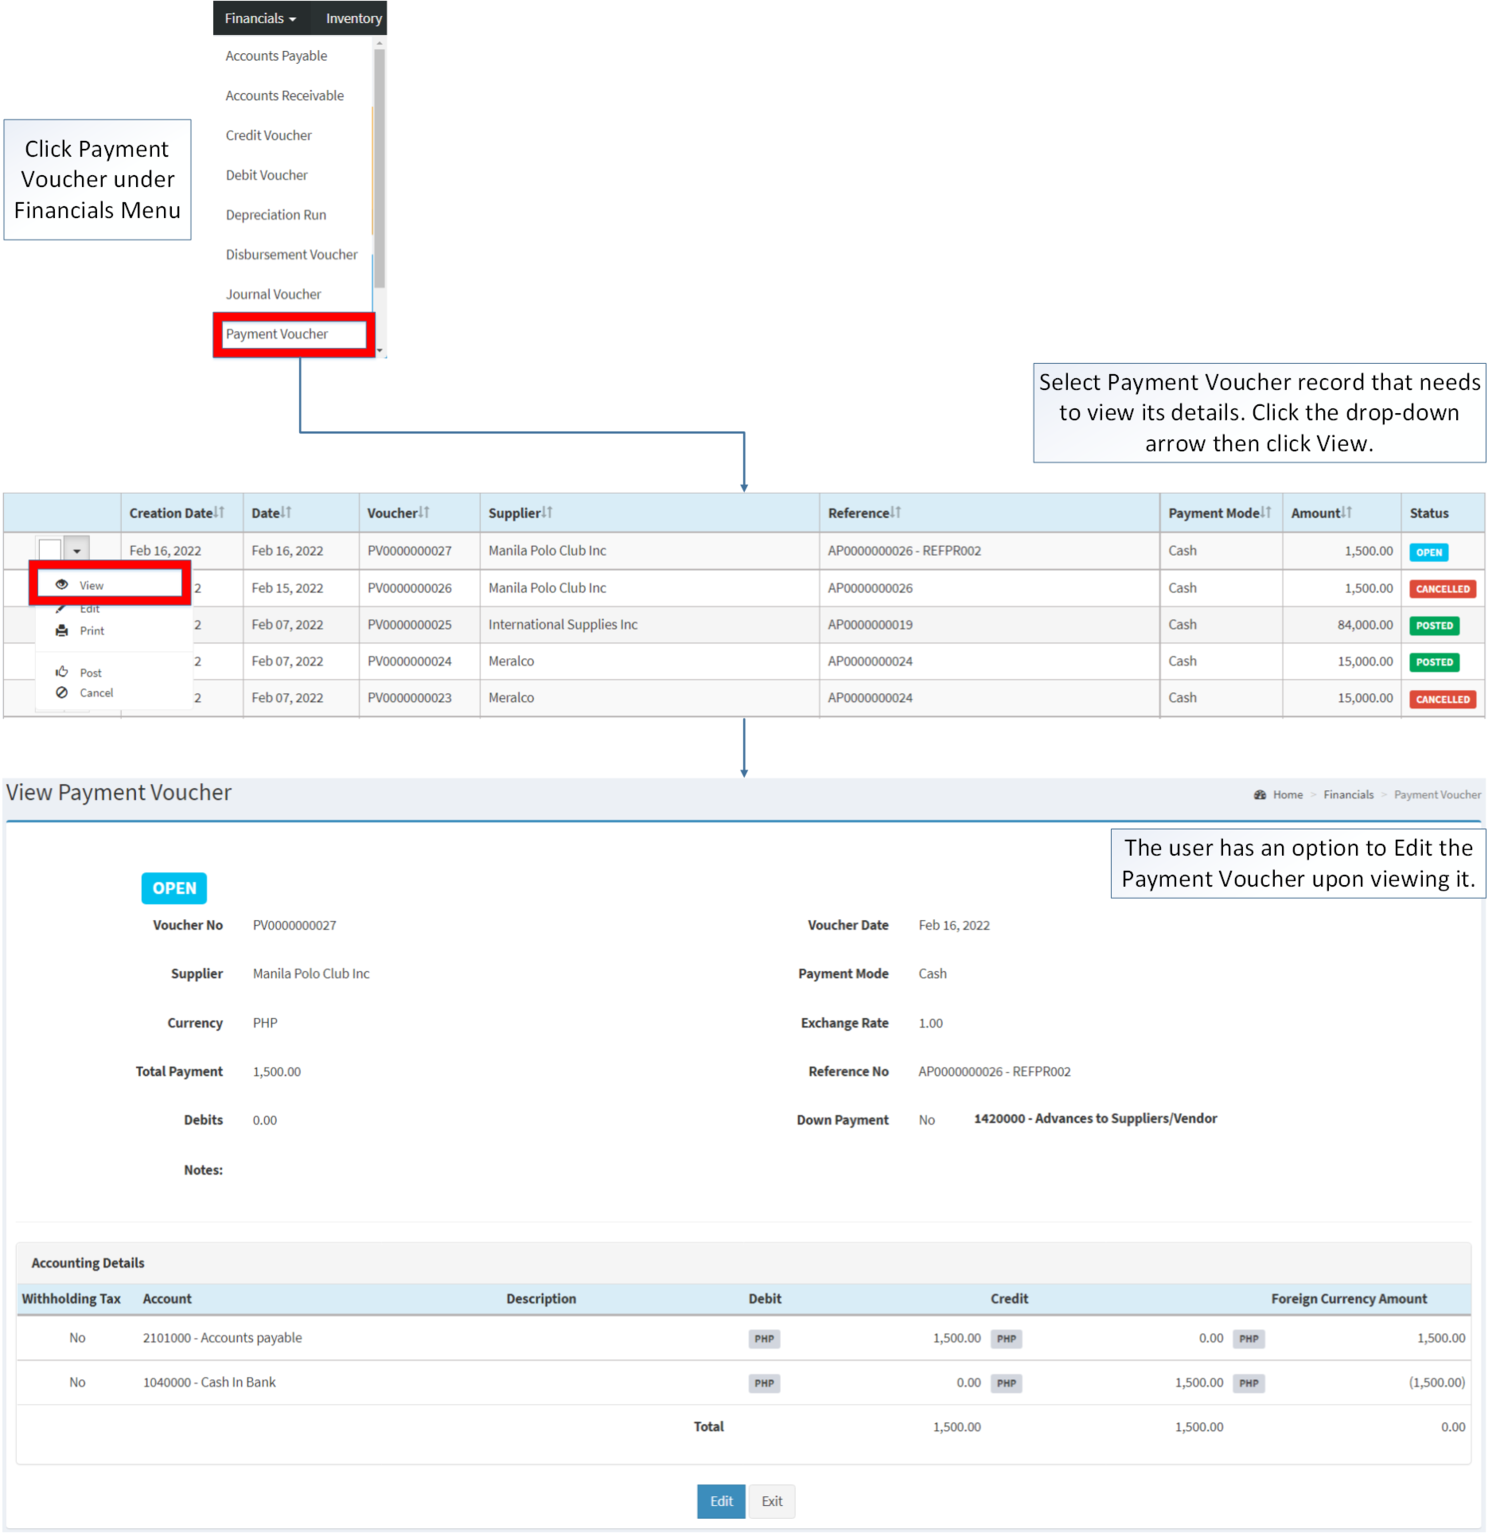
Viewing Payment Voucher
- Click the Payment Voucher under Financials Menu
- Select Payment Voucher that needs to view its details. Click the drop-down arrow then click View.
- The user has an option to Edit the Payment Voucher upon Viewing it.
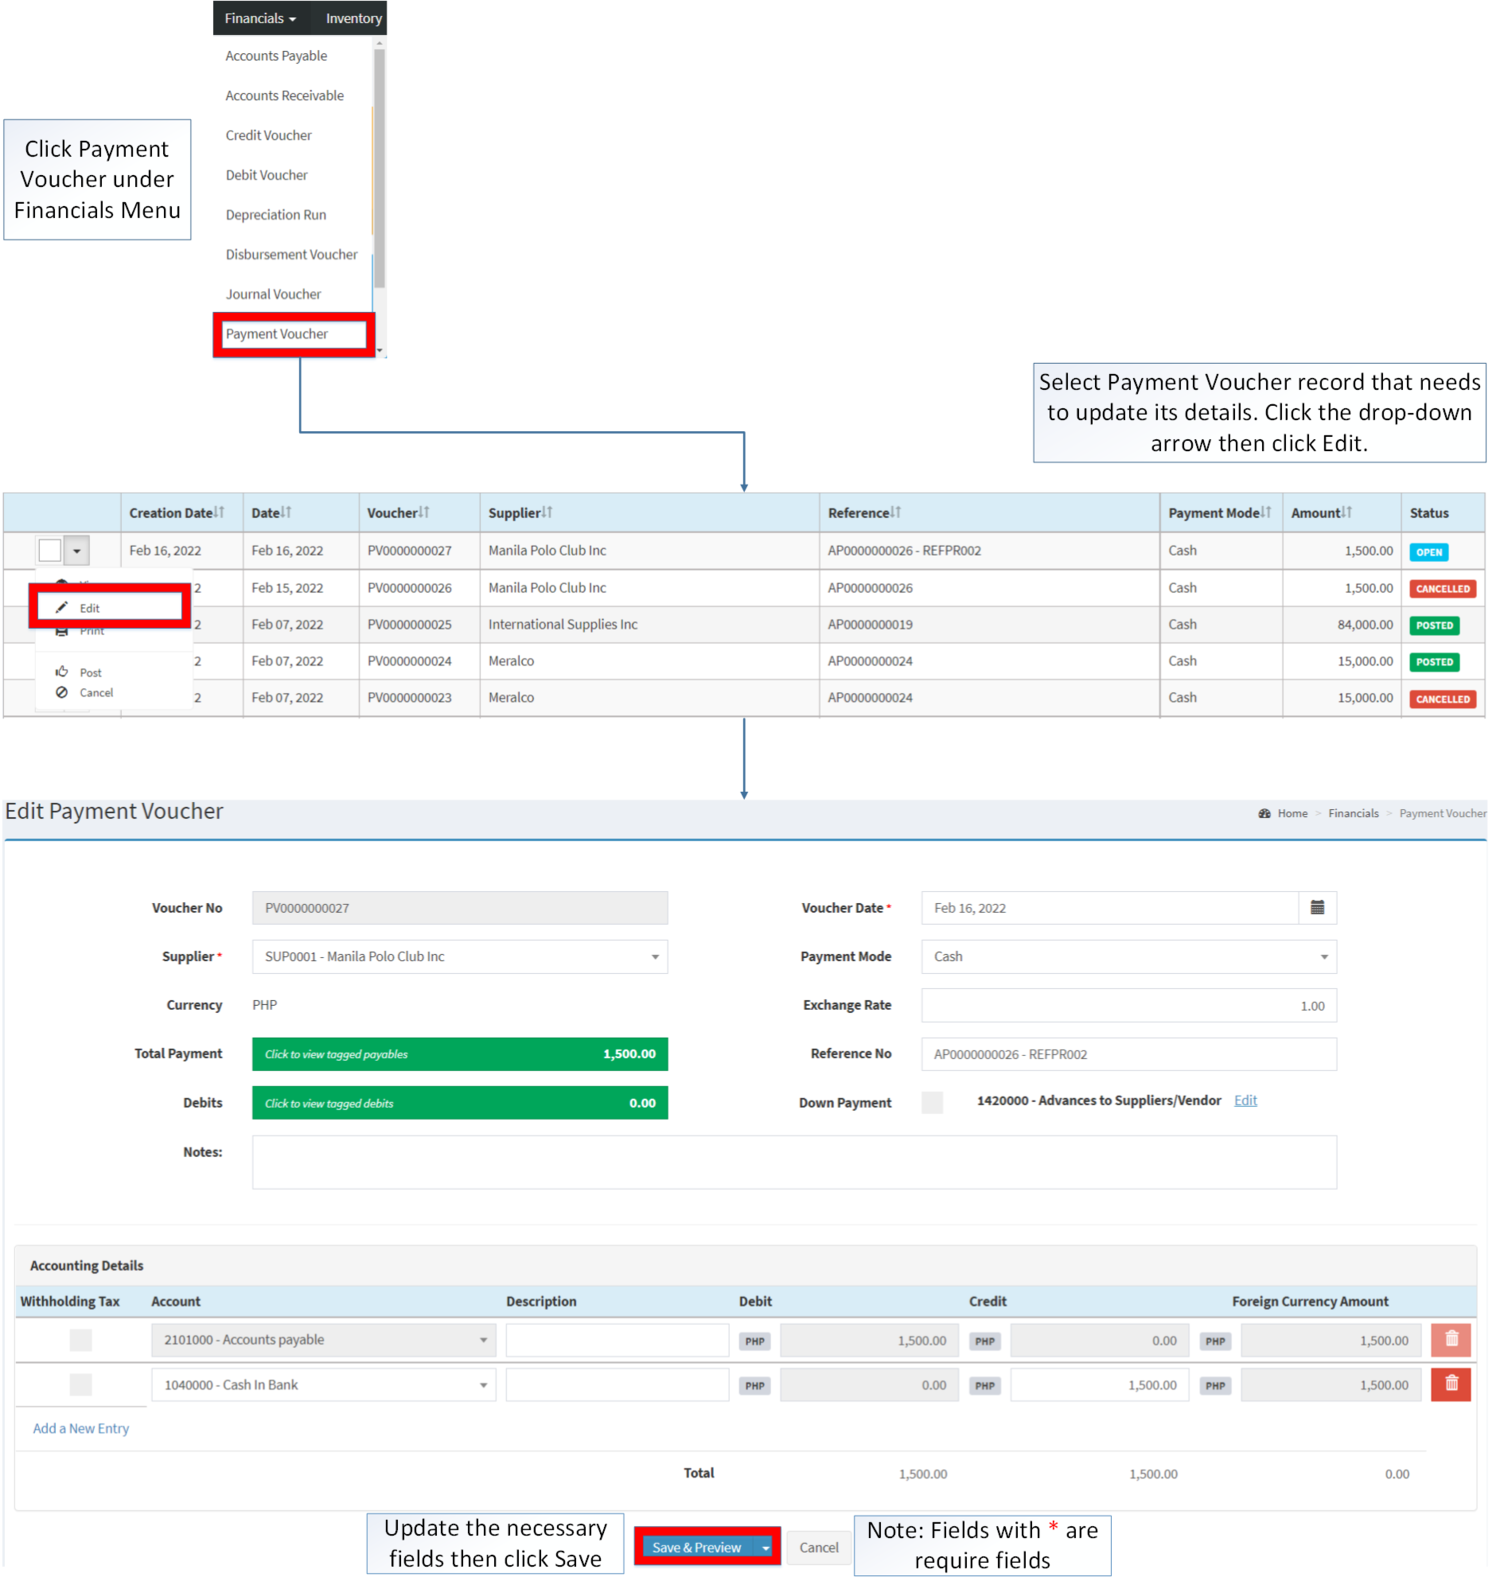
Editing Payment Voucher
- Click Payment Voucher under Financials Menu.
- Select Payment Voucher record that needs to update its details. Click the drop-down arrow then click Edit.
- Update the necessary fields then click Save.
| Field | Description | Expected Values |
|---|---|---|
| 1.Voucher No | •The generated Voucher Number of the Transaction upon creation | •Alphanumeric(auto-generated) |
| 2.Supplier | •Name of Supplier | •Supplier List in the Supplier Maintenance Module |
| 3.Currency | •Date when the Transaction was Created | •Currency List in the Supplier Maintenance Module |
| 4.Total Payment | •Payables to be tagged on the Transaction | •Accounts Payable List Provided in Accounts Payable Financial Module |
| 5.Debits | •Debit Vouchers to be tagged on the Transaction | •List of Debit Vouchers provided in the Debit Voucher Financial Module |
| 6.Voucher Date | •Date when the voucher was created | •Date |
| 7.Payment Mode | •Mode of Payment for the Transaction | •Cash/Check |
| 8.Exchange Rate | •Exchange Rate of the Currency | •Amount/Number |
| 9.Reference No. | •Reference Number of the Transaction | •Alphanumeric |
| 10.Down Payment | •Allows the user to create a debit voucher from the Transaction | •Tick/untick / Edit down payment Account |
| 11.Overpayment | •Allows the user to create a credit voucher from the transaction | •Tick/untick / Edit Overpayment Account |
| 12.Notes | •Adds additional remarks on the transaction | •Alphanumeric |
| 13.Withholding Tax | •Applies a Withholding Tax to a specific account | •Tick/Untick |
| 14.Account | •Account to be charged for credit and debit amount on the transaction | •Account list in the Chart of Accounts Maintenance Module |
| 15.Description | •Any remarks or description on the Account Line | •Alphanumeric |
| 16.Debit | •Debit Amount for the Transaction | •Number |
| 17.Credit | •Credit Amount for the Transaction | •Number |
| 18. Foreign Currency Amount | •The converted currency amount to be paid | •Number |
Notes:
- By ticking Down Payment, the user can create a Debit Voucher.
- Supplier should be on ACTIVE status when using it upon creating or editing a transaction.
- This can be seen in Supplier Maintenance Module
- INACTIVE supplier can still be used if it is used in a transaction prior to its deactivation
- Account should be on ACTIVE status when using it upon creating or editing a transaction.
- This can be seen in Chart of Account Maintenance Module.
- Currency should be on ACTIVE status when using it upon creating or editing a transaction.
- This can be seen in Currency Maintenance Module.
- INACTIVE currency can still be used if it is used in a transaction prior to its deactivation
- Currency cannot be edited once it is already created.
- Only one user at a time can use the Payment Voucher.
Printing 2307 Payment Voucher
- Click Payment Voucher under Financials Menu
- Select Payment Voucher record that needs to print its details. Click the drop-down arrow then click Print 2307. The option will be only applicable if the said Payment Voucher has been applied with Withholding Tax
- Under form 2307, Double check the details then click Generate PDF to finalize
Printing Payment Voucher
- Click Payment Voucher under Financials Menu
- Select the Payment Voucher that needs to print its details. Click the Drop-down Arrow then press Print.
Selecting Payment Method
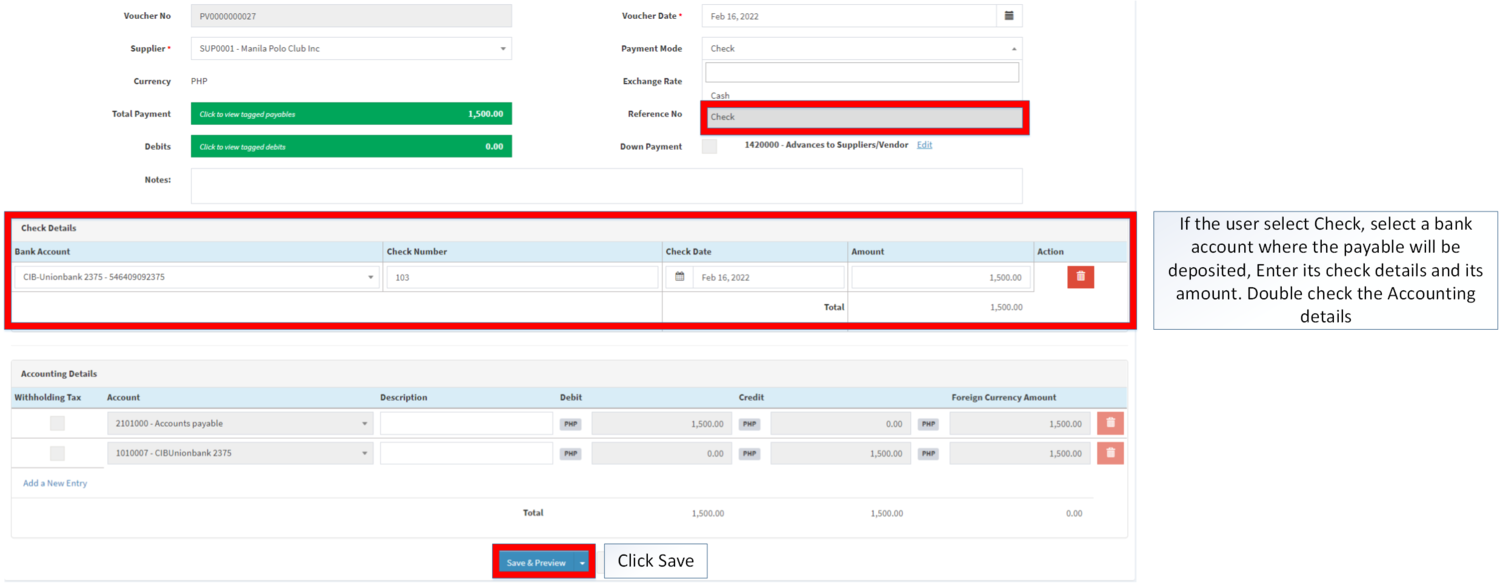
If the Selected Payment is Check
- Select Bank Account where the payable will be deposited
- Enter its check details and its amount
- Double check the Accounting details
- Click Save
| Field | Description of Data Output |
|---|---|
| 1. Deposit To | Dropdown selection listing of all active banks from Bank Maintenance Module |
| 2. Check Number | Manual Entry of Check Number |
| 3. Check Date | Date when the Check Payment is deposited. |
| 4. Amount | Manual Entry of Amount to receive |
| 5. Delete | Deletes Check Detailes |
| 6. Add New Check | Add new Check Line |
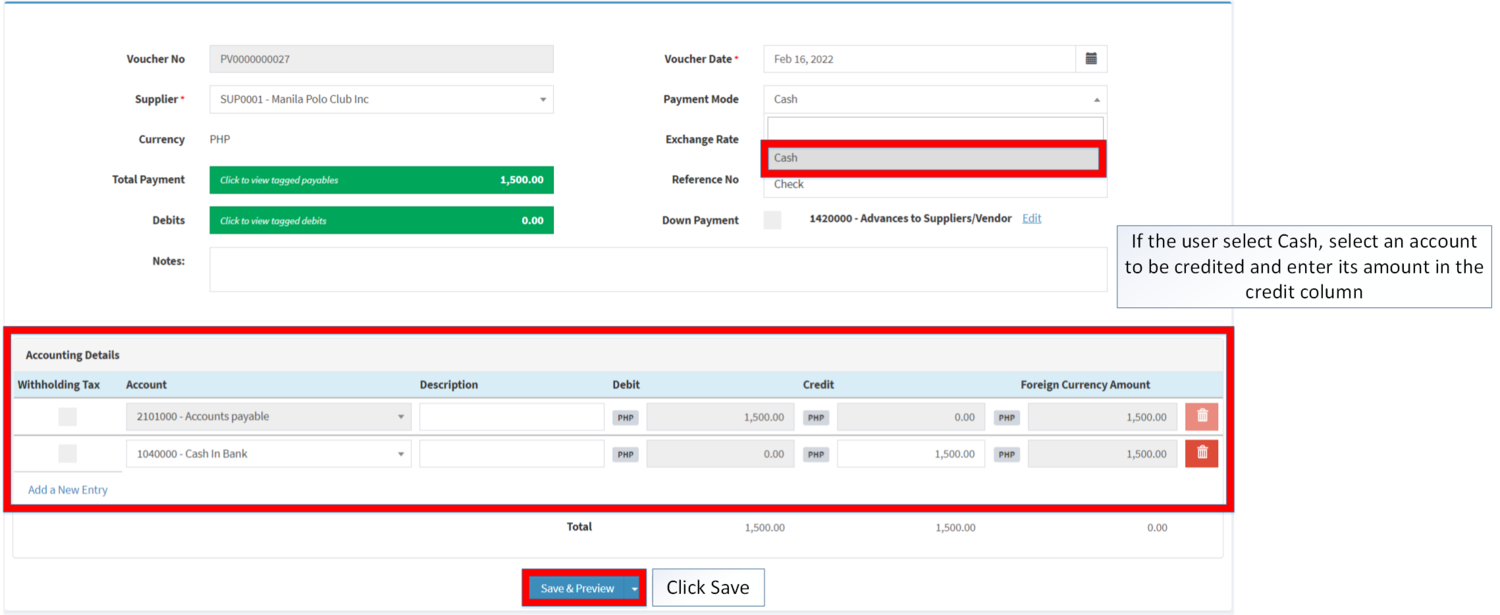
If the Selected Payment is Cash
- Select account to be credited
- OPTIONAL: You may also enter account description for easy referencing e.g. Payment for PO#123456
- Enter received amount on Credit column
- Click Save
| Field | Description of Data Output |
|---|---|
| 1. Account | Dropdown selection listing of Active Chart of Accounts under Chart of Accounts Maintenance Module |
| 2. Description | Manual Entry of Account Description |
| 3. Debit | Manual Entry of Debit Account |
| 4. Credit | Auto-Generated amount based from tagged payable |
| 5. Delete(Line-Item) | Deletes Accounting Entry |
| 6. Add a New Entry | Adds a new Line Entry |
| 7. Total(Debit) | Auto-Calculated: Sum of Debit Entry |
| 8. Total(Credit) | Auto-Calculated: Sum of Credit Entry |
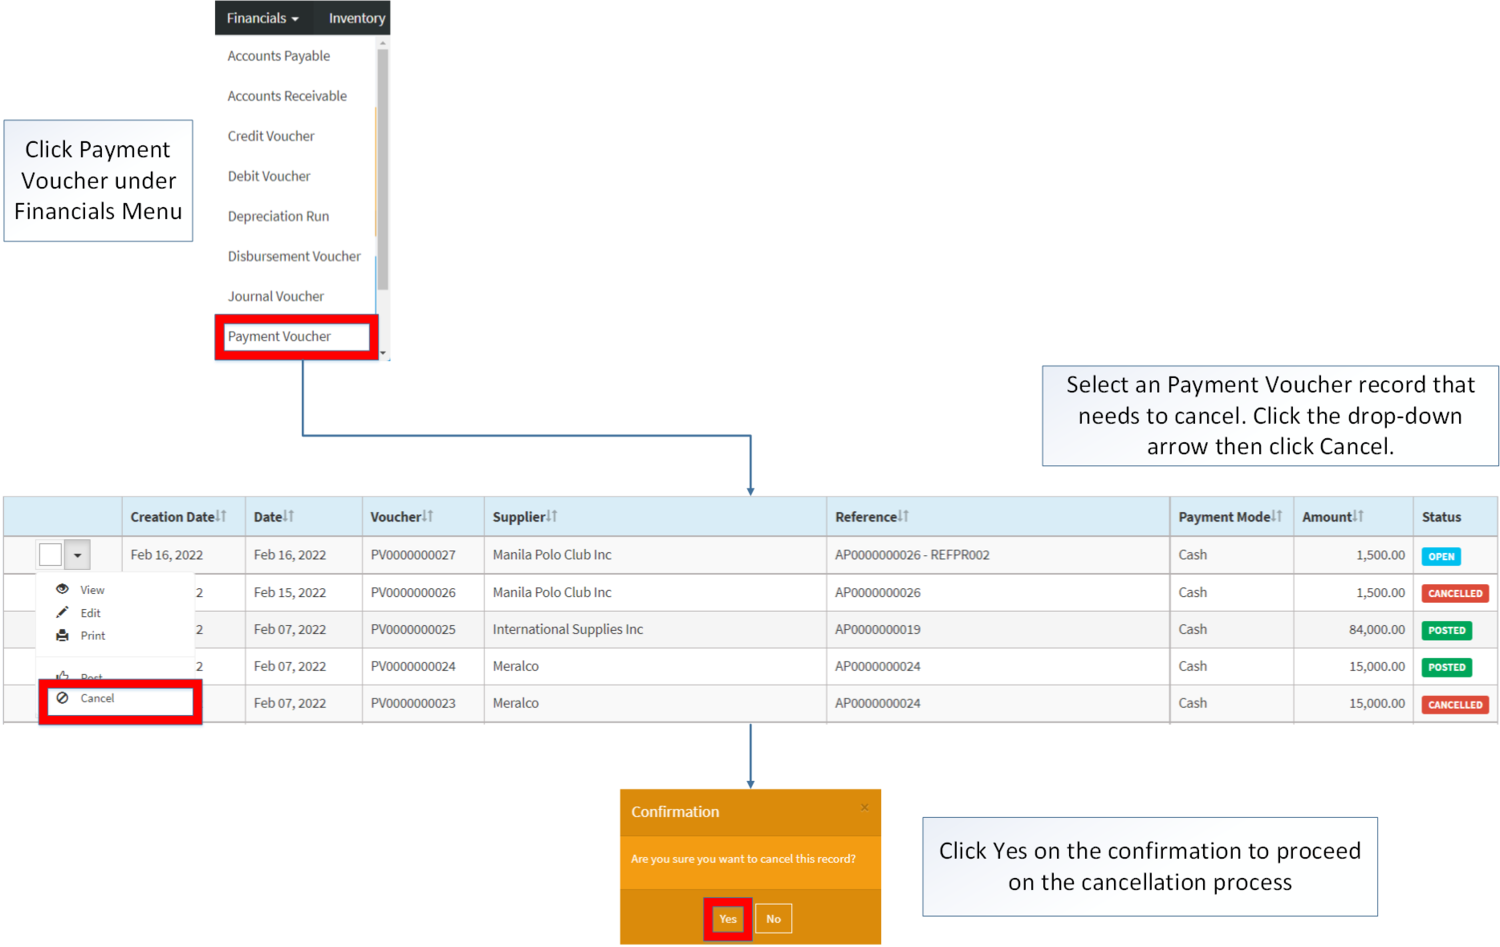
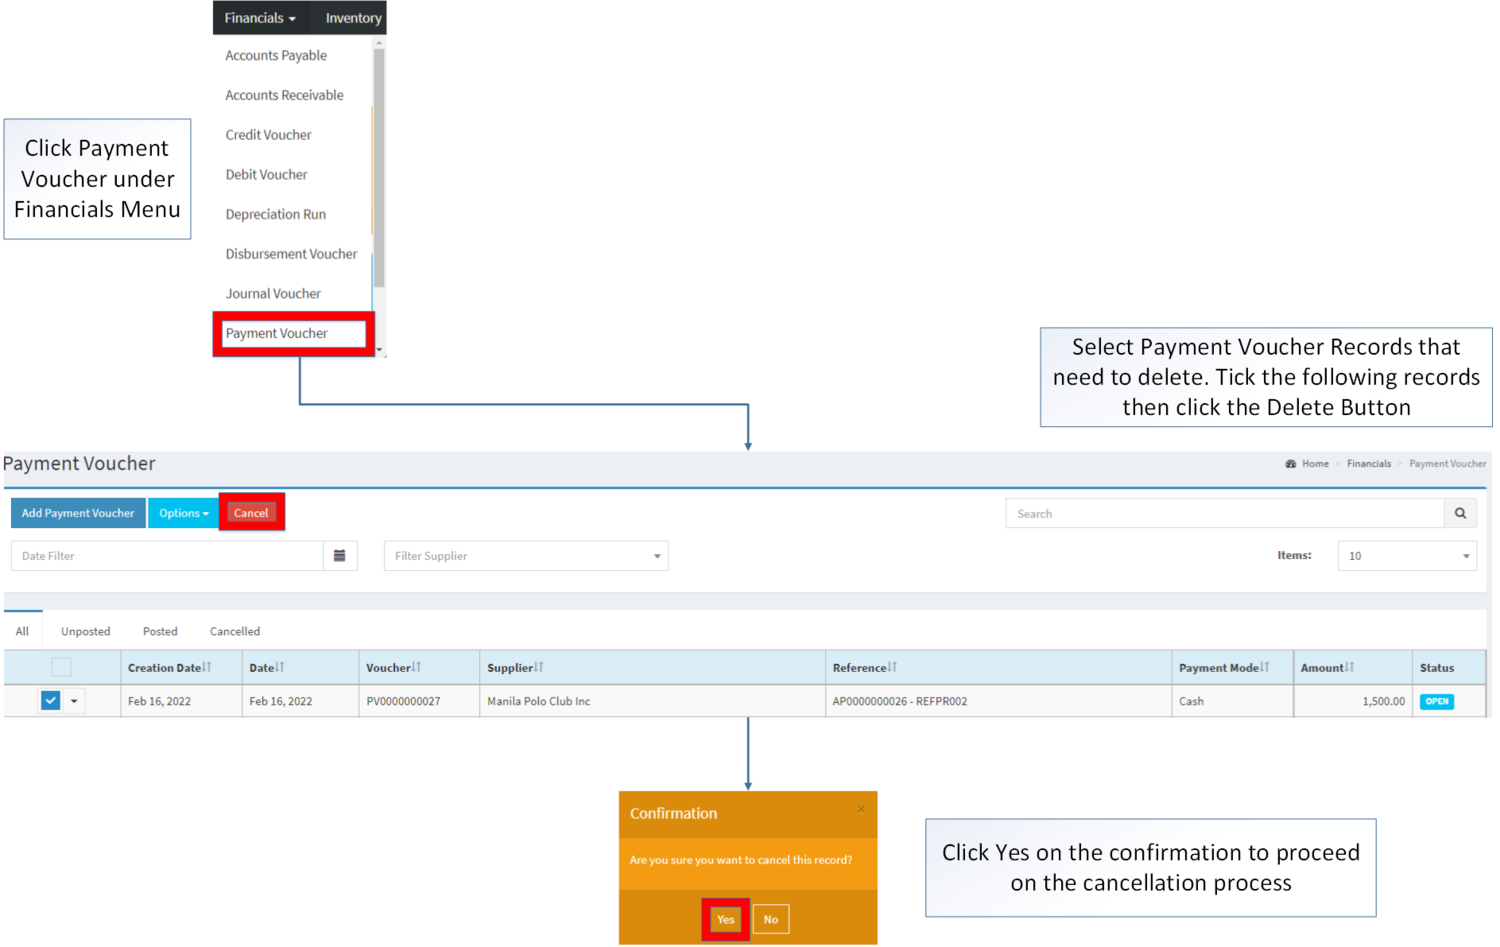
Cancelling Payment Voucher Record
Payment Voucher can be canceled in two ways:
- Using drop-down arrow of a record can be used in single record cancellation
- Using Cancel Button for cancelling multiple records
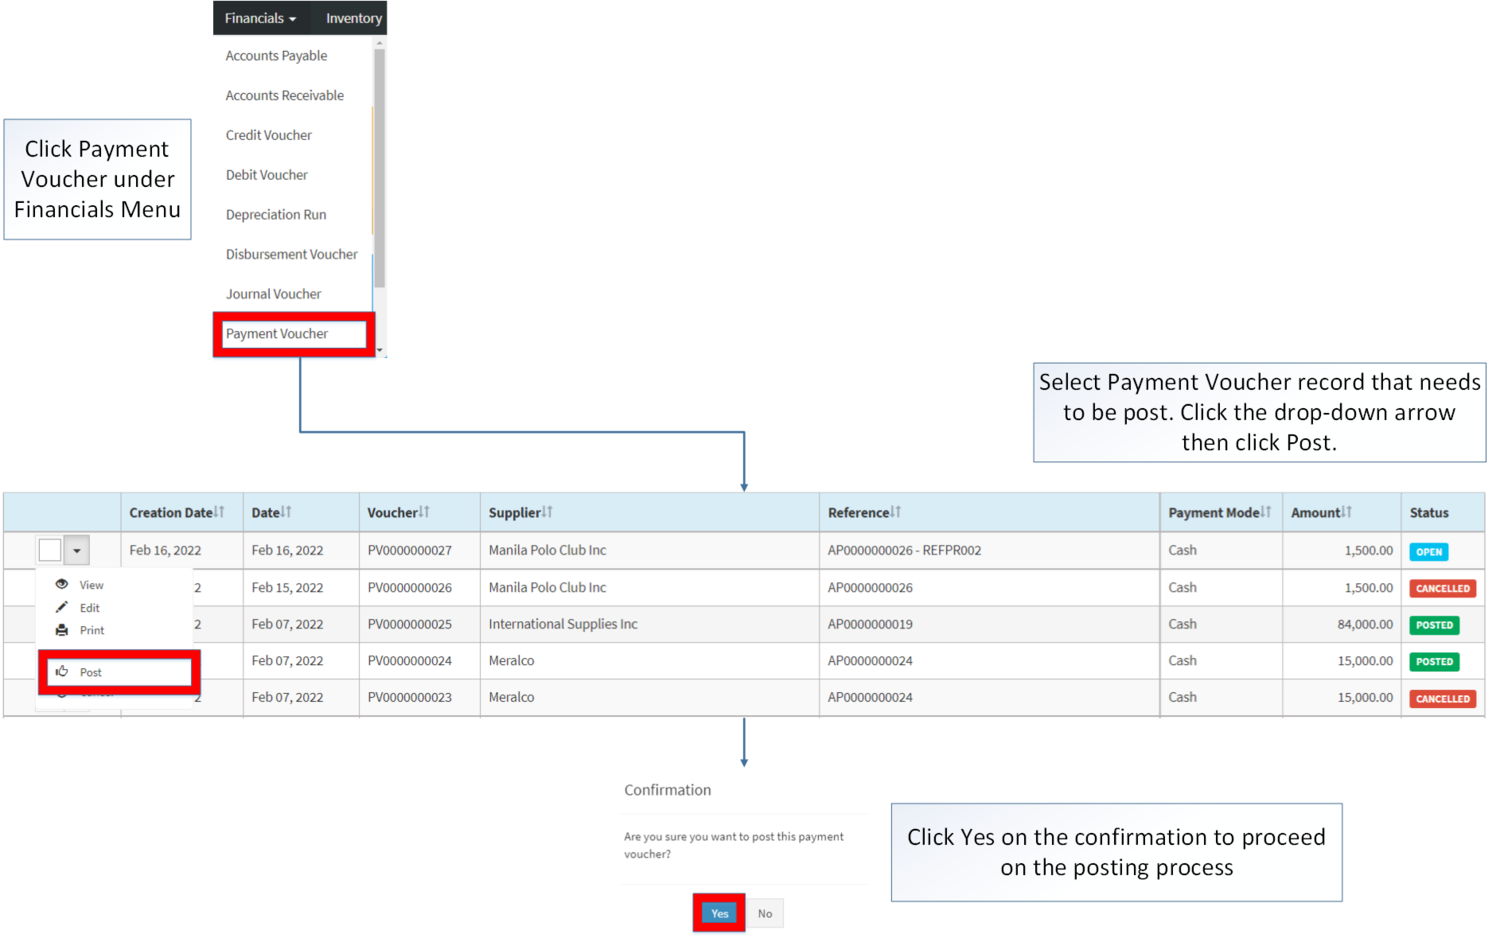
Posting Payment Voucher
- Click Payment Voucher under Financials Menu
- Select the Payment Voucher record that needs to be post. Click the drop-down arrow then click Post
- Click Yes on the confirmation to proceed on the posting process.
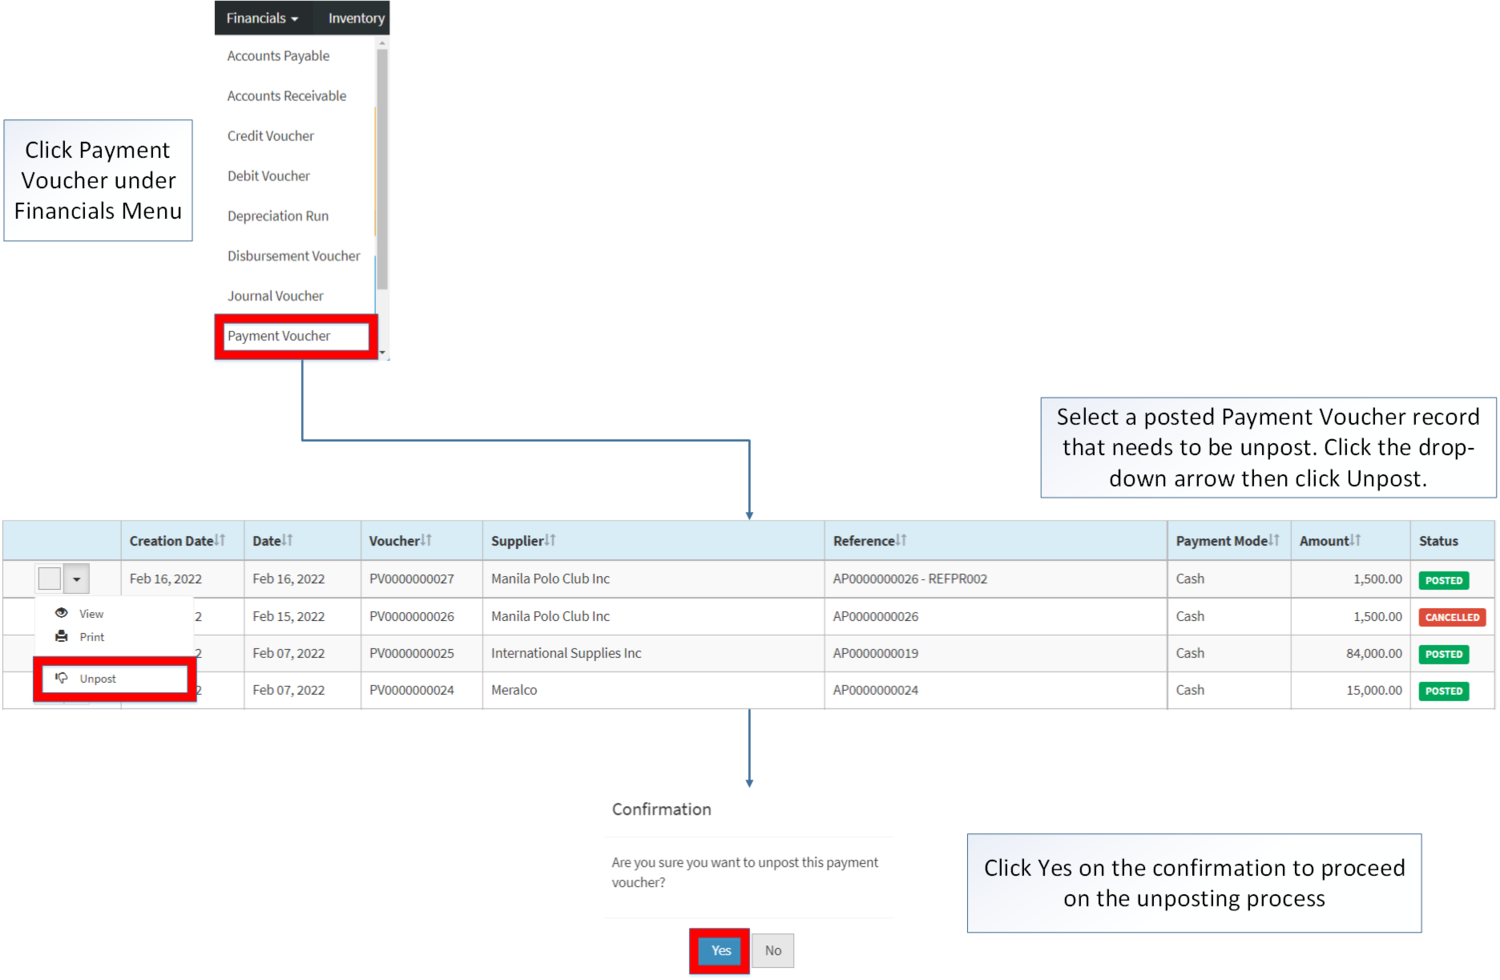
Unposting Payment Voucher
- Click Payment Voucher under Financials Menu
- Select a Posted Payment Voucher that needs to be unpost. Click the drop-down arrow then click Unpost
- Click Yes on the confirmation to proceed on the unposting process.
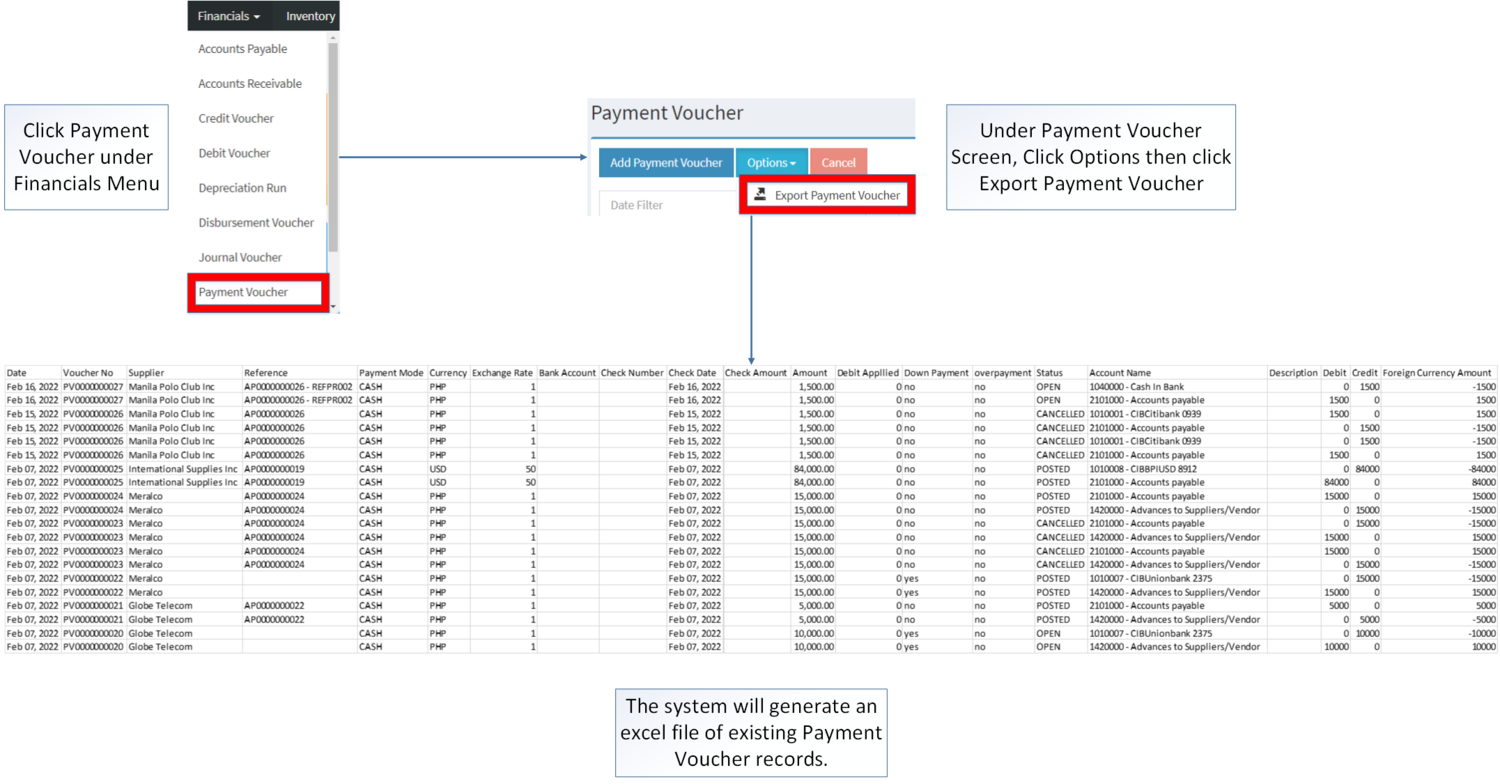
Exporting Payment Voucher
- Click Payment Voucher under Financials Menu
- Under Payment Voucher Screen, Click Options then click Export Payment Voucher
Payment Voucher Record Options
| Status | View | Edit | Post | Unpost | Cancel | |
|---|---|---|---|---|---|---|
| UNPOSTED | ☑ | ☑ | ☑ | ☑ | ☑ | |
| POSTED | ☑ | ☑ | ☑ | |||
| CANCELLED | ☑ | ☑ |
Notes:
- The user has an option to Edit the Record while viewing it
- The user can only Edit the Record if it is still in OPEN status
- If the Payment Voucher is Posted, Unposting the record will leave its status to OPEN thus can now be edited.
- The user can only Cancel the Payment Voucher if the status of the said Voucher is still on OPEN Status
- Debit Vouchers tagged will revert it status to Active when the Payment Voucher has been Cancelled.
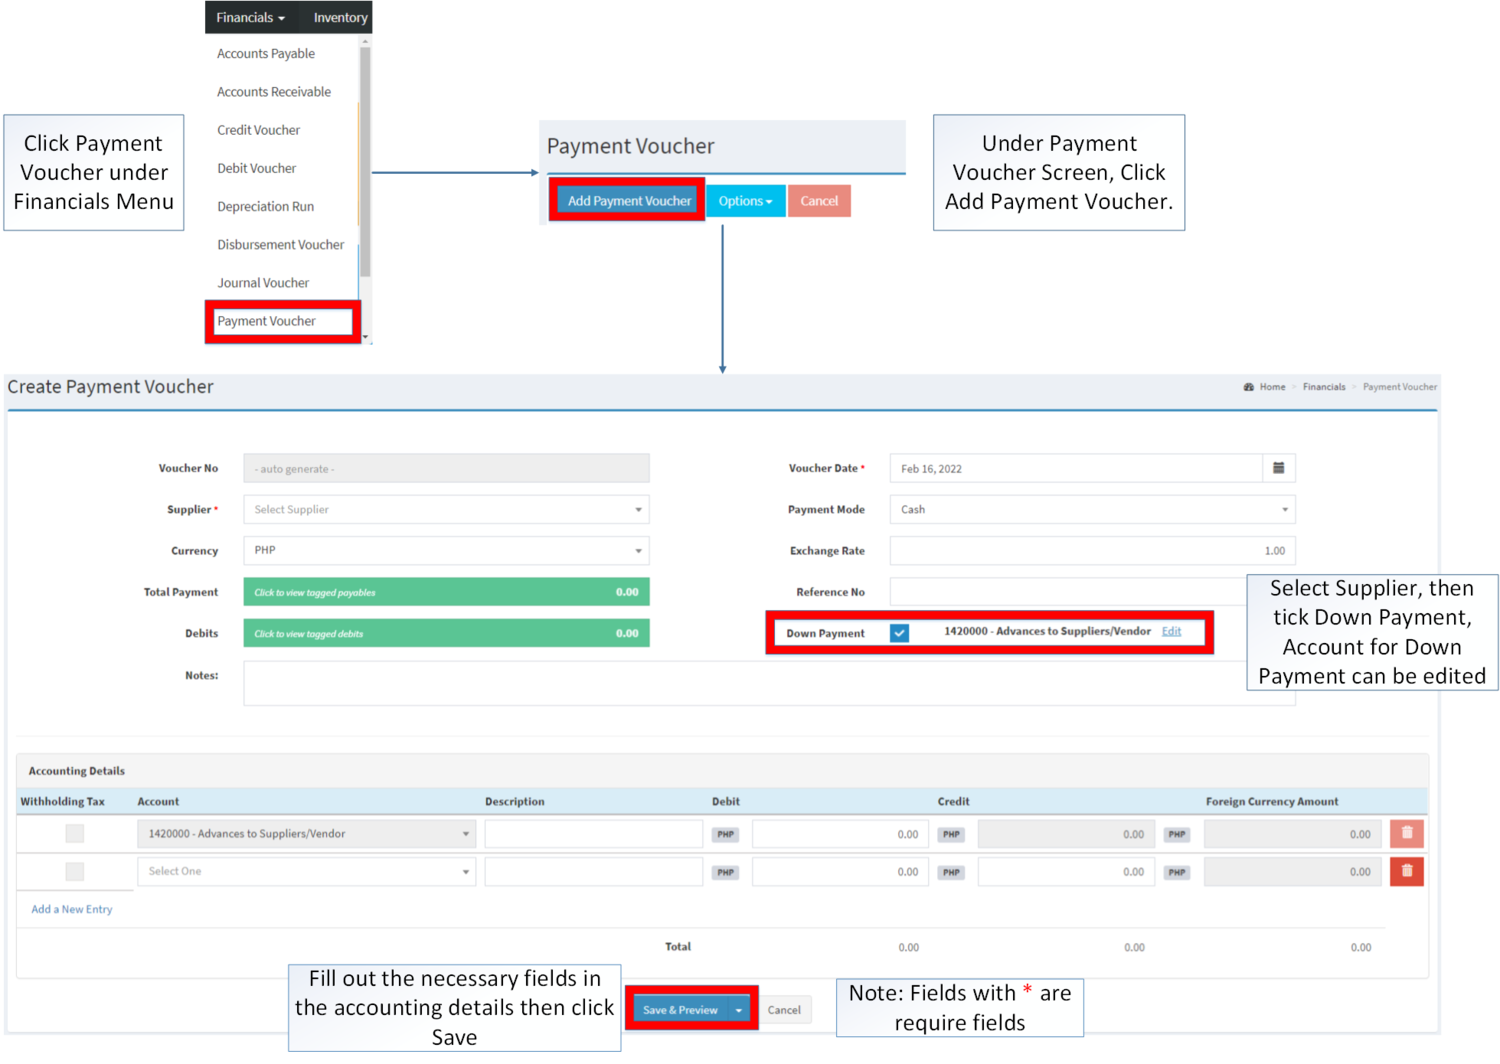
Creating Debit Voucher
- Click Payment Voucher from Financial Module
- Under Payment Voucher Screen, Click Add Payment Voucher
- Select Supplier, then tick the Down Payment, Account for Down Payment can be edited.
- Fill out the necessary fields in the accounting details then Click Save.
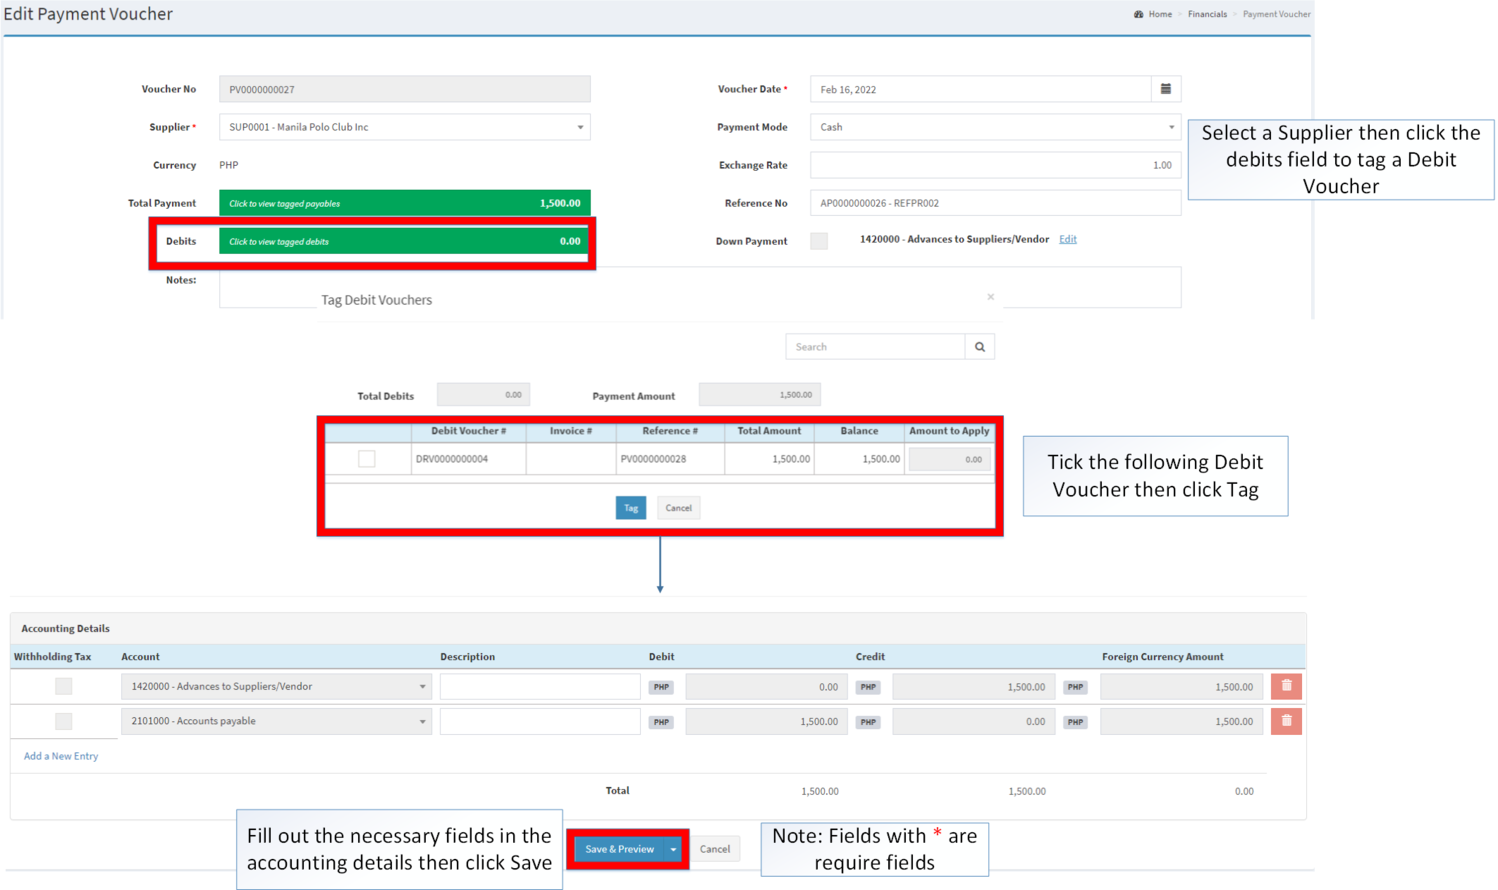
Applying Debit Voucher
- Under Create Payment Voucher, Select a Supplier then click the Debits field to tag a Debit Voucher
- Tick the following Debit Voucher then click Tag
- Fill out the necessary fields in the accounting details then click Save.
| Modules | |
|---|---|
| Financials | Financials | Accounts Payable | Payment Voucher | Debit Voucher |
| Maintenance | Supplier | Currency | Exchange Rate | Proforma | Chart of Account |
| Reports | |
| Purchase Reports | Purchase Report |
| Financial Statements | Accounts Payable Aging | AP Detailed Report | AP Transaction Report |
| Tax Reports | BIR Form 1601E-Q | BIR Form 0619-E |
