Billing
-
- Last edited 3 years ago by Gelo
-
Contents
Billing
This module allows the user to create Billings for Job Order Transactions
Requirements before using Billing
- The user should setup the following Maintenance Module in order to proceed on using the Billing.
Billing Record List
| Status | Description |
|---|---|
| UNPAID | If the Billing Record is newly created and not yet paid |
| WITH PARTIAL PAYMENT | If the Billing Payment is paid partially |
| PAID | If the Billing Record is fully paid and Posted |
| CANCELLED | If the Billing is cancelled. |
Creating Billing Record
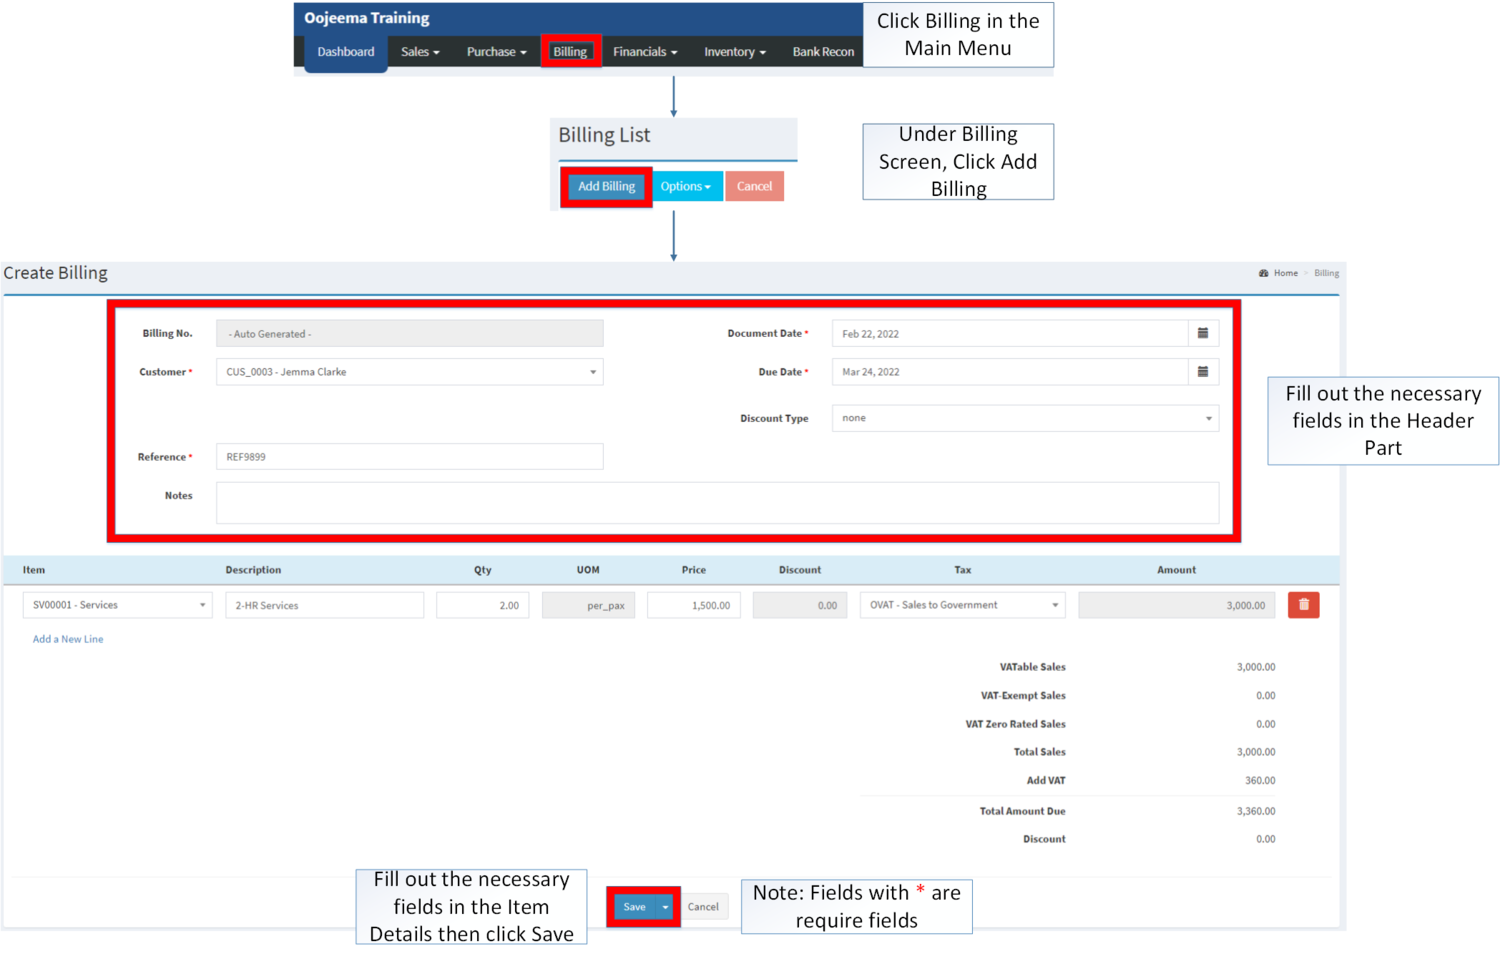
- Click Billing in the Main Menu
- Under Billing Screen, Click Add Billing
- Fill up the necessary fields on the header part
- Fill up the necessary fields in the item details then click Save. Note: Fields with * are require fields
| Field | Description | Allowed Inputs | Restricted Inputs | Character Limit | Required Field? |
|---|---|---|---|---|---|
| 1.Billing No. | •Billing reference number that is auto generated upon creation | •Alphanumeric(Auto-Generated) | N/A | N/A | N/A |
| 2.Customer | •Name of Customer | •Customer List provided in the Customer Maintenance Module | N/A | N/A | Yes |
| 3.Reference | •Reference code for the Billing Transaction | •Alphanumeric
•Special Character |
None | 20 | Yes |
| 4.Document Date | •Date when the document was created | •Date picker provided by the system | N/A | N/A | Yes |
| 5.Due Date | •Due date of Billing Transaction | •Date picker provided by the system | N/A | N/A | Yes |
| 6.Discount Type | •Discount Type for the items in the transaction | •Amount/Percentage | N/A | N/A | No |
| 7.Notes | •Other Remarks for the transaction | •Alphanumeric | None | 300 | No |
| 8.Item | •Item List to be placed in the transaction | •Item List Provided in the Item Master Maintenance Module | N/A | N/A | Yes |
| 9.Description | •Any remarks/description | •Alphanumeric
•Special Character |
None | 100 | No |
| 10.Quantity | •Quantity of items applied in the transaction | •Numeric | Any inputs aside numeric | 20 | Yes |
| 11.Unit of Measure(UOM) | •Unit of Measure of the Item | •Unit of Measure List provided in the Unit of Measure Maintenance Module | N/A | N/A | N/A |
| 12.Price | •Price of the items | •Numeric | Any inputs aside numeric | 20 | Yes |
| 13.Discount | •Discount Value to be applied in the Billing | •Discount Amount depending on Discount Type | N/A | N/A | N/A |
| 14.Tax | •Tax Type of the item in the transaction | •Tax Type List provided in the Tax Maintenance Module | N/A | N/A | No |
| 15.Amount | •Total amount of the Item Line based from the Price, Discounts and Taxes applied | •Numeric(Auto-Generated) | N/A | N/A | N/A |
Notes:
- The user can only edit the Billing if it is on UNPAID status.
- PAID Billing can only be edited if the Receipt Voucher is Unposted.
- Accounts Receivable will be auto-generated upon Billing creation.
- The receivable should be post first before receiving payment via Receipt Voucher.
- Item should be on ACTIVE status when using it upon creating or editing a transaction.
- This can be seen under Item Master Maintenance Module.
- Customer should be on ACTIVE status when using it upon creating or editing a transaction.
- This can be seen under Customer Maintenance Module.
- Tax should on ACTIVE status when using it upon creating or editing a transaction.
- This can be seen under Tax Maintenance Module.
Viewing Billing
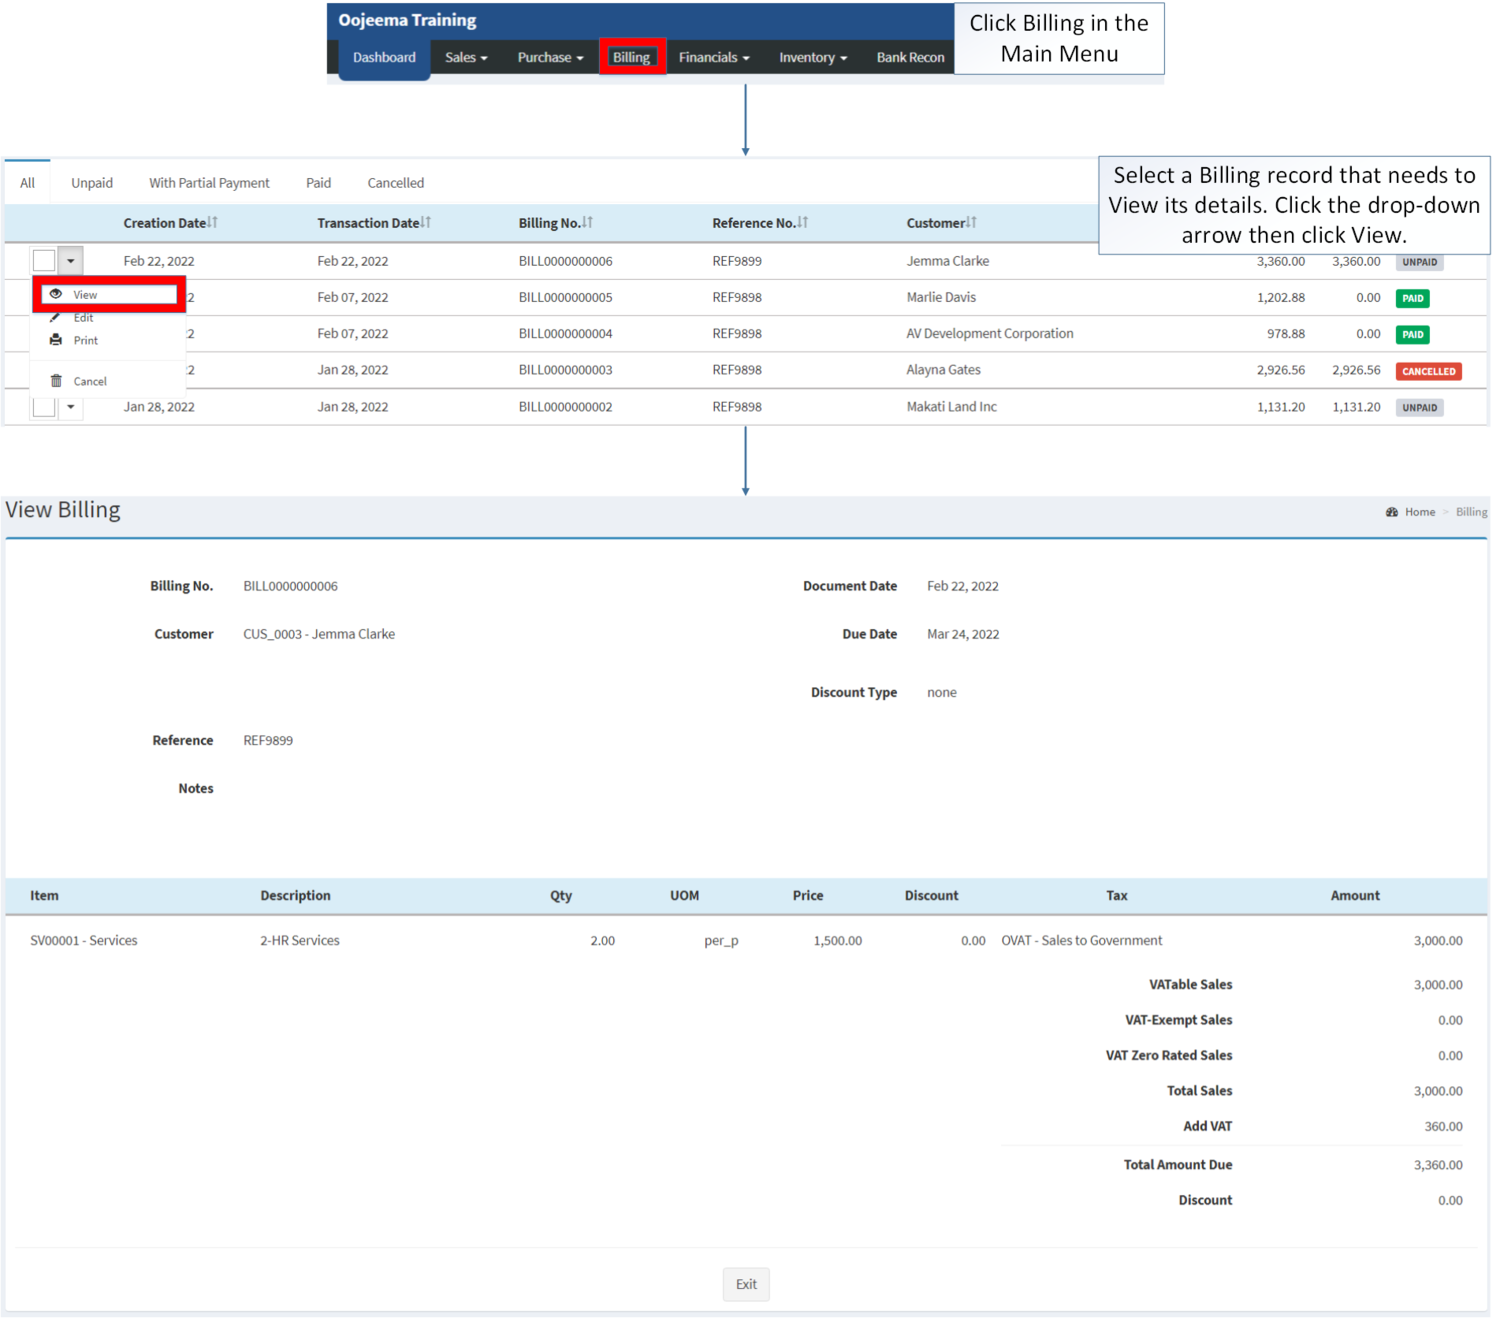
- Click Billing in the Main Menu
- Under Billing Screen, Select a Billing record that needs to view its details, click the drop-down arrow then click View
Editing Billing
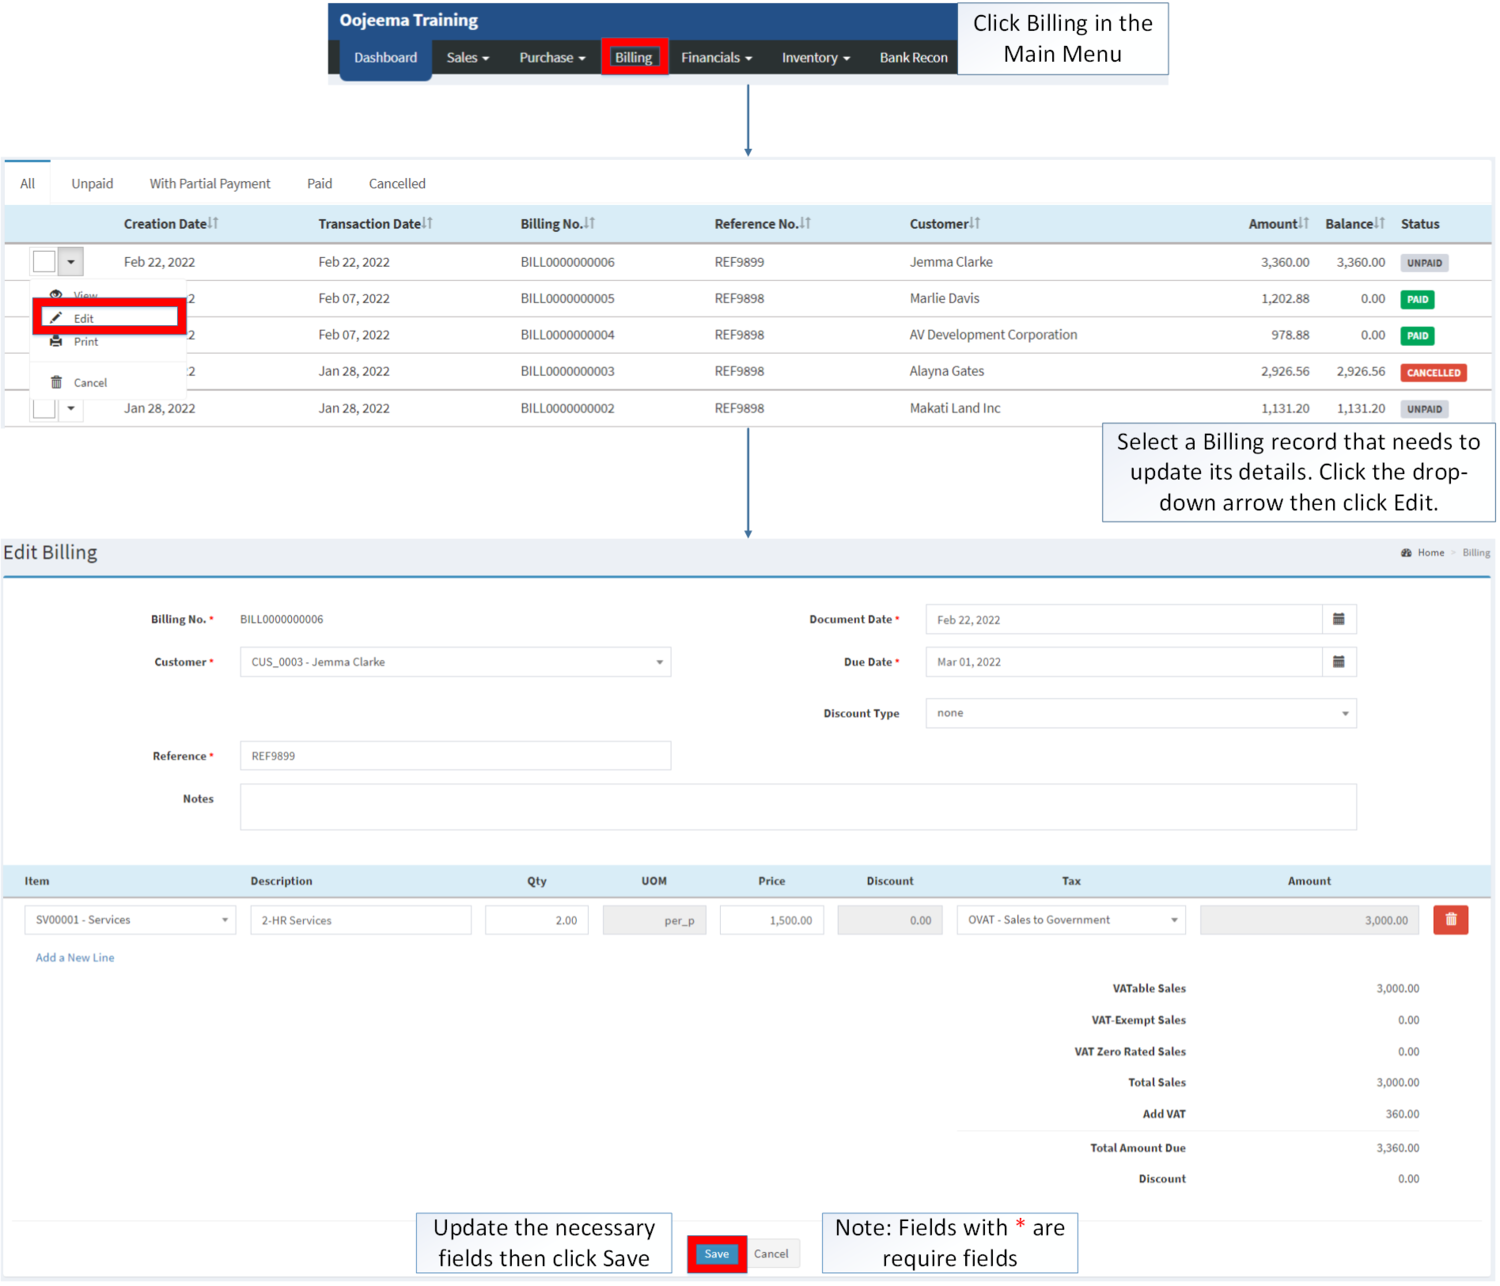
- Click Billing in the Main Menu
- Under Billing Screen, Select a Billing record that needs to update its details, click the drop-down arrow then click Edit
- Update the necessary fields then click Save.
| Field | Description | Allowed Inputs | Restricted Inputs | Character Limit | Required Field? |
|---|---|---|---|---|---|
| 1.Billing No. | •Billing reference number that is auto generated upon creation | •Alphanumeric(Auto-Generated) | N/A | N/A | N/A |
| 2.Customer | •Name of Customer | •Customer List provided in the Customer Maintenance Module | N/A | N/A | Yes |
| 3.Reference | •Reference code for the Billing Transaction | •Alphanumeric
•Special Character |
None | 20 | Yes |
| 4.Document Date | •Date when the document was created | •Date picker provided by the system | N/A | N/A | Yes |
| 5.Due Date | •Due date of Billing Transaction | •Date picker provided by the system | N/A | N/A | Yes |
| 6.Discount Type | •Discount Type for the items in the transaction | •Amount/Percentage | N/A | N/A | No |
| 7.Notes | •Other Remarks for the transaction | •Alphanumeric | None | 300 | No |
| 8.Item | •Item List to be placed in the transaction | •Item List Provided in the Item Master Maintenance Module | N/A | N/A | Yes |
| 9.Description | •Any remarks/description | •Alphanumeric
•Special Character |
None | 100 | No |
| 10.Quantity | •Quantity of items applied in the transaction | •Numeric | Any inputs aside numeric | 20 | Yes |
| 11.Unit of Measure(UOM) | •Unit of Measure of the Item | •Unit of Measure List provided in the Unit of Measure Maintenance Module | N/A | N/A | N/A |
| 12.Price | •Price of the items | •Numeric | Any inputs aside numeric | 20 | Yes |
| 13.Discount | •Discount Value to be applied in the Billing | •Discount Amount depending on Discount Type | N/A | N/A | N/A |
| 14.Tax | •Tax Type of the item in the transaction | •Tax Type List provided in the Tax Maintenance Module | N/A | N/A | No |
| 15.Amount | •Total amount of the Item Line based from the Price, Discounts and Taxes applied | •Numeric(Auto-Generated) | N/A | N/A | N/A |
Notes:
- The user can only edit the Billing if it is on UNPAID status.
- PAID Billing can only be edited if the Receipt Voucher is Unposted.
- Accounts Receivable will be auto-generated upon Billing creation.
- The receivable should be post first before receiving payment via Receipt Voucher.
Printing Billing Record
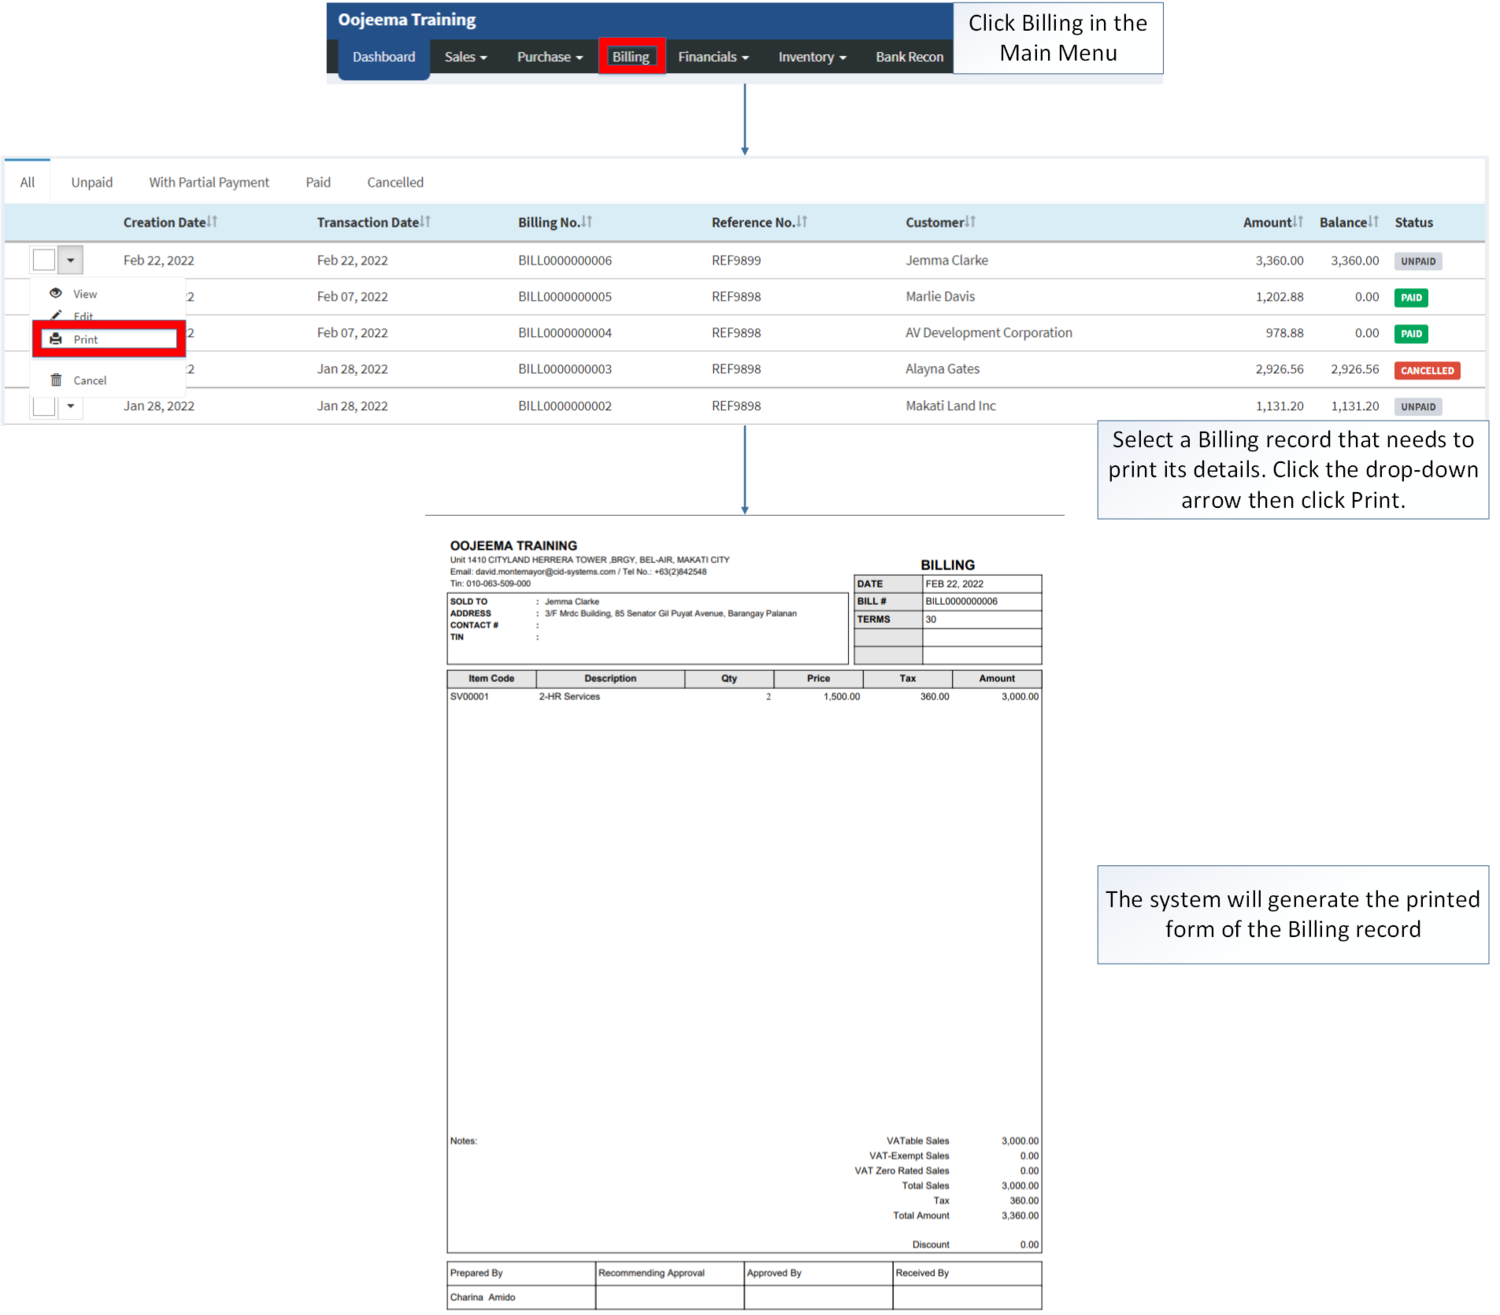
- Click Billing in the Main Menu
- Select a Billing record that needs to print its details, click the drop-down arrow then click Print
Cancelling Billing Record
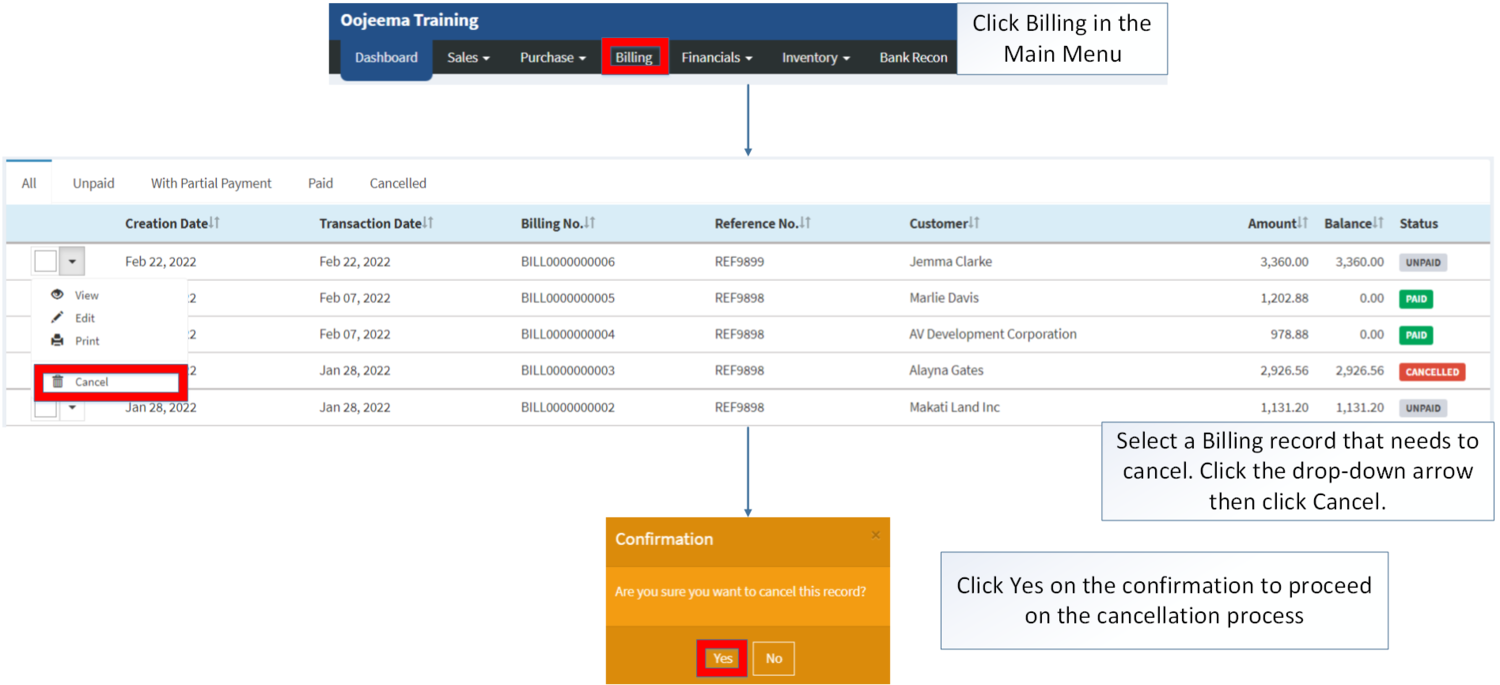
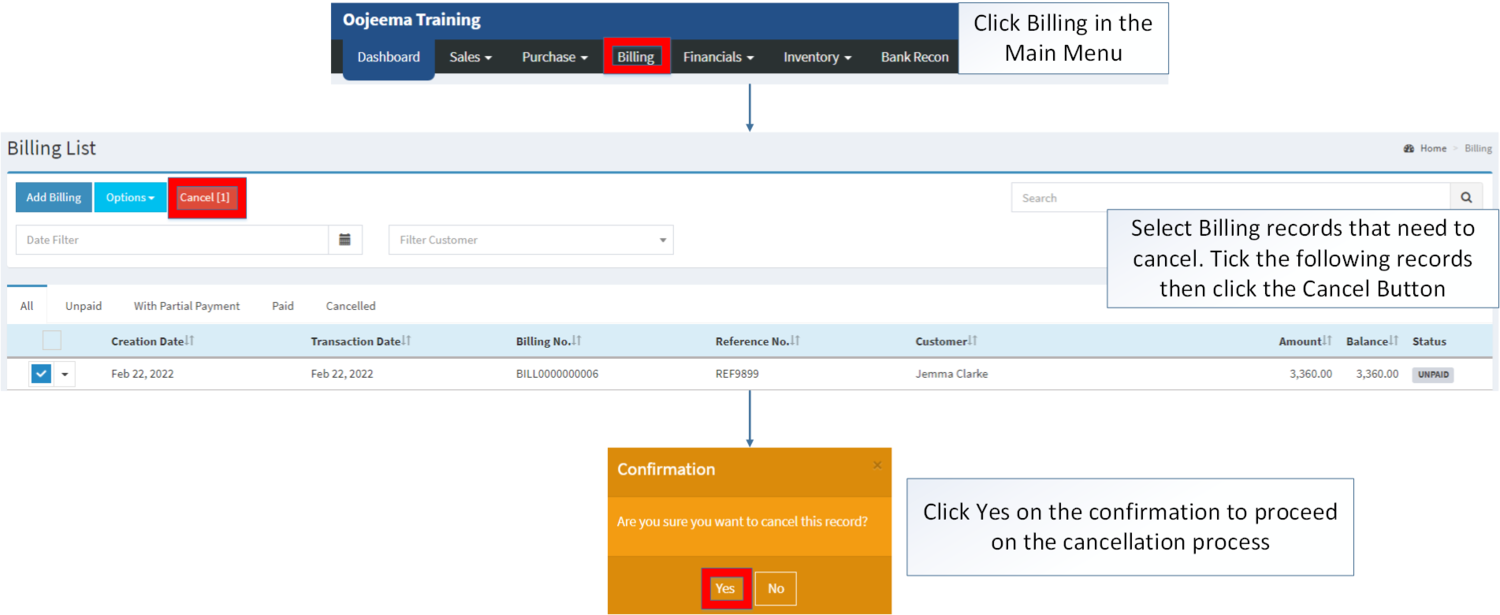
Billing can be cancelled in two ways:
- Using drop-down arrow of a record can be used in single record cancellation
- Using Cancel Button for cancelling multiple records
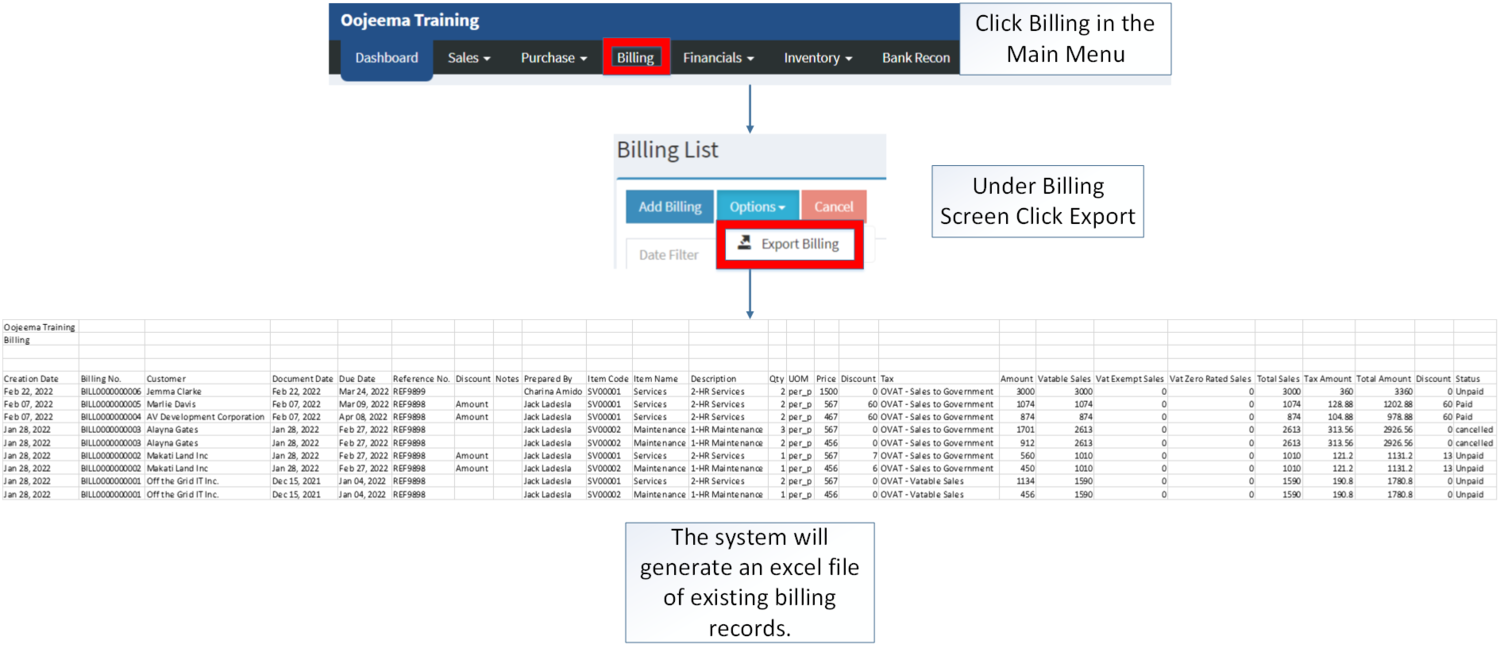
Exporting Billing
- Under Billing Screen, Click Options
- Under Options, The user may Export the record
- When Exporting the records, the user may also use the filter options such as Date Filter, Search Bar and Customer filter for precise searching and exporting of records.
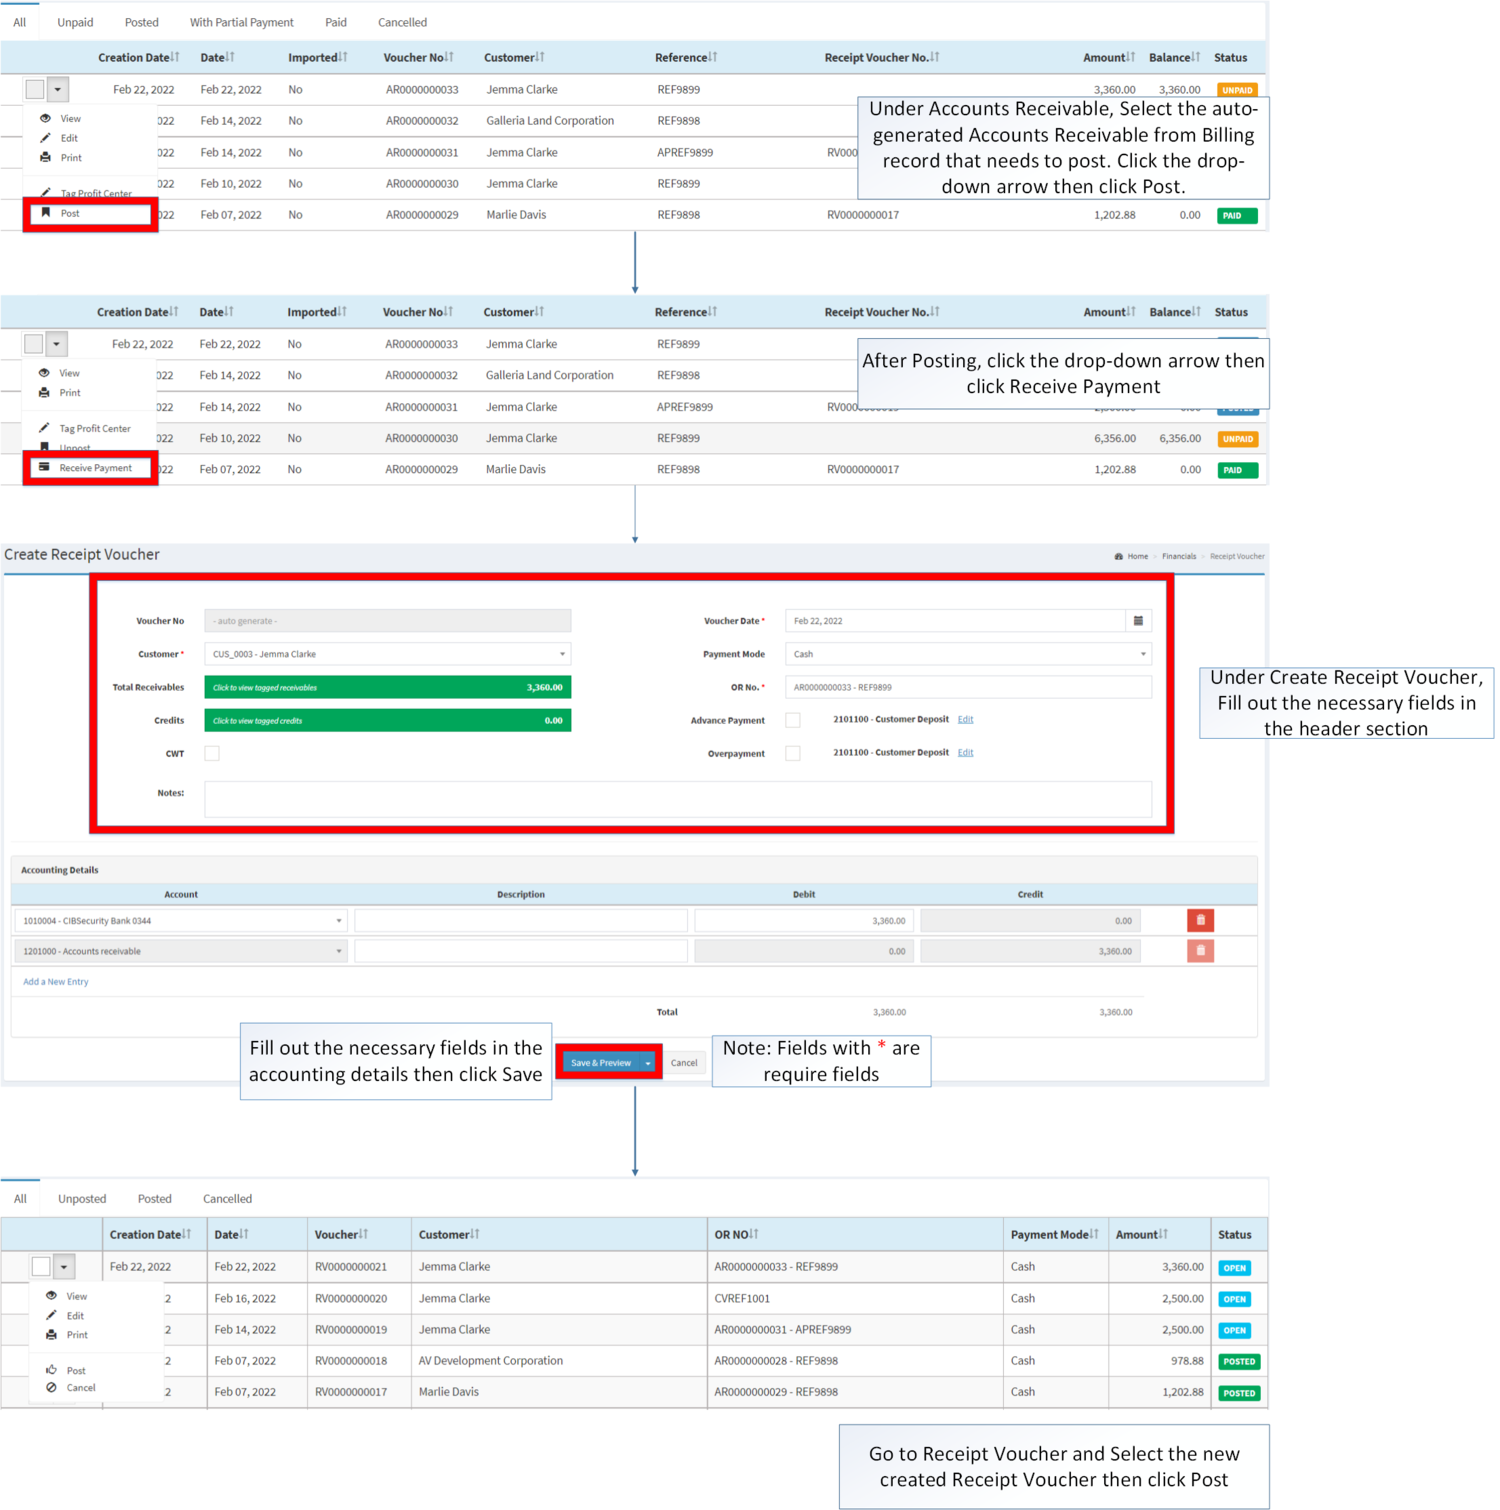
Receiving Payment on Billing
- Under Accounts Receivable, Select the auto-generated Accounts Receivable from Billing record that needs to post. Click the drop-down arrow then click Post.
- After Posting, click the drop-down arrow then click Receive Payment
- Under Create Receipt Voucher, Fill out the necessary fields in the header section
- Fill out the necessary fields in the accounting details then click Save
Notes:
- The user may apply a Profit Center in the Auto-Generated Receivable Record
Billing Record Options
| Status | View | Edit | Cancel | |
|---|---|---|---|---|
| UNPAID | ☑ | ☑ | ☑ | ☑ |
| WITH PARTIAL PAYMENT | ☑ | ☑ | ||
| PAID | ☑ | ☑ | ||
| CANCELLED | ☑ | ☑ |
Notes:
- The user can only edit the Billing if it is on UNPAID status.
- PAID Billing can only be edited if the Receipt Voucher is Unposted.
- Accounts Receivable will be auto-generated upon Billing creation.
- The receivable should be post first before receiving payment via Receipt Voucher.
- Item should be on ACTIVE status when using it upon creating or editing a transaction.
- This can be seen under Item Master Maintenance Module.
- Customer should be on ACTIVE status when using it upon creating or editing a transaction.
- This can be seen under Customer Maintenance Module.
- Tax should on ACTIVE status when using it upon creating or editing a transaction.
- This can be seen under Tax Maintenance Module.
| Modules | |
|---|---|
| BIlling | Billing |
| Financials | Accounts Receivable | Receipt Voucher |
| Maintenance | Customer | Item Master | Price List | Profit Center | Unit of Measure | Tax | Unit of Measure |

