Setting Account
-
- Last edited 5 years ago by John Ruel Montesino
-
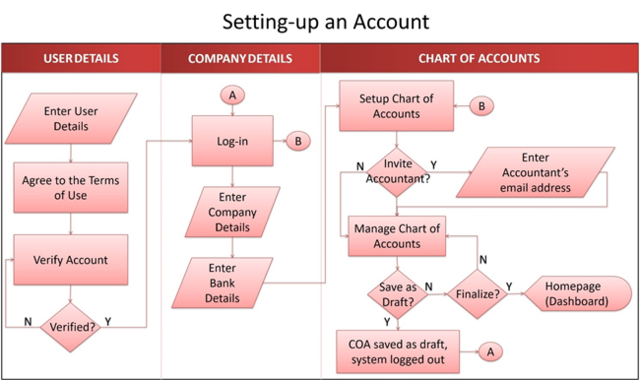
To set-up an Oojeema account for your business:
1. From Oojeema website (https://oojeema.com/), click “Try for Free!”.
2. Fill-out the user details – for initial admin’s account registration and company details.
a. Package type to avail – Demo (14-day trial), Lite (Free), Pro (P800/month)
b. Initial admin’s Name
c. Initial admin’s Contact Number
d. Company Name – this will be the company name to be displayed on all transactions
e. Company Address – this will be the company address to be displayed on all downloadable/printed transactions
f. Company Email Address – recipient of account verification email
g. Password – account log-in password
3. Click “Next”, then the “Terms of Use” will be displayed. Tick the checkbox to agree to the Terms of Use and click “Next”.
4. Verify your account by checking the verification link sent to the entered email address.
5. After verifying your account, log in using the email address and password you have entered in the form before and fill-out the “Company Details”.
a. Country
b. Region
c. Province
d. Company / Business Type
e. Line of Business – this will be the basis for the default Chart of Accounts
f. Tax ID Number (optional) – can add later on in the Company Information page
6. Click “Next”, then fill-out “Bank Details” or you may skip this part by clicking “Next”. You can add bank accounts later on in the Bank Maintenance page.
7. Finally, setup your Chart of Accounts. You may invite your accountant to help you here by clicking “Invite Accountant”.
a. To add another account in your Chart of Accounts – click “Add an account” button. You can still add accounts later on in the Chart of Accounts maintenance page.
b. To save the chart of accounts as draft which you may finalize later on – click “Save as Draft” button.
c. To finalize your Chart of Accounts – click “Finalize” button. Upon finalizing the Chart of Accounts, you will be redirected to your accounts’ home page.
