You are viewing an old version of this page. Return to the latest version.
No categories assigned
Accounts Receivable
-
- Last edited 3 years ago by Gelo
-
Contents
- 1 Accounts Receivable
- 1.1 Requirements before using Accounts Receivable
- 1.2 Accounts Receivable Record List
- 1.3 Adding Accounts Receivable
- 1.4 Viewing Accounts Receivable
- 1.5 Editing Accounts Receivable
- 1.6 Printing Accounts Receivable
- 1.7 Posting Accounts Receivable
- 1.8 Unposting Accounts Receivable
- 1.9 Receiving Payment in Accounts Receivable
- 1.10 Cancelling Accounts Receivable Record
- 1.11 Importing and Exporting Accounts Receivable
- 1.12 Accounts Receivable Record Option
Accounts Receivable
Allows the user to create a transaction for the balance due to a firm for goods and services delivered or used but not yet paid for by customers.
Requirements before using Accounts Receivable
- The user should setup the following Maintenance Module in order to proceed on using the Accounts Receivable
| Status | Description |
|---|---|
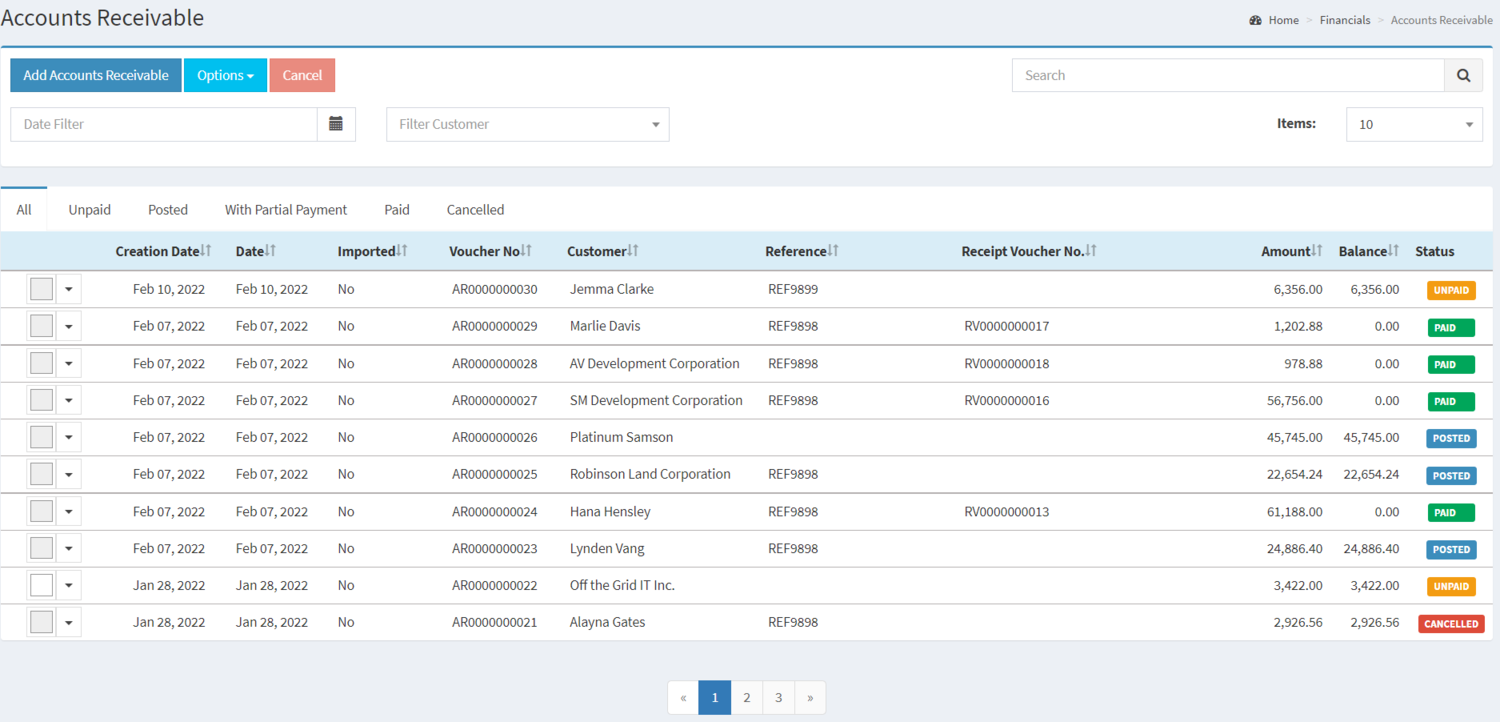
| UNPAID | If the Accounts Receivable has been created |
| POSTED | If the Accounts Receivable is Posted and ready to receive its payment |
| WITH PARTIAL PAYMENT | If the Accounts Receivable is Paid Partially |
| PAID | If the Accounts Receivable is completely Paid |
| CANCELLED | If the Accounts Receivable is cancelled |
Accounts Receivable Record List
Adding Accounts Receivable
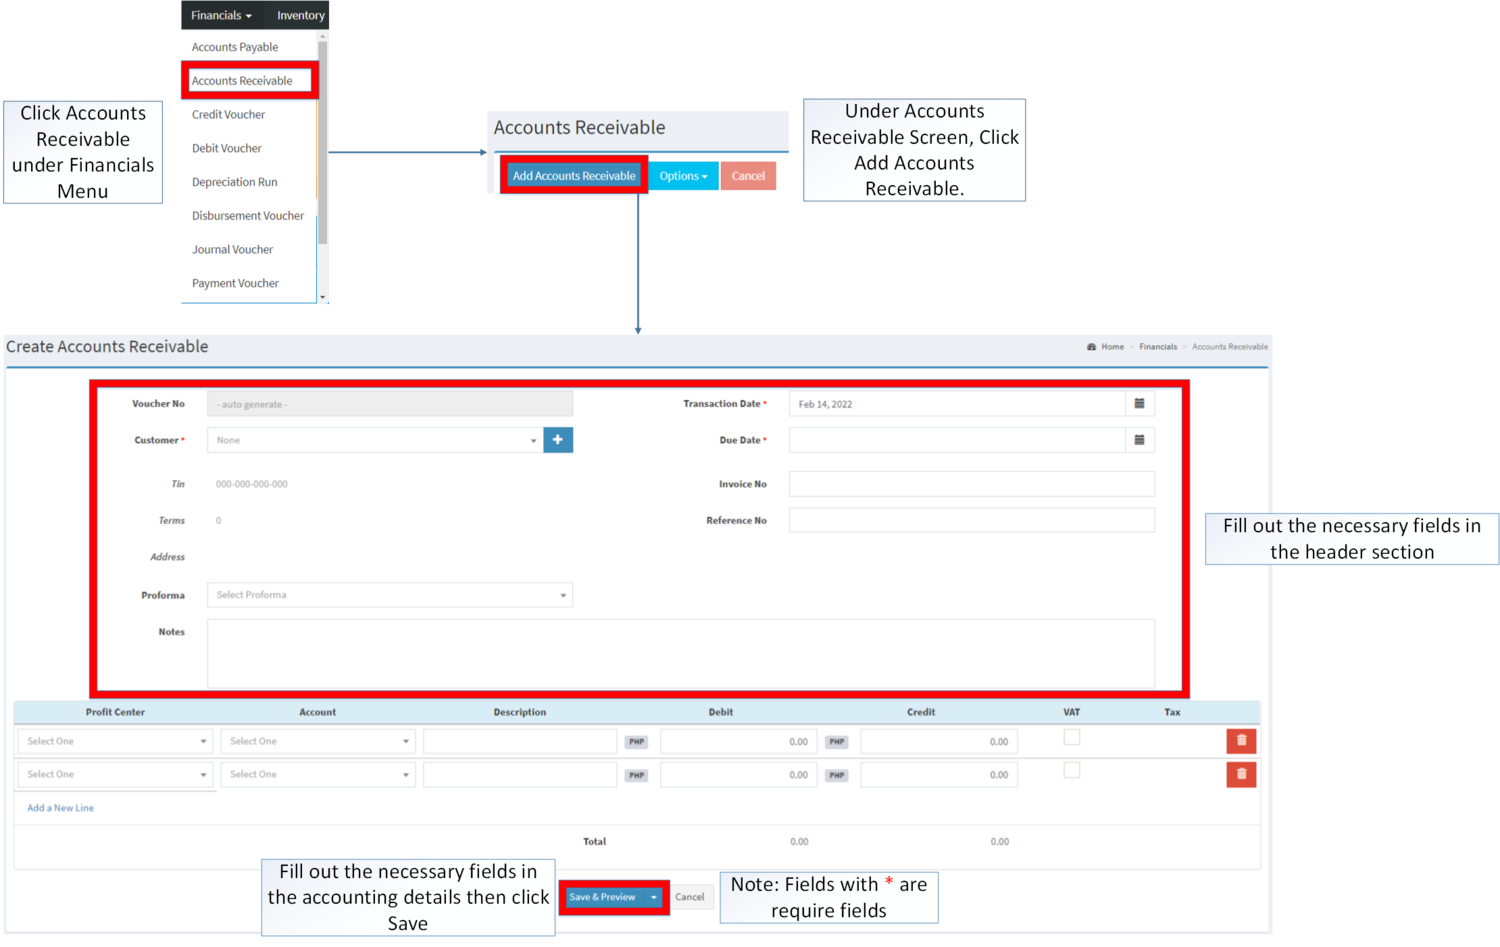
- Click Accounts Receivable under Financials menu
- Under Accounts Receivable Screen, Click Add Accounts Receivable
- Fill up the necessary fields in the Header Section
- Fill up the necessary fields in the Accounting Details then Click Save. Note: Fields with * are require fields
| Field | Description | Expected Values |
|---|---|---|
| 1. Voucher No. | •Voucher Reference number generated upon creation | •Alphanumeric(Auto-Generated) |
| 2.Customers | •Name of Customer | •Customer List provided in the Customer Maintenance Module |
| 3.Tax Identification Number(TIN) | •TIN of the Customer | •Number(Auto-Generated base from Customer's Profile) |
| 4.Terms | •Days on completing the sale | •Number(Auto-Generated base from the
Customer's Profile) |
| 5.Address | •Address of the Customer | •Alphanumeric(Auto-Generated base from the Customer's Profile) |
| 6.Proforma | •Financial statements is to facilitate comparisons of historic data and projections of future performance. | •Proforma list provided in the Proforma Maintenance Module |
| 7.Transaction Date | •Date when the Payable Transaction was created | •Date |
| 8.Due Date | •Due date of Payable Transaction | •Date |
| 9.Invoice No | •Invoice number reference for the transaction | •Alphanumeric |
| 10.Reference No | •Reference No for the transaction | •Number |
| 11.Notes | •Other Remarks on the Transaction | •Alphanumeric |
| 12.Account | •Account to be charged for credit and debit amount on the transaction | •Account list in the Chart of Accounts Maintenance Module |
| 13.Description | •Any remarks or Notes in the Account Line of the transaction | •Alphanumeric |
| 14.Debit | •Debit Amount for the Transaction | •Number |
| 15.Credit | •Credit Amount for the Transaction | •Number |
| 16.Value Added Tax(VAT) | •VAT to be applied in the amount on the accounting details in the transaction | •Tick/Untick |
| 17.Tax | •Type of Tax to be applied when the VAT is ticked | •Tax List provided in the Tax Maintenance Module |
Notes:
- Accounts Receivable Transactions are auto-generated when it is created from Billing and Delivery Receipt with Sales Invoice in it.
- Account should be on ACTIVE status when using it upon creating or editing a transaction.
- This can be seen in Chart of Account Maintenance Module.
- Proforma should be on ACTIVE status when using it upon creating or editing a transaction.
- This can be seen in Proforma Maintenance Module
- Customer should be on ACTIVE status when using it upon creating or editing a transaction.
- This can be seen in Customers Maintenance Module
- Tax should be on ACTIVE status when using it upon creating or editing a transaction.
- This can be seen in Tax Maintenance Module
- This will be only available in the transaction when the VAT column is checked.
Viewing Accounts Receivable
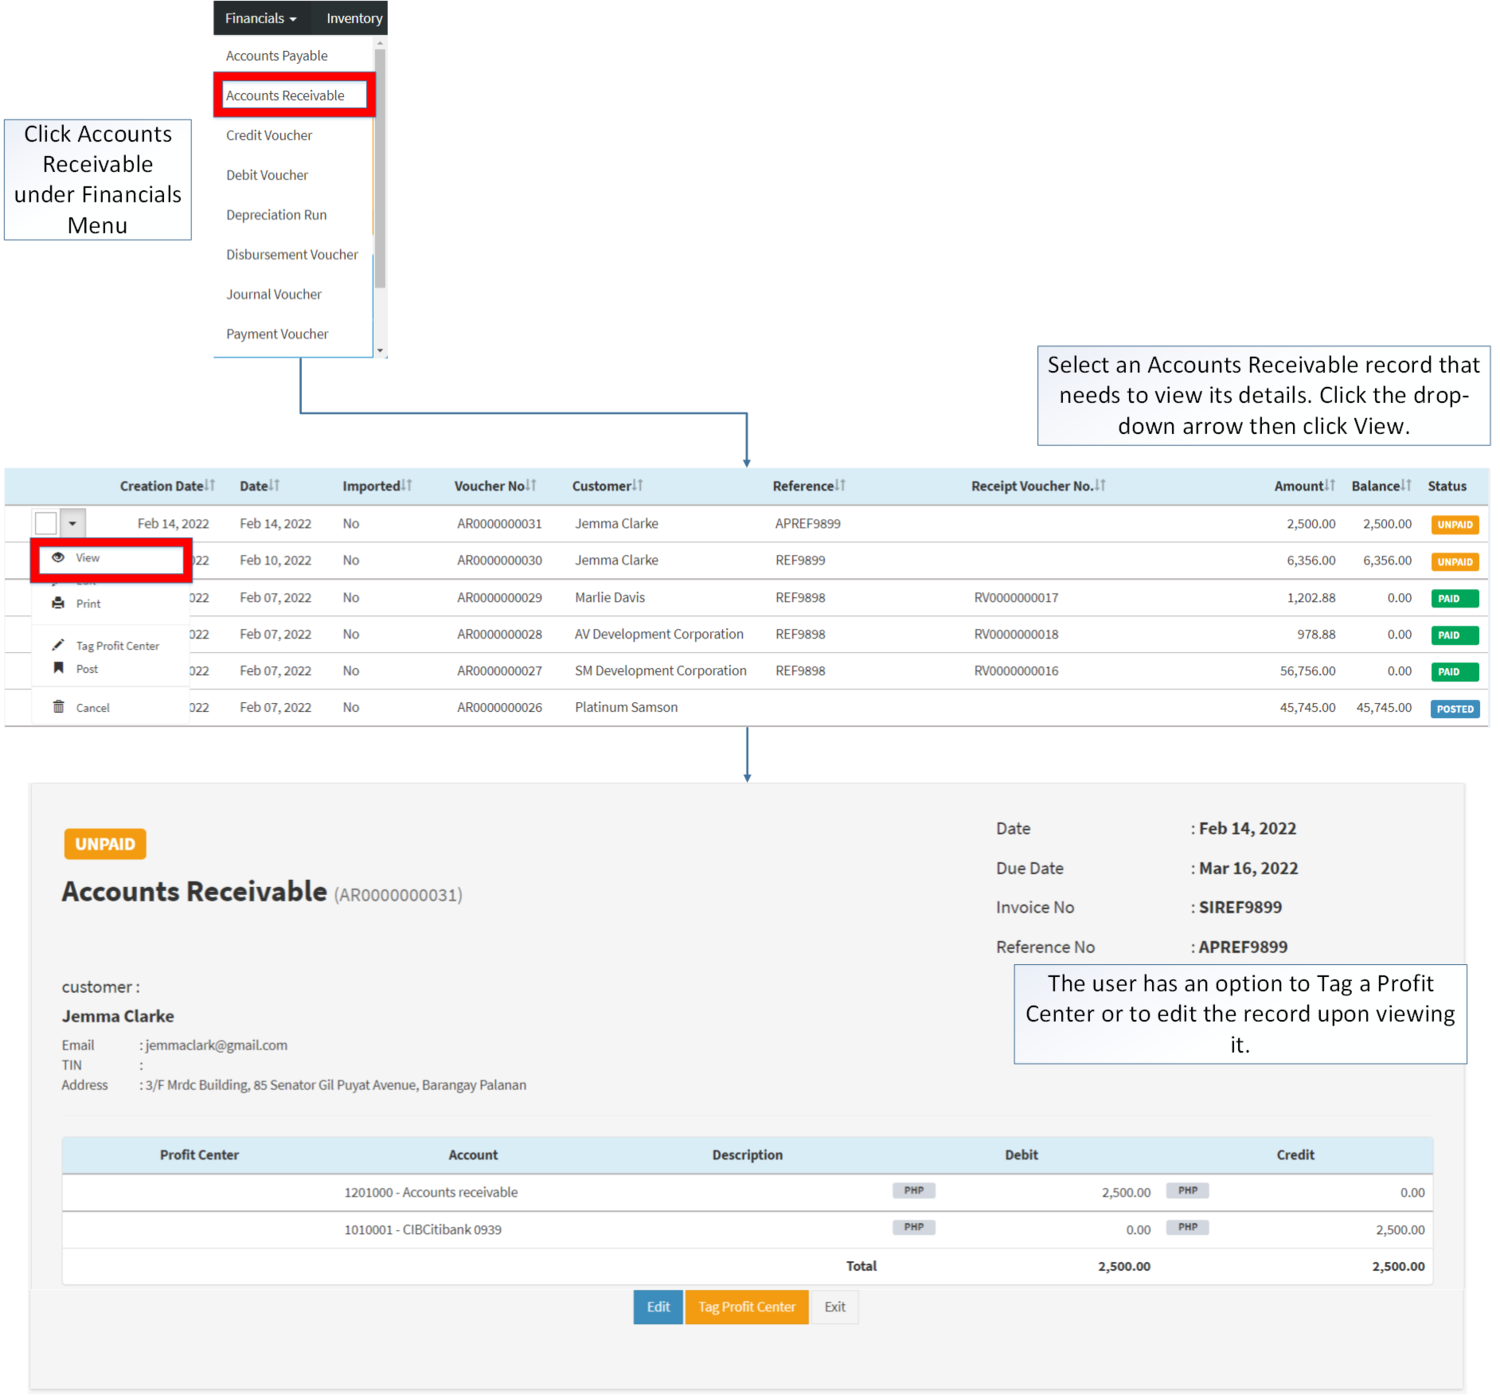
- Click Accounts Receivable under Financials Menu
- Select an Accounts Receivable record that needs to view its details. Click the drop-down arrow then click View.
- The user has an option to Tag a Profit Center or to edit the record upon viewing it.
Editing Accounts Receivable
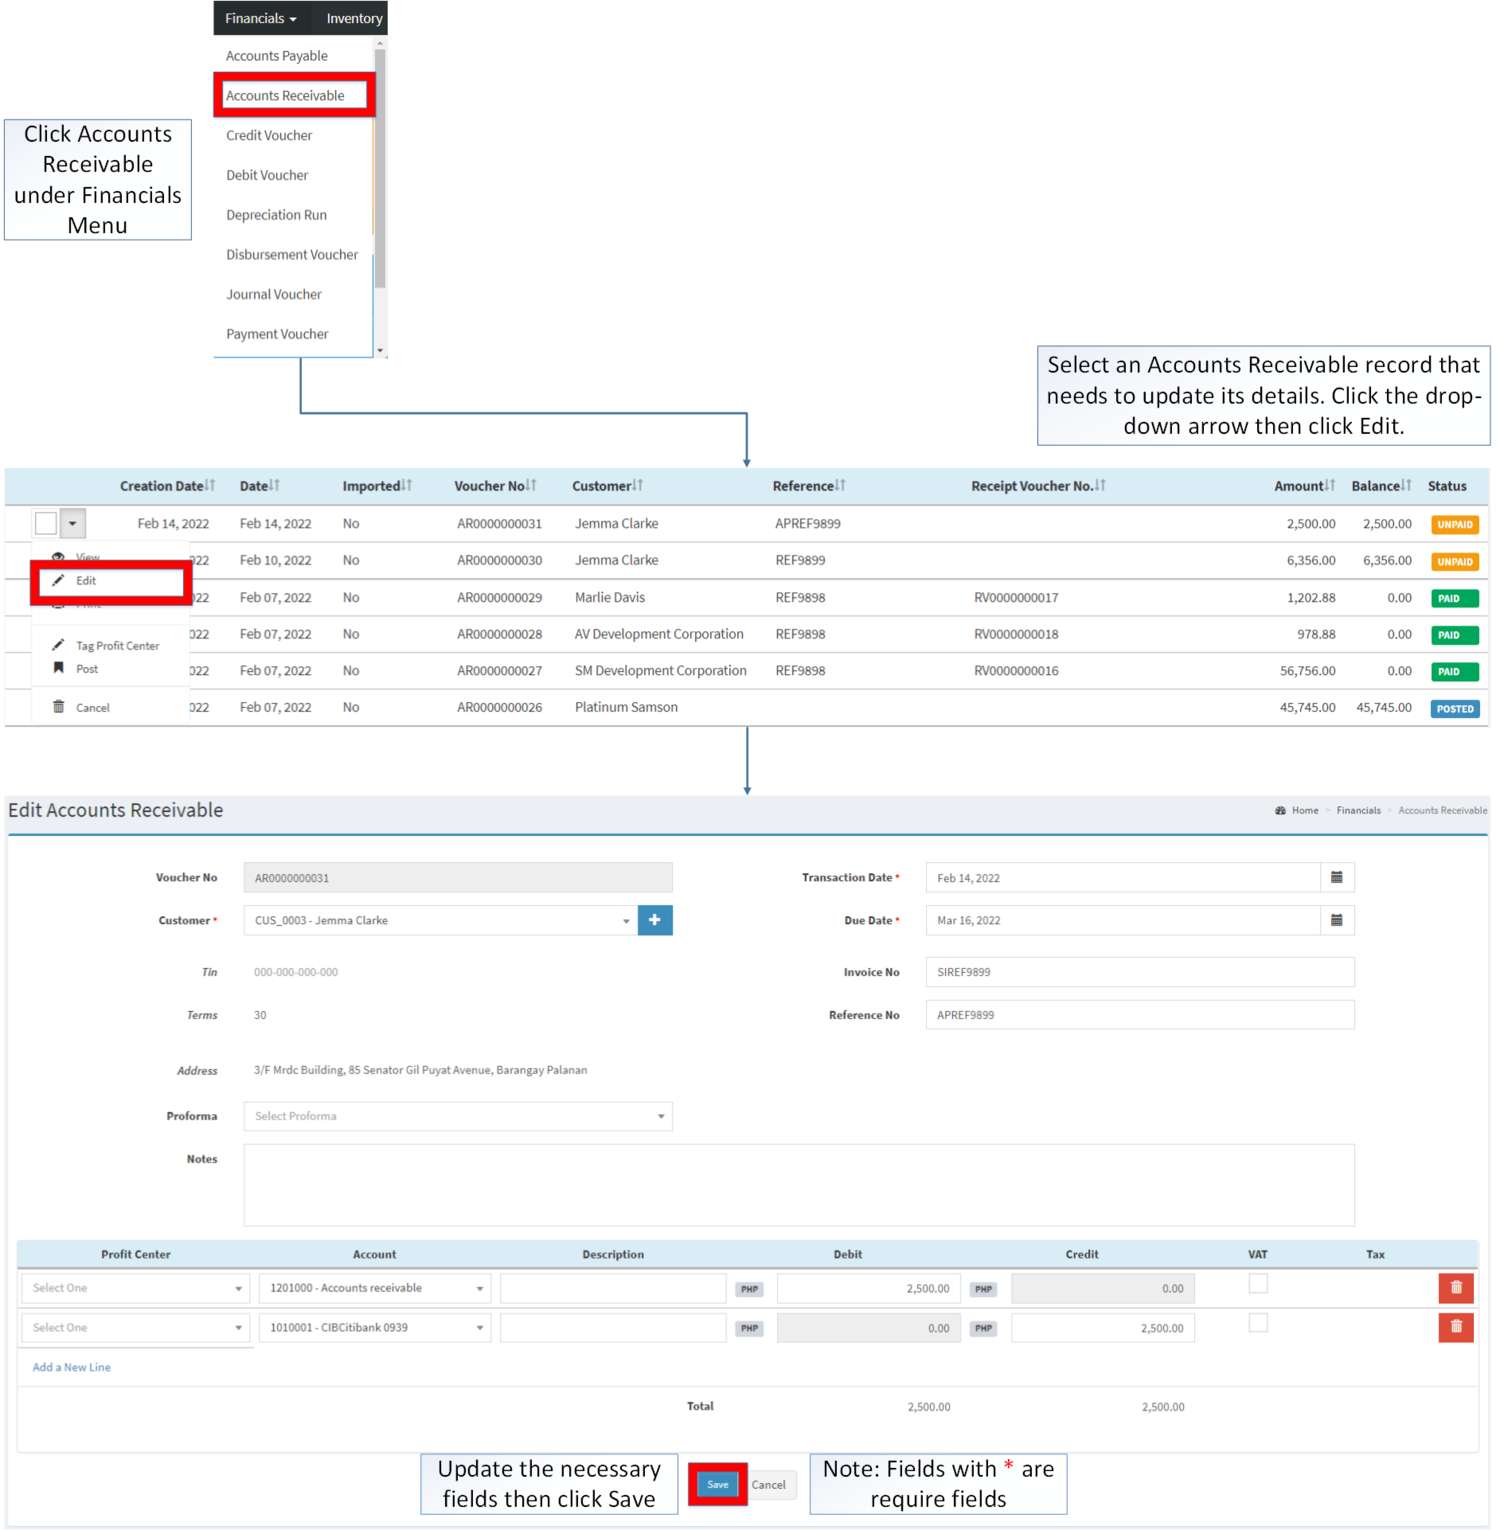
- Click Accounts Receivable under Financials Menu
- Select the Accounts Receivable that needs to update its details. Click the drop-down arrow then click Edit.
- Update the necessary information then click Save.
Notes:
- Auto-Generated Accounts Receivable can only be edited through its Sales Invoice
- To edit the total amount of the receivable, the delivery receipt should also be edited by cancelling the Sales Invoice and reverting its Delivery Receipt to prepared.
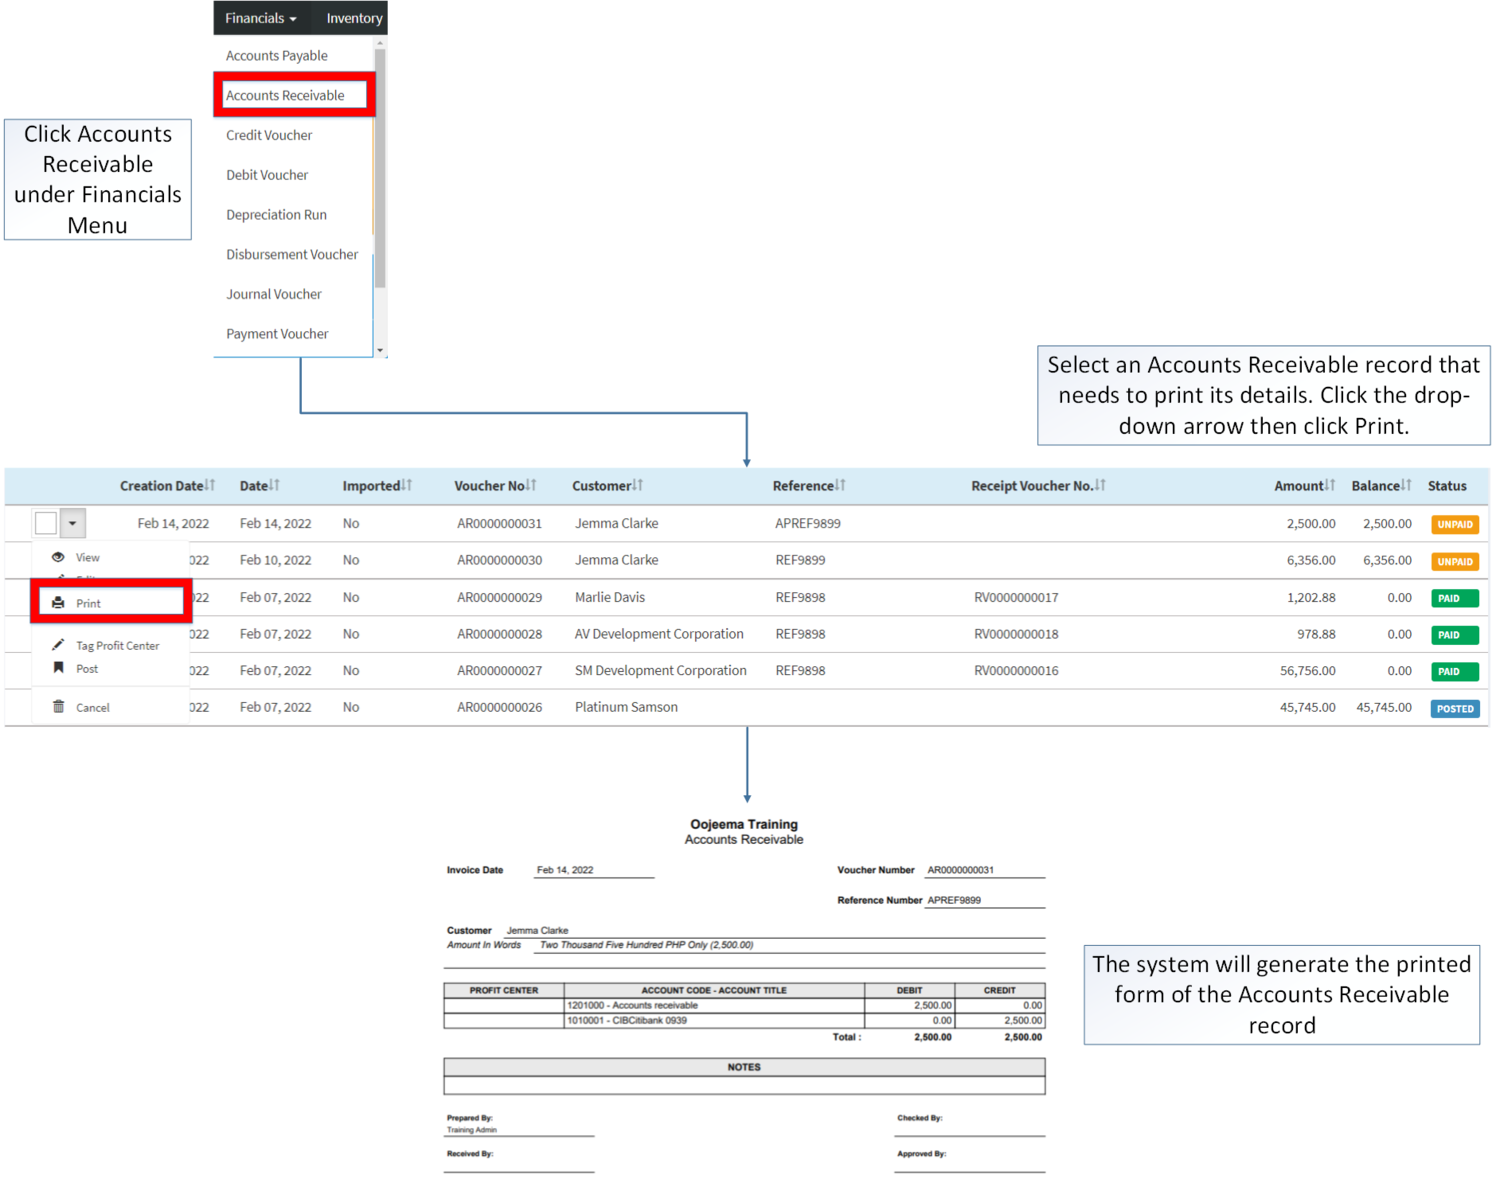
Printing Accounts Receivable
- Click Financials then click Accounts Receivable
- Select the Accounts Receivable that needs to print its details. Click the Drop-down Arrow then press Print.
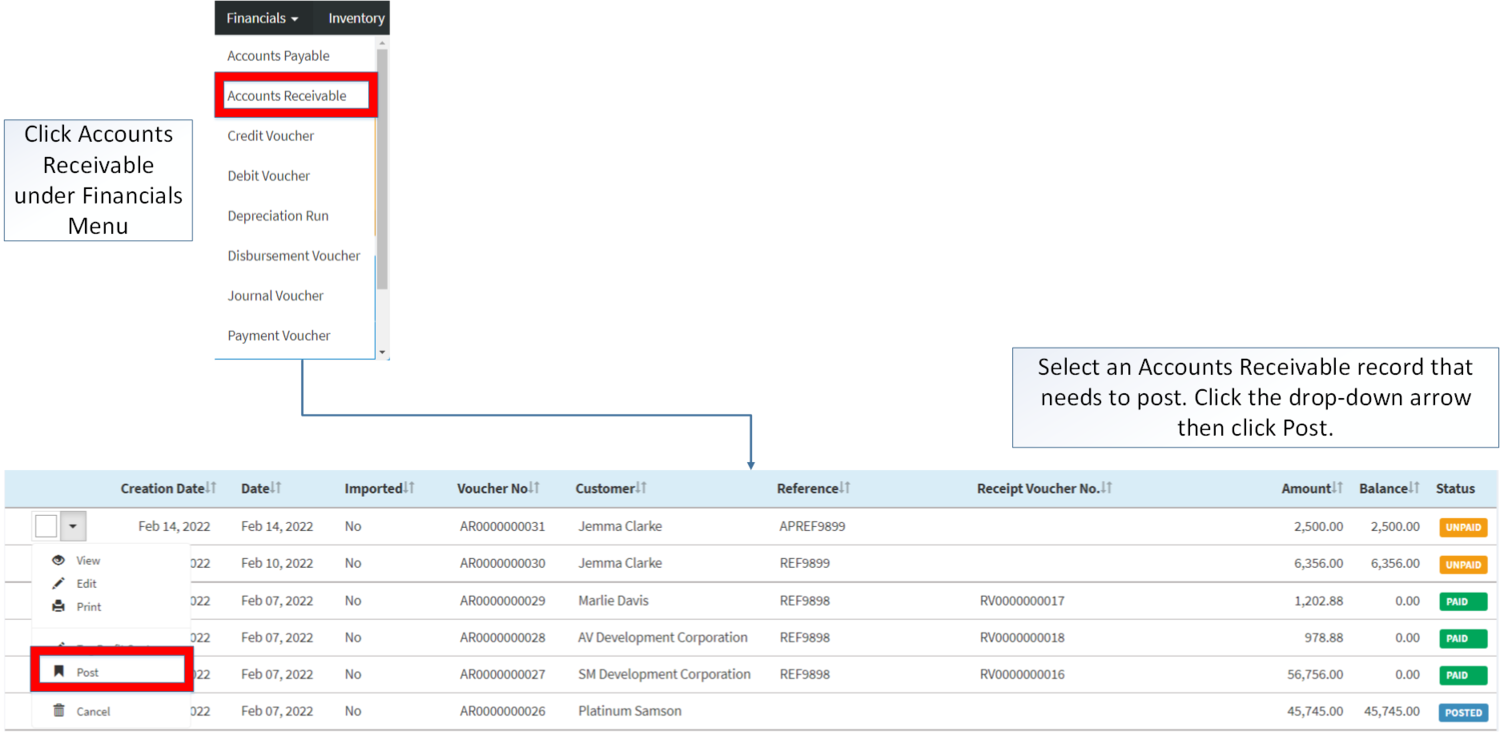
Posting Accounts Receivable
- Click Financials then click Accounts Receivable
- Select the Accounts Receivable that needs to post its details. Click the drop-down arrow then click Post
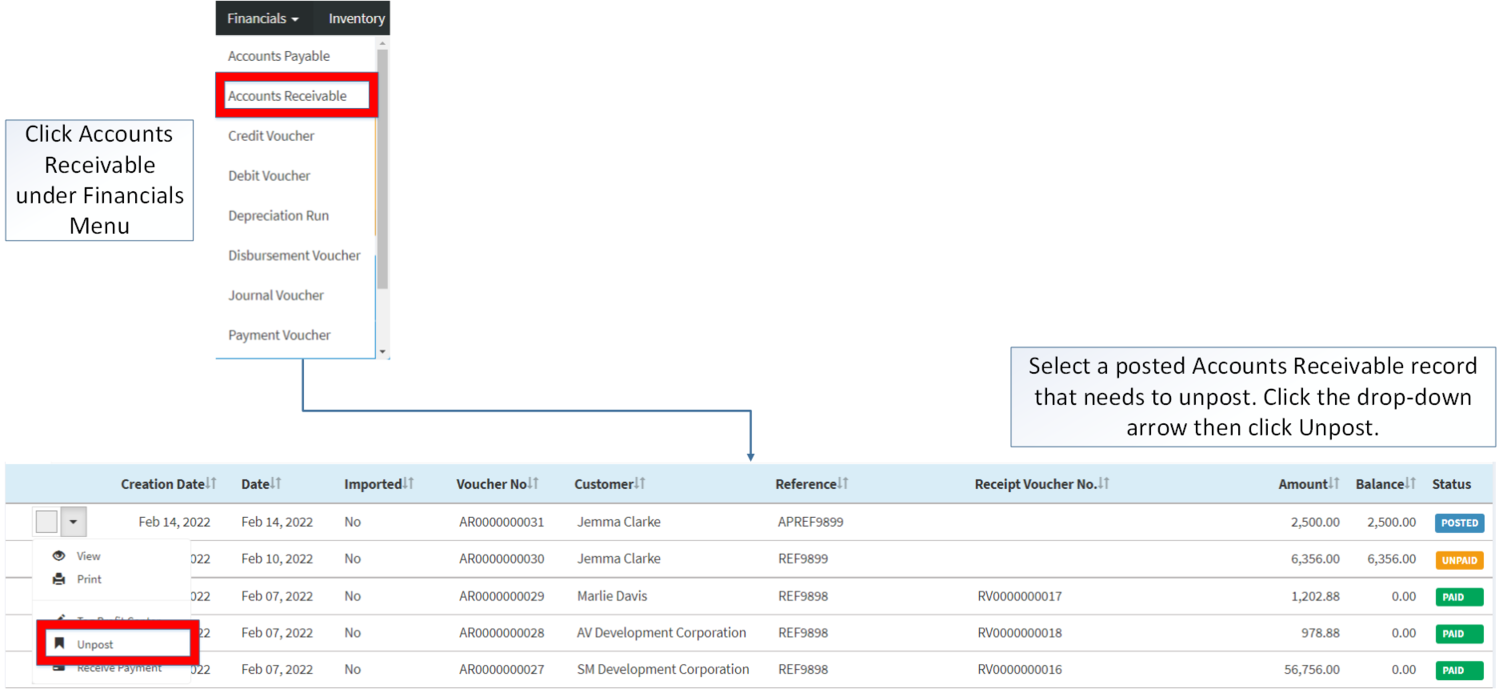
Unposting Accounts Receivable
- Click Financials then click Accounts Receivable
- Select a Posted Accounts Receivable that needs to post its details. Click the drop-down arrow then click Unpost
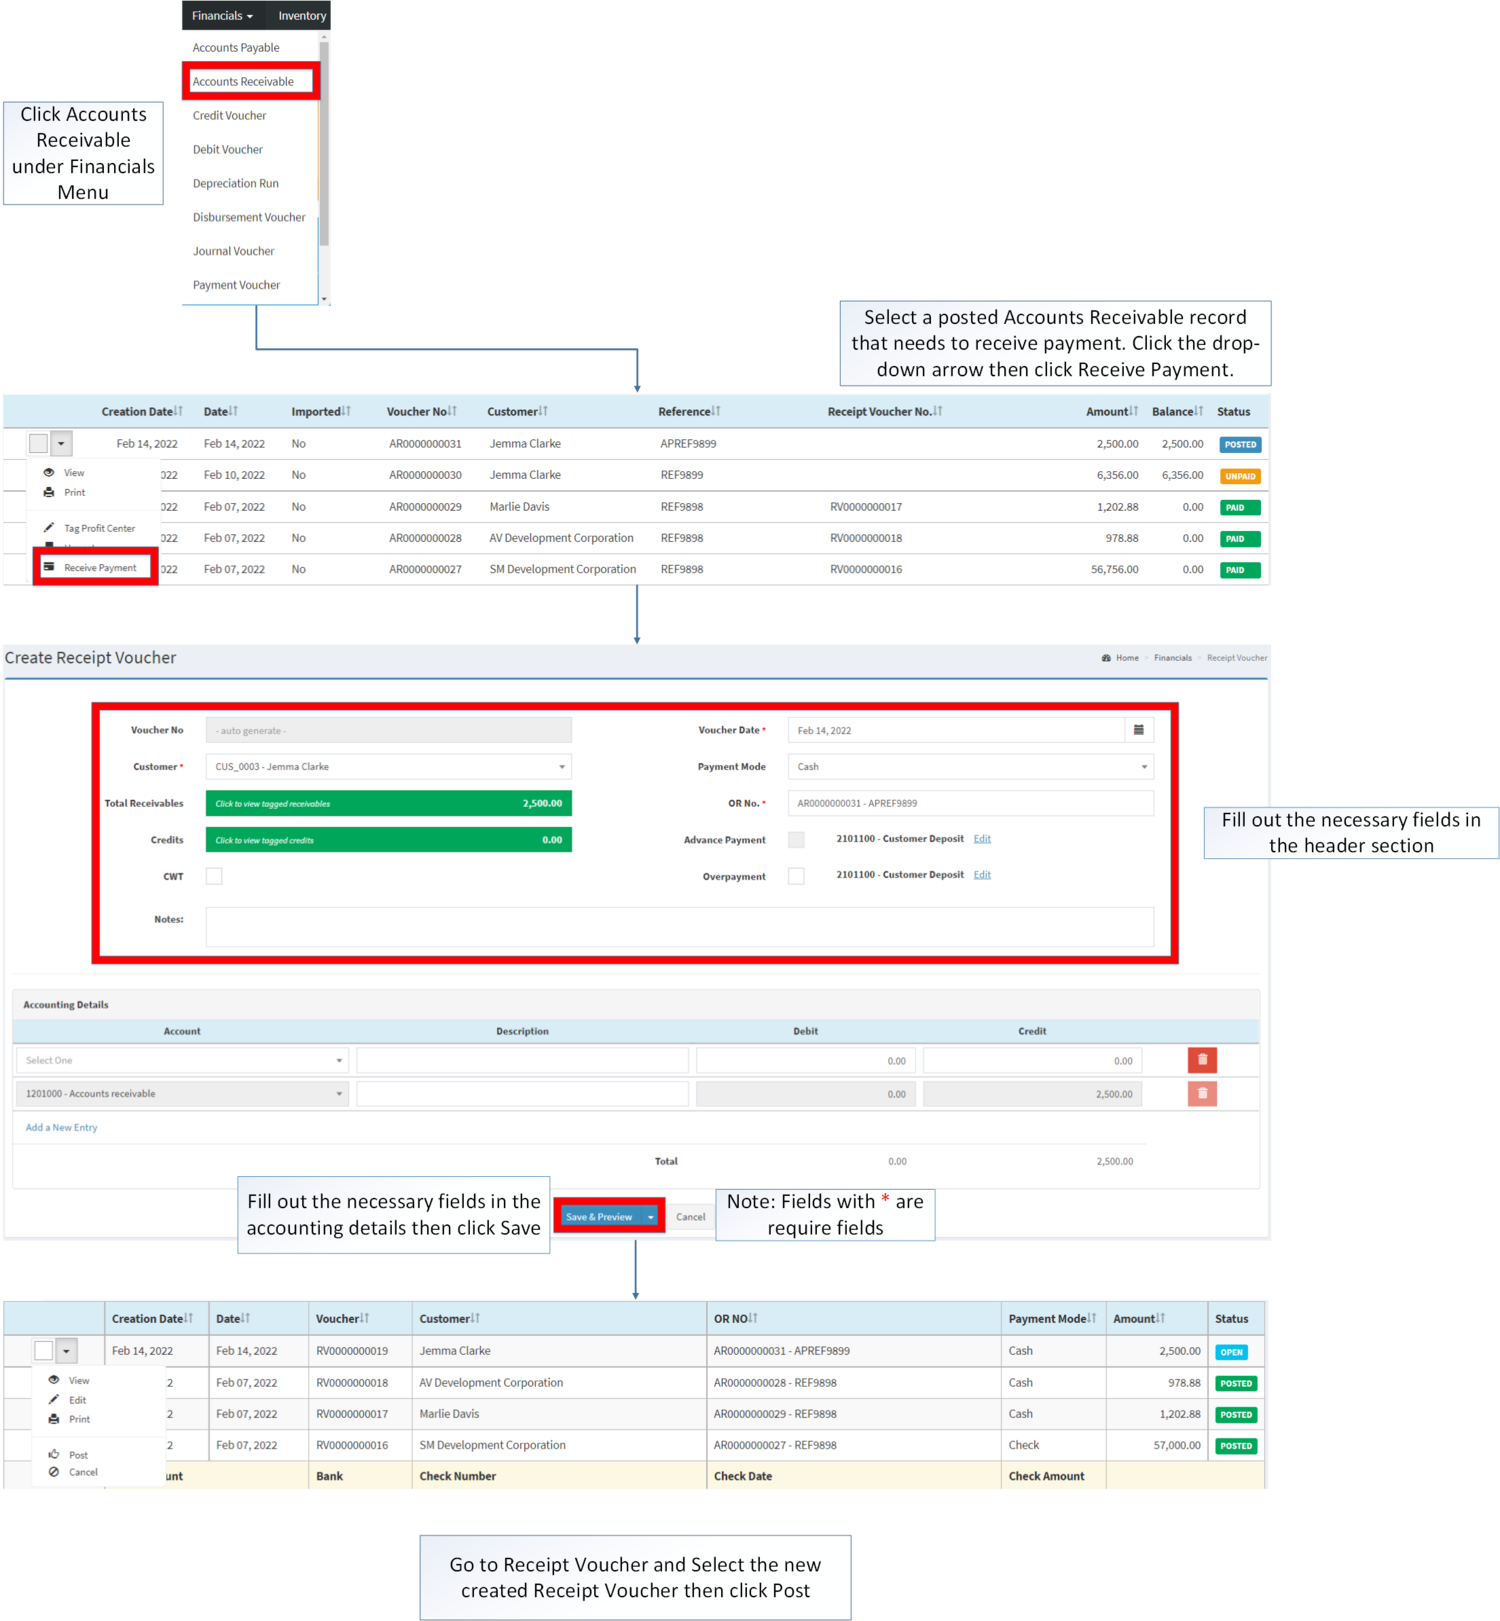
Receiving Payment in Accounts Receivable
- Click Accounts Receivable under Financials Menu
- Select a posted Accounts Receivable record that needs to receive payment. Click the drop-down arrow then click Receive Payment
- Fill out the necessary fields in the header part.
- Fill out the necessary fields in the accounting details then click Save. Note: Fields with * are require fields.
- Go to Receipt Voucher and select the newly created Receipt Voucher then click Post.
Cancelling Accounts Receivable Record
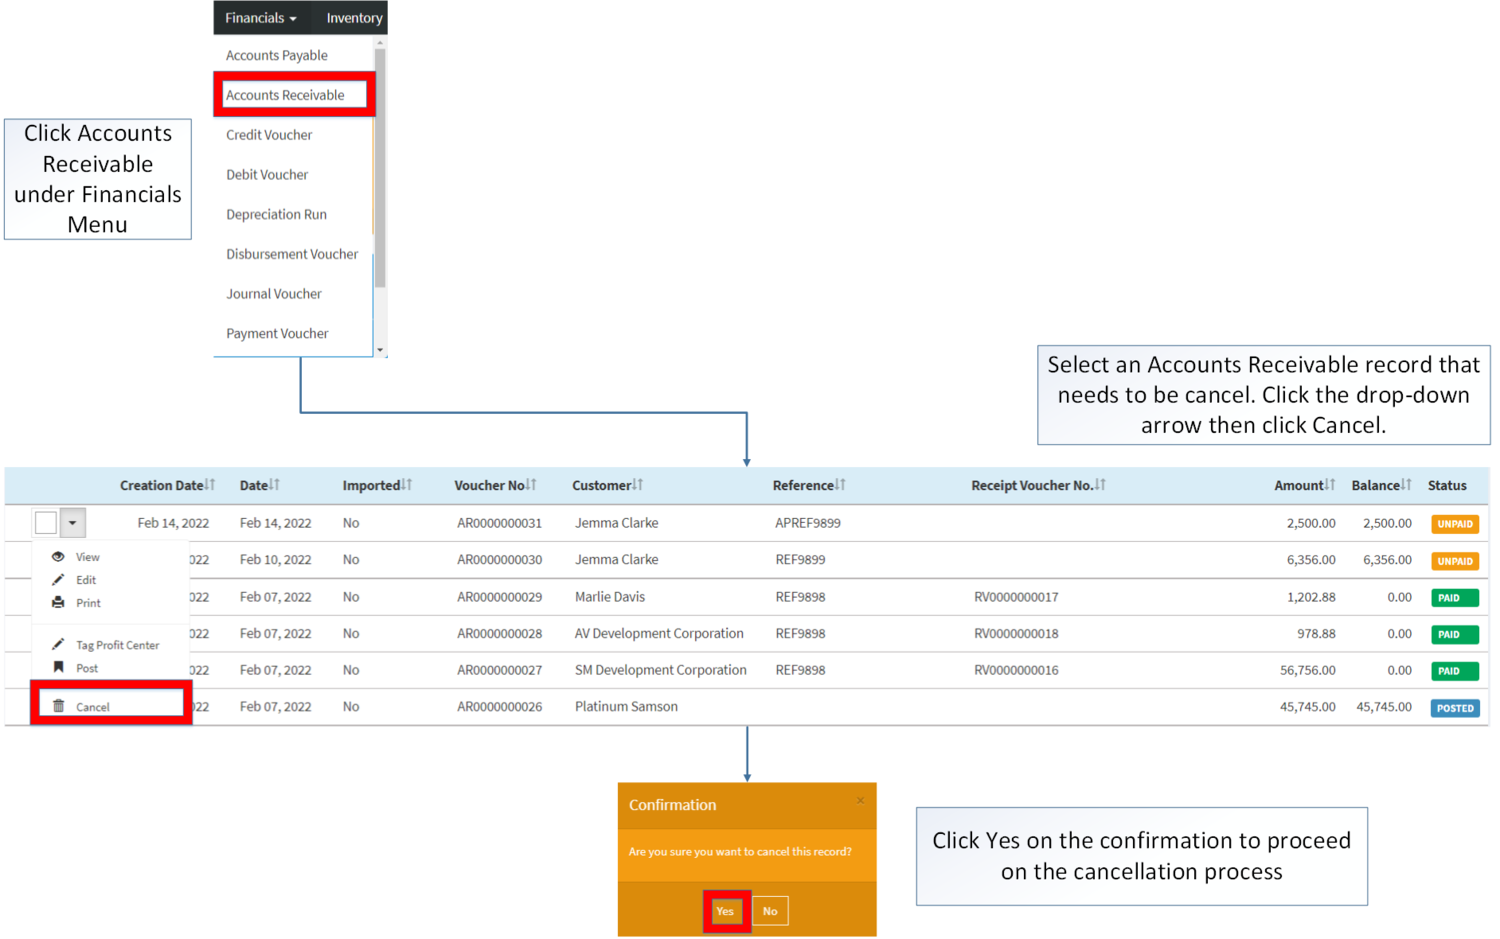
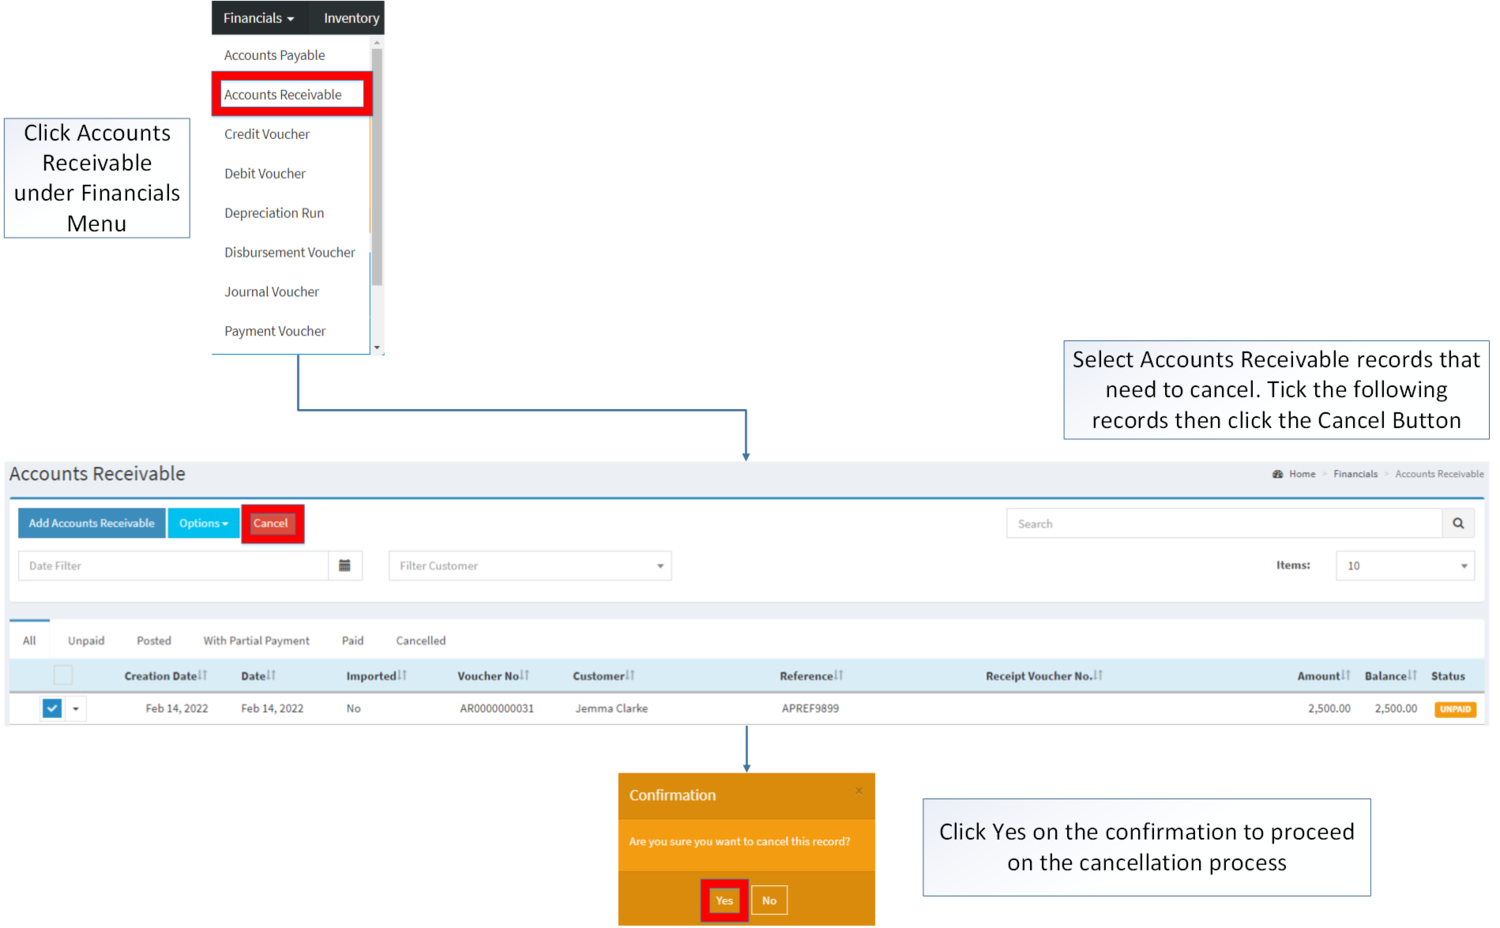
Import Accounts Receivable can be canceled in two ways:
- Using drop-down arrow of a record can be used in single record cancellation
- Using Cancel Button for cancelling multiple records
Importing and Exporting Accounts Receivable
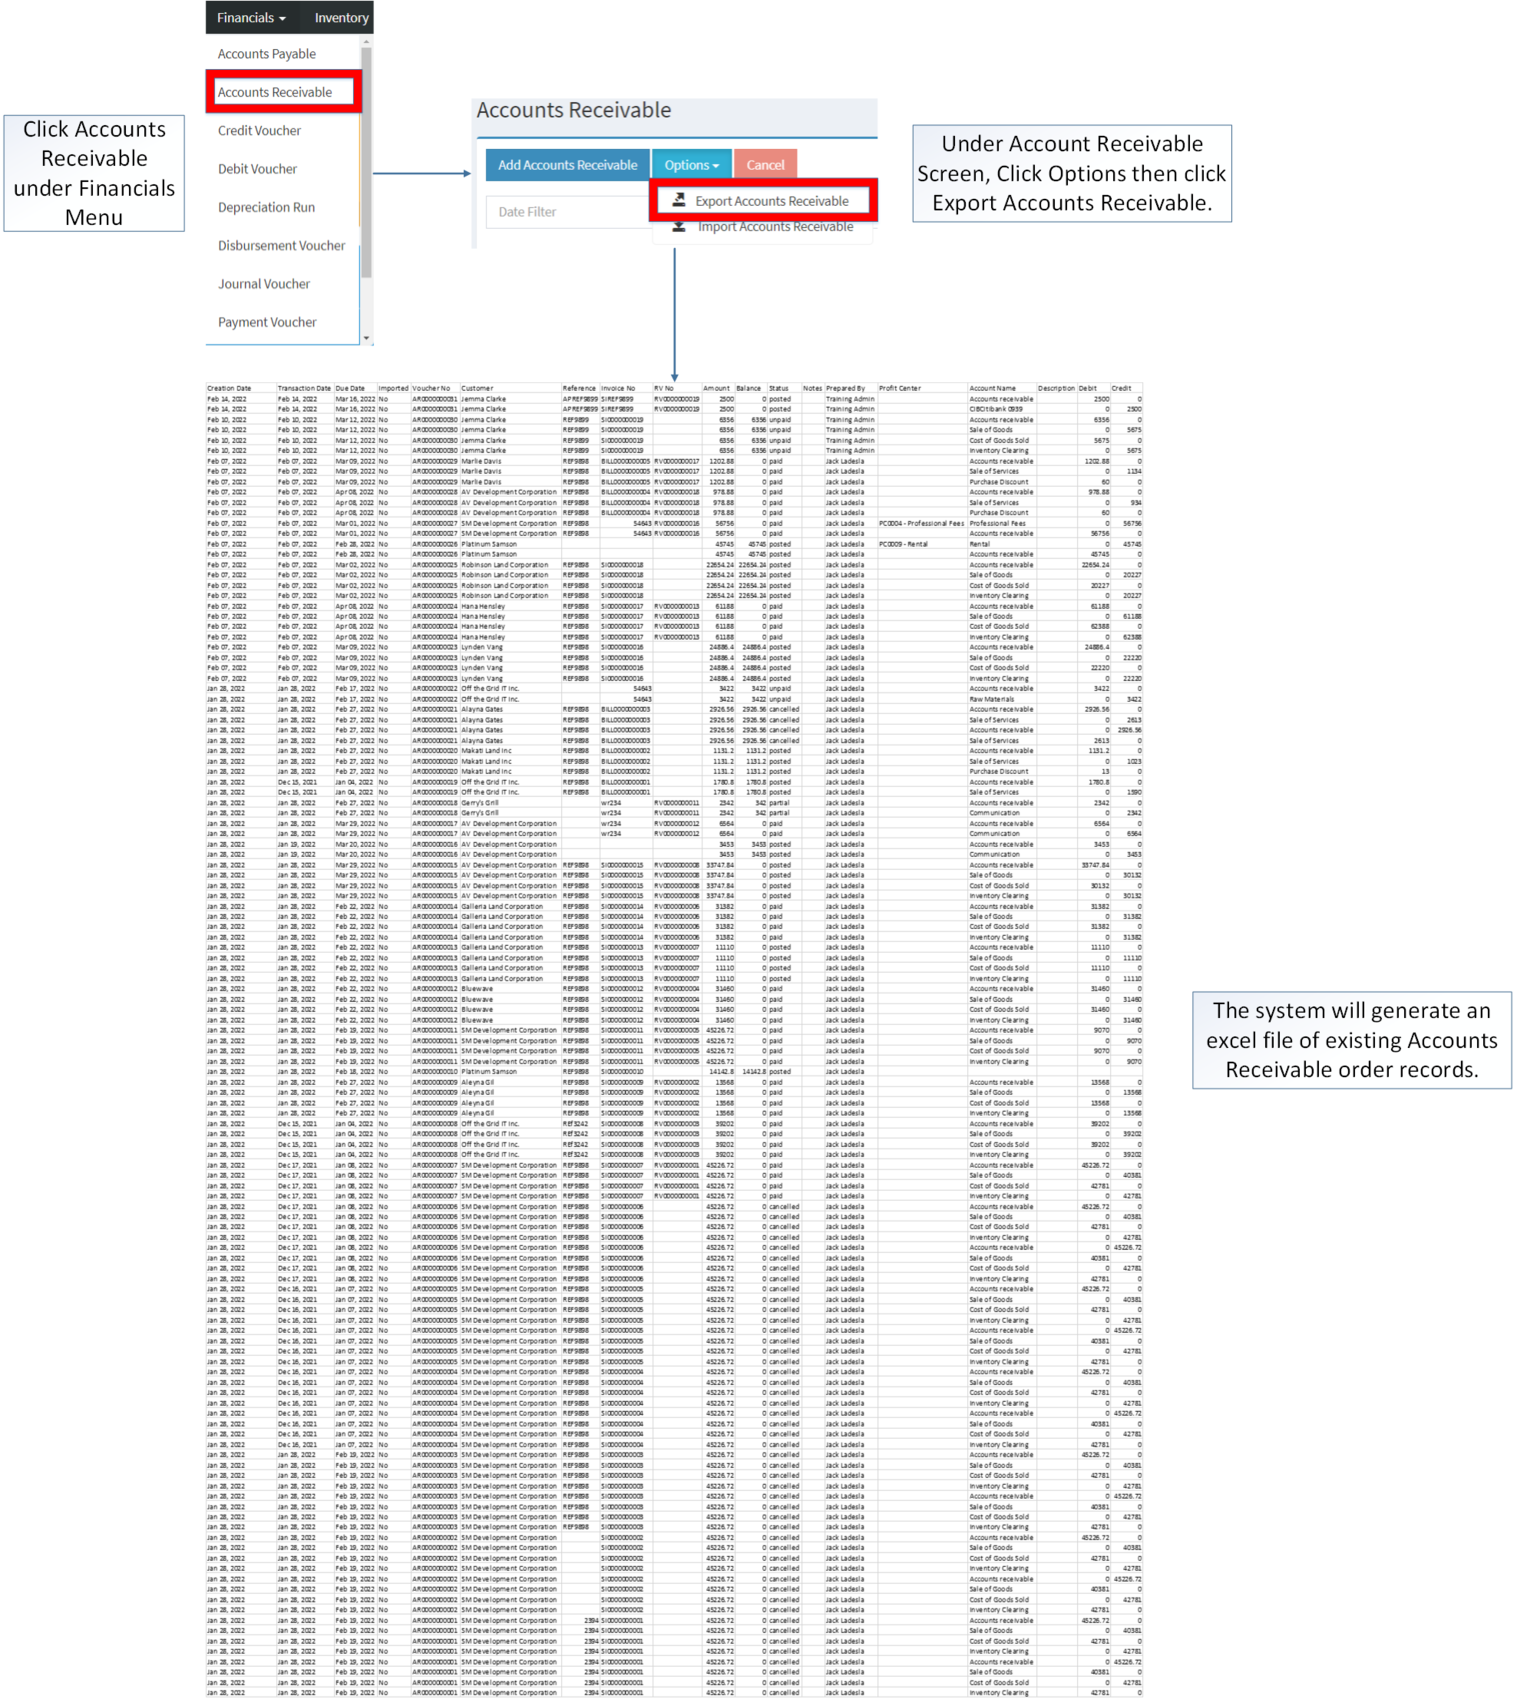
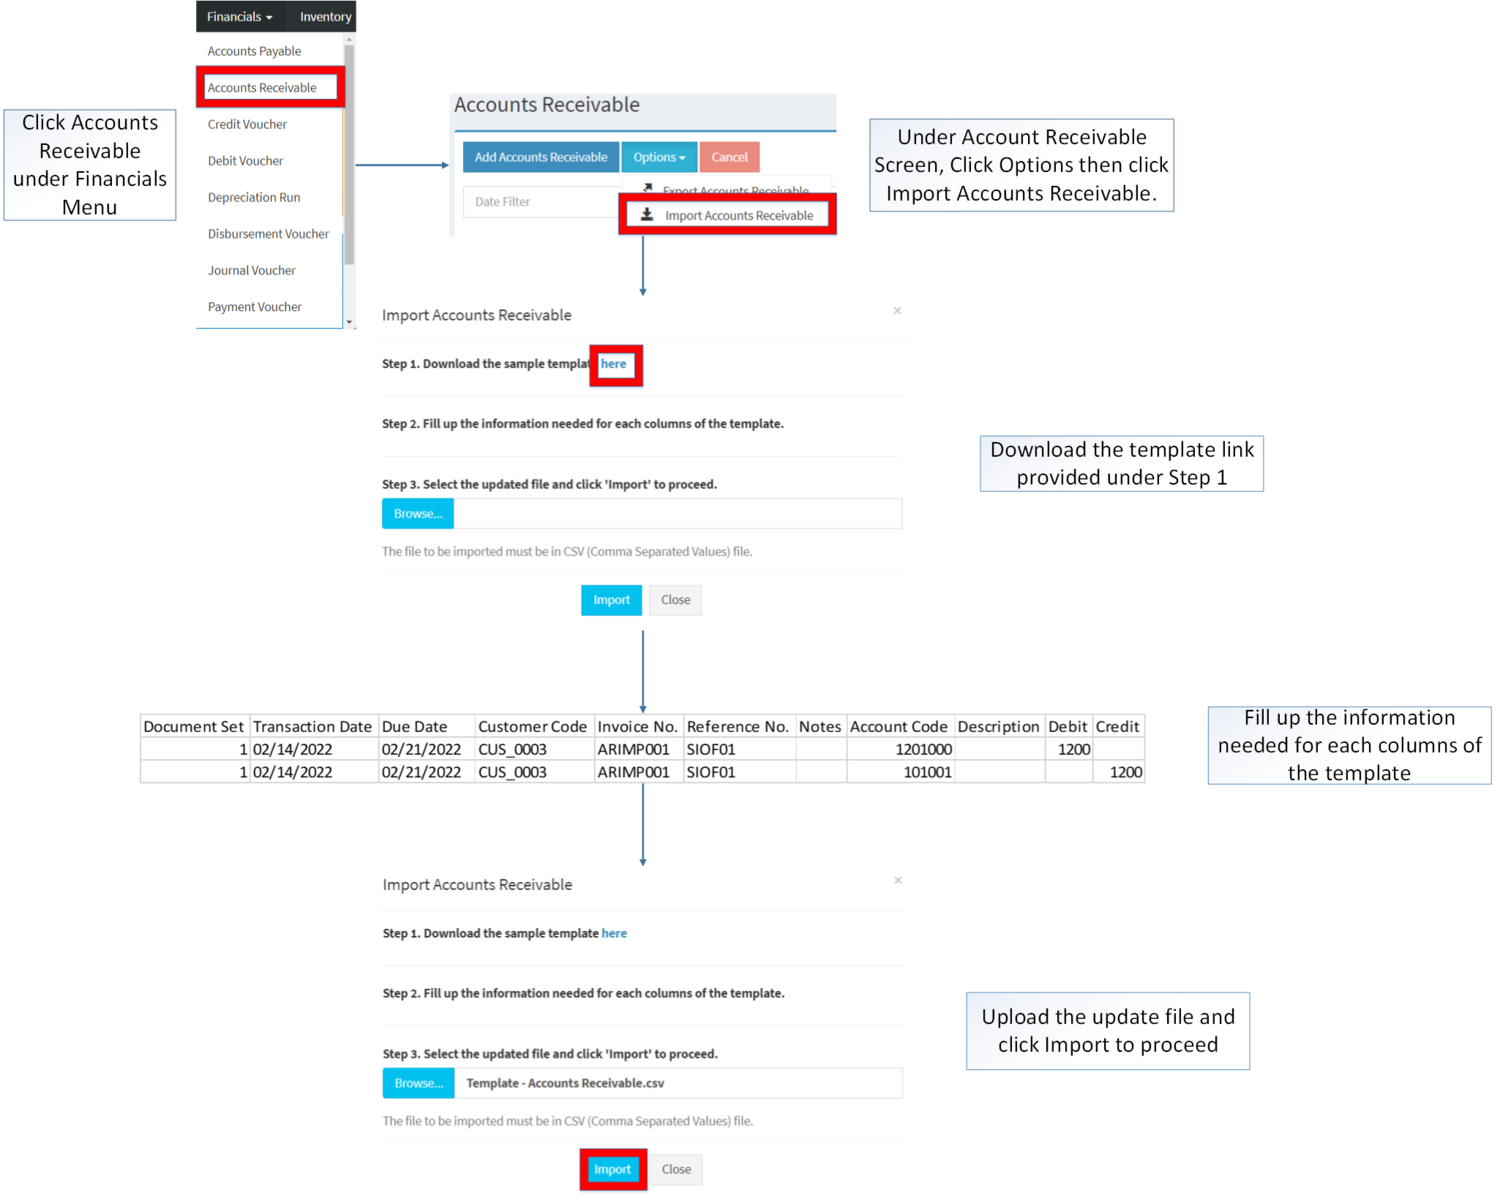
- Under Accounts Receivable Screen, Click Options
- Under Options, the user may Export or Import Accounts Receivable
- When Exporting the records, the user may also use the filter options such as Date Filter, Search Bar and Customer filter for precise searching and exporting of records.
- For batch creation, under Accounts Receivable menu, click options then choose Import Accounts Receivable button
| Field | Description of Data Output | Allowed Inputs | Input Restrictions | Required (Y/N) |
|---|---|---|---|---|
| 1. Document Set | Manual entry of Document Set of Accounts Receivable (e.g., 1, 2, 3, A, B, C) | *Alphanumeric
*Underscore (_) |
*Other special characters not mentioned | Y |
| 2. Transaction Date | Manual entry of Transaction Date of Accounts Receivable | *Numeric
*Dash (-), Backslash (/) |
*Other special characters not mentioned | Y |
| 3. Due Date | Manual entry of Due Date of Accounts Receivable – must be based on Customer’s payment terms | *Numeric
*Dash (-), Backslash (/) |
*Other special characters not mentioned | Y |
| 4. Customer Code | Manual entry of Customer code – must be based from Customer Data maintenance | *Numeric
* Customer Code based from Customer maintenance |
*Any input not mentioned in the required inputs | Y |
| 5. Invoice No. | Manual entry of Accounts Receivable Invoice No. | *Alphanumeric
*Underscore (_), Dash (-) |
*Other special characters not mentioned | N |
| 6. Reference No. | Manual entry of Accounts Receivable Reference No. | *Alphanumeric
*Underscore (_), Dash (-) |
*Other special characters not mentioned | N |
| 7. Notes | Manual entry of Accounts Receivable Notes | *Alphanumeric
*Underscore (_), Dash (-) |
*Other special characters not mentioned | N |
| 8. Account Code | Manual entry of Account Code – must be based from Chart of Accounts maintenance | *Numeric
*Account Code based from Chart of Accounts maintenance |
*Any input not mentioned in the required inputs | Y |
| 9. Description | Manual entry of Account Description | *Alphanumeric
*Special Characters |
*None | N |
| 10. Debit | Manual entry of Debit amount | *Numeric | *Any input excepts numbers | Y |
| 11. Credit | Manual entry of Credit amount | *Numeric | *Any input excepts numbers | Y |
Accounts Receivable Record Option
| Status | View | Edit | Post | Receive Payment | Cancel |
|---|---|---|---|---|---|
| UNPAID | ☑ | ☑ | ☑ | ☑ | ☑ |
| POSTED | ☑ | ☑ | |||
| WITH PARTIAL PAYMENT | ☑ | ☑ | |||
| PAID | ☑ | ||||
| CANCELLED | ☑ |
Notes:
- The user can only Receive Payment the Accounts Receivable if the Receivable transaction has tag reference on it.
- Posted Receivable can also received payments but cannot be edited.
| Modules | |
|---|---|
| Financials | Financials | Accounts Receivable | Receipt Voucher |
| Sales | Delivery Receipt | Sales Invoice |
| Maintenance | Customer | Proforma | Chart of Account | Tax |
| Reports | |
| Financial Reports | Accounts Receivable Aging | AR Detailed Report | AR Transaction Report |
