Price List
-
- Last edited 3 years ago by Gelo
-
Contents
- 1 Price List
- 1.1 Requirements before using Price List
- 1.2 Price List Record
- 1.3 Adding Price List
- 1.4 Viewing Price List
- 1.5 Editing Price List
- 1.6 Activating Price List Record
- 1.7 Deactivating Price List Record
- 1.8 Deleting Price List Record
- 1.9 Tagging Customers in the Price List
- 1.10 Importing and Exporting Price List
- 1.11 Price List Record Option
- 1.12 Price Master List Record
- 1.13 Editing Master Price List Selling Price
- 1.14 Importing and Exporting Master Price List
Price List
This maintenance screen allows the users to configure the prices of the items to be used in their transaction
Requirements before using Price List
- The user should setup the following Maintenance Module in order to proceed on using the Price List
Price List Record
Notes:
- Price List Record provides a set of prices on items depending on the tagged Customer on it.
- If there are no set Price on a specific item. The price will be defaulted to zero.
- Prices of Items will be shown when the user is using the following modules
| Sales Module | Purchase Module |
Adding Price List
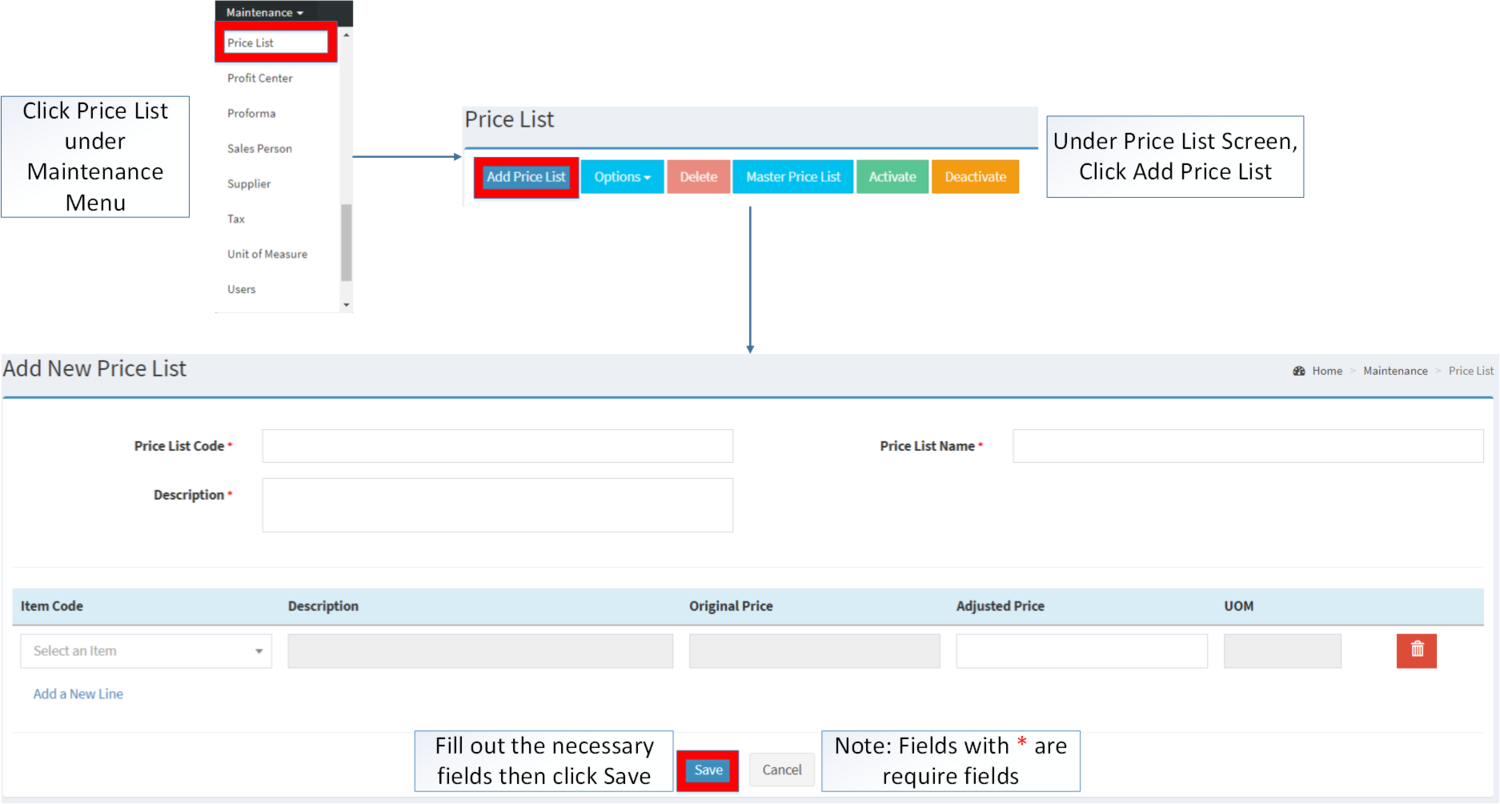
- Go to Maintenance then click Price List
- Under Price List Screen, Click Add Price List
- Fill out the necessary fields the click Save. Note: Fields with * are require fields
| Field | Description | Expected Values |
|---|---|---|
| 1.Price List Code | •Code of the Price List | •Alphanumeric |
| 2.Price List Name | •Name of the Price List | •Alphanumeric |
| 3.Description | •Description of the Price List | •Alphanumeric |
| 4.Item Code | •Item to be included on the Price List | •Item List provided on Item Master Maintenance Module |
| 5.Original Price | •Original Price of the Item | •Number |
| 6.Adjusted Price | •New Price of the Item | •Number |
| 7.UOM | •Unit of Measure of the Item | •Alphanumeric |
Notes:
- Price List Code is unique for each record, Once created, the Price List Code Field cannot be edited.
- When adding an Item in the Pricelist, the system required to put the Item Code. Double-check the item code that corresponds to the item that the price to be updated.
- To check, refer to Item Master Maintenance Module.
- The Item status should be ACTIVE in order for its price to be adjusted.
Viewing Price List
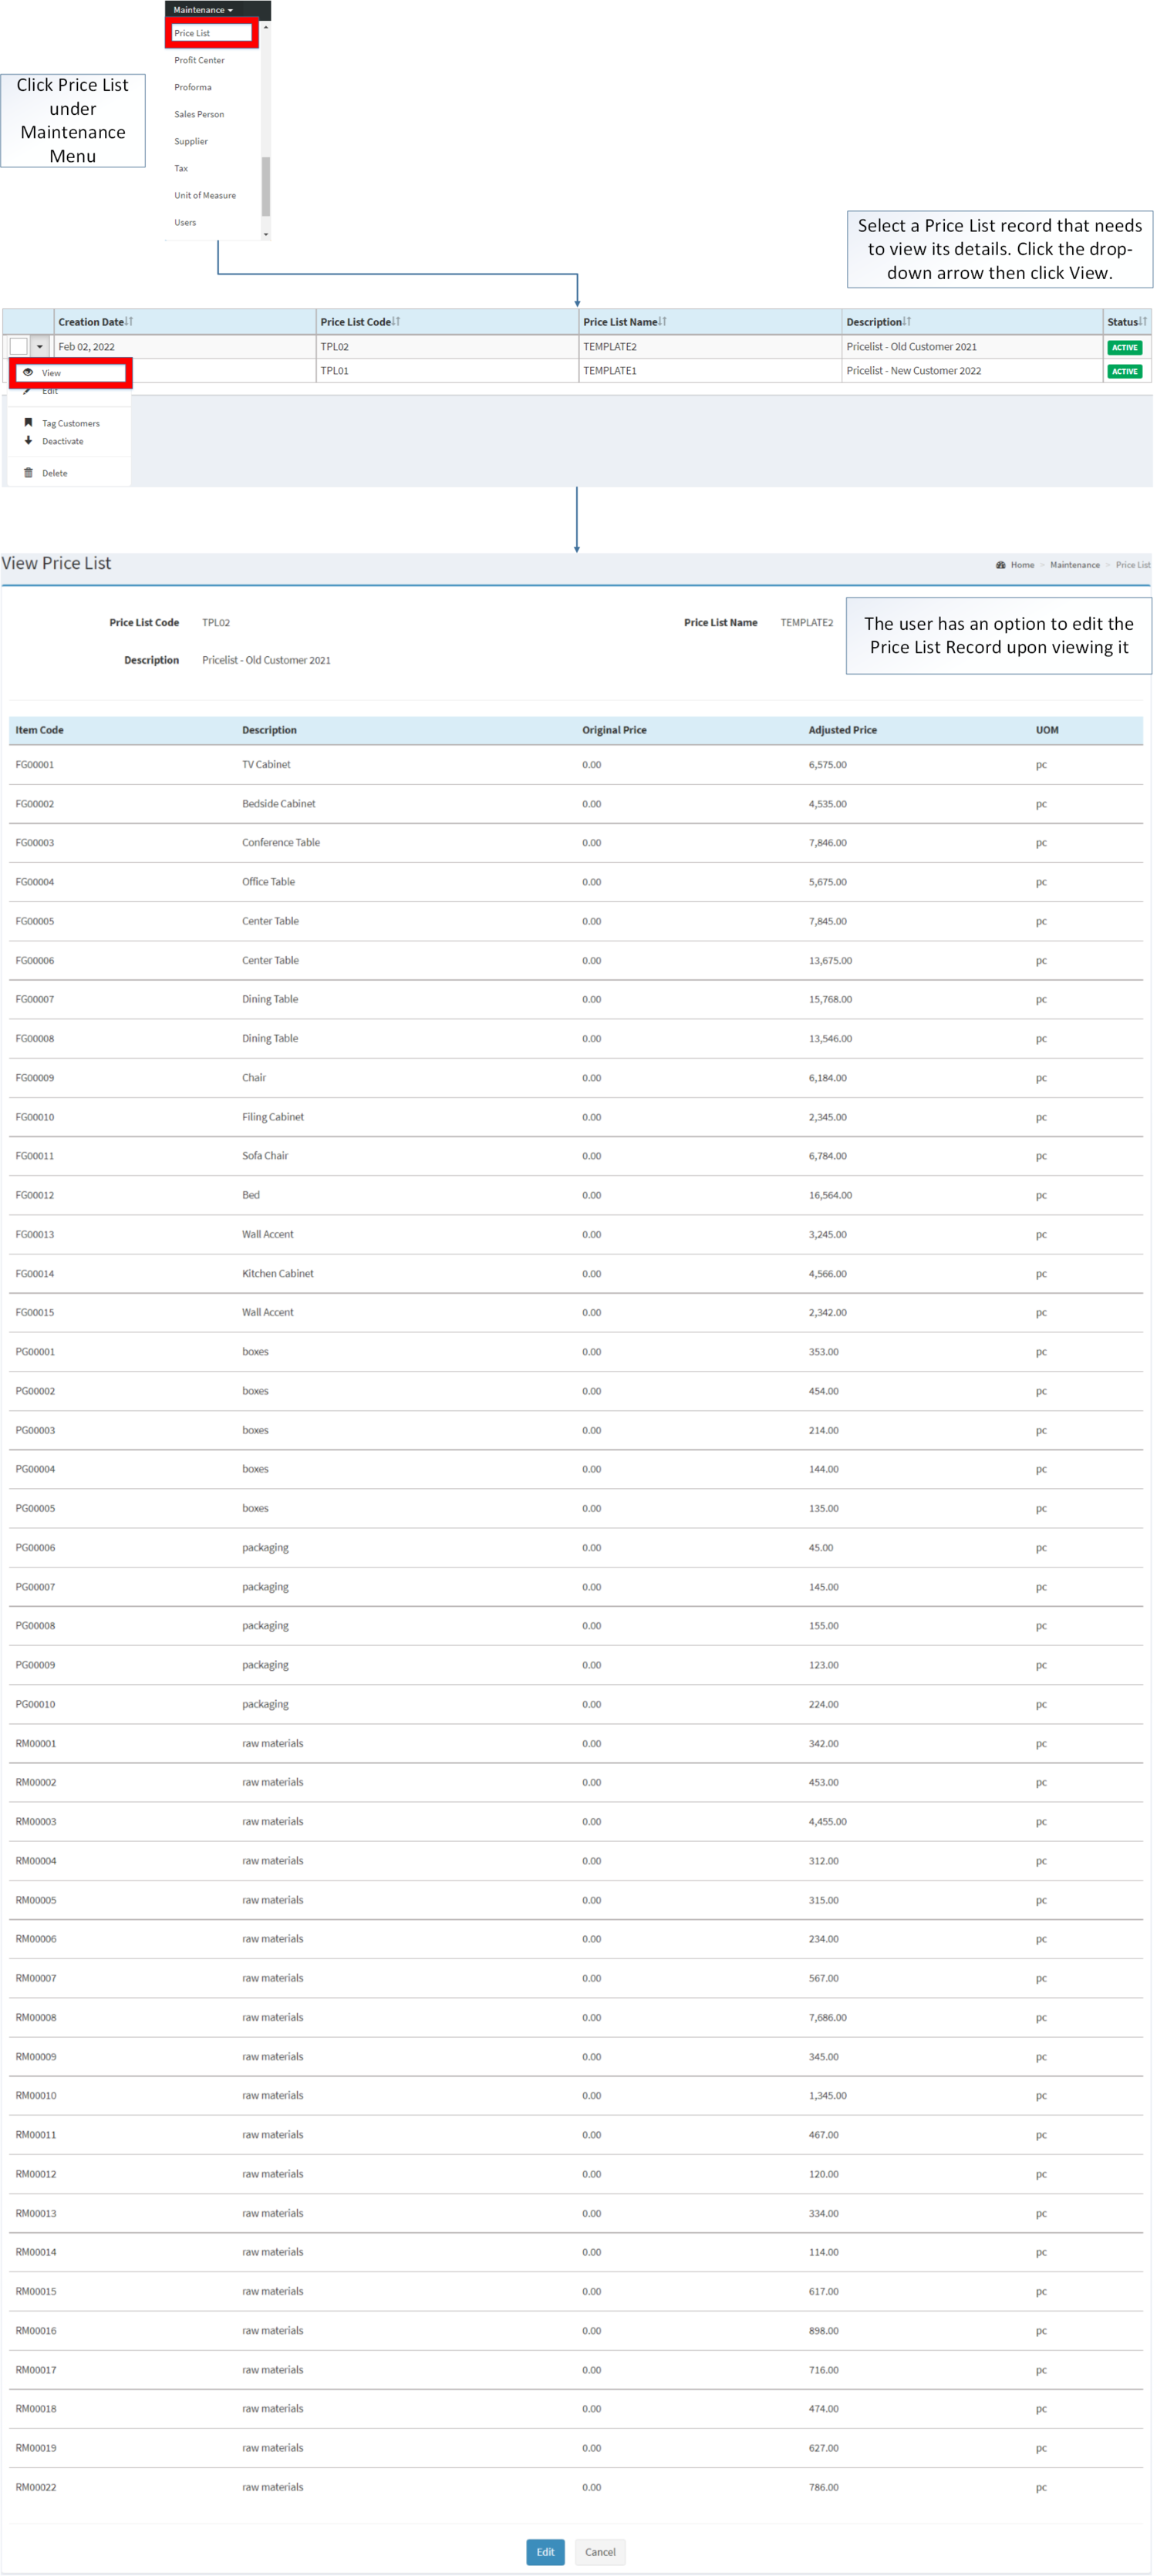
- Go to Maintenance then click Price List
- Select a Price List record that needs to view its details. Click the drop-down arrow then click View.
- The user has an option to edit the Price List Record upon viewing it
Editing Price List
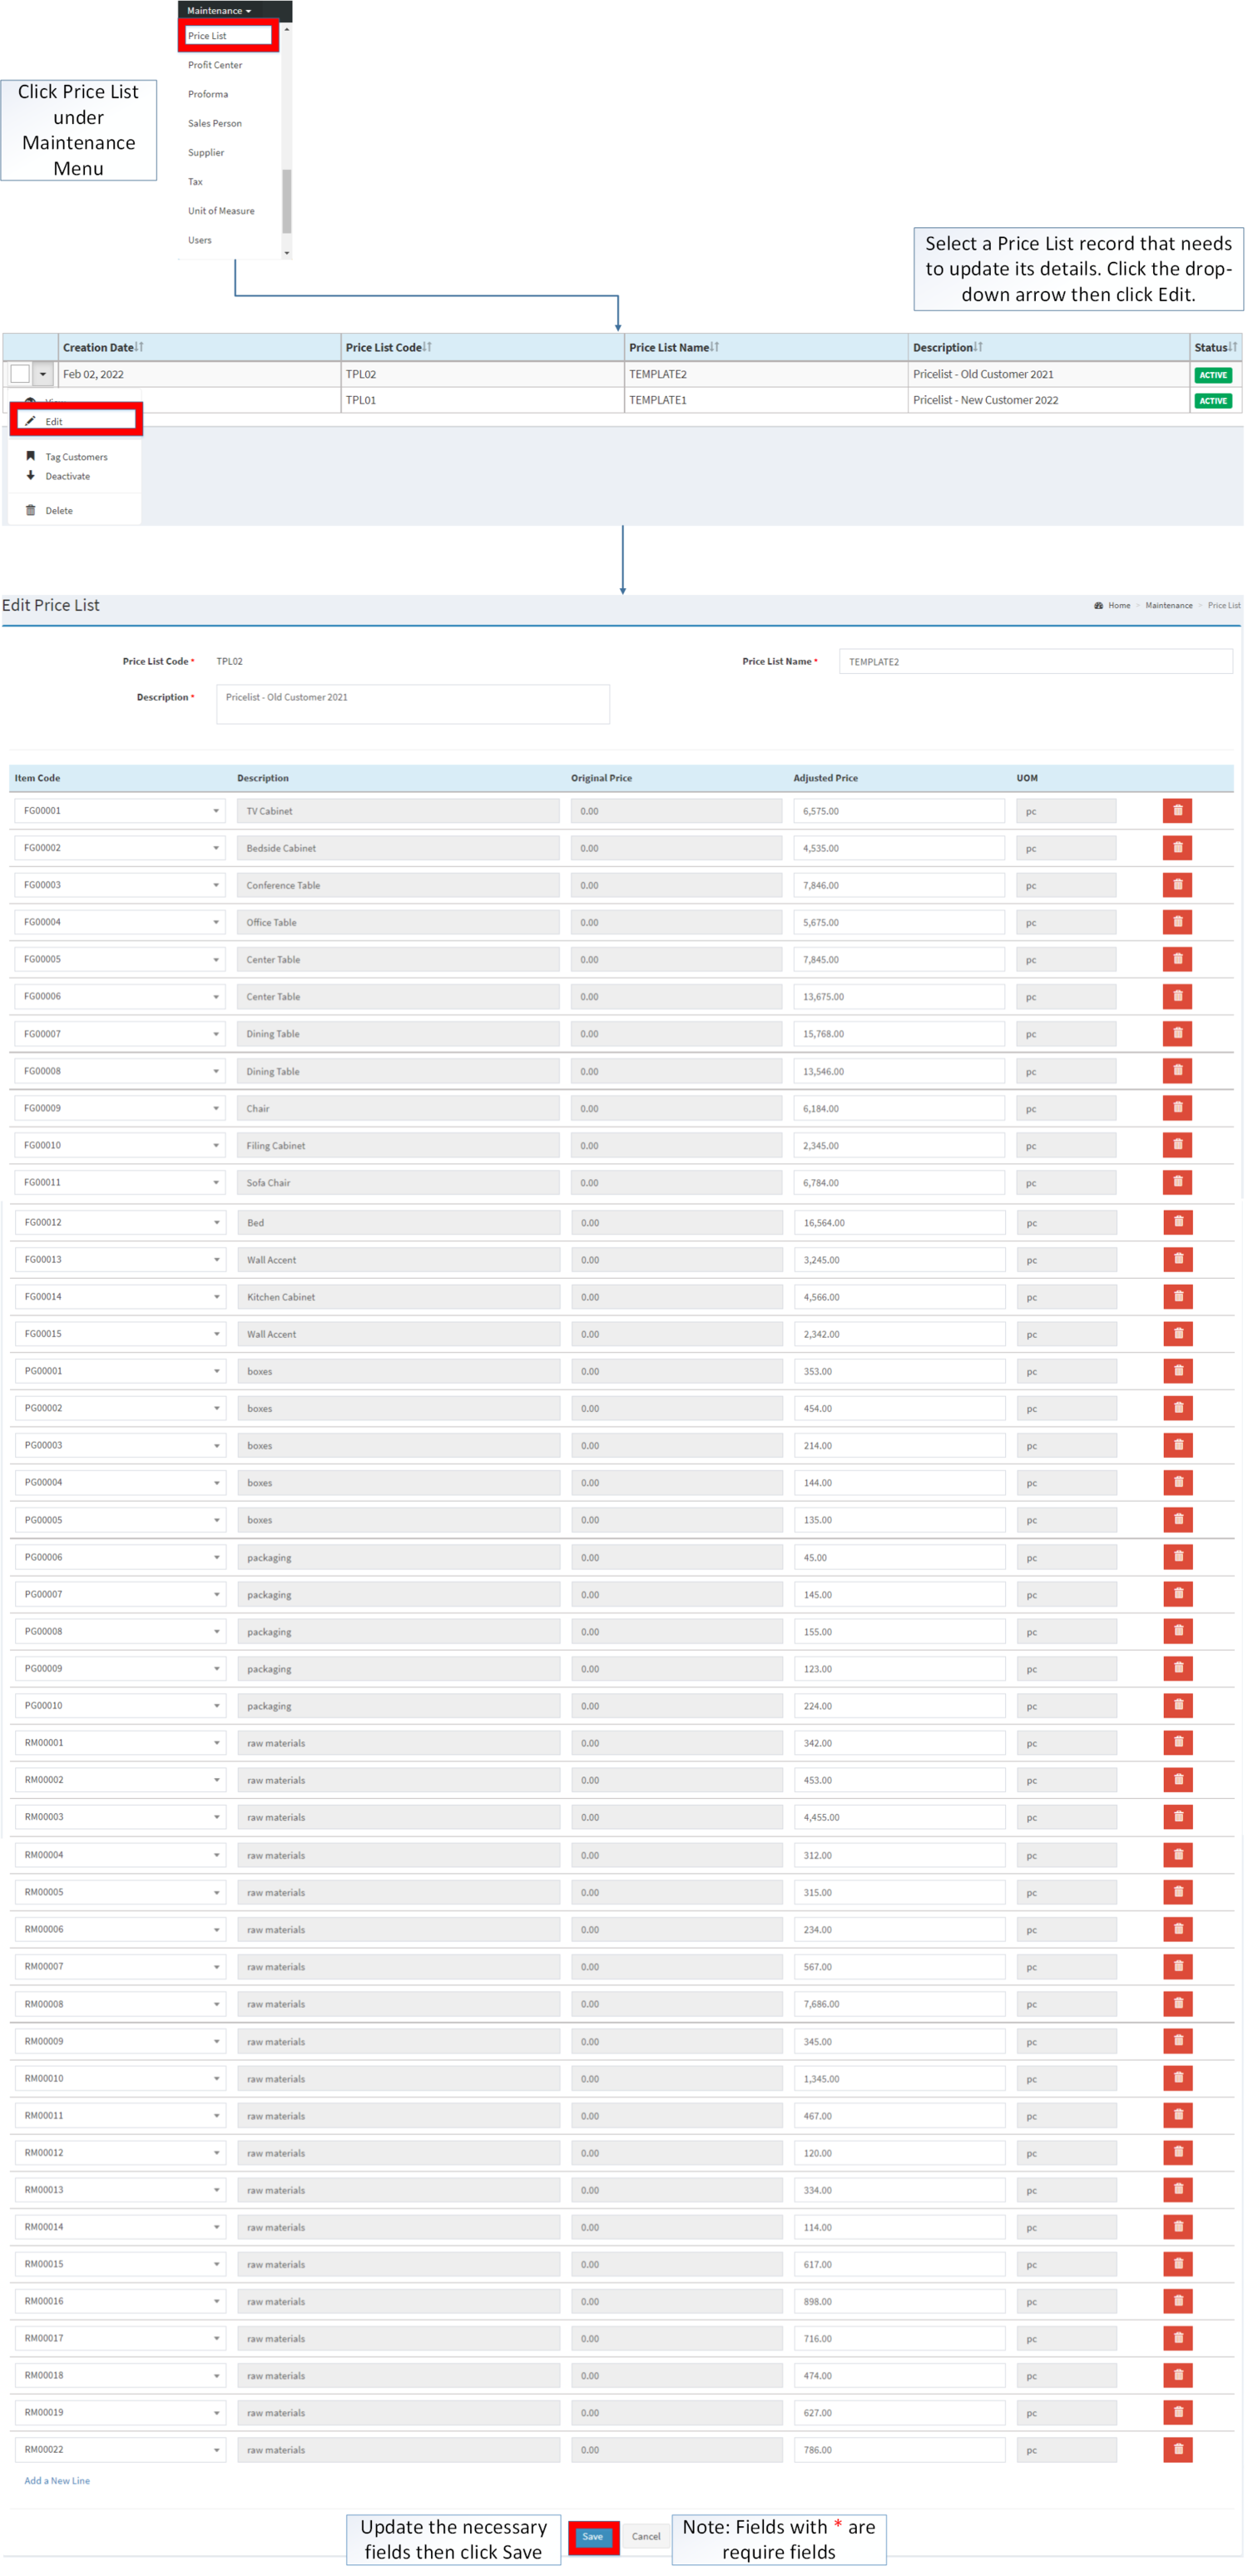
- Go to Maintenance then click Price List
- Select the Price List that needs to update its details. Click the drop-down arrow then click Edit
- Update the necessary Fields and Click Save
| Field | Description | Expected Values |
|---|---|---|
| 1.Price List Code | •Code of the Price List | •Alphanumeric |
| 2.Price List Name | •Name of the Price List | •Alphanumeric |
| 3.Description | •Description of the Price List | •Alphanumeric |
| 4.Item Code | •Item to be included on the Price List | •Item List provided on Item Master Maintenance Module |
| 5.Original Price | •Original Price of the Item | •Number |
| 6.Adjusted Price | •New Price of the Item | •Number |
| 7.UOM | •Unit of Measure of the Item | •Alphanumeric |
Notes:
- When adding an Item in the Pricelist, the system required to put the Item Code. Double-check the item code that corresponds to the item that the price to be updated.
- To check, refer to Item Master Maintenance Module.
- The Item status should be ACTIVE in order for its price to be adjusted.
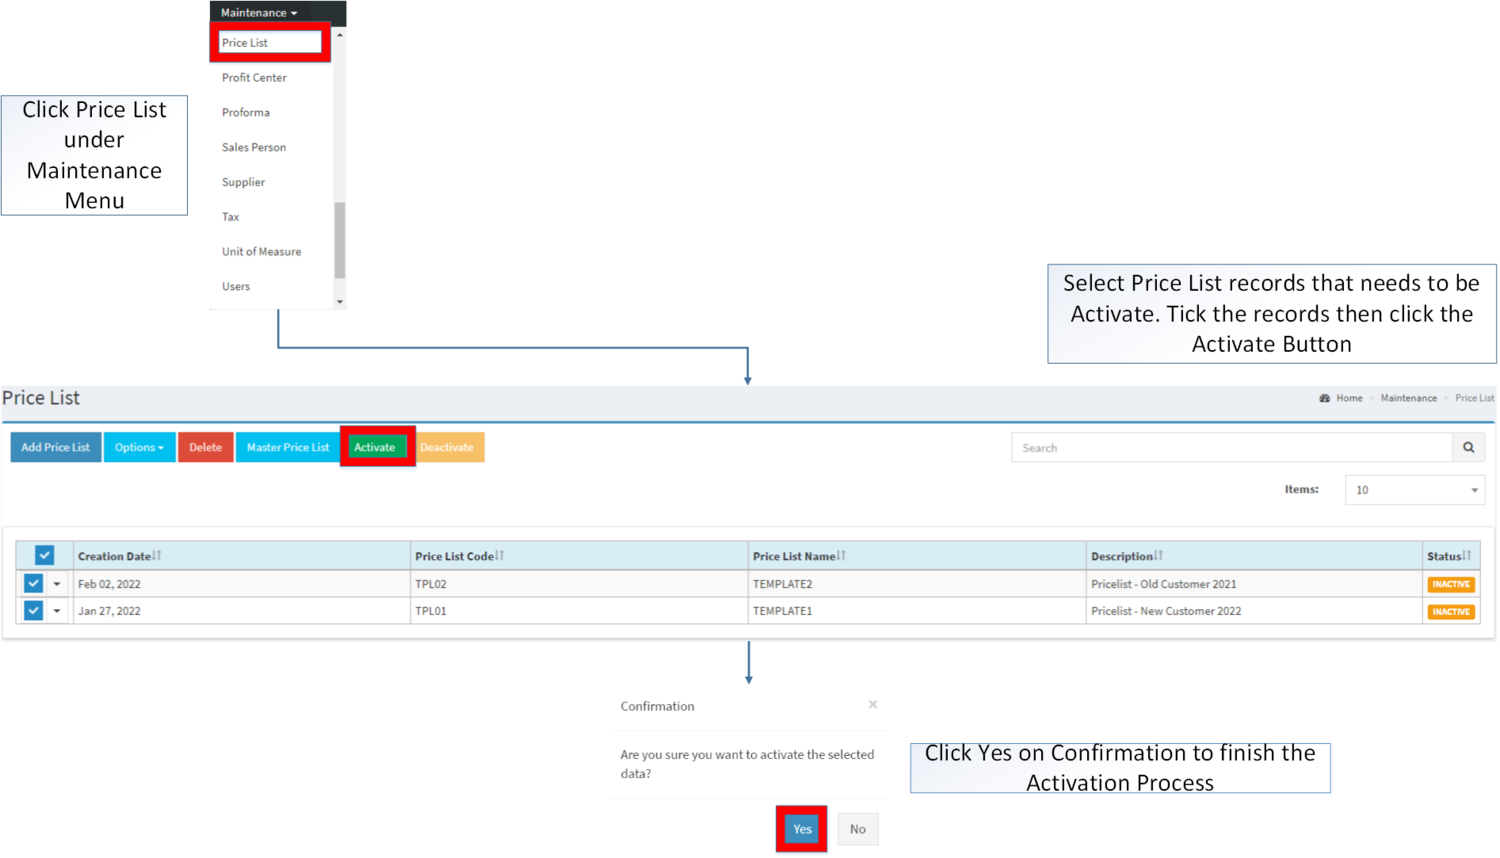
Activating Price List Record
Price List can be Activated in two ways:
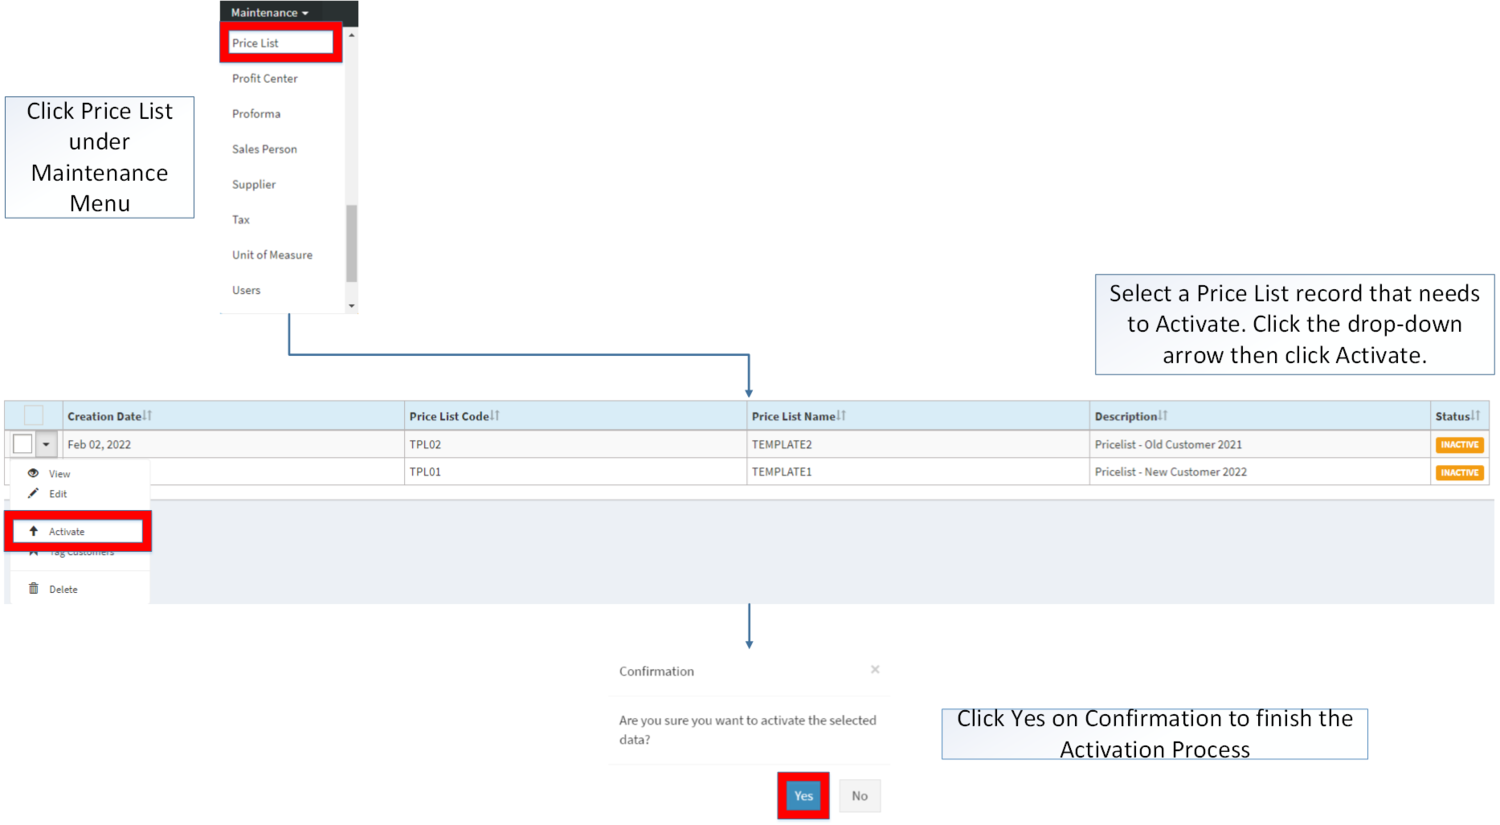
- Using drop-down arrow of a record can be used in single record Activation
- Using Activate Button for activating multiple record
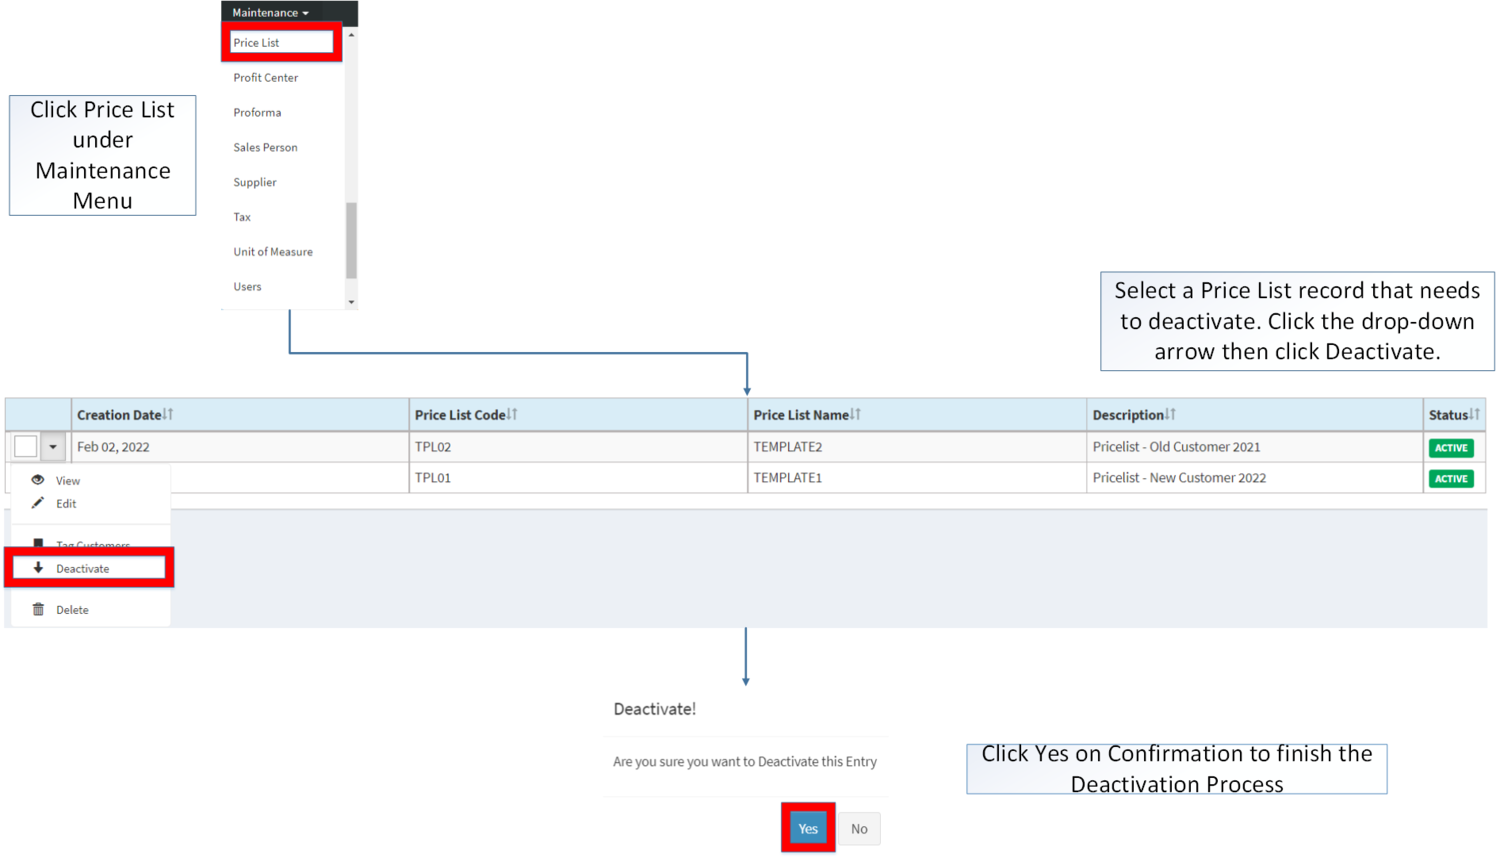
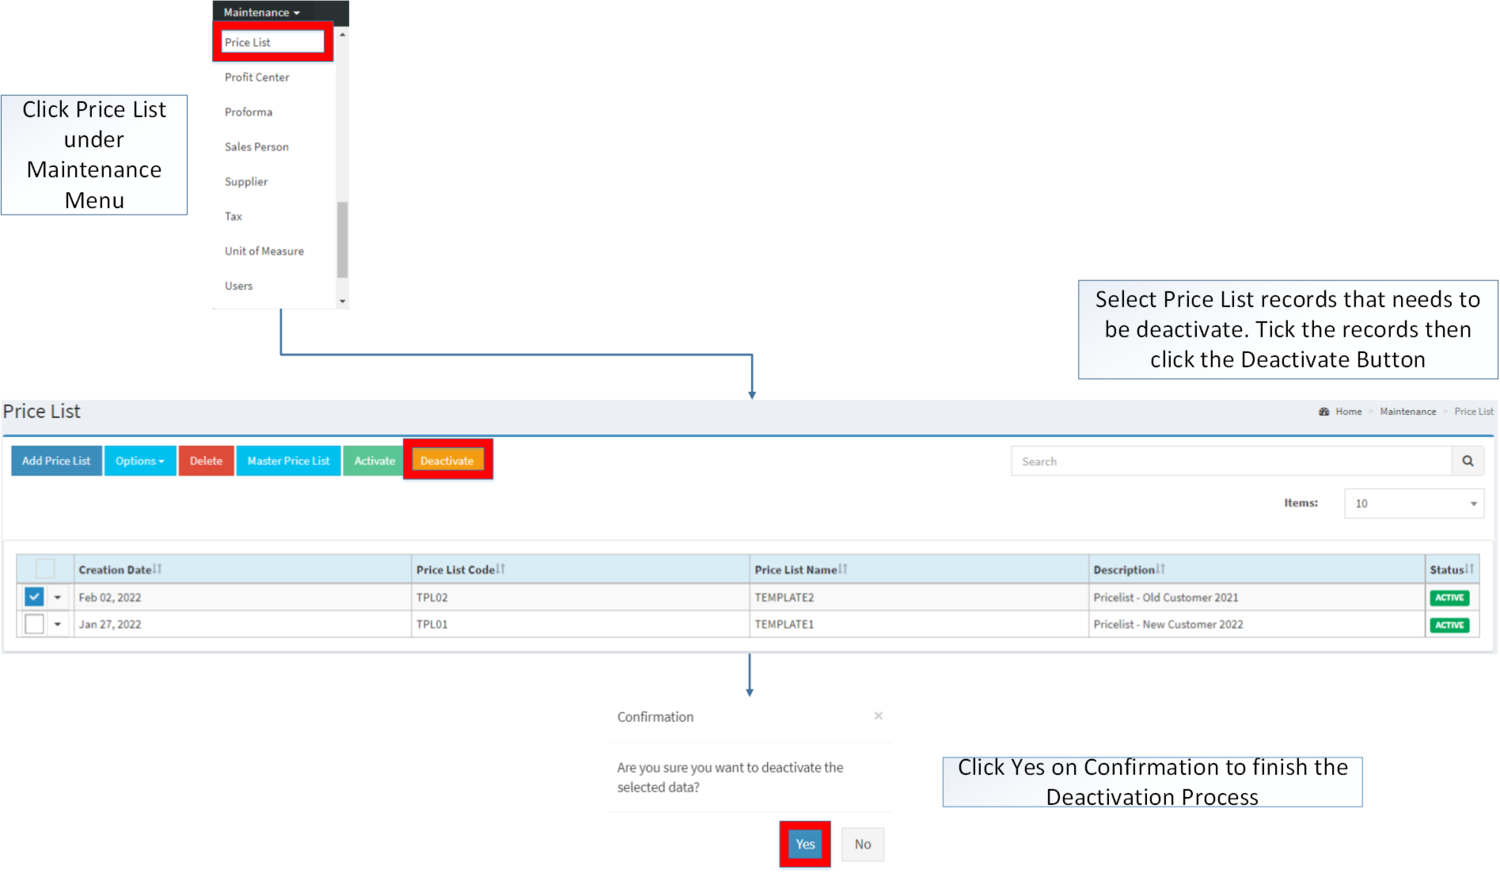
Deactivating Price List Record
Price List can be deactivated in two ways:
- Using drop-down arrow of a record can be used in single record deactivation
- Using Deactivate Button for deactivating multiple record
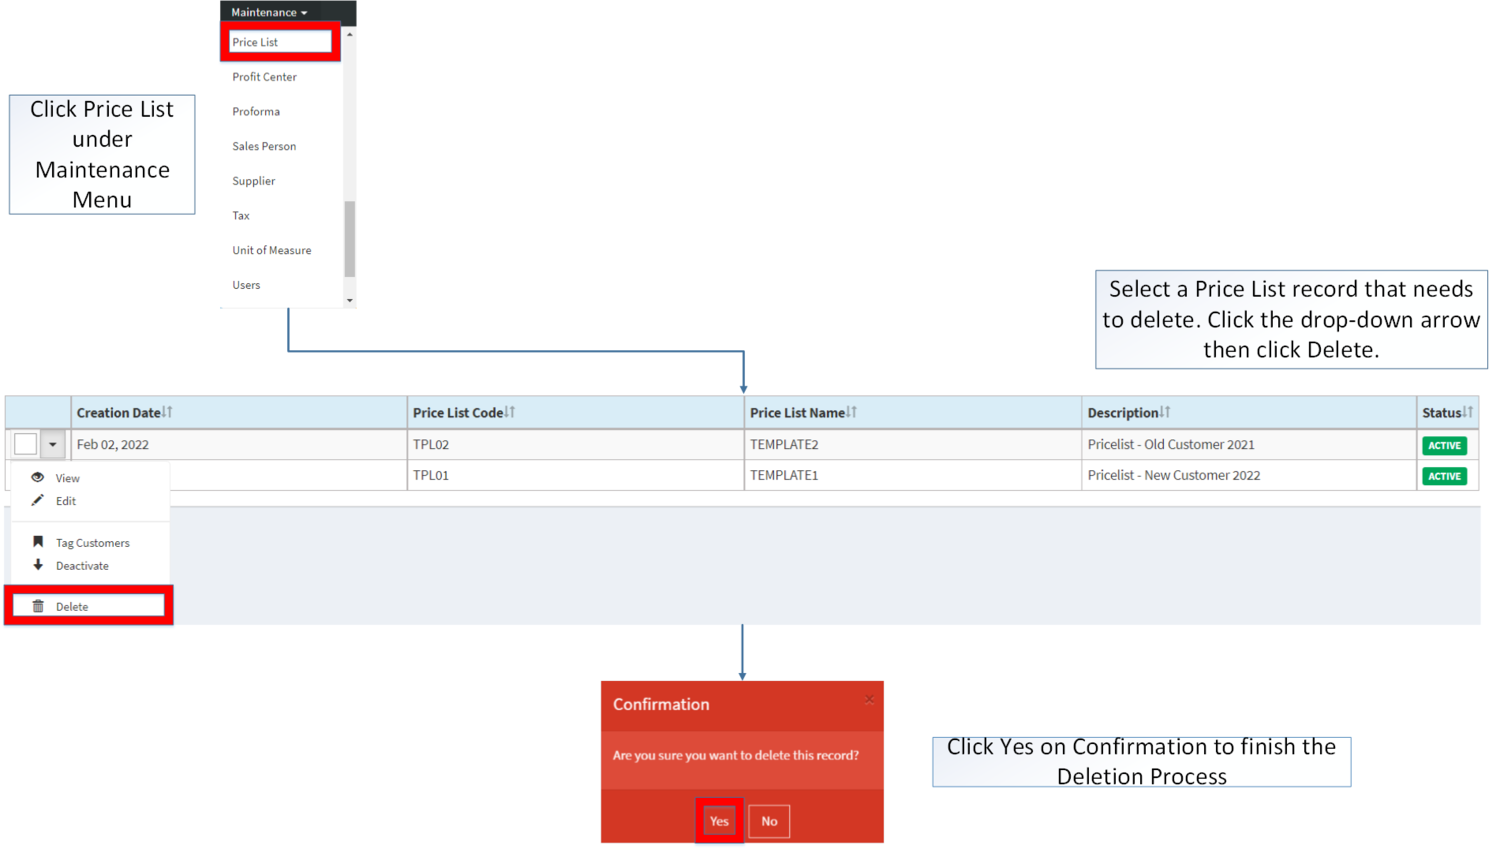
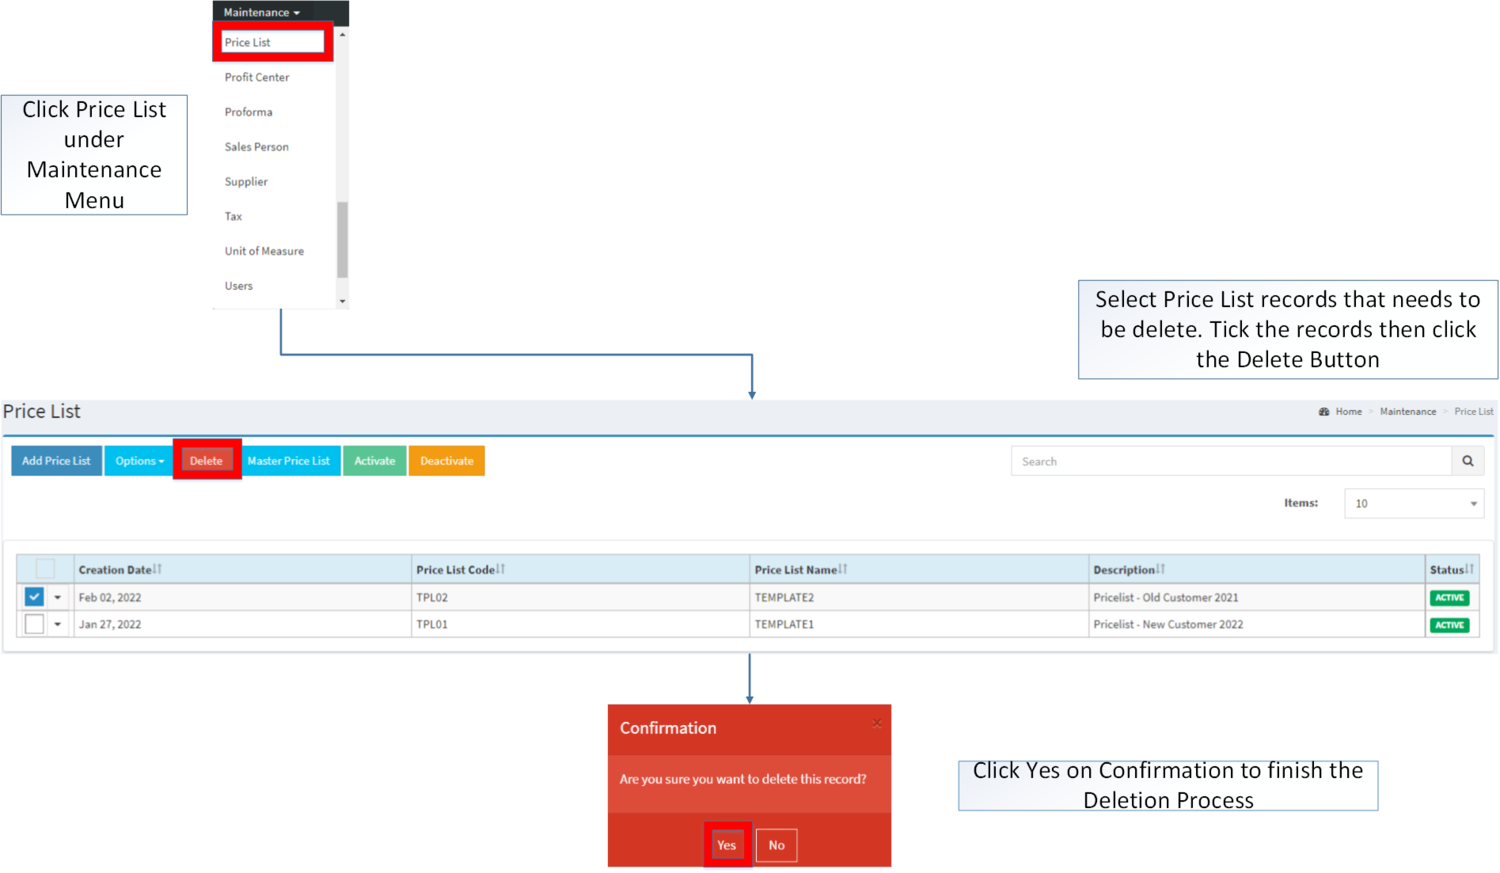
Deleting Price List Record
Price List can be deleted in two ways:
- Using drop-down arrow of a record can be used in single record deletion
- Using Delete Button for deleting multiple record
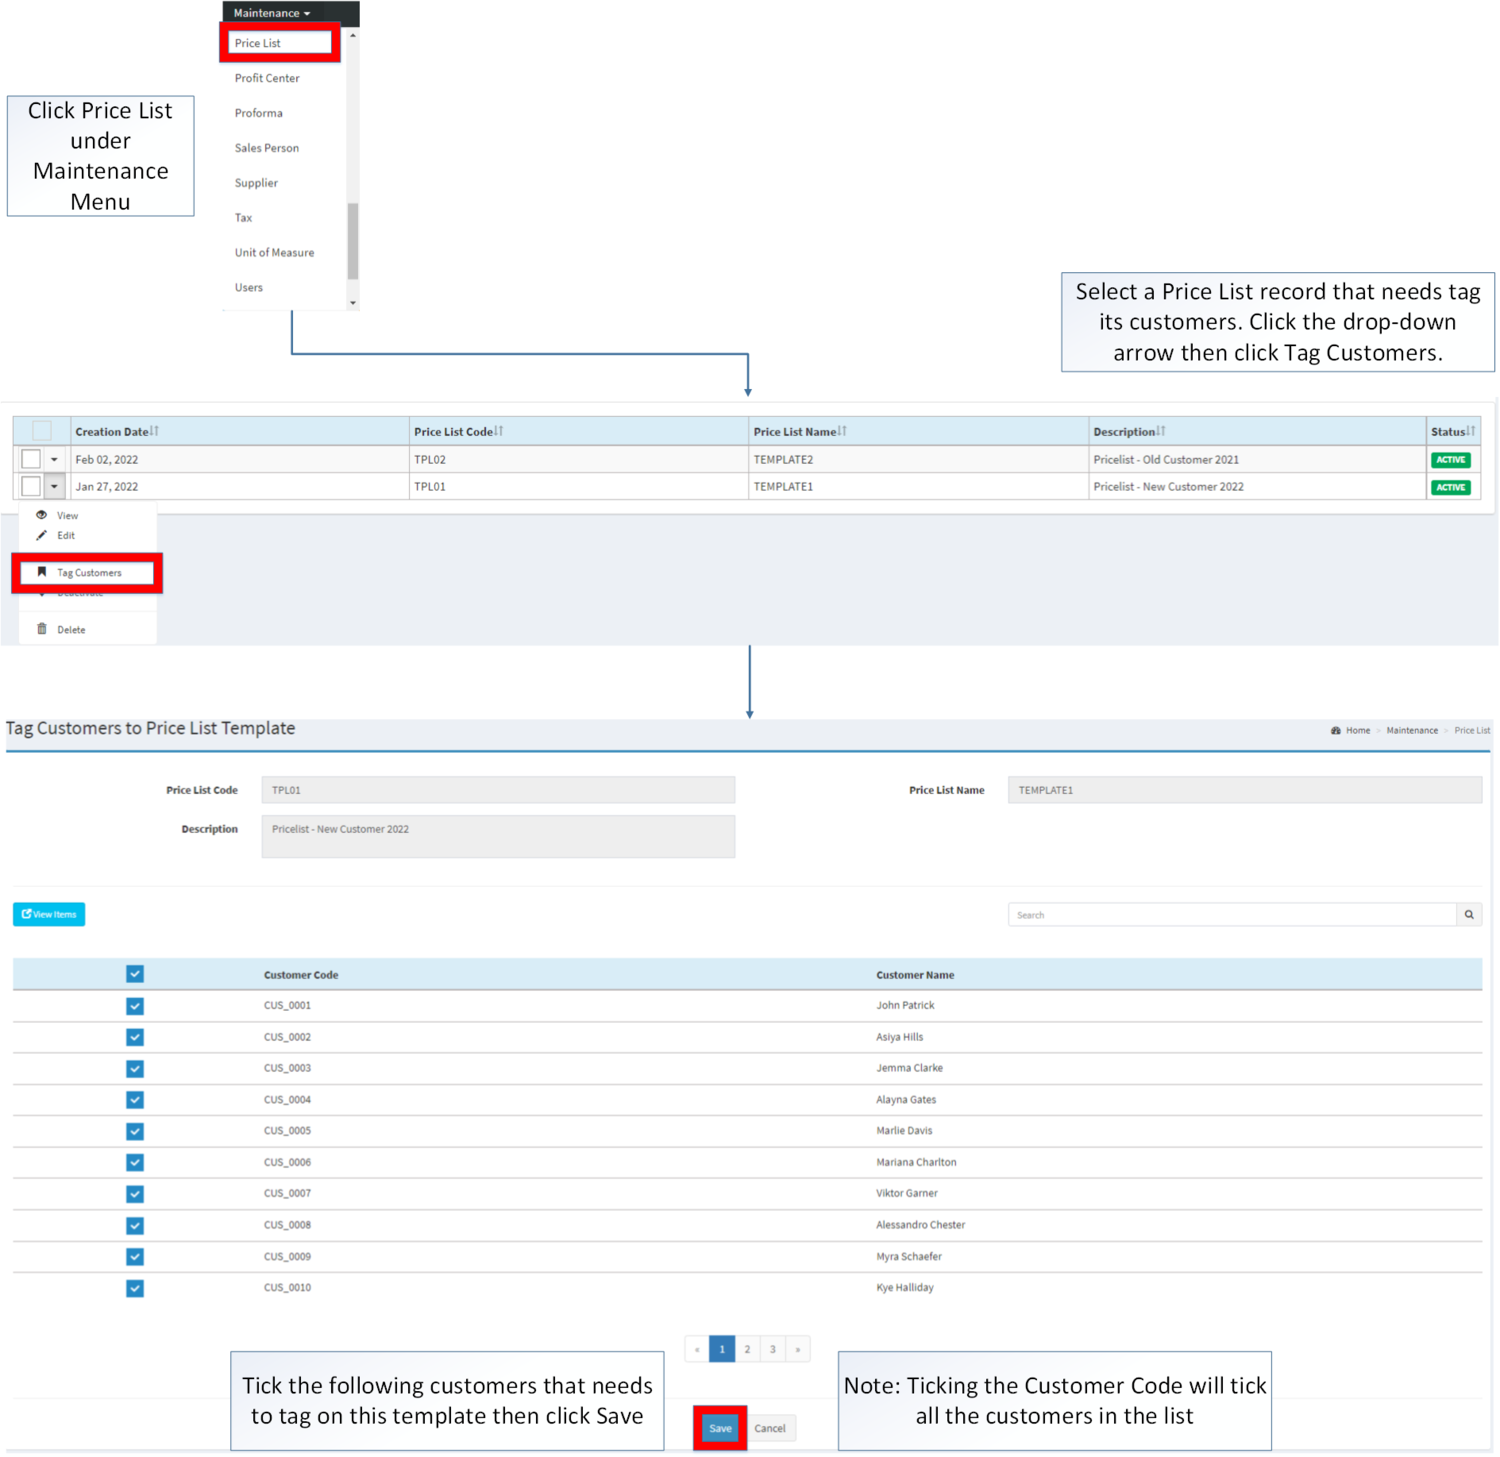
Tagging Customers in the Price List
- Go to Maintenance then click Price List
- Select the Price List that needs to be tagged its Customers. Click the Drop-down arrow and click Tag Customers.
- Tick the customer/s that need to tag on this Template then Click Save. Note: Ticking the Customer Code will tick all the customers in the list.
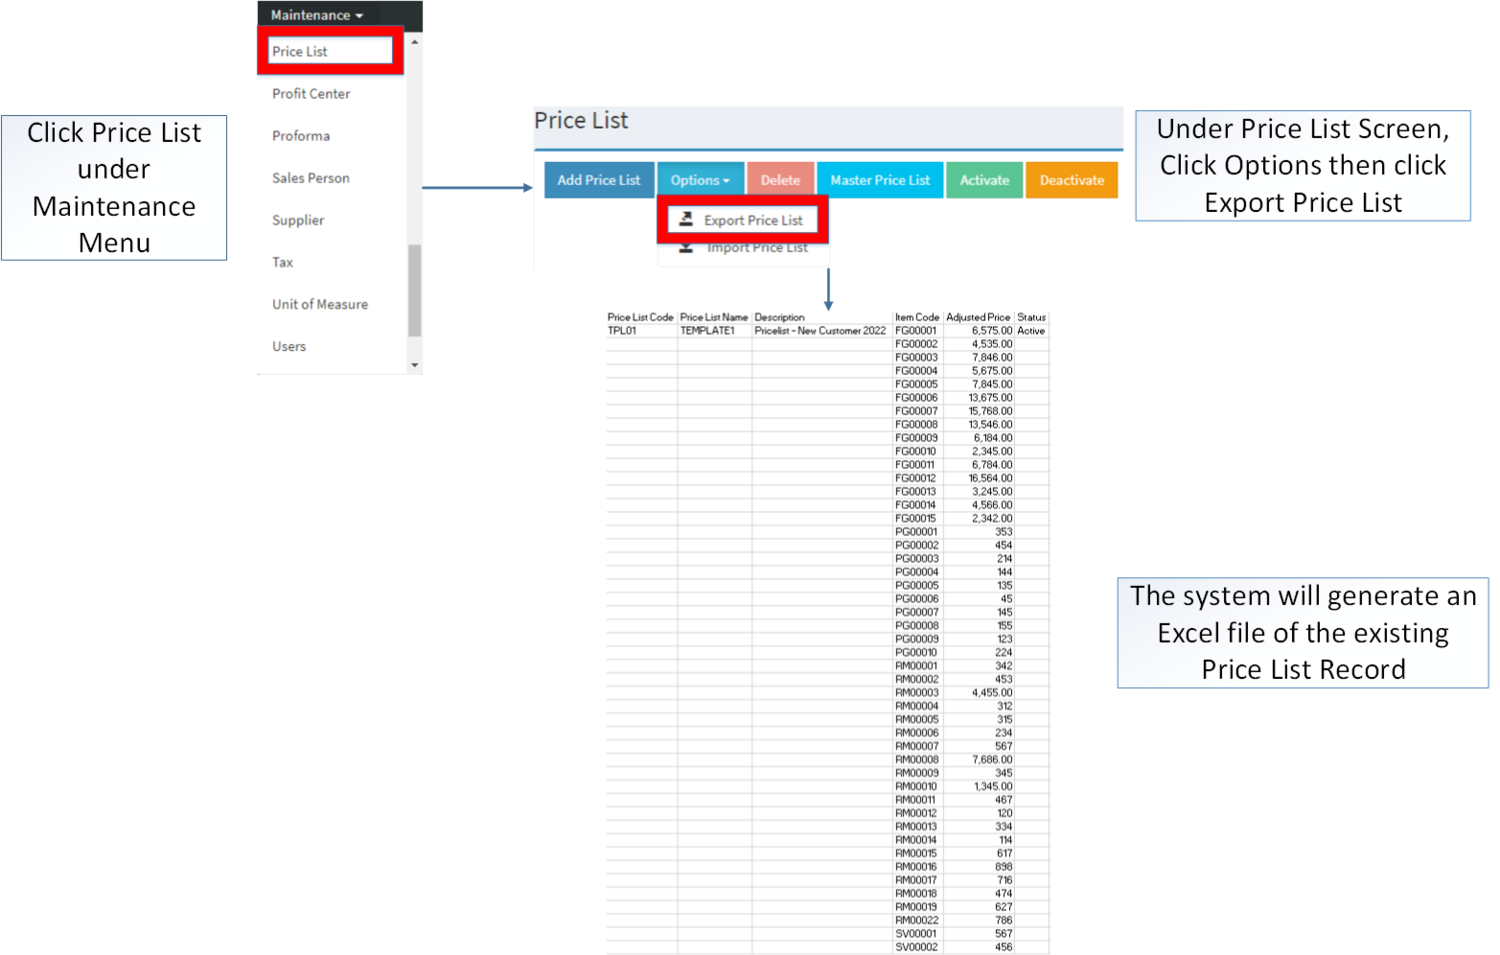
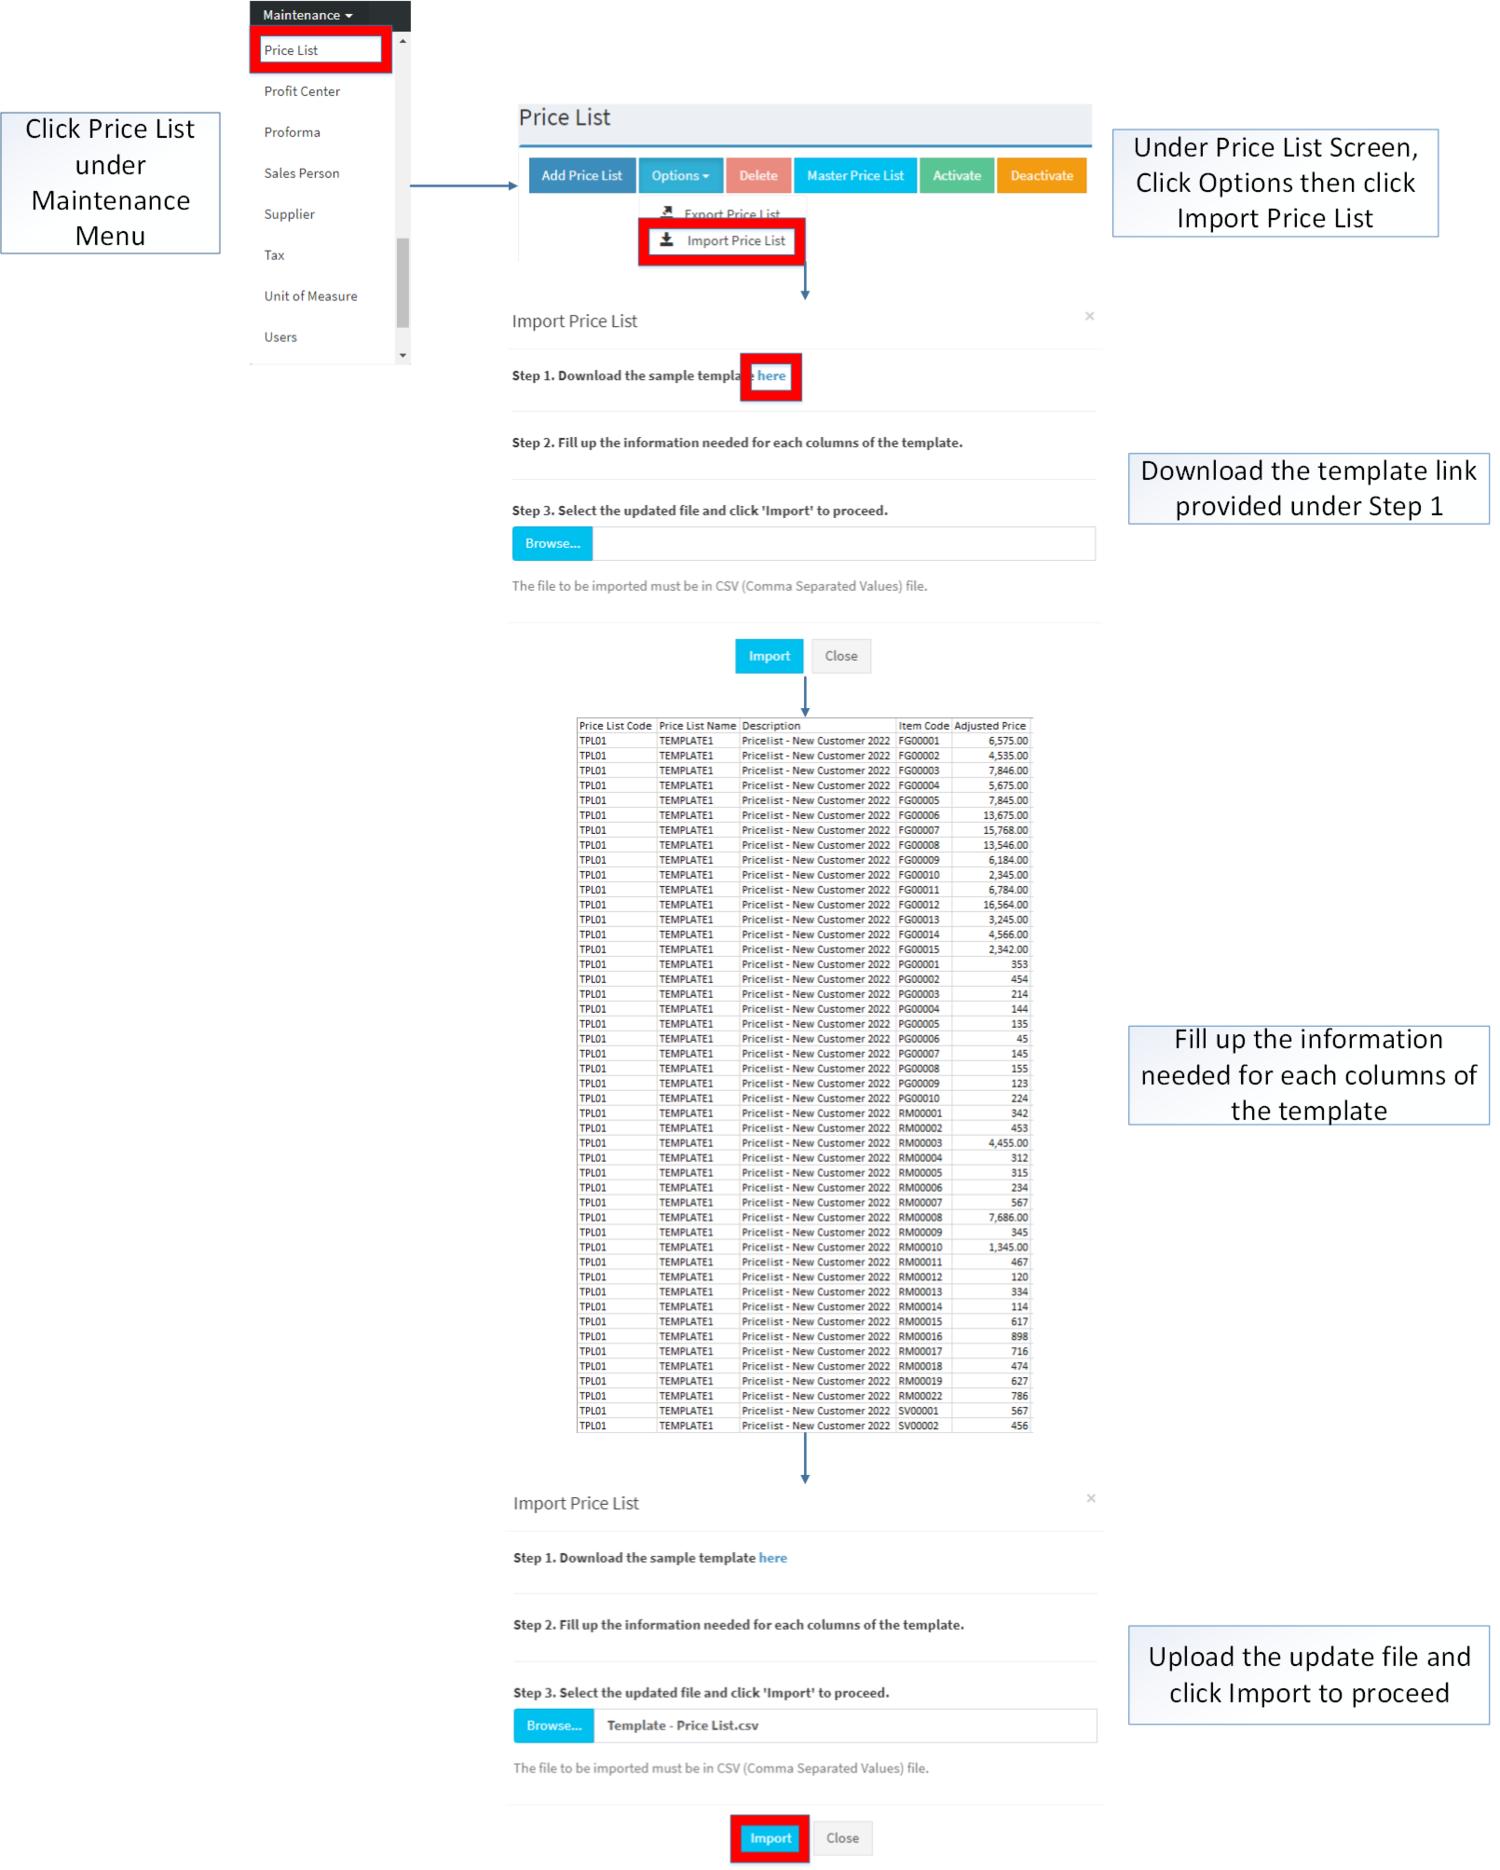
Importing and Exporting Price List
1. Under Chart of Account Screen, Click Options
2. Under Options, The user may Export or Import The Record
- When Exporting the records, the user may also use the filter options through tabs for precise searching and exporting of records.
- When Importing the records, the user should follow the following steps provided in the Importing Price List Screen such as
| Field | Description | Allowed Inputs | Input Restrictions | Required Field? |
|---|---|---|---|---|
| 1.Price List Code | Code of the Price List | *Alphanumeric
*Dash "-" *Underscore "_" |
*Upto 20 characters
*Other Special Characters |
Yes |
| 2.Price List Name | Name of the Price List | *Alphanumeric
*Special Characters (Period, Comma, Space, Percent, Ampersand, Left Parenthesis, Right Parenthesis, Left Bracket, Right Bracket, Underscore, Minus, Plus, Equal, Slash, Dollar Sign, Number Sign, At Sign, Exclamation, Single Quote, Double Quote, Colon, and Semicolon) |
*Up to 50 characters
*Other Special Characters not mentioned |
Yes |
| 3.Description | Description of the Price List | *Alphanumeric
*Special Character |
*Up to 250 characters | Yes |
| 4.Item Code | Item to be included on the Price List | *Item Code under Item List provided on Item Master Maintenance Module | *Any inputs not mentioned in the required inputs
*Inactive Items |
Yes |
| 5.Adjusted Price | New Price of the Item | *Numeric | *Up to 100 characters
*Any inputs except numbers |
Yes |
Notes:
- When importing Price List, Tagging the same item to pricelist with the same Customer type is restricted.
- Adding Multiple Items with the same Price List name by changing only the Item Code and Final Selling Price each row in the template. Please make sure that the contents from the price list name up to price markup are the same.
Price List Record Option
| Status | View | Edit | Tag Customer | Deactivate | Activate | Delete |
|---|---|---|---|---|---|---|
| ACTIVE | ☑ | ☑ | ☑ | ☑ | ☑ | |
| INACTIVE | ☑ | ☑ | ☑ | ☑ | ☑ |
- The Customer status should be ACTIVE when tagging it to the Price List.
- When using the Customer on a transaction. The tagged pricelist to it will be used as default.
- Activating/Deactivating and Deleting of Records can be done in two ways.
- For single records, the user may use the drop down arrow then the action that need to perform.
- For multiple records, the user may tick the records then click the action button that need to perform
- Click the Yes in the confirmation to proceed on the action taken.
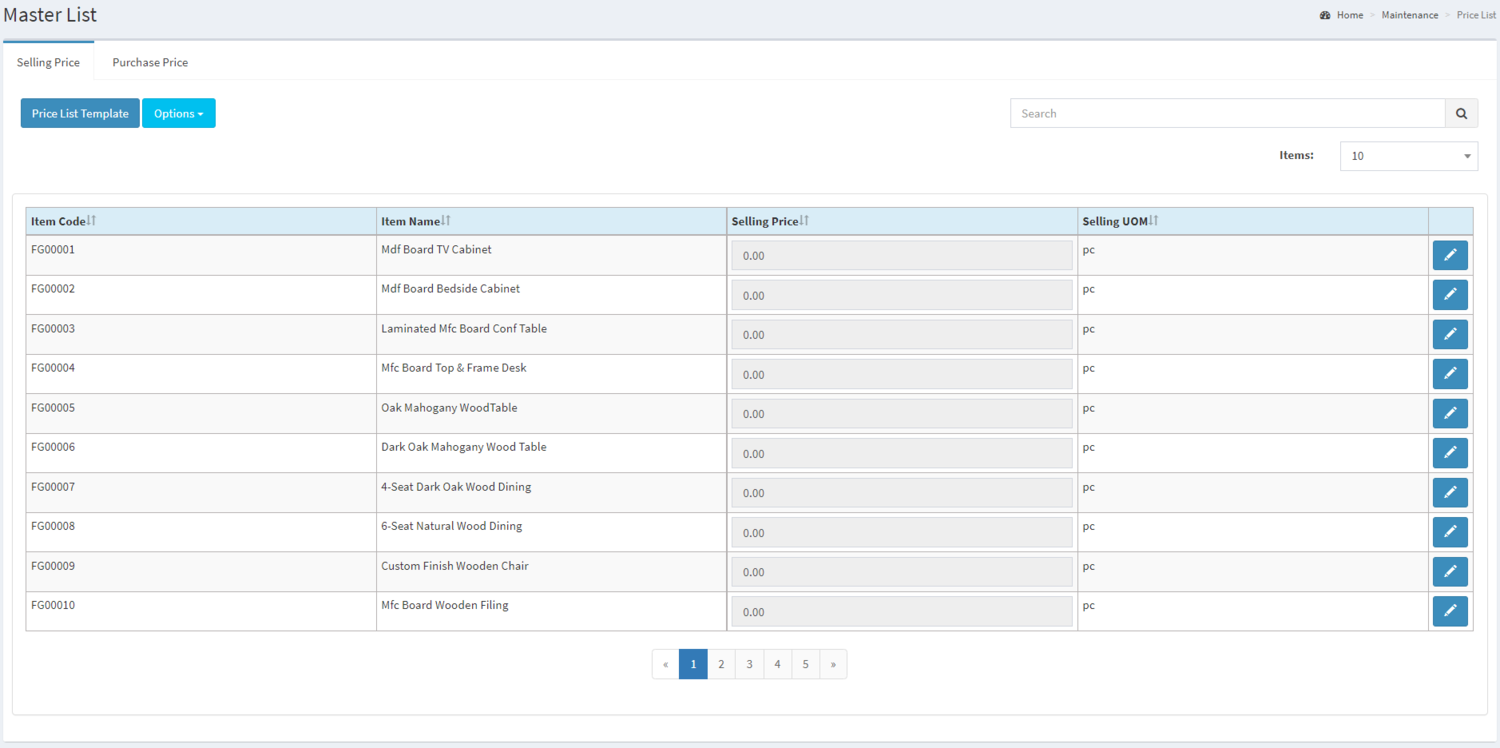
Price Master List Record
| Field | Description | Expected Value |
|---|---|---|
| 1.Item Code | •Unique Identification Code of the Item | •Item List from Item Master Maintenance Module |
| 2.Item Name | •Item Name corresponding to the Item Code under Item master Maintenance Module | •Item List from Item Master Maintenance Module |
| 3.Selling Price | •Selling Price of an Item | •Number |
| 4.Unit of Measure(UOM) | •Unit of Measure of the Item | •Auto-Generated based from the Unit Measured assigned on the Item on the Item Master Maintenance Module |
| 5.Edit Button | •Allows the user to Edit the Selling Price | •Enables Selling Price Field |
Notes:
- If there are no amount placed in the Master Price List, the default price will be zero.
Editing Master Price List Selling Price
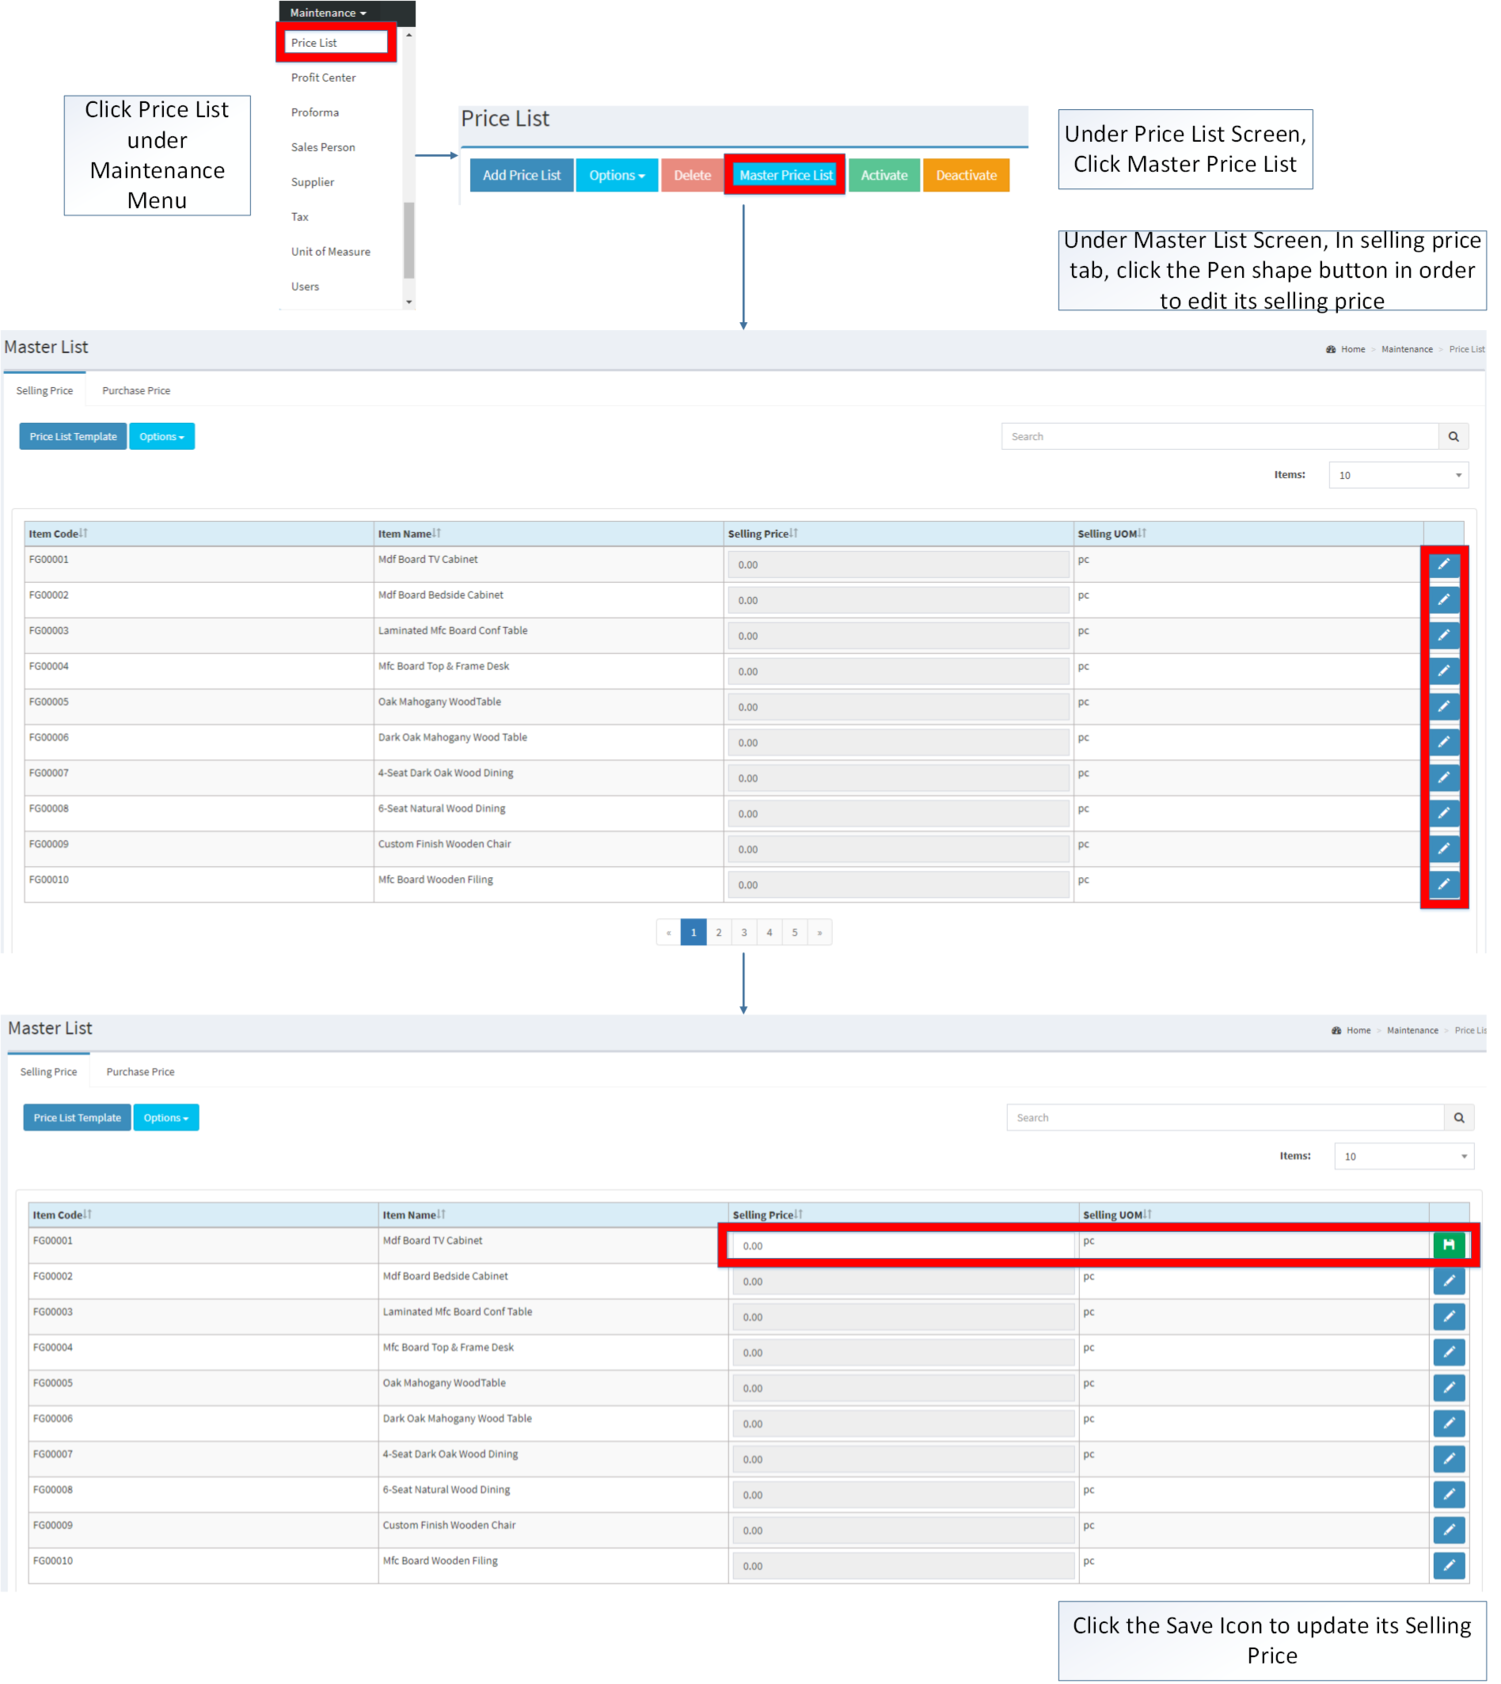
- Go to Maintenance then click Price List
- Under Price List Screen, Click Master Price List
- Under Master List Screen, In selling price tab, click the Pen shape button in order to edit its selling price.
- Click the Save Icon to update its Selling Price.
Importing and Exporting Master Price List
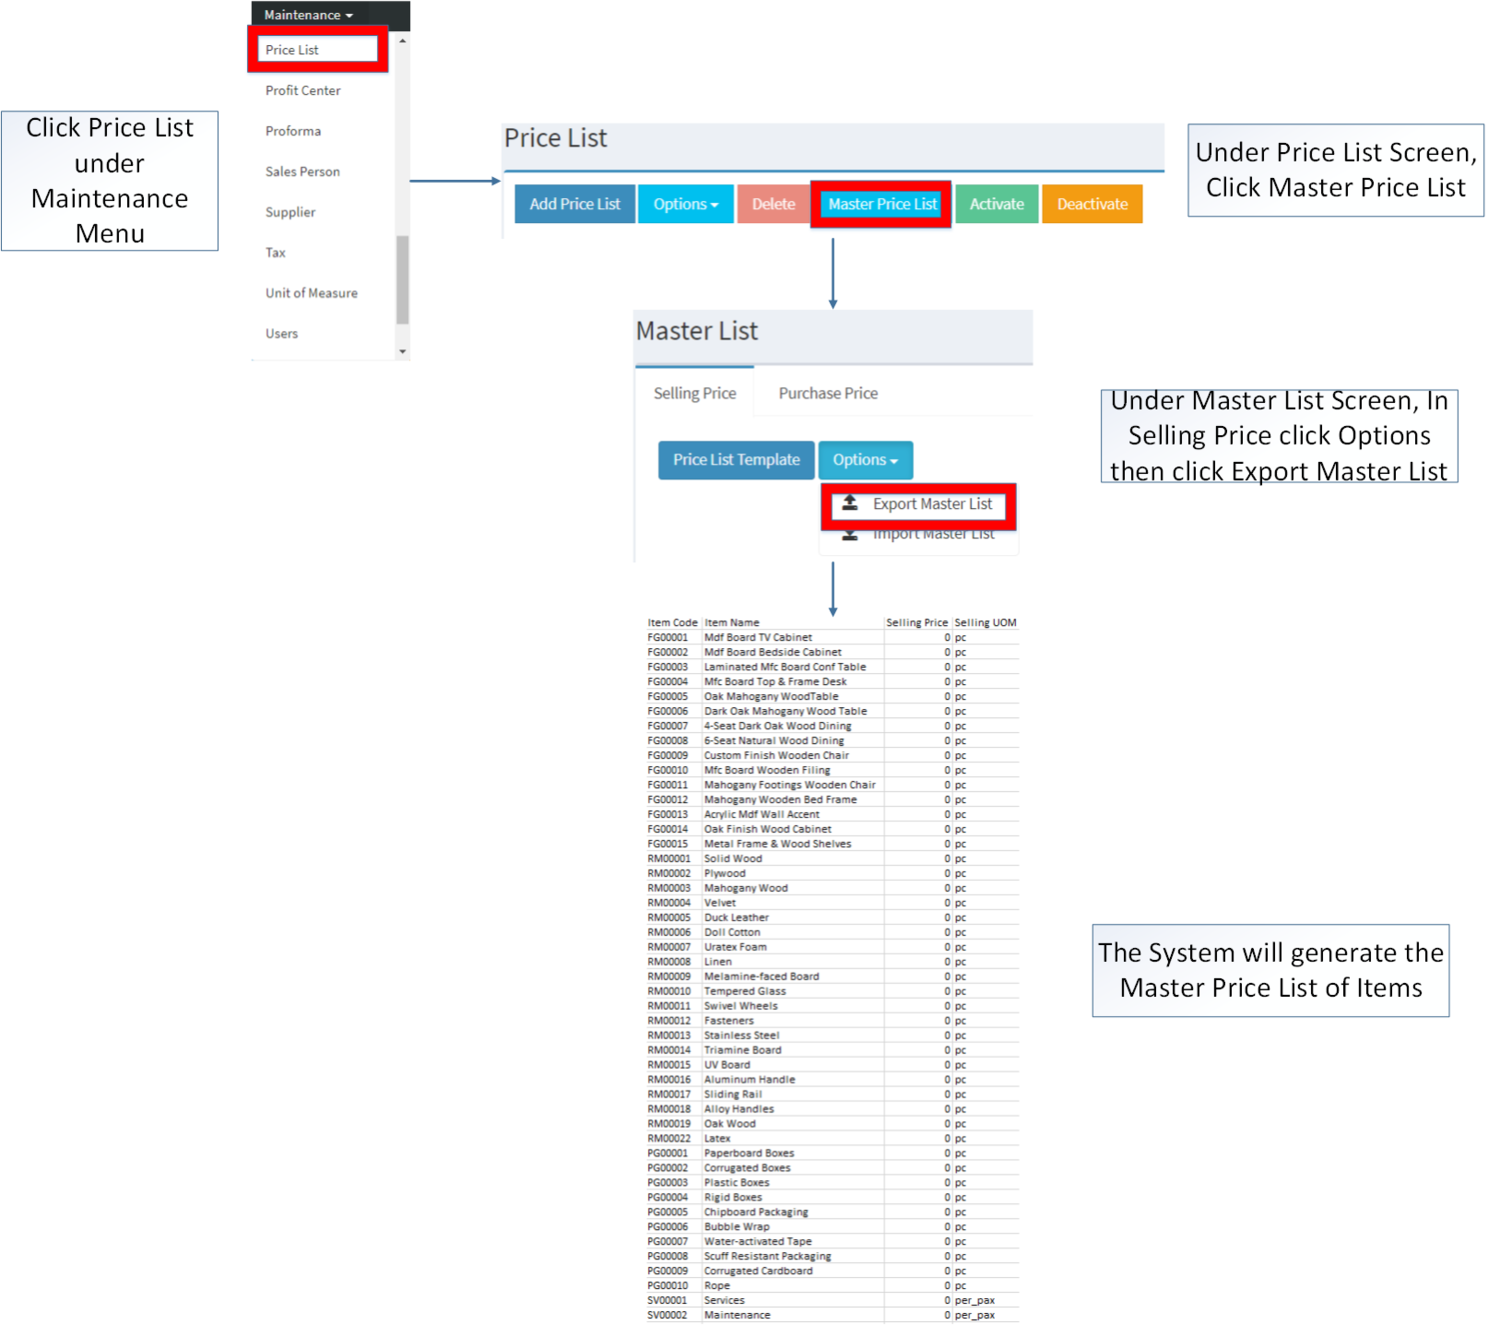
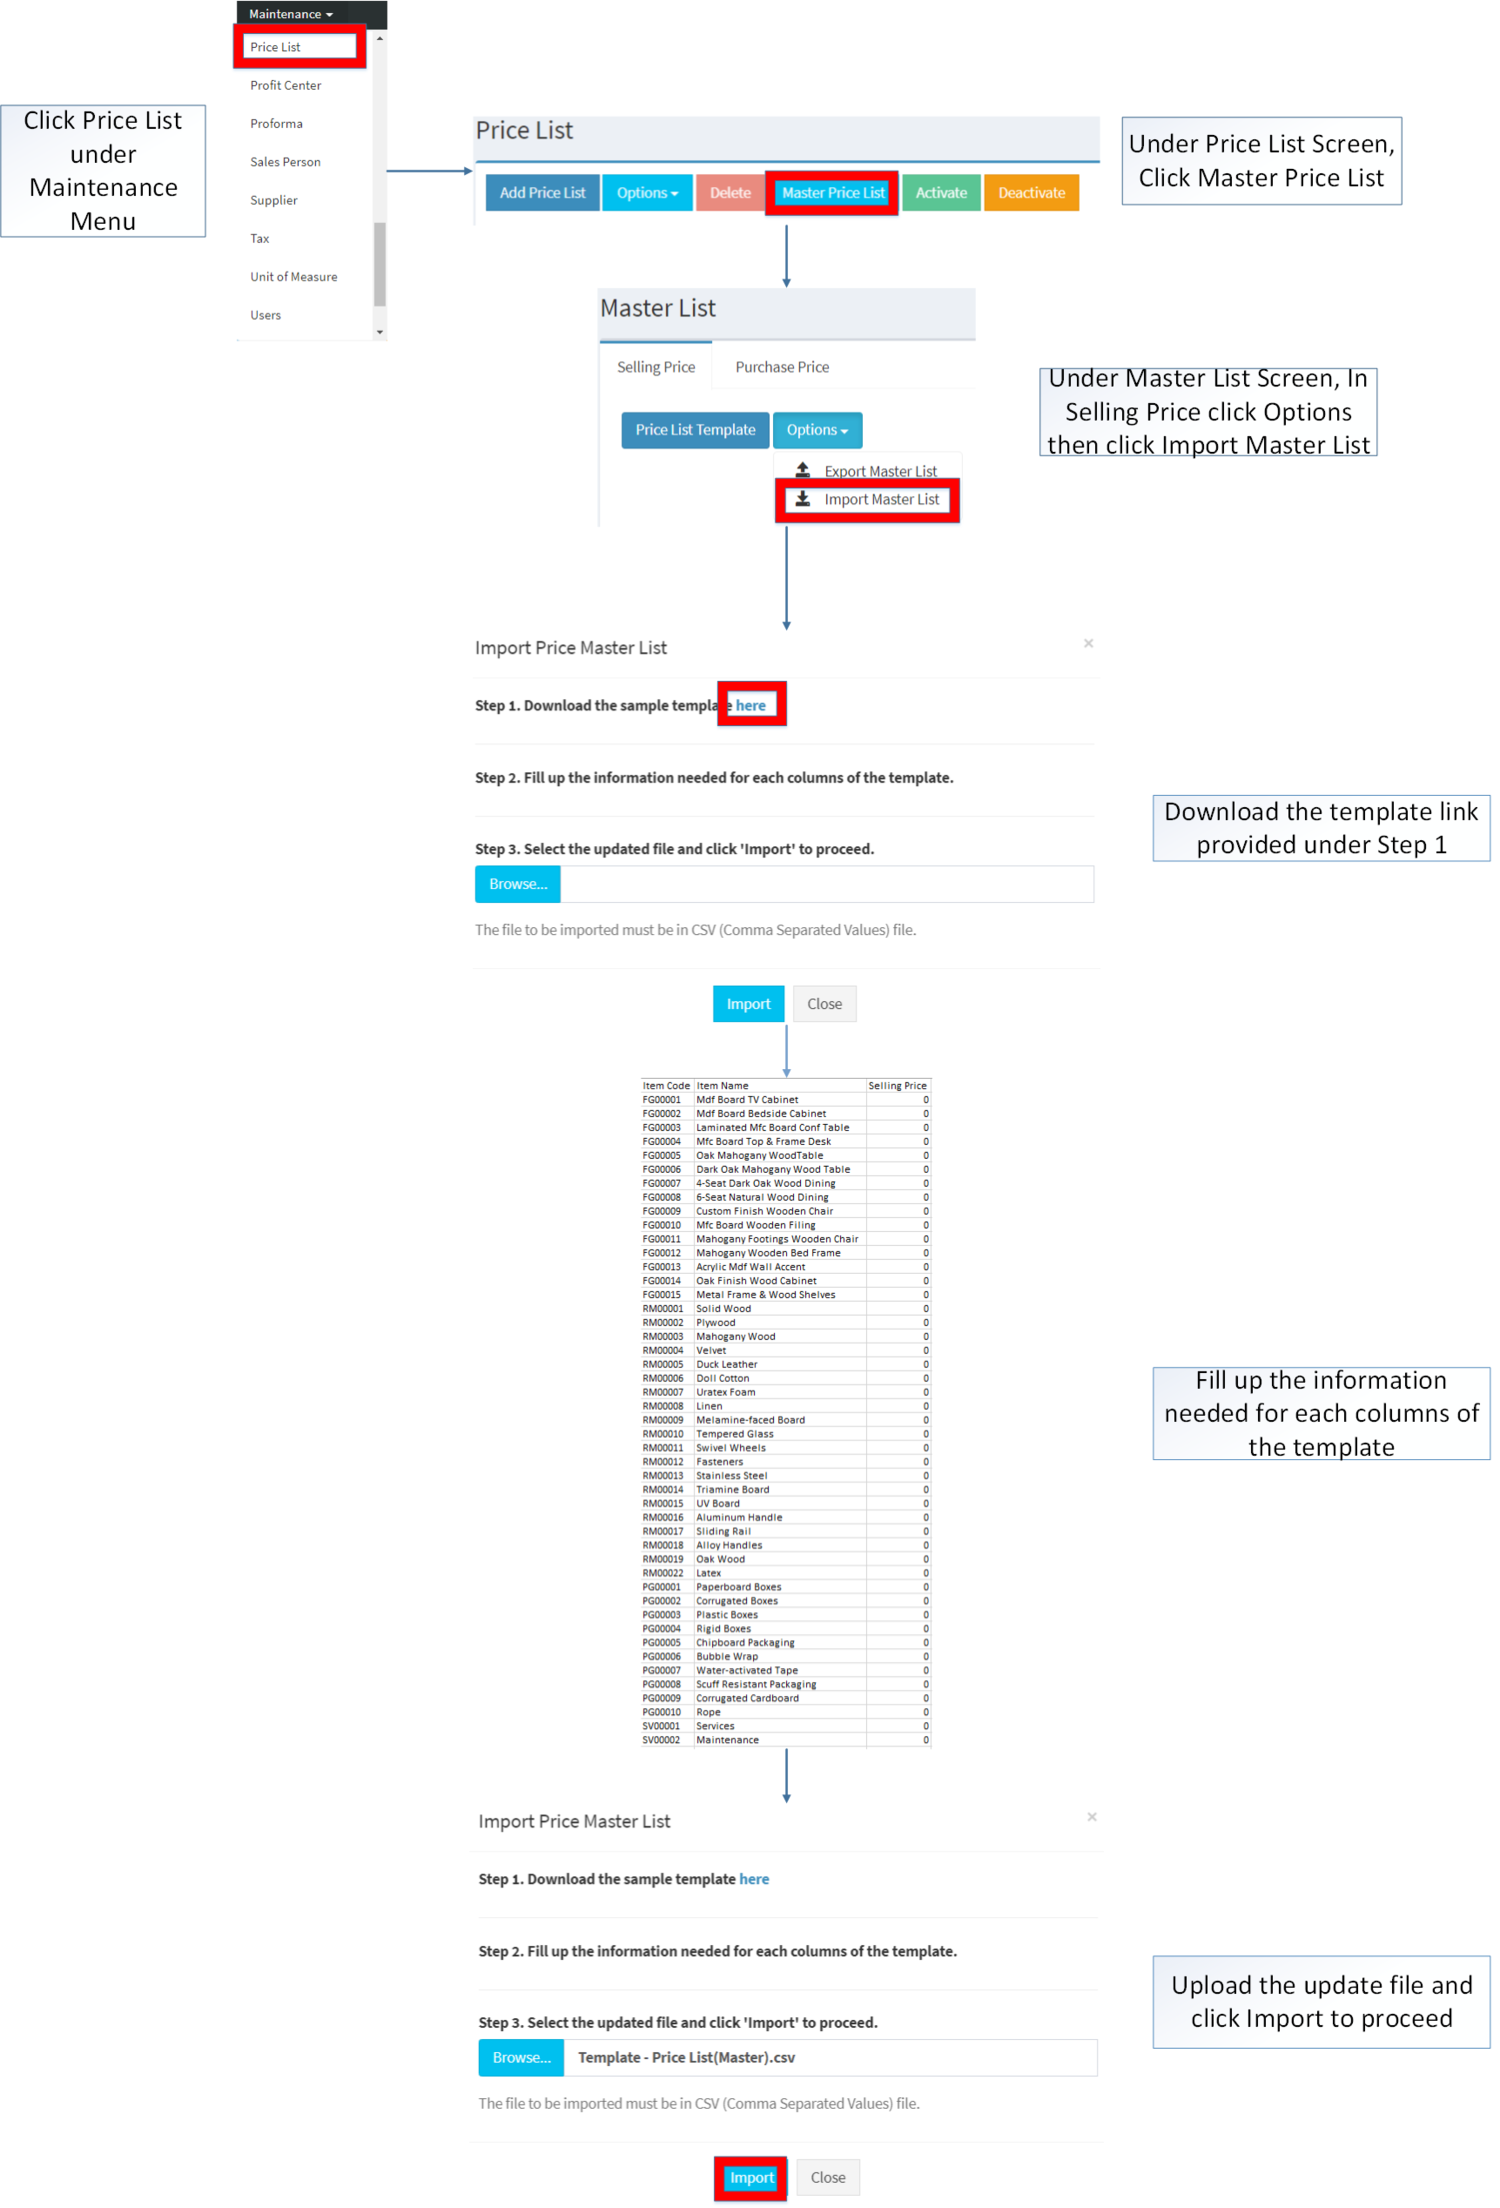
- Under Price List, Click Master Price List
- Under Master Price List, Click Options
- Under Options, The user may Export or Import The Record
- When Exporting the records, the user may also use the filter options through tabs for precise searching and exporting of records.
- When Importing the records, the user should follow the following steps provided in the Importing Chart of Account Screen such as
| Field | Description | Allowed Inputs | Input Restrictions | Required Field? |
|---|---|---|---|---|
| 1.Item Code | Unique Identification Code of the Item | *Existing Item Code under Item List provided on Item Master Maintenance Module
*Auto-Generated |
*Any inputs not mentioned in the allowed inputs
*Inactive Items |
No(Auto-Generated) |
| 2.Item Name | Item Name corresponding to the Item Code under Item Master Maintenance Module | *Existing Item Name under Item List provided on Item Master Maintenance Module
*Auto-Generated |
*Any inputs not mentioned in the allowed inputs
*Inactive Items |
No(Auto-Generated) |
| 3.Selling Price | Selling Price of an Item | *Numeric | *Up to 20 characters
*Any inputs except numbers |
Yes |
| Modules | |
|---|---|
| Maintenance | Maintenance | Price List | Customer | Item Master | Unit of Measure |
| Sales | Sales Quotation | Sales Order | Delivery Receipt | Sales Invoice |
| Purchase | Import Purchase Order | Purchase Order | Purchase Receipt |

