No categories assigned
Pro Customers
-
- Last edited 3 years ago by Gelo
-
Contents
Adding New Customer
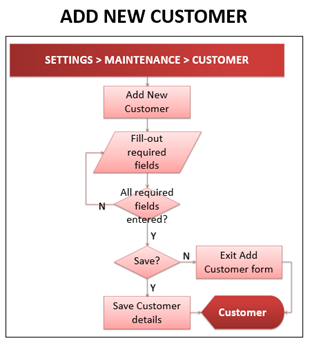
To add a Customer:
- Click on the Gear icon in the system header. Select "Maintenance", then select “Customers”. The Manage Customers page will be displayed.
- Click “Options” button, then select “Add New Customer”.
- Add New Customer form will be displayed. Fill it out:
- Customer Code – accepts alphanumeric, max of 15 characters
- Customer Name – accepts alphanumeric, special character, max of 100 characters
- Email – for customer email address, special character max of 50
- Address – for customer address, accepts alphanumeric, max of 200 characters
- City/Province – accepts alphanumeric, max of 200 characters
- Business Type – for business type (Corporation, Individual) selection
- TIN – for customer TIN no., numeric entry.
- Payment Terms – accepts numeric entry, max of 5 characters
- Contact Number – numeric entry, can input multiple contact numbers to be separated by comma
- After filling-out the form, click “Save” button to store new account details. Otherwise, click “Exit”, to discard entries and exit the form.
Importing Customers
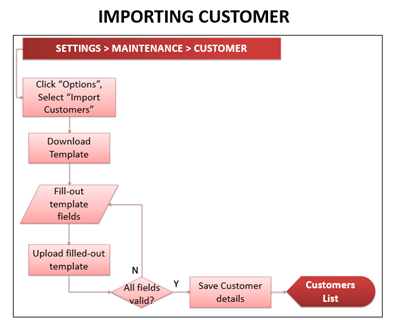
To add new Customers by batch:
- Click on the Gear icon in the system header. Select "Maintenance", then select “Customers”. The Chart of Accounts will be displayed.
- Click “Options” button, then select “Import Customers”. Import Customers pop-up window will be displayed.
- Download the sample template by clicking the “here” link, and open the downloaded file.
- On the downloaded template, fill-out the information needed for each columns of the template:
- Sample filled-out Import Customer template
- After filling out the form, save it on your computer and upload it back to the system, then back to the Import Customer pop-up window, click “Import”. Imported customers will be displayed in the Customer list.
Viewing, Editing, Deleting Customer
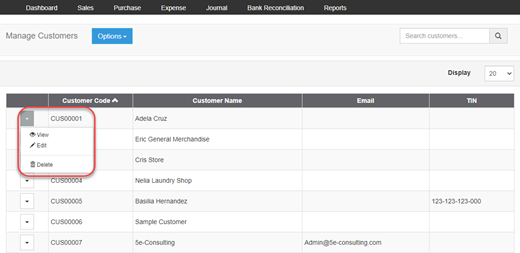
User can view, edit, delete accounts by clicking the corresponding function’s link in Customer list-specific account dropdown menu list.
Exporting Customers
User can export the chart of accounts by clicking “Options” button, then click “Export Customers”.


